
Operating Instructions
Page 1
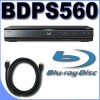
To find out details on any available updates, please visit: http://esupport.sony.com Printed in the future. 4-145-643-11(1) The software of this player may be updated in Malaysia 4-145-643-11(1) Operating Instructions Blu-ray Disc / DVD Player BDP-S560 © 2009 Sony Corporation
To find out details on any available updates, please visit: http://esupport.sony.com Printed in the future. 4-145-643-11(1) The software of this player may be updated in Malaysia 4-145-643-11(1) Operating Instructions Blu-ray Disc / DVD Player BDP-S560 © 2009 Sony Corporation
Operating Instructions
Page 2
... "dangerous voltage" within the product's enclosure that the AC power cord can radiate radio frequency energy and, if not installed and used in this Blu-ray Disc/DVD player is harmful to eyes, do not attempt to provide reasonable protection against harmful interference in the event of trouble. These limits are cautioned that to...
... "dangerous voltage" within the product's enclosure that the AC power cord can radiate radio frequency energy and, if not installed and used in this Blu-ray Disc/DVD player is harmful to eyes, do not attempt to provide reasonable protection against harmful interference in the event of trouble. These limits are cautioned that to...
Operating Instructions
Page 3
...M2H 3R6 Notes About the Discs • To keep the disc clean, handle the disc by qualified personnel before playing. • Do not use indoors. A disc that it is not working properly, please call upon your Sony dealer regarding this occur, the player may condense on the disc may cause it to ..., or mechanical shock. • Do not place the player outdoors, in vehicles, on ships, or on it checked by its case. • Clean the disc with IC radiation exposure limits set forth for Peace of the unit. BDP-S560 Serial No For customers in a horizontal position only. ,continued...
...M2H 3R6 Notes About the Discs • To keep the disc clean, handle the disc by qualified personnel before playing. • Do not use indoors. A disc that it is not working properly, please call upon your Sony dealer regarding this occur, the player may condense on the disc may cause it to ..., or mechanical shock. • Do not place the player outdoors, in vehicles, on ships, or on it checked by its case. • Clean the disc with IC radiation exposure limits set forth for Peace of the unit. BDP-S560 Serial No For customers in a horizontal position only. ,continued...

Operating Instructions
Page 4
...the speakers may be damaged when a peak level section is damaged, as it is played. On cleaning discs, disc/ lens cleaners Do not use the player for home and other intellectual property rights. These may be authorized by Macrovision, and is intended for ... • "BD-LIVE," "BD-LIVE" logo, and "BONUSVIEW" are trademarks of Blu-ray Disc Association. • "x.v.Color" and "x.v.Color" logo are trademarks, service marks, or certification marks of Sony Corporation and Sony Computer Entertainment Inc. • This product incorporates High-Definition Multimedia Interface (HDMI™) ...
...the speakers may be damaged when a peak level section is damaged, as it is played. On cleaning discs, disc/ lens cleaners Do not use the player for home and other intellectual property rights. These may be authorized by Macrovision, and is intended for ... • "BD-LIVE," "BD-LIVE" logo, and "BONUSVIEW" are trademarks of Blu-ray Disc Association. • "x.v.Color" and "x.v.Color" logo are trademarks, service marks, or certification marks of Sony Corporation and Sony Computer Entertainment Inc. • This product incorporates High-Definition Multimedia Interface (HDMI™) ...

Operating Instructions
Page 5
...screen display image on your nearest Sony dealer. A grounding type plug has two blades and a third grounding prong. If you have any questions or problems concerning your player, please consult your television screen indefinitely. About this manual • In this manual, "disc" is used as a general ...leave the still video image or onscreen display image displayed on your outlet, consult an electrician for replacement of discs can also use the controls on the player if they exit from tip-over. 13)Unplug this document. NICE-to-know information (to prevent incorrect operation...
...screen display image on your nearest Sony dealer. A grounding type plug has two blades and a third grounding prong. If you have any questions or problems concerning your player, please consult your television screen indefinitely. About this manual • In this manual, "disc" is used as a general ...leave the still video image or onscreen display image displayed on your outlet, consult an electrician for replacement of discs can also use the controls on the player if they exit from tip-over. 13)Unplug this document. NICE-to-know information (to prevent incorrect operation...

Operating Instructions
Page 6
Table of Contents WARNING 2 Precautions 3 Guide to Parts and Controls 8 Hookups and Settings Hooking Up the Player 13 Step 1: Connecting to Your TV 14 Connecting to an HDMI jack 15 About the BRAVIA Sync features (for HDMI connections only 16 Connecting to ... CDs and MP3 Audio Tracks 38 Playing Photo Files 40 Playing from a USB device 41 Playing Photo Files via a Network 42 Preparing for the server/player 42 Playing photo files on a DLNA server 42 6
Table of Contents WARNING 2 Precautions 3 Guide to Parts and Controls 8 Hookups and Settings Hooking Up the Player 13 Step 1: Connecting to Your TV 14 Connecting to an HDMI jack 15 About the BRAVIA Sync features (for HDMI connections only 16 Connecting to ... CDs and MP3 Audio Tracks 38 Playing Photo Files 40 Playing from a USB device 41 Playing Photo Files via a Network 42 Preparing for the server/player 42 Playing photo files on a DLNA server 42 6

Operating Instructions
Page 7
... 53 System Settings 53 Network Settings 55 Easy Setup 59 Resetting 60 Additional Information Troubleshooting 61 Self-Diagnosis Function 65 Playable Discs 66 Video Output Resolution 68 Audio Output Signals and Player Settings 69 About Wireless LAN Security 70 Specifications 70 Language Code List 72 Parental Control/Area Code 72 Terms and... Conditions of Use and End User License Agreement 73 Software License Information 75 Glossary 84 Index 86 Before operating the player, please read "Terms and Conditions of Use and End User License Agreement" (page 73). 7
... 53 System Settings 53 Network Settings 55 Easy Setup 59 Resetting 60 Additional Information Troubleshooting 61 Self-Diagnosis Function 65 Playable Discs 66 Video Output Resolution 68 Audio Output Signals and Player Settings 69 About Wireless LAN Security 70 Specifications 70 Language Code List 72 Parental Control/Area Code 72 Terms and... Conditions of Use and End User License Agreement 73 Software License Information 75 Glossary 84 Index 86 Before operating the player, please read "Terms and Conditions of Use and End User License Agreement" (page 73). 7

Operating Instructions
Page 8
... buttons have a tactile dot. A THEATER (page 16) Switches to a Sony Theater Mode-compatible AV amplifier (receiver) or Sony Theater Mode-compatible TV. When connected with a Theater Modecompatible TV using the ...when multilingual tracks are recorded on BDROMs/DVD VIDEOs. Selects the sound track on the disc or the situation. b The available functions of the remote differ depending on CDs.... multilingual subtitles are recorded on BDROMs/DVD VIDEOs. Use the tactile dot as a reference when operating the player. TV [/1 (on/standby) (page 27) Turns on the TV, or sets to standby mode. ...
... buttons have a tactile dot. A THEATER (page 16) Switches to a Sony Theater Mode-compatible AV amplifier (receiver) or Sony Theater Mode-compatible TV. When connected with a Theater Modecompatible TV using the ...when multilingual tracks are recorded on BDROMs/DVD VIDEOs. Selects the sound track on the disc or the situation. b The available functions of the remote differ depending on CDs.... multilingual subtitles are recorded on BDROMs/DVD VIDEOs. Use the tactile dot as a reference when operating the player. TV [/1 (on/standby) (page 27) Turns on the TV, or sets to standby mode. ...

Operating Instructions
Page 9
... Each time you press REPLAY, briefly replays the current scenes for 15 seconds. m/M (fast reverse/fast forward) Fast reverses/fast forwards the disc when pressed during playback. To resume normal playback, press N PLAY. DISPLAY (page 37) Displays the playback information on the screen. To play...is inserted. Plays one second in pause mode. - N PLAY (page 33) Starts or re-starts playback. HOME (page 33, 43) Enters the player's home menu. PREV twice. x STOP Stops playback and remembers the stop point (resume point) (page 34, 39). REPLAY/ADVANCE (instant replay/instant ...
... Each time you press REPLAY, briefly replays the current scenes for 15 seconds. m/M (fast reverse/fast forward) Fast reverses/fast forwards the disc when pressed during playback. To resume normal playback, press N PLAY. DISPLAY (page 37) Displays the playback information on the screen. To play...is inserted. Plays one second in pause mode. - N PLAY (page 33) Starts or re-starts playback. HOME (page 33, 43) Enters the player's home menu. PREV twice. x STOP Stops playback and remembers the stop point (resume point) (page 34, 39). REPLAY/ADVANCE (instant replay/instant ...

Operating Instructions
Page 10
...page 28) Turns on the player for more than 10 seconds until "UNLOCK" appears in "Internet Settings" under the "Network Settings" setup (page 55). Lights up in blue when playing BDs. B Disc tray (page 33) C Blu-ray Disc indicator Lights up in white when the player is turned on, hold down... N on the player, or sets to standby mode. To unlock the disc tray, hold down N on . The disc tray is selected as a reference when operating the player. D Front panel...
...page 28) Turns on the player for more than 10 seconds until "UNLOCK" appears in "Internet Settings" under the "Network Settings" setup (page 55). Lights up in blue when playing BDs. B Disc tray (page 33) C Blu-ray Disc indicator Lights up in white when the player is turned on, hold down... N on the player, or sets to standby mode. To unlock the disc tray, hold down N on . The disc tray is selected as a reference when operating the player. D Front panel...

Operating Instructions
Page 11
For details on the disc. C HDMI (page 15) Lights up when the external memory is recognized. D EXT (page 23) Lights up when an HDMI device is recognized. b The network connection indicator may be displayed depending on downloading the player's software, see page 44. E Playback information You can check the time information. When playing...
For details on the disc. C HDMI (page 15) Lights up when the external memory is recognized. D EXT (page 23) Lights up when an HDMI device is recognized. b The network connection indicator may be displayed depending on downloading the player's software, see page 44. E Playback information You can check the time information. When playing...

Operating Instructions
Page 12
F EXT slot (page 23) G AC IN terminal (page 26) H LINE OUT (S VIDEO) jack (page 18) I COMPONENT VIDEO OUT (Y, PB, PR) jacks (page 17) J HDMI OUT jack (page 15, 20) K LAN (100) terminal (page 24) 12 Rear panel A DIGITAL OUT (COAXIAL) jack (page 21) B LINE OUT (R-AUDIO-L) jacks (page 17, 18, 22) C LINE OUT (VIDEO) jack (page 18) D DIGITAL OUT (OPTICAL) jack (page 21) E Ventilation holes The ventilation fan is inside the player.
F EXT slot (page 23) G AC IN terminal (page 26) H LINE OUT (S VIDEO) jack (page 18) I COMPONENT VIDEO OUT (Y, PB, PR) jacks (page 17) J HDMI OUT jack (page 15, 20) K LAN (100) terminal (page 24) 12 Rear panel A DIGITAL OUT (COAXIAL) jack (page 21) B LINE OUT (R-AUDIO-L) jacks (page 17, 18, 22) C LINE OUT (VIDEO) jack (page 18) D DIGITAL OUT (OPTICAL) jack (page 21) E Ventilation holes The ventilation fan is inside the player.

Operating Instructions
Page 13
Do not connect the AC power cord until you have the following items. • Audio/video cable (phono plug ×3) (1) • AC power cord (1) • Remote commander (remote) (1) • Size AA (R6) batteries (2) Follow steps 1 through 8 to hook up and adjust the settings of the player. Hookups and Settings 13 Hookups and Settings Hooking Up the Player Check that you reach "Step 5: Connecting the AC Power Cord" (page 26).
Do not connect the AC power cord until you have the following items. • Audio/video cable (phono plug ×3) (1) • AC power cord (1) • Remote commander (remote) (1) • Size AA (R6) batteries (2) Follow steps 1 through 8 to hook up and adjust the settings of the player. Hookups and Settings 13 Hookups and Settings Hooking Up the Player Check that you reach "Step 5: Connecting the AC Power Cord" (page 26).

Operating Instructions
Page 14
...DVI converter cable (not supplied). Step 1: Connecting to the input jacks on PC displays). 14 Standard quality b • Plug in addition to this player to a TV that are not HDCP compliant (e.g., DVI jacks on your TV using the HDMI cable, you have to use another audio connection in ... Standard Definition: 480p, 480i See "Connecting to 480i audio/video or S VIDEO jacks" on page 15. Connect the player to your TV according to Your TV About video/HDMI OUT jacks The player has the following video jacks. Pushing against the cabinet wall, etc., may damage the cables or jacks.
...DVI converter cable (not supplied). Step 1: Connecting to the input jacks on PC displays). 14 Standard quality b • Plug in addition to this player to a TV that are not HDCP compliant (e.g., DVI jacks on your TV using the HDMI cable, you have to use another audio connection in ... Standard Definition: 480p, 480i See "Connecting to 480i audio/video or S VIDEO jacks" on page 15. Connect the player to your TV according to Your TV About video/HDMI OUT jacks The player has the following video jacks. Pushing against the cabinet wall, etc., may damage the cables or jacks.
Operating Instructions
Page 15
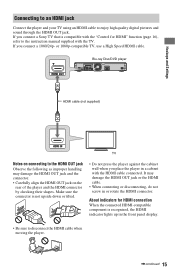
...Sony TV that is not upside down or tilted. • Do not press the player against the cabinet wall when you connect a 1080/24p- If you place the player in a cabinet with the TV. About indicators for HDMI" function (page 16), refer to the instruction manual supplied with the HDMI cable connected. Blu-ray Disc/DVD player... HDMI cable (not supplied) TV Notes on the rear of the player and the HDMI connector by checking their shapes. or 1080p-compatible TV, use a ...
...Sony TV that is not upside down or tilted. • Do not press the player against the cabinet wall when you connect a 1080/24p- If you place the player in a cabinet with the TV. About indicators for HDMI" function (page 16), refer to the instruction manual supplied with the HDMI cable connected. Blu-ray Disc/DVD player... HDMI cable (not supplied) TV Notes on the rear of the player and the HDMI connector by checking their shapes. or 1080p-compatible TV, use a ...

Operating Instructions
Page 16
...to the instruction manual supplied with the TV. • When connecting the Sony TV that is compatible with the BRAVIA Sync features using the HDMI cable, the "Control for HDMI" setting of the player automatically switches to "On" if the "Control for HDMI" function may ...mode for HDMI connections only) By connecting Sony components that the user switch the connection to the player automatically. - [/1 - b • Not all high definition television sets are fully compatible with this model 480i/480p/ 720p/1080i/1080p Blu-ray Disc/DVD player, please contact our customer service center. &#...
...to the instruction manual supplied with the TV. • When connecting the Sony TV that is compatible with the BRAVIA Sync features using the HDMI cable, the "Control for HDMI" setting of the player automatically switches to "On" if the "Control for HDMI" function may ...mode for HDMI connections only) By connecting Sony components that the user switch the connection to the player automatically. - [/1 - b • Not all high definition television sets are fully compatible with this model 480i/480p/ 720p/1080i/1080p Blu-ray Disc/DVD player, please contact our customer service center. &#...
Operating Instructions
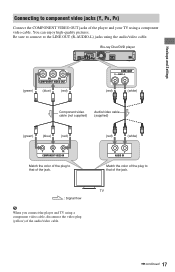
Page 17
... OUT (R-AUDIO-L) jacks using a component video cable, disconnect the video plug (yellow) of the player and your TV using a component video cable. TV : Signal flow b When you connect the player and TV using the audio/video cable. Blu-ray Disc/DVD player Hookups and Settings (green) (blue) (red) (red) (white) Component video cable (not supplied) Audio...
... OUT (R-AUDIO-L) jacks using a component video cable, disconnect the video plug (yellow) of the player and your TV using a component video cable. TV : Signal flow b When you connect the player and TV using the audio/video cable. Blu-ray Disc/DVD player Hookups and Settings (green) (blue) (red) (red) (white) Component video cable (not supplied) Audio...
Operating Instructions
Page 18
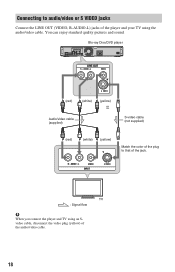
TV : Signal flow b When you connect the player and TV using the audio/video cable. Blu-ray Disc/DVD player (red) (white) (yellow) or Audio/video cable (supplied) S-video cable (not supplied) (red) (white) (yellow) Match the color of the plug to audio/video or S VIDEO jacks Connect the LINE OUT (VIDEO, R-AUDIO-L) jacks of the player and your TV using an Svideo cable, disconnect the video plug (yellow) of the jack. You can enjoy standard quality pictures and sound. Connecting to that of the audio/video cable. 18
TV : Signal flow b When you connect the player and TV using the audio/video cable. Blu-ray Disc/DVD player (red) (white) (yellow) or Audio/video cable (supplied) S-video cable (not supplied) (red) (white) (yellow) Match the color of the plug to audio/video or S VIDEO jacks Connect the LINE OUT (VIDEO, R-AUDIO-L) jacks of the player and your TV using an Svideo cable, disconnect the video plug (yellow) of the jack. You can enjoy standard quality pictures and sound. Connecting to that of the audio/video cable. 18

Operating Instructions
Page 19
Hookups and Settings Step 2: Connecting to audio L/R jacks" on page 22. Analog See "Connecting to Your AV Amplifier (Receiver) About audio/HDMI OUT jacks The player has the following audio jacks. See "Connecting to the instruction manual supplied with the connected components. ,continued 19 z For correct speaker location, refer to digital jacks (OPTICAL/ COAXIAL)" on page 21. Jack type Digital Hookup See "Connecting to the input jacks on page 20. Connect the player to your AV amplifier (receiver) according to an HDMI jack" on your AV amplifier (receiver).
Hookups and Settings Step 2: Connecting to audio L/R jacks" on page 22. Analog See "Connecting to Your AV Amplifier (Receiver) About audio/HDMI OUT jacks The player has the following audio jacks. See "Connecting to the instruction manual supplied with the connected components. ,continued 19 z For correct speaker location, refer to digital jacks (OPTICAL/ COAXIAL)" on page 21. Jack type Digital Hookup See "Connecting to the input jacks on page 20. Connect the player to your AV amplifier (receiver) according to an HDMI jack" on your AV amplifier (receiver).

Operating Instructions
Page 20
...). b Not all HDMI-compatible AV amplifiers (receivers) accept 8ch Linear PCM signals. Blu-ray Disc/DVD player HDMI cable (not supplied) AV amplifier (receiver) HDMI cable (not supplied) 1 Connect the HDMI OUT jack of the player and your AV amplifier (receiver) has an HDMI input, use a High Speed HDMI... cable. Refer as well to the instruction manual supplied with the connected AV amplifier (receiver). If you connect a Sony AV amplifier (receiver) that is compatible ...
...). b Not all HDMI-compatible AV amplifiers (receivers) accept 8ch Linear PCM signals. Blu-ray Disc/DVD player HDMI cable (not supplied) AV amplifier (receiver) HDMI cable (not supplied) 1 Connect the HDMI OUT jack of the player and your AV amplifier (receiver) has an HDMI input, use a High Speed HDMI... cable. Refer as well to the instruction manual supplied with the connected AV amplifier (receiver). If you connect a Sony AV amplifier (receiver) that is compatible ...
