Operating Instructions
Page 4
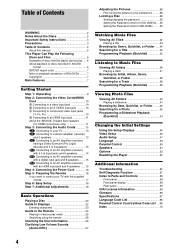
... Safety Instructions 3 Precautions 3 Table of Contents 4 About this manual 5 This Player Can Play the Following Discs and Files 5 Examples of discs that the player cannot play .....6 About playback of discs recorded in AVCHD format 6 BD/DVD region code 7 Note on playback operations of BDs/DVDs .........7 Copyrights 7... 7: Additional Adjustments 19 Basic Operations Playing a Disc 20 Guide to Displays 22 Entering characters 23 Guide to the Remote 24 Playing in various play mode 25 Searching using the remote 26 Checking the Disc Information 26 Clarifying Low Volume Sounds (Audio DRC...
... Safety Instructions 3 Precautions 3 Table of Contents 4 About this manual 5 This Player Can Play the Following Discs and Files 5 Examples of discs that the player cannot play .....6 About playback of discs recorded in AVCHD format 6 BD/DVD region code 7 Note on playback operations of BDs/DVDs .........7 Copyrights 7... 7: Additional Adjustments 19 Basic Operations Playing a Disc 20 Guide to Displays 22 Entering characters 23 Guide to the Remote 24 Playing in various play mode 25 Searching using the remote 26 Checking the Disc Information 26 Clarifying Low Volume Sounds (Audio DRC...

Operating Instructions
Page 5
.... This Player Can Play the Following Discs and Files Disc Format Blu-ray Disc DVD VIDEO DVD-RW/-R DVD+RW/+R CD "Blu-ray Disc" is a trademark. Playback of the icons used in this manual may not match the graphics displayed on -screen display illustrations used in this manual are new and evolving, some discs may not play depending on the remote...
.... This Player Can Play the Following Discs and Files Disc Format Blu-ray Disc DVD VIDEO DVD-RW/-R DVD+RW/+R CD "Blu-ray Disc" is a trademark. Playback of the icons used in this manual may not match the graphics displayed on -screen display illustrations used in this manual are new and evolving, some discs may not play depending on the remote...

Operating Instructions
Page 9
... following items: • Video cord (phono plug × 1) (1) • Stereo audio cord (phono plug × 2) (1) • Power cord (1) • Remote commander (remote) (1) • Size AA (R6) batteries (2) • Step 1: Unpacking 9 • Step 2: Connecting the Video Cords/ HDMI Cord 10 • Step 3: Connecting... supplied with the components to be connected. • You cannot connect this player to a TV that you have a video input jack. • Be sure to disconnect the power cord of the player. Getting Started Step 1: Unpacking Getting Started Follow steps 1 to 7 to ...
... following items: • Video cord (phono plug × 1) (1) • Stereo audio cord (phono plug × 2) (1) • Power cord (1) • Remote commander (remote) (1) • Size AA (R6) batteries (2) • Step 1: Unpacking 9 • Step 2: Connecting the Video Cords/ HDMI Cord 10 • Step 3: Connecting... supplied with the components to be connected. • You cannot connect this player to a TV that you have a video input jack. • Be sure to disconnect the power cord of the player. Getting Started Step 1: Unpacking Getting Started Follow steps 1 to 7 to ...

Operating Instructions
Page 11
...not work. Getting Started D Connecting to an HDMI input jack Use a certified Sony HDMI cord (not supplied) to HDMI OUT HDMI cord (not supplied) HDMI IN TV, projector, or AV amplifier (receiver) This Blu-ray Disc player incorporates High-Definition Multimedia Interface (HDMI™) technology. HDMI, the HDMI logo...On" (page 52). To prepare for HDMI connection After the player is simplified as improper handling may damage the HDMI OUT jack and the connector. • Carefully align the HDMI OUT jack on the TV's remote, the HDMI compatible components turn off by using the POWER ...
...not work. Getting Started D Connecting to an HDMI input jack Use a certified Sony HDMI cord (not supplied) to HDMI OUT HDMI cord (not supplied) HDMI IN TV, projector, or AV amplifier (receiver) This Blu-ray Disc player incorporates High-Definition Multimedia Interface (HDMI™) technology. HDMI, the HDMI logo...On" (page 52). To prepare for HDMI connection After the player is simplified as improper handling may damage the HDMI OUT jack and the connector. • Carefully align the HDMI OUT jack on the TV's remote, the HDMI compatible components turn off by using the POWER ...

Operating Instructions
Page 16
...batteries to avoid possible damage from battery leakage and corrosion. 16 Then plug the player and TV power cords into the remote casing, particularly when replacing the batteries. • Do not expose the remote sensor to the markings inside the battery compartment. Insert two Size AA (R6...) batteries by matching the 3 and # ends on the player (page 58). You can control the player using the remote, point it at the remote sensor on the batteries to direct sunlight or a lighting apparatus. Doing so may cause a malfunction. •...
...batteries to avoid possible damage from battery leakage and corrosion. 16 Then plug the player and TV power cords into the remote casing, particularly when replacing the batteries. • Do not expose the remote sensor to the markings inside the battery compartment. Insert two Size AA (R6...) batteries by matching the 3 and # ends on the player (page 58). You can control the player using the remote, point it at the remote sensor on the batteries to direct sunlight or a lighting apparatus. Doing so may cause a malfunction. •...

Operating Instructions
Page 17
...with your TV. Mute the sound (for a few seconds. Note Depending on the connected unit, you may not be able to control your Sony TV with the supplied remote. If your TV is listed in the table below, set the appropriate manufacturer's code. 1 While holding down TV [/1, press the number ... of nonSony TVs as well. VOL +/- MUTING You can Turn the TV on the supplied remote. 17 Select the channel up and down 1, 2, and 3 of the number buttons. 3 Wait for Sony TV only). Manufacturer Sony Daewoo Emerson GE Hitachi JVC LG/Gold star MGA/Mitsubishi NEC Panasonic Philips Pioneer RCA R.Shack...
...with your TV. Mute the sound (for a few seconds. Note Depending on the connected unit, you may not be able to control your Sony TV with the supplied remote. If your TV is listed in the table below, set the appropriate manufacturer's code. 1 While holding down TV [/1, press the number ... of nonSony TVs as well. VOL +/- MUTING You can Turn the TV on the supplied remote. 17 Select the channel up and down 1, 2, and 3 of the number buttons. 3 Wait for Sony TV only). Manufacturer Sony Daewoo Emerson GE Hitachi JVC LG/Gold star MGA/Mitsubishi NEC Panasonic Philips Pioneer RCA R.Shack...
Operating Instructions
Page 20
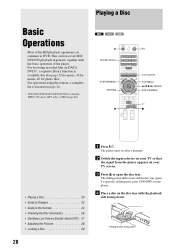
Playing a Disc Basic Operations Most of the player. BD DVD CD Z Number buttons SYSTEM MENU OPEN/ TV CLOSE DIMMER DISPLAY TV/VIDEO 1 4 7 CLEAR 23 56 89 VIDEO FORMAT 0 AUDIO SUBTITLE ANGLE RED GREEN ... PREV SLOW/STEP POP UP/ MENU NEXT SCAN PLAY SCAN PLAY MODE PAUSE STOP VOL CH MUTING \/1 Color buttons TOP MENU For operations using the remote, a complete list is available. This section covers BD/ DVD/CD playback in general, together with the basic operation of the BD playback operations are common...
Playing a Disc Basic Operations Most of the player. BD DVD CD Z Number buttons SYSTEM MENU OPEN/ TV CLOSE DIMMER DISPLAY TV/VIDEO 1 4 7 CLEAR 23 56 89 VIDEO FORMAT 0 AUDIO SUBTITLE ANGLE RED GREEN ... PREV SLOW/STEP POP UP/ MENU NEXT SCAN PLAY SCAN PLAY MODE PAUSE STOP VOL CH MUTING \/1 Color buttons TOP MENU For operations using the remote, a complete list is available. This section covers BD/ DVD/CD playback in general, together with the basic operation of the BD playback operations are common...
Operating Instructions
Page 21
...cases: - h Remove the disc, and press Z again to close the disc tray. You press H, SYSTEM MENU, TOP MENU, or POP UP/ MENU buttons on and the TV/AV receiver's input is switched to the player. Some BDs/DVDs display the menu automatically. For more information about the remote's operations, see page 24.... the same point. About One-Touch Play (for 15 minutes. Either cases, navigate through the menu using Wait a short while until the disc type appears on the remote or the player. To use the BD's or DVD's menu When you play a BD-ROM, DVD VIDEO, or a finalized DVD+RW, DVD-RW ...
...cases: - h Remove the disc, and press Z again to close the disc tray. You press H, SYSTEM MENU, TOP MENU, or POP UP/ MENU buttons on and the TV/AV receiver's input is switched to the player. Some BDs/DVDs display the menu automatically. For more information about the remote's operations, see page 24.... the same point. About One-Touch Play (for 15 minutes. Either cases, navigate through the menu using Wait a short while until the disc type appears on the remote or the player. To use the BD's or DVD's menu When you play a BD-ROM, DVD VIDEO, or a finalized DVD+RW, DVD-RW ...

Operating Instructions
Page 22
The three Title Lists appear similar and are operable in this display leads further to Displays Title List For DATA DVDs, this manual, press the Guide to the Title Lists of content type. BD DVD DATA DVD CD When 'Select an item, and press ENTER' appears in a similar way.
The three Title Lists appear similar and are operable in this display leads further to Displays Title List For DATA DVDs, this manual, press the Guide to the Title Lists of content type. BD DVD DATA DVD CD When 'Select an item, and press ENTER' appears in a similar way.
Operating Instructions
Page 24
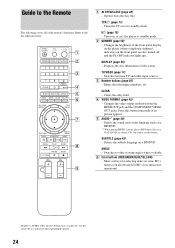
Opens/closes the disc tray. Switches between TV and other viewing angles when available. D VIDEO FORMAT (page 45) - Changes ... other input sources. Number 5, AUDIO, CH+, and H buttons have a tactile dot. Guide to the Remote The following covers all of the front panel display on the player (when completely darkened, indicators on the front panel are also turned off and the FL OFF indicator lights ...this button repeatedly if no picture appears. Enters the title/chapter numbers, etc. TV &/1 (page 17) - Displays the disc information on , or sets the player to the list when necessary.
Opens/closes the disc tray. Switches between TV and other viewing angles when available. D VIDEO FORMAT (page 45) - Changes ... other input sources. Number 5, AUDIO, CH+, and H buttons have a tactile dot. Guide to the Remote The following covers all of the front panel display on the player (when completely darkened, indicators on the front panel are also turned off and the FL OFF indicator lights ...this button repeatedly if no picture appears. Enters the title/chapter numbers, etc. TV &/1 (page 17) - Displays the disc information on , or sets the player to the list when necessary.
Operating Instructions
Page 26
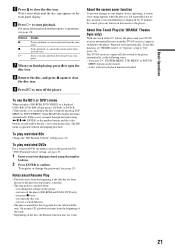
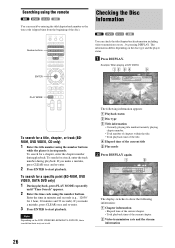
...the current chapter. • Total playback time of the current chapter. 2 Video transmission rate and the stream information 26 Searching using the remote BD DVD DATA DVD CD You can check the title/chapter/track information including video transmission rate etc., by entering the title/chapter/track ...Chapter Time Chapter Total 01.11.56 2h15m34s 10.03 Mbps Repeat Title The display switches to start playback. Note Depending on the disc type and the player status. OPEN/ TV CLOSE Number buttons DIMMER DISPLAY TV/VIDEO 123 456 7 CLEAR 89 VIDEO FORMAT 0 AUDIO SUBTITLE ANGLE RED ...
...the current chapter. • Total playback time of the current chapter. 2 Video transmission rate and the stream information 26 Searching using the remote BD DVD DATA DVD CD You can check the title/chapter/track information including video transmission rate etc., by entering the title/chapter/track ...Chapter Time Chapter Total 01.11.56 2h15m34s 10.03 Mbps Repeat Title The display switches to start playback. Note Depending on the disc type and the player status. OPEN/ TV CLOSE Number buttons DIMMER DISPLAY TV/VIDEO 123 456 7 CLEAR 89 VIDEO FORMAT 0 AUDIO SUBTITLE ANGLE RED ...

Operating Instructions
Page 33
... Starts playing the title you selected from Beginning Add to play mode During playback, press PLAY MODE repeatedly. "Repeat Off" See page 25 for the remote's operations. Items Play from the beginning. The selected item changes with each press: "Time Search" (page 26) -
... Starts playing the title you selected from Beginning Add to play mode During playback, press PLAY MODE repeatedly. "Repeat Off" See page 25 for the remote's operations. Items Play from the beginning. The selected item changes with each press: "Time Search" (page 26) -

Operating Instructions
Page 37
... Starts playing the track you put an extension ".MP3" to malfunction. • Playback may not start immediately after stopping playback, the player resumes playback from the last track you played. • Depending on MP3 tracks, playback starts from the characters you want to play ... the track names. • Sub area: Displays the total playback time of each press: "Repeat Track" - "Repeat Off" See page 25 for the remote's operations. • Even after skipping to UDF (Universal Disk Format). - Note that conforms to another album. • When using the "Options" menu ...
... Starts playing the track you put an extension ".MP3" to malfunction. • Playback may not start immediately after stopping playback, the player resumes playback from the last track you played. • Depending on MP3 tracks, playback starts from the characters you want to play ... the track names. • Sub area: Displays the total playback time of each press: "Repeat Track" - "Repeat Off" See page 25 for the remote's operations. • Even after skipping to UDF (Universal Disk Format). - Note that conforms to another album. • When using the "Options" menu ...

Operating Instructions
Page 41
... All Folders" above . Slideshow starts. To play mode During playback, press PLAY MODE repeatedly. z Hints • See page 24 for the remote's operations. • Even after stopping playback, the player resumes playback from the last file you want to start from the Browse menu. The photo file is reduced). - The file has... condition or the method (e.g., writer software). • Files may appear slowly depending on the situation. b Select the file you played. About unplayable photo files The player does not play on this player if edited on the "Options" menu.
... All Folders" above . Slideshow starts. To play mode During playback, press PLAY MODE repeatedly. z Hints • See page 24 for the remote's operations. • Even after stopping playback, the player resumes playback from the last file you want to start from the Browse menu. The photo file is reduced). - The file has... condition or the method (e.g., writer software). • Files may appear slowly depending on the situation. b Select the file you played. About unplayable photo files The player does not play on this player if edited on the "Options" menu.
Operating Instructions
Page 55
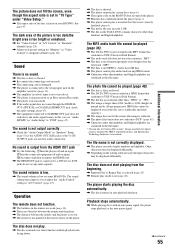
See page 45. Operation The remote does not function. , The batteries in "Audio Setup" to a DVI device (DVI jacks do not accept audio signals). The disc does not start playing from the HDMI OUT jack , Try the following: 1Turn the player off and on again. 2Turn the connected ... regulated by JEITA (Japan Electronics and Information Technology Industries Association). Insert the disc with an auto pause signal, the player stops playback at the remote sensor on (page 20). The photo file cannot be played (page 40). , The disc is dirty or flawed. , The DATA DVD is not correctly finalized (...
See page 45. Operation The remote does not function. , The batteries in "Audio Setup" to a DVI device (DVI jacks do not accept audio signals). The disc does not start playing from the HDMI OUT jack , Try the following: 1Turn the player off and on again. 2Turn the connected ... regulated by JEITA (Japan Electronics and Information Technology Industries Association). Insert the disc with an auto pause signal, the player stops playback at the remote sensor on (page 20). The photo file cannot be played (page 40). , The disc is dirty or flawed. , The DATA DVD is not correctly finalized (...

Operating Instructions
Page 56
... x on the front panel display. , Contact your TV, etc). The disc tray does not open and "LOCK" appears on the player (not the remote) repeatedly until the indicators on the front panel display turn on the player again. Refer to the operating manual that the connected component is set to...Play, or Random Play cannot be able to operate abnormally, unplug the player. 56 Refer to the language setting of the connected TV (if you change the setting on your Sony dealer or local authorized Sony service facility. The language for digital cameras regulated by JEITA (Japan Electronics ...
... x on the front panel display. , Contact your TV, etc). The disc tray does not open and "LOCK" appears on the player (not the remote) repeatedly until the indicators on the front panel display turn on the player again. Refer to the operating manual that the connected component is set to...Play, or Random Play cannot be able to operate abnormally, unplug the player. 56 Refer to the language setting of the connected TV (if you change the setting on your Sony dealer or local authorized Sony service facility. The language for digital cameras regulated by JEITA (Japan Electronics ...
Operating Instructions
Page 58
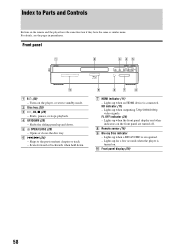
... Opens or closes the disc tray. Scans forward or backwards when held down . Index to Parts and Controls Buttons on the player, or sets to the previous/next chapter or track. - Turns on the remote and the player have the same function ...if they have the same or similar name. E A OPEN/CLOSE (20) - Lights up when outputting 720p/1080i/1080p video signals. D UP/DOWN (20) - G HDMI indicator (11) - Lights up when the front panel display and other indicators on . For details, see the pages in parentheses. H Remote sensor (16) I Blu-ray Disc...
... Opens or closes the disc tray. Scans forward or backwards when held down . Index to Parts and Controls Buttons on the player, or sets to the previous/next chapter or track. - Turns on the remote and the player have the same function ...if they have the same or similar name. E A OPEN/CLOSE (20) - Lights up when outputting 720p/1080i/1080p video signals. D UP/DOWN (20) - G HDMI indicator (11) - Lights up when the front panel display and other indicators on . For details, see the pages in parentheses. H Remote sensor (16) I Blu-ray Disc...

Operating Instructions
Page 70
... AACS 66 ANGLE 24 AUDIO 24 "Audio Control" 27 "Audio Output Mode" 51 "Audio Setup" 47 AVCHD 6, 66 B Batteries 16 BD-R 5, 66 BD-RE 5, 66 Blu-ray Disc 5, 66 'BRAVIA' Theatre Sync 11 C CD 5 Chapter 25, 66 Color buttons 24 Connecting the audio cords 12 the video cords 10 D DIMMER 24..." 36 O "Options" 52 P "Parental Control" 50 "Photos" 40 POP UP/MENU 25 Pro Logic 14, 47, 66 Progressive format 67 R Region code 7 Remote 16, 17, 24 Resetting the Player 53 S Searching 26, 34, 38, 42 "Setup" 22 Setup Displays 44 "Slideshow" 41 "Speaker Setup" 51 "Speakers" 12, 51 SUBTITLE 24 T Title 26...
... AACS 66 ANGLE 24 AUDIO 24 "Audio Control" 27 "Audio Output Mode" 51 "Audio Setup" 47 AVCHD 6, 66 B Batteries 16 BD-R 5, 66 BD-RE 5, 66 Blu-ray Disc 5, 66 'BRAVIA' Theatre Sync 11 C CD 5 Chapter 25, 66 Color buttons 24 Connecting the audio cords 12 the video cords 10 D DIMMER 24..." 36 O "Options" 52 P "Parental Control" 50 "Photos" 40 POP UP/MENU 25 Pro Logic 14, 47, 66 Progressive format 67 R Region code 7 Remote 16, 17, 24 Resetting the Player 53 S Searching 26, 34, 38, 42 "Setup" 22 Setup Displays 44 "Slideshow" 41 "Speaker Setup" 51 "Speakers" 12, 51 SUBTITLE 24 T Title 26...


