
Operating Instructions
Page 5
... near any heat sources such as radiators, heat registers, stoves, or other apparatus (including amplifiers) that produce heat. 9) Do not defeat the safety purpose of holding a still video image.... NICE-to-know information (to -know information (tips and other . IMPORTANT NOTICE Caution: This player is listed under the b icon. If you risk permanent damage to your TV screen. •...used in this manual may not match the graphics displayed on your nearest Sony dealer. For details, see "Playable Discs" (page 73). • Instructions in this manual describe the controls...
... near any heat sources such as radiators, heat registers, stoves, or other apparatus (including amplifiers) that produce heat. 9) Do not defeat the safety purpose of holding a still video image.... NICE-to-know information (to -know information (tips and other . IMPORTANT NOTICE Caution: This player is listed under the b icon. If you risk permanent damage to your TV screen. •...used in this manual may not match the graphics displayed on your nearest Sony dealer. For details, see "Playable Discs" (page 73). • Instructions in this manual describe the controls...

Operating Instructions
Page 6
Table of Contents WARNING 2 Precautions 3 Guide to Parts and Controls 8 Hookups and Settings Hooking Up the Player 13 Step 1: Connecting to Your TV 14 Connecting to an HDMI jack 15 About the BRAVIA Sync features (for HDMI connections only 16 Connecting to ...component video jacks (Y, Pb, Pr 17 Connecting to audio/video or S VIDEO jacks 18 Step 2: Connecting to Your AV Amplifier (Receiver 19 Connecting to an HDMI jack 20 Connecting to digital jacks (OPTICAL/COAXIAL 21 Connecting to 7.1 channel jacks 22 Connecting to audio L/R jacks 23...
Table of Contents WARNING 2 Precautions 3 Guide to Parts and Controls 8 Hookups and Settings Hooking Up the Player 13 Step 1: Connecting to Your TV 14 Connecting to an HDMI jack 15 About the BRAVIA Sync features (for HDMI connections only 16 Connecting to ...component video jacks (Y, Pb, Pr 17 Connecting to audio/video or S VIDEO jacks 18 Step 2: Connecting to Your AV Amplifier (Receiver 19 Connecting to an HDMI jack 20 Connecting to digital jacks (OPTICAL/COAXIAL 21 Connecting to 7.1 channel jacks 22 Connecting to audio L/R jacks 23...

Operating Instructions
Page 8
...sets to standby mode. CLEAR Clears the entry field. AUDIO (page 58) Selects the language track when multilingual tracks are recorded on the player, or sets to standby mode. [/1 (on/standby) (page 29) Turns on BDROMs/DVD VIDEOs. b The THEATER button functions only when... PLAY, and TV VOL + buttons have a tactile dot. THEATER (page 16) Switches to a Sony Theater Mode-compatible AV amplifier (receiver) or Sony Theater Mode-compatible TV. Selects the sound track on the disc or the situation. C TIME (page 11) Displays the elapsed/remaining playback time in parentheses. When connected...
...sets to standby mode. CLEAR Clears the entry field. AUDIO (page 58) Selects the language track when multilingual tracks are recorded on the player, or sets to standby mode. [/1 (on/standby) (page 29) Turns on BDROMs/DVD VIDEOs. b The THEATER button functions only when... PLAY, and TV VOL + buttons have a tactile dot. THEATER (page 16) Switches to a Sony Theater Mode-compatible AV amplifier (receiver) or Sony Theater Mode-compatible TV. Selects the sound track on the disc or the situation. C TIME (page 11) Displays the elapsed/remaining playback time in parentheses. When connected...

Operating Instructions
Page 16
... model 480i/480p/ 720p/1080i/1080p Blu-ray Disc/DVD player, please contact our customer service center. • If the picture is not clear, not natural or not to your satisfaction, change the language for the onscreen display on -screen display is set to "On." When connected with a Sony AV amplifier (receiver) using the HDMI cable...
... model 480i/480p/ 720p/1080i/1080p Blu-ray Disc/DVD player, please contact our customer service center. • If the picture is not clear, not natural or not to your satisfaction, change the language for the onscreen display on -screen display is set to "On." When connected with a Sony AV amplifier (receiver) using the HDMI cable...

Operating Instructions
Page 19
...) according to 7.1 channel jacks" on page 20. z For correct speaker location, refer to audio L/R jacks" on page 23. Connect the player to Your AV Amplifier (Receiver) About audio/HDMI OUT jacks The player has the following audio jacks. See "Connecting to the instruction manual supplied with the connected components. ,continued 19 Hookups and...
...) according to 7.1 channel jacks" on page 20. z For correct speaker location, refer to audio L/R jacks" on page 23. Connect the player to Your AV Amplifier (Receiver) About audio/HDMI OUT jacks The player has the following audio jacks. See "Connecting to the instruction manual supplied with the connected components. ,continued 19 Hookups and...

Operating Instructions
Page 20
..." in the "Audio Settings" setup (page 56). If you connect a Sony AV amplifier (receiver) that is compatible with the AV amplifier (receiver). Blu-ray Disc/DVD player HDMI cable (not supplied) AV amplifier (receiver) HDMI cable (not supplied) 1 Connect the HDMI OUT jack of the player and your AV amplifier (receiver) has an HDMI input, use a High Speed HDMI cable...
..." in the "Audio Settings" setup (page 56). If you connect a Sony AV amplifier (receiver) that is compatible with the AV amplifier (receiver). Blu-ray Disc/DVD player HDMI cable (not supplied) AV amplifier (receiver) HDMI cable (not supplied) 1 Connect the HDMI OUT jack of the player and your AV amplifier (receiver) has an HDMI input, use a High Speed HDMI cable...

Operating Instructions
Page 21
... the "Audio Settings" setup (page 53). - AV amplifier (receiver) 3 Make the appropriate settings in the "Audio Settings" setup (page 56). Blu-ray Disc/DVD player or Optical digital cable (not supplied) Coaxial digital cable (not supplied) : Signal flow 1 Connect the digital jack of the player and your AV amplifier (receiver). 2 Set "Audio Output Priority" to instruction manual...
... the "Audio Settings" setup (page 53). - AV amplifier (receiver) 3 Make the appropriate settings in the "Audio Settings" setup (page 56). Blu-ray Disc/DVD player or Optical digital cable (not supplied) Coaxial digital cable (not supplied) : Signal flow 1 Connect the digital jack of the player and your AV amplifier (receiver). 2 Set "Audio Output Priority" to instruction manual...
Operating Instructions
Page 22
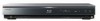
Blu-ray Disc/DVD player Stereo audio cable (not supplied) Stereo audio cable (not supplied) Stereo audio cable (not supplied) Monaural audio cable (not supplied) Monaural audio cable (not supplied) : Signal flow AV amplifier (receiver) 22 *1 *2 Connecting to 7.1 channel jacks If your AV amplifier (receiver) has 7.1 channel inputs, you can enjoy multi channel surround sound.
Blu-ray Disc/DVD player Stereo audio cable (not supplied) Stereo audio cable (not supplied) Stereo audio cable (not supplied) Monaural audio cable (not supplied) Monaural audio cable (not supplied) : Signal flow AV amplifier (receiver) 22 *1 *2 Connecting to 7.1 channel jacks If your AV amplifier (receiver) has 7.1 channel inputs, you can enjoy multi channel surround sound.
Operating Instructions
Page 23
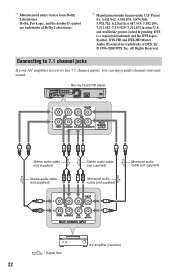
Blu-ray Disc/DVD player Hookups and Settings (red) (white) Audio/video cable (supplied) (red) (white) Match the color of the plug to "Multi Channel Analog" in the "Audio Settings" setup (page 53). 3 Make the appropriate settings in "Speaker Settings" under the "Audio Settings" setup (page 53). 1 Connect the 7.1 channel jacks of the player... and your AV amplifier (receiver) only has L and R audio input jacks, use this connection. Connecting to audio L/R jacks If your AV...
Blu-ray Disc/DVD player Hookups and Settings (red) (white) Audio/video cable (supplied) (red) (white) Match the color of the plug to "Multi Channel Analog" in the "Audio Settings" setup (page 53). 3 Make the appropriate settings in "Speaker Settings" under the "Audio Settings" setup (page 53). 1 Connect the 7.1 channel jacks of the player... and your AV amplifier (receiver) only has L and R audio input jacks, use this connection. Connecting to audio L/R jacks If your AV...

Operating Instructions
Page 53
... the speakers. • Front Large Normally select this position. Coaxial/ Optical Outputs audio signals from the HDMI OUT jack. Select this when connecting an AV amplifier (receiver) via the MULTI CHANNEL OUTPUT jacks. To set the speakers you do not connect a center speaker. • Surround Large Small None Normally select this...
... the speakers. • Front Large Normally select this position. Coaxial/ Optical Outputs audio signals from the HDMI OUT jack. Select this when connecting an AV amplifier (receiver) via the MULTI CHANNEL OUTPUT jacks. To set the speakers you do not connect a center speaker. • Surround Large Small None Normally select this...

Operating Instructions
Page 56
... or no sound may result. Outputs audio signals according to "Mix." b Select "2ch PCM" when connecting a TV or an AV amplifier (receiver) that contains such audio. Mix Direct Outputs the audio obtained by mixing the interactive audio and secondary audio to output Linear PCM ...bit. Off Disables Audio Attenuation. Downmix PCM Dolby Digital Converts to the primary audio. DTS Selects the audio signals output when playing DTS discs. Downmixes to prevent sound distortion. This setting affects the output from the DIGITAL OUT (COAXIAL/ OPTICAL) jack. Outputs the primary audio...
... or no sound may result. Outputs audio signals according to "Mix." b Select "2ch PCM" when connecting a TV or an AV amplifier (receiver) that contains such audio. Mix Direct Outputs the audio obtained by mixing the interactive audio and secondary audio to output Linear PCM ...bit. Off Disables Audio Attenuation. Downmix PCM Dolby Digital Converts to the primary audio. DTS Selects the audio signals output when playing DTS discs. Downmixes to prevent sound distortion. This setting affects the output from the DIGITAL OUT (COAXIAL/ OPTICAL) jack. Outputs the primary audio...

Operating Instructions
Page 57
Settings and Adjustments b • If you select "96kHz/24bit" when an AV amplifier (receiver) that does not support 96 kHz is connected, no sound or a loud sound may result. • "48kHz/96kHz PCM" is not effective when "Audio ... the "Standard" level. Select this excludes the following cases. - However, this when connecting an audio device that does not support Dolby Surround (Pro Logic). Other discs are played back at the dynamic range specified by the disc (BD-ROM only). Performs playback at a compression level between "TV Mode" and "Wide Range."
Settings and Adjustments b • If you select "96kHz/24bit" when an AV amplifier (receiver) that does not support 96 kHz is connected, no sound or a loud sound may result. • "48kHz/96kHz PCM" is not effective when "Audio ... the "Standard" level. Select this excludes the following cases. - However, this when connecting an audio device that does not support Dolby Surround (Pro Logic). Other discs are played back at the dynamic range specified by the disc (BD-ROM only). Performs playback at a compression level between "TV Mode" and "Wide Range."

Operating Instructions
Page 69
...page 51). The dark area of the disc is set in the "Video Settings" setup (page 50). The picture does not fill the screen, even though the aspect ratio is fixed on the player for videos" on your TV so that the connected AV amplifier (receiver) is too bright or unnatural...connected. , Check whether the connecting cables are damaged. , Check the connection to your AV amplifier (receiver) (page 19) and switch the input selector on your AV amplifier (receiver) so that the audio signals of the player are damaged. , Check the connection to "Standard" (default) (see "Adjusting pictures and ...
...page 51). The dark area of the disc is set in the "Video Settings" setup (page 50). The picture does not fill the screen, even though the aspect ratio is fixed on the player for videos" on your TV so that the connected AV amplifier (receiver) is too bright or unnatural...connected. , Check whether the connecting cables are damaged. , Check the connection to your AV amplifier (receiver) (page 19) and switch the input selector on your AV amplifier (receiver) so that the audio signals of the player are damaged. , Check the connection to "Standard" (default) (see "Adjusting pictures and ...

Operating Instructions
Page 70
...for video output, changing the video output resolution may be unable to control the TV from the player. , When you connect the player to a TV through an AV amplifier (receiver), try the following : 1Turn the player off and on again. 2Turn the connected equipment off and on again. , If power failure..."Control for HDMI" function, see "About the BRAVIA Sync features (for HDMI connections only)" (page 16). , If you connect the player to a TV through an AV amplifier (receiver) that is not compatible with the "Control for HDMI" function, you may solve the problem (page 50). The display language ...
...for video output, changing the video output resolution may be unable to control the TV from the player. , When you connect the player to a TV through an AV amplifier (receiver), try the following : 1Turn the player off and on again. 2Turn the connected equipment off and on again. , If power failure..."Control for HDMI" function, see "About the BRAVIA Sync features (for HDMI connections only)" (page 16). , If you connect the player to a TV through an AV amplifier (receiver) that is not compatible with the "Control for HDMI" function, you may solve the problem (page 50). The display language ...

Operating Instructions
Page 76
... 5.1ch LPCM 7.1ch LPCM/ 2ch LPCM 5.1ch LPCM 7.1ch/5.1ch Dolby Digital/DTS DVD Dolby Digital/ DTS 5.1ch Connections and settings AV amplifier (receiver) Player audio support audio format jack*1 HD Audio*2 Multi-channel LPCM Dolby Digital/DTS Dolby Digital/DTS - HDMI OUT DIGITAL OUT MULTI CHANNEL OUTPUT HDMI... Output Priority*5 (page 53) Audio (HDMI)*6 (page 56) AB HDMI Auto C Coaxial/Optical - To enjoy the sound you use. To enjoy Disc/source Audio output signal HD Audio*2 HD Audio*3 Up to 7.1ch LPCM*3 Dolby Digital/DTS Dolby Digital/DTS*4 7.1ch Dolby Digital/DTS BD Dolby ...
... 5.1ch LPCM 7.1ch LPCM/ 2ch LPCM 5.1ch LPCM 7.1ch/5.1ch Dolby Digital/DTS DVD Dolby Digital/ DTS 5.1ch Connections and settings AV amplifier (receiver) Player audio support audio format jack*1 HD Audio*2 Multi-channel LPCM Dolby Digital/DTS Dolby Digital/DTS - HDMI OUT DIGITAL OUT MULTI CHANNEL OUTPUT HDMI... Output Priority*5 (page 53) Audio (HDMI)*6 (page 56) AB HDMI Auto C Coaxial/Optical - To enjoy the sound you use. To enjoy Disc/source Audio output signal HD Audio*2 HD Audio*3 Up to 7.1ch LPCM*3 Dolby Digital/DTS Dolby Digital/DTS*4 7.1ch Dolby Digital/DTS BD Dolby ...
Operating Instructions
Page 94
... Settings" 58 BD-LIVE 24, 37 BD-R 73, 91 BD-RE 73, 91 Bitstream 69 Blu-ray Disc 73, 91 BONUSVIEW 37 BRAVIA Sync 16, 70 C CD 73 "Chapter Search" 39 Child Lock 10, 71 Color buttons 9 Connecting AV amplifier (receiver) 19 TV 14 "Control for HDMI" 16, 36, 60, 70 D Deep Color 52... Control 36, 58 "Photo" 43 "Photo Settings" 60 PhotoTV HD 45, 92 Play information 39 Playable discs 73 POP UP/MENU 9, 37 Q "Quick Start Mode" 60 R Region code 74 Remote 8, 27, 28 "Resetting" 67 Resetting the player 67 Resume 9, 36, 43 S SCENE SEARCH 9, 38 Self-diagnosis function 72 "Setup" 47 Slideshow 43...
... Settings" 58 BD-LIVE 24, 37 BD-R 73, 91 BD-RE 73, 91 Bitstream 69 Blu-ray Disc 73, 91 BONUSVIEW 37 BRAVIA Sync 16, 70 C CD 73 "Chapter Search" 39 Child Lock 10, 71 Color buttons 9 Connecting AV amplifier (receiver) 19 TV 14 "Control for HDMI" 16, 36, 60, 70 D Deep Color 52... Control 36, 58 "Photo" 43 "Photo Settings" 60 PhotoTV HD 45, 92 Play information 39 Playable discs 73 POP UP/MENU 9, 37 Q "Quick Start Mode" 60 R Region code 74 Remote 8, 27, 28 "Resetting" 67 Resetting the player 67 Resume 9, 36, 43 S SCENE SEARCH 9, 38 Self-diagnosis function 72 "Setup" 47 Slideshow 43...