XL-DK227N Operation Manual
Page 1
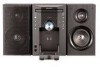
... accessories are included. MICRO COMPONENT SYSTEM MODEL XL-DK227N Thank you in operating your SHARP product. XL-DK227N Micro component system consisting of Apple Inc. It will guide you for purchasing this manual carefully. To obtain the best performance from this product, please read this SHARP product. iPod is a registered trademark of XL-DK227N (main unit) and CP-DK227N (speaker system). Remote control 1 (RRMCGA152AWSA...
... accessories are included. MICRO COMPONENT SYSTEM MODEL XL-DK227N Thank you in operating your SHARP product. XL-DK227N Micro component system consisting of Apple Inc. It will guide you for purchasing this manual carefully. To obtain the best performance from this product, please read this SHARP product. iPod is a registered trademark of XL-DK227N (main unit) and CP-DK227N (speaker system). Remote control 1 (RRMCGA152AWSA...
XL-DK227N Operation Manual
Page 2
... 5,539,829, 5,544,247, 5,606,618, 5,610,985, 5,740,317, 5,777,992, 5,878,080 or 5,960,037. Important Instruction XL-DK227N SPECIAL NOTES CAUTION: TO REDUCE THE RISK OF ELECTRIC SHOCK, DO NOT REMOVE COVER (OR BACK). REFER SERVICING TO QUALIFIED SERVICE PERSONNEL. Use of cable...shock to constitute a risk of important operating and maintenance (servicing) instructions in accordance with the instructions, may be connected to the grounding system of the building, as a CLASS 1 LASER PRODUCT Caution - This equipment generates, uses, and can be determined by turning the ...
... 5,539,829, 5,544,247, 5,606,618, 5,610,985, 5,740,317, 5,777,992, 5,878,080 or 5,960,037. Important Instruction XL-DK227N SPECIAL NOTES CAUTION: TO REDUCE THE RISK OF ELECTRIC SHOCK, DO NOT REMOVE COVER (OR BACK). REFER SERVICING TO QUALIFIED SERVICE PERSONNEL. Use of cable...shock to constitute a risk of important operating and maintenance (servicing) instructions in accordance with the instructions, may be connected to the grounding system of the building, as a CLASS 1 LASER PRODUCT Caution - This equipment generates, uses, and can be determined by turning the ...

XL-DK227N Operation Manual
Page 3
... and prolong the service life of the polarized or grounding-type plug. for your outlet, consult an electrician fire or electric shock. IMPORTANT SAFETY INSTRUCTIONS XL-DK227N Important Instruction Electricity is damaged, liquid has been spilled or objects have fallen into the apparatus, the apparatus has been exposed to rain or moisture...
... and prolong the service life of the polarized or grounding-type plug. for your outlet, consult an electrician fire or electric shock. IMPORTANT SAFETY INSTRUCTIONS XL-DK227N Important Instruction Electricity is damaged, liquid has been spilled or objects have fallen into the apparatus, the apparatus has been exposed to rain or moisture...
XL-DK227N Operation Manual
Page 4
.... Article810 of the National Electrical Code, ANSI/NFPA 70, provides information with the product. When installing an outside antenna system should be taken to the product. If replacement of the plug is required, be sure the service technician has used replacement...shock, or other controls may result in serious personal injuries as well as the original plug. 21) Wall or ceiling mounting - XL-DK227N IMPORTANT SAFETY INSTRUCTIONS (continued) Important Instruction 18) Damage Requiring Service - Adjust only those controls that has the same overload protection as...
.... Article810 of the National Electrical Code, ANSI/NFPA 70, provides information with the product. When installing an outside antenna system should be taken to the product. If replacement of the plug is required, be sure the service technician has used replacement...shock, or other controls may result in serious personal injuries as well as the original plug. 21) Wall or ceiling mounting - XL-DK227N IMPORTANT SAFETY INSTRUCTIONS (continued) Important Instruction 18) Damage Requiring Service - Adjust only those controls that has the same overload protection as...
XL-DK227N Operation Manual
Page 5
...http://mp3licensing.com MPEG Layer-3 audio coding technology licensed from Fraunhofer IIS and Thomson. Contents XL-DK227N Page General Information Precautions 6 Controls and indicators 7 - 9 Preparation for Use System connections 10 - 12 Remote control 13 Basic Operation General control 14 Setting the clock (... designed to the radio 26 - 27 Advanced Features Timer and sleep operation (Remote Control only 28 - 31 Enhancing your system 31 - 32 References Troubleshooting chart 33 - 34 Maintenance 34 Specifications 35 CONSUMER LIMITED WARRANTY Back cover 5 An independent license...
...http://mp3licensing.com MPEG Layer-3 audio coding technology licensed from Fraunhofer IIS and Thomson. Contents XL-DK227N Page General Information Precautions 6 Controls and indicators 7 - 9 Preparation for Use System connections 10 - 12 Remote control 13 Basic Operation General control 14 Setting the clock (... designed to the radio 26 - 27 Advanced Features Timer and sleep operation (Remote Control only 28 - 31 Enhancing your system 31 - 32 References Troubleshooting chart 33 - 34 Maintenance 34 Specifications 35 CONSUMER LIMITED WARRANTY Back cover 5 An independent license...
XL-DK227N Operation Manual
Page 6
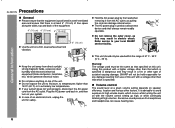
...system. Warning: The voltage used must be the same as a disconnect device and shall always remain readily operable. SHARP will not be used as that specified on this may result in a fire or other type of this product with a higher voltage other than 140˚F (60˚C) or to your local SHARP...that which is specified is specified. In case of the unit. XL-DK227N Precautions General Please ensure that the equipment is positioned in a ...equipment. 4" (10 cm) 4" (10 cm) 4" (10 cm) Docking Station MICRO COMPONENT SYSTEM Use the unit on a firm, level surface free from vibration. 4" (10 ...
...system. Warning: The voltage used must be the same as a disconnect device and shall always remain readily operable. SHARP will not be used as that specified on this may result in a fire or other type of this product with a higher voltage other than 140˚F (60˚C) or to your local SHARP...that which is specified is specified. In case of the unit. XL-DK227N Precautions General Please ensure that the equipment is positioned in a ...equipment. 4" (10 cm) 4" (10 cm) 4" (10 cm) Docking Station MICRO COMPONENT SYSTEM Use the unit on a firm, level surface free from vibration. 4" (10 ...

XL-DK227N Operation Manual
Page 7
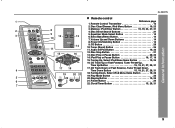
Power On/Stand-by Button 14, 15, 20, 26, 28 3. Disc Tray Open/Close Button 20 4. CD Button 20 13 11. Audio In Button 32 14. Disc or iPod Play or Pause Button 19, 21 6. Phones Jack 31 12 10. Timer Indicator 29 5. iPod Button 16 15 15. Controls and indicators Docking Station MICRO COMPONENT SYSTEM XL-DK227N Front panel Reference page 1. Disc Tray 20 2. Volume Control 14 11 8. Disc Stop Button 21 10 7. Audio In Jack 31 9. Tuner (Band) Button 26 14 12. iPod Docking Station 17 General Information 7 Remote sensor 13 13.
Power On/Stand-by Button 14, 15, 20, 26, 28 3. Disc Tray Open/Close Button 20 4. CD Button 20 13 11. Audio In Button 32 14. Disc or iPod Play or Pause Button 19, 21 6. Phones Jack 31 12 10. Timer Indicator 29 5. iPod Button 16 15 15. Controls and indicators Docking Station MICRO COMPONENT SYSTEM XL-DK227N Front panel Reference page 1. Disc Tray 20 2. Volume Control 14 11 8. Disc Stop Button 21 10 7. Audio In Jack 31 9. Tuner (Band) Button 26 14 12. iPod Docking Station 17 General Information 7 Remote sensor 13 13.

XL-DK227N Operation Manual
Page 8
...11 4. Speaker Wire 1 3 7 2 4 Extra Bass Indicator 14 13. Video Out Jack 11, 31 5 7. Subwoofer Pre-output Jack 32 Speaker system 6 1. MP3/WMA Title Indicators 25 3. FM Stereo Receiving Indicator 26 11. Disc Repeat Play Indicator 22 14. AC Power Cord 12 4 3. Disc ...Play Indicator 20 General Information 1 2 8 Rear panel Reference page 3 1. XL-DK227N Controls and indicators (continued) 1 2 34 56 12 13 14 15 8 9 10 7 11 Display Reference page 1. MP3/WMA Folder Indicator 25 2. WMA...
...11 4. Speaker Wire 1 3 7 2 4 Extra Bass Indicator 14 13. Video Out Jack 11, 31 5 7. Subwoofer Pre-output Jack 32 Speaker system 6 1. MP3/WMA Title Indicators 25 3. FM Stereo Receiving Indicator 26 11. Disc Repeat Play Indicator 22 14. AC Power Cord 12 4 3. Disc ...Play Indicator 20 General Information 1 2 8 Rear panel Reference page 3 1. XL-DK227N Controls and indicators (continued) 1 2 34 56 12 13 14 15 8 9 10 7 11 Display Reference page 1. MP3/WMA Folder Indicator 25 2. WMA...
XL-DK227N Operation Manual
Page 9
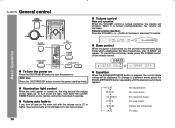
... Menu Items Button 19, 26 16. Remote Control Transmitter 13 2. Volume Up and Down Buttons 14 8. Audio In/iPod Button 16, 32 15 16 12. XL-DK227N General Information Remote control 1 Reference page 1.
... Menu Items Button 19, 26 16. Remote Control Transmitter 13 2. Volume Up and Down Buttons 14 8. Audio In/iPod Button 16, 32 15 16 12. XL-DK227N General Information Remote control 1 Reference page 1.

XL-DK227N Operation Manual
Page 10
XL-DK227N System connections Make sure to unplug the AC power cord before making any connections. Right speaker Antenna connection (see page 11) FM antenna AM loop antenna Left speaker Preparation for Use Speaker connection (see page 11) 10 AC outlet (AC 120 V ~ 60 Hz) AC power connection (see page 12)
XL-DK227N System connections Make sure to unplug the AC power cord before making any connections. Right speaker Antenna connection (see page 11) FM antenna AM loop antenna Left speaker Preparation for Use Speaker connection (see page 11) 10 AC outlet (AC 120 V ~ 60 Hz) AC power connection (see page 12)

XL-DK227N Operation Manual
Page 11
XL-DK227N Preparation for Use Antenna connection Supplied FM antenna: Connect the FM antenna wire to the plus (+) terminal. Position the AM loop antenna for futher information. ...
XL-DK227N Preparation for Use Antenna connection Supplied FM antenna: Connect the FM antenna wire to the plus (+) terminal. Position the AM loop antenna for futher information. ...

XL-DK227N Operation Manual
Page 12
.../DEMO button again. Note: When the power is used to the demonstration mode: When the unit is in , the unit will enter the demonstration mode. XL-DK227N System connections (continued) AC power connection After checking all the connections have been made correctly, plug the AC power cord of time. You will enter the...
.../DEMO button again. Note: When the power is used to the demonstration mode: When the unit is in , the unit will enter the demonstration mode. XL-DK227N System connections (continued) AC power connection After checking all the connections have been made correctly, plug the AC power cord of time. You will enter the...

XL-DK227N Operation Manual
Page 13
.... Now, you can be exposed to excessive heat such as sunshine, fire or the like. Docking Station MICRO COMPONENT SYSTEM Battery removal: Open the battery cover and pull up the battery to battery leakage. Remote control XL-DK227N Battery installation Use 2 "AA" size batteries (UM/SUM-3, R6, HP-7 or similar). Notes concerning use rechargeable...
.... Now, you can be exposed to excessive heat such as sunshine, fire or the like. Docking Station MICRO COMPONENT SYSTEM Battery removal: Open the battery cover and pull up the battery to battery leakage. Remote control XL-DK227N Battery installation Use 2 "AA" size batteries (UM/SUM-3, R6, HP-7 or similar). Notes concerning use rechargeable...
XL-DK227N Operation Manual
Page 14
... appears. To cancel the extra bass mode, press the X-BASS button on the remote control for more than 2 seconds. For rock music. XL-DK227N General control Docking Station MICRO COMPONENT SYSTEM Volume control Main unit operation: When the VOLUME control is first turned on, the unit will enter the extra bass mode which emphasizes...
... appears. To cancel the extra bass mode, press the X-BASS button on the remote control for more than 2 seconds. For rock music. XL-DK227N General control Docking Station MICRO COMPONENT SYSTEM Volume control Main unit operation: When the VOLUME control is first turned on, the unit will enter the extra bass mode which emphasizes...
XL-DK227N Operation Manual
Page 15
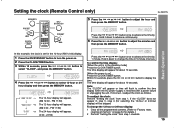
.... 6 Press the or button to select 12-hour or 24- To change the time in the stand-by 1 hour. Setting the clock (Remote Control only) XL-DK227N 5 Press the or button to display the time. Note: The "CLOCK" will appear or time will flash to advance the time by mode] Press...
.... 6 Press the or button to select 12-hour or 24- To change the time in the stand-by 1 hour. Setting the clock (Remote Control only) XL-DK227N 5 Press the or button to display the time. Note: The "CLOCK" will appear or time will flash to advance the time by mode] Press...
XL-DK227N Operation Manual
Page 16
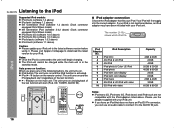
... 40GB 20GB & 30GB 40GB & 60GB 20GB 60GB 2GB & 4GB 30GB 60GB & 80GB Docking Station MICRO COMPONENT SYSTEM Notes: iPod nano 2G, iPod nano 3G, iPod classic and iPod touch are not compatible with your iPod unit. iPod XL-DK227N Listening to the iPod Supported iPod models: iPod nano (software 1.2 above) iPod mini (software 1.2 above...
... 40GB 20GB & 30GB 40GB & 60GB 20GB 60GB 2GB & 4GB 30GB 60GB & 80GB Docking Station MICRO COMPONENT SYSTEM Notes: iPod nano 2G, iPod nano 3G, iPod classic and iPod touch are not compatible with your iPod unit. iPod XL-DK227N Listening to the iPod Supported iPod models: iPod nano (software 1.2 above) iPod mini (software 1.2 above...

XL-DK227N Operation Manual
Page 17
... the power on. 2 Press the iPod button to turn the power on. 2. iPod (bottom) iPod pull up 2. iPod adaptor 4 Press the / button to remove adaptor XL-DK227N iPod PLAYBACK (PLAY & STOP) 3. iPod Caution: Do not place the iPod docking base without tip. Press the ON/STAND-BY button to select iPod function...
... the power on. 2 Press the iPod button to turn the power on. 2. iPod (bottom) iPod pull up 2. iPod adaptor 4 Press the / button to remove adaptor XL-DK227N iPod PLAYBACK (PLAY & STOP) 3. iPod Caution: Do not place the iPod docking base without tip. Press the ON/STAND-BY button to select iPod function...
XL-DK227N Operation Manual
Page 18
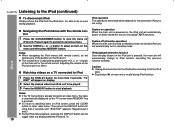
...press the CLEAR button to stand-by mode. Then press the DISPLAY button for more than 2 seconds. To return to watching video on iPod unit. System off (stand-by operation) When the main unit is pressed, the main unit will appear on display. 2 Select the desired video from the iPod ... unit will not toggle video out display between iPod and TV. 18 Navigating the iPod menus with remote control, do so even during iPod function. XL-DK227N Listening to the iPod (continued) To disconnect iPod Simply remove the iPod from iPod unit to be played. 3 Press the MEMORY button to select...
...press the CLEAR button to stand-by mode. Then press the DISPLAY button for more than 2 seconds. To return to watching video on iPod unit. System off (stand-by operation) When the main unit is pressed, the main unit will appear on display. 2 Select the desired video from the iPod ... unit will not toggle video out display between iPod and TV. 18 Navigating the iPod menus with remote control, do so even during iPod function. XL-DK227N Listening to the iPod (continued) To disconnect iPod Simply remove the iPod from iPod unit to be played. 3 Press the MEMORY button to select...
XL-DK227N Operation Manual
Page 19
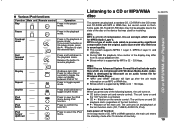
... more than 2 seconds to resume playback. Fast forward/ reverse ____ Press and hold down to a CD or MP3/WMA disc XL-DK227N CD or MP3/WMA disc Playback This system can play back a standard CD, CD-R/RW in the playback mode. Press to toggle repeat mode. Some audio CD-R and ...compression from its actual playback time. Press to view the iPod menu during iPod function. It is 32 ~ 320 kbps. Bitrate which are Advanced System Format files that was used for Windows Media Player. WMA is developed by mode after the unit reads information on . Auto power off...
... more than 2 seconds to resume playback. Fast forward/ reverse ____ Press and hold down to a CD or MP3/WMA disc XL-DK227N CD or MP3/WMA disc Playback This system can play back a standard CD, CD-R/RW in the playback mode. Press to toggle repeat mode. Some audio CD-R and ...compression from its actual playback time. Press to view the iPod menu during iPod function. It is 32 ~ 320 kbps. Bitrate which are Advanced System Format files that was used for Windows Media Player. WMA is developed by mode after the unit reads information on . Auto power off...

XL-DK227N Operation Manual
Page 20
... (heart, octagon, etc). If the power fails while the tray is open the disc tray. 4 Place the disc on the disc tray, label side up. XL-DK227N Listening to a CD or MP3/WMA disc (continued) 5 Press the OPEN/CLOSE button to close the disc tray. [CD] TOTAL indicator MP3 indicator [MP3/WMA...] WMA indicator CD or MP3/WMA disc Playback Docking Station MICRO COMPONENT SYSTEM Total number of Total playing Total number tracks on the disc time of the disc of files Due to the structure of the disc information...
... (heart, octagon, etc). If the power fails while the tray is open the disc tray. 4 Place the disc on the disc tray, label side up. XL-DK227N Listening to a CD or MP3/WMA disc (continued) 5 Press the OPEN/CLOSE button to close the disc tray. [CD] TOTAL indicator MP3 indicator [MP3/WMA...] WMA indicator CD or MP3/WMA disc Playback Docking Station MICRO COMPONENT SYSTEM Total number of Total playing Total number tracks on the disc time of the disc of files Due to the structure of the disc information...