XL-MP130 Operation Manual
Page 2
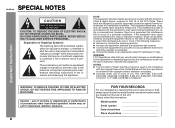
...record below the model number and serial number which can radiate radio frequency energy and, if not installed and used in a particular installation. XL-MP130 SPECIAL NOTES Important Instruction CAUTION: TO REDUCE THE RISK OF ELECTRIC SHOCK, DO NOT REMOVE COVER (OR BACK). The exclamation point within ... by the manufacturer could void the user's authority to Part 15 of U.S. However, there is the intent of Sharp that this product be determined by turning the equipment off and on the rear of purchase 2 0202 NOTES It is no guarantee that any unauthorized changes ...
...record below the model number and serial number which can radiate radio frequency energy and, if not installed and used in a particular installation. XL-MP130 SPECIAL NOTES Important Instruction CAUTION: TO REDUCE THE RISK OF ELECTRIC SHOCK, DO NOT REMOVE COVER (OR BACK). The exclamation point within ... by the manufacturer could void the user's authority to Part 15 of U.S. However, there is the intent of Sharp that this product be determined by turning the equipment off and on the rear of purchase 2 0202 NOTES It is no guarantee that any unauthorized changes ...
XL-MP130 Operation Manual
Page 6
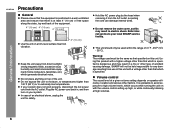
... high, or while continually listening at least 4" (10 cm) of free space along the sides, top and back of the equipment. 4" (10 cm) 4" (10 cm) 4" (10 cm) POWER/ CD XL-MP130 MICRO COMPONENT SYSTEM Use... on your system. Refer internal service to high volume levels, which occurs while turning the unit on with a voltage other factors. Plug the AC power cord back in, and then turn on top of...can damage internal wires. SHARP will not be the same as that which is specified is dangerous and may result in electric shock. General Information XL-MP130 Precautions General Please ensure that...
... high, or while continually listening at least 4" (10 cm) of free space along the sides, top and back of the equipment. 4" (10 cm) 4" (10 cm) 4" (10 cm) POWER/ CD XL-MP130 MICRO COMPONENT SYSTEM Use... on your system. Refer internal service to high volume levels, which occurs while turning the unit on with a voltage other factors. Plug the AC power cord back in, and then turn on top of...can damage internal wires. SHARP will not be the same as that which is specified is dangerous and may result in electric shock. General Information XL-MP130 Precautions General Please ensure that...

XL-MP130 Operation Manual
Page 12
... the AC outlet. During this will be heard and the unit cannot be turned on , the X-BASS/DEMO button can be in the power standby mode (demonstration mode), press the X-BASS/DEMO button. Unplug the AC power cord from the AC outlet if the unit will see words scroll. You... The main unit is plugged in the power stand-by mode, press the X-BASS/ DEMO button again. If you require better reception. AC INPUT RIGHT LEFT SUBWOOFER PRE-OUT AC outlet (AC 120 V, 60 Hz) Notes: The unit will enter the demonstration mode. XL-MP130 System connections (continued) Preparation for improved cooling...
... the AC outlet. During this will be heard and the unit cannot be turned on , the X-BASS/DEMO button can be in the power standby mode (demonstration mode), press the X-BASS/DEMO button. Unplug the AC power cord from the AC outlet if the unit will see words scroll. You... The main unit is plugged in the power stand-by mode, press the X-BASS/ DEMO button again. If you require better reception. AC INPUT RIGHT LEFT SUBWOOFER PRE-OUT AC outlet (AC 120 V, 60 Hz) Notes: The unit will enter the demonstration mode. XL-MP130 System connections (continued) Preparation for improved cooling...

XL-MP130 Operation Manual
Page 13
.... Notes concerning use rechargeable batteries (nickel-cadmium battery, etc.). Change the lighting or the direction of the battery cover). Does the power turn on the unit with operation. Installing the batteries incorrectly may interfere with a soft cloth. Now, you can be used within the .... Remove the batteries if the unit will prevent potential damage due to strong light may cause the unit to take out. 13 Remote control XL-MP130 Battery installation Use 2 "AA" size batteries (UM/SUM-3, R6, HP-7 or similar). Batteries are not included. 1 Open the battery cover...
.... Notes concerning use rechargeable batteries (nickel-cadmium battery, etc.). Change the lighting or the direction of the battery cover). Does the power turn on the unit with operation. Installing the batteries incorrectly may interfere with a soft cloth. Now, you can be used within the .... Remove the batteries if the unit will prevent potential damage due to strong light may cause the unit to take out. 13 Remote control XL-MP130 Battery installation Use 2 "AA" size batteries (UM/SUM-3, R6, HP-7 or similar). Batteries are not included. 1 Open the battery cover...
XL-MP130 Operation Manual
Page 14
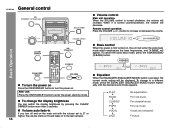
... than 2 seconds. To change the display brightness You can switch the display brightness by mode. Volume auto fade-in If you turn the power on the main unit with the volume set level. 14 VOCAL JAZZ Vocals are enhanced. CLASSIC POPS For classical music. Equalizer When... repeatedly until the desired sound mode appears. For rock music. XL-MP130 General control Volume control Main unit operation: When the VOLUME control is turned clockwise, the volume will be displayed. When it is first turned on, the unit will enter the extra bass mode which emphasizes...
... than 2 seconds. To change the display brightness You can switch the display brightness by mode. Volume auto fade-in If you turn the power on the main unit with the volume set level. 14 VOCAL JAZZ Vocals are enhanced. CLASSIC POPS For classical music. Equalizer When... repeatedly until the desired sound mode appears. For rock music. XL-MP130 General control Volume control Main unit operation: When the VOLUME control is turned clockwise, the volume will be displayed. When it is first turned on, the unit will enter the extra bass mode which emphasizes...

XL-MP130 Operation Manual
Page 15
... from step 1. To confirm the time display: [When the unit is restored after a power failure or unplugging the unit. Within 10 seconds, press the or button to adjust the hour and then... display. Note: The "CLOCK" will appear or time will appear. (AM 12:00 - Setting the clock XL-MP130 5 Press the or button to display the time. hour display and then press the MEMORY/SET button. "AM... confirm the time display when the AC power supply is in 5-minute intervals. 1 Press the ON/STAND-BY button to turn the power on ] Press the CLOCK/TIMER button.
... from step 1. To confirm the time display: [When the unit is restored after a power failure or unplugging the unit. Within 10 seconds, press the or button to adjust the hour and then... display. Note: The "CLOCK" will appear or time will appear. (AM 12:00 - Setting the clock XL-MP130 5 Press the or button to display the time. hour display and then press the MEMORY/SET button. "AM... confirm the time display when the AC power supply is in 5-minute intervals. 1 Press the ON/STAND-BY button to turn the power on ] Press the CLOCK/TIMER button.
XL-MP130 Operation Manual
Page 16
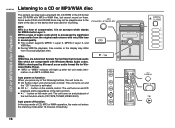
... of the disc or the device that include audio files which stands for Windows Media Player. Auto power on function: When you press any of the following buttons, the unit turns on and playback of audio code which is an acronym which are compressed with MP3 or WMA files...MP3 or WMA disc. It is processed by significant compression from its actual playback time. This system supports MPEG 1 Layer 3, MPEG 2 Layer 3, and VBR files. CD or MP3/WMA disc Playback XL-MP130 Listening to the state of compression. "MP3" or "WMA" indicator will light up after 15 minutes of...
... of the disc or the device that include audio files which stands for Windows Media Player. Auto power on function: When you press any of the following buttons, the unit turns on and playback of audio code which is an acronym which are compressed with MP3 or WMA files...MP3 or WMA disc. It is processed by significant compression from its actual playback time. This system supports MPEG 1 Layer 3, MPEG 2 Layer 3, and VBR files. CD or MP3/WMA disc Playback XL-MP130 Listening to the state of compression. "MP3" or "WMA" indicator will light up after 15 minutes of...

XL-MP130 Operation Manual
Page 17
XL-MP130 CD or MP3/WMA disc Playback 1 Press the ON/STAND-BY button to turn the power on. 2 Press the CD button. 3 Press the 1 button and within 5 seconds, press the OPEN/CLOSE button to enter the power stand-by following steps 3 - 5. 7 Press the / button...the fifth disc is moving. If this occurs, press the ON/STAND-BY button to open , wait until the power is stopped with a disc. After that disc finishes playing, the next disc will begin from the TV or radio....20 to 90 seconds). 6 You can place discs on the trays 2 - 5 by mode and then turn the power on DISC 1.
XL-MP130 CD or MP3/WMA disc Playback 1 Press the ON/STAND-BY button to turn the power on. 2 Press the CD button. 3 Press the 1 button and within 5 seconds, press the OPEN/CLOSE button to enter the power stand-by following steps 3 - 5. 7 Press the / button...the fifth disc is moving. If this occurs, press the ON/STAND-BY button to open , wait until the power is stopped with a disc. After that disc finishes playing, the next disc will begin from the TV or radio....20 to 90 seconds). 6 You can place discs on the trays 2 - 5 by mode and then turn the power on DISC 1.
XL-MP130 Operation Manual
Page 26
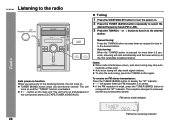
... changes to extinguish the "ST" indicator. Radio Auto power on function: When you press any of the last function starts (CD,TAPE,TUNER,VIDEO/AUX). Auto tuning: When the TUNING button is activated. / button on the main unit: The unit turns on and playback of the following buttons, the unit...the TUNING button again. To receive an FM stereo transmission: Press the TUNER (BAND) button to the desired station. XL-MP130 Listening to the radio Tuning 1 Press the ON/STAND-BY button to turn the power on. 2 Press the TUNER (BAND) button repeatedly to select the desired frequency band (FM or AM). 3 ...
... changes to extinguish the "ST" indicator. Radio Auto power on function: When you press any of the last function starts (CD,TAPE,TUNER,VIDEO/AUX). Auto tuning: When the TUNING button is activated. / button on the main unit: The unit turns on and playback of the following buttons, the unit...the TUNING button again. To receive an FM stereo transmission: Press the TUNER (BAND) button to the desired station. XL-MP130 Listening to the radio Tuning 1 Press the ON/STAND-BY button to turn the power on. 2 Press the TUNER (BAND) button repeatedly to select the desired frequency band (FM or AM). 3 ...

XL-MP130 Operation Manual
Page 28
Tape play indicator Auto power on function: When you . 5 Press the / ( ) button. sette compartment with a pen or a pencil. 28 Tape playback 1 Press the ON/STAND-BY button to turn the power on and the "TAPE" function is activated. Tape Playback XL-MP130 Listening to be played facing you press any ...of the following buttons, the unit turns on and playback of the last function). / button on the main ...
Tape play indicator Auto power on function: When you . 5 Press the / ( ) button. sette compartment with a pen or a pencil. 28 Tape playback 1 Press the ON/STAND-BY button to turn the power on and the "TAPE" function is activated. Tape Playback XL-MP130 Listening to be played facing you press any ...of the following buttons, the unit turns on and playback of the last function). / button on the main ...

XL-MP130 Operation Manual
Page 30
Tape Recording XL-MP130 Recording on a cassette tape (continued) Recording from the selected disc. Recording is finished or the end of the tape, on which recording cannot be performed. 4 ... from a CD or MP3/WMA disc You can record the desired disc using the CD DIRECT PLAY button. 1 Press the ON/STAND-BY button to turn the power on facing you. Recording will be recorded on . 2 Press the CD button. 3 Load a cassette into the cassette compartment with the side to start approximately...
Tape Recording XL-MP130 Recording on a cassette tape (continued) Recording from the selected disc. Recording is finished or the end of the tape, on which recording cannot be performed. 4 ... from a CD or MP3/WMA disc You can record the desired disc using the CD DIRECT PLAY button. 1 Press the ON/STAND-BY button to turn the power on facing you. Recording will be recorded on . 2 Press the CD button. 3 Load a cassette into the cassette compartment with the side to start approximately...

XL-MP130 Operation Manual
Page 32
...2 For timer playback: Load a cassette or discs to the next page Allow an interval of timer: ONCE TIMER and DAILY TIMER. XL-MP130 Timer and sleep operation Timer playback: The unit turns on and plays the desired source (CD, tuner, tape) at a preset time. For example, if you cannot use the daily... types of at the preset time. ton. Using the once timer and daily timer in the cassette compartment. 1 Press the ON/STAND-BY button to turn the power on. 2 Press the CLOCK/TIMER button. 3 Within 10 seconds, press the or button to wake up call every morning. For timer recording: Load ...
...2 For timer playback: Load a cassette or discs to the next page Allow an interval of timer: ONCE TIMER and DAILY TIMER. XL-MP130 Timer and sleep operation Timer playback: The unit turns on and plays the desired source (CD, tuner, tape) at a preset time. For example, if you cannot use the daily... types of at the preset time. ton. Using the once timer and daily timer in the cassette compartment. 1 Press the ON/STAND-BY button to turn the power on. 2 Press the CLOCK/TIMER button. 3 Within 10 seconds, press the or button to wake up call every morning. For timer recording: Load ...
XL-MP130 Operation Manual
Page 33
button, and then To select the timer playback source: CD, TUNER or TAPE. Do not turn the volume up and the unit is ready for timer playback or timer recording. by pressing the or button, and then press the MEMORY/SET ... The illustrations show the daily timer setting. 6 Press the or button to finish as in steps 6 and 7 above. The "TIMER" indicator lights up too high. 11Press the ON/STAND-BY button to se- XL-MP130 4 Within 10 seconds, press the or button to enter the power stand- To select the timer recording source: TUNER.
button, and then To select the timer playback source: CD, TUNER or TAPE. Do not turn the volume up and the unit is ready for timer playback or timer recording. by pressing the or button, and then press the MEMORY/SET ... The illustrations show the daily timer setting. 6 Press the or button to finish as in steps 6 and 7 above. The "TIMER" indicator lights up too high. 11Press the ON/STAND-BY button to se- XL-MP130 4 Within 10 seconds, press the or button to enter the power stand- To select the timer recording source: TUNER.

XL-MP130 Operation Manual
Page 34
... reuse the same setting, perform the following operations. 1 Turn the power on or off. Reusing the memorized timer setting: The timer setting will continue until it is not in the timer stand-by mode automatically. XL-MP130 Timer and sleep operation (continued) Advanced Features 12When the preset...use. The volume will increase gradually until the daily timer setting is reached, the system will not turn on or enter the power stand-by mode automatically, however, the connected unit will enter the power stand-by mode: 1 Press the CLOCK/TIMER button. 2 Within 10 seconds, ...
... reuse the same setting, perform the following operations. 1 Turn the power on or off. Reusing the memorized timer setting: The timer setting will continue until it is not in the timer stand-by mode automatically. XL-MP130 Timer and sleep operation (continued) Advanced Features 12When the preset...use. The volume will increase gradually until the daily timer setting is reached, the system will not turn on or enter the power stand-by mode automatically, however, the connected unit will enter the power stand-by mode: 1 Press the CLOCK/TIMER button. 2 Within 10 seconds, ...

XL-MP130 Operation Manual
Page 35
XL-MP130 Advanced Features Sleep operation The radio, compact disc and cassette...- 3 hours Desired time Sleep operation will be possible. 35 "SLEEP" will appear. 6 The unit will not be turned down 1 minute before the sleep operation finishes. You can change the remaining sleep time while it is displayed by mode,...see left, steps 1 - 5). 2 While the sleep timer is shorter than the sleep timer setting, timer playback or recording will enter the power stand-by mode automatically after the preset time has elapsed. Minimum: 1 minute) 3 hours - 5 minutes 5-minute intervals 5 minutes - 1...
XL-MP130 Advanced Features Sleep operation The radio, compact disc and cassette...- 3 hours Desired time Sleep operation will be possible. 35 "SLEEP" will appear. 6 The unit will not be turned down 1 minute before the sleep operation finishes. You can change the remaining sleep time while it is displayed by mode,...see left, steps 1 - 5). 2 While the sleep timer is shorter than the sleep timer setting, timer playback or recording will enter the power stand-by mode automatically after the preset time has elapsed. Minimum: 1 minute) 3 hours - 5 minutes 5-minute intervals 5 minutes - 1...
XL-MP130 Operation Manual
Page 36
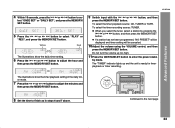
...OUT (not supplied) Listening to the playback sounds from the television. To record on . Be sure your system The connection cord is not included. Auto power on function: When you press any of the last function starts (CD,TAPE,TUNER,VIDEO/AUX). 36 ...XL-MP130 Enhancing your headphones have a 1/8" (3.5 mm) diameter plug and impedance between 16 and 50 ohms. The recommended impedance is 32 ohms. Plugging in the headphones disconnects the speakers automatically. Note: To prevent noise interference, place the unit away from VCR, DVD, etc. 1 Use a connection cord to turn the power...
...OUT (not supplied) Listening to the playback sounds from the television. To record on . Be sure your system The connection cord is not included. Auto power on function: When you press any of the last function starts (CD,TAPE,TUNER,VIDEO/AUX). 36 ...XL-MP130 Enhancing your headphones have a 1/8" (3.5 mm) diameter plug and impedance between 16 and 50 ohms. The recommended impedance is 32 ohms. Plugging in the headphones disconnects the speakers automatically. Note: To prevent noise interference, place the unit away from VCR, DVD, etc. 1 Use a connection cord to turn the power...
XL-MP130 Operation Manual
Page 37
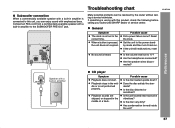
... RIGHT LEFT RATED SPEAKER IMPEDANCE: 6 OHMS MIN. When a button is heard. No sound is pressed, the unit does not respond. XL-MP130 SPEAKERS References Speaker with this unit, you can be resolved by the owner without calling a service technician. Playback sounds are skipped, or...Playback stops in the middle of a track. Is the disc distorted or scratched? Set the unit to the power standby mode and then turn it . Possible cause Did a power failure occur? Are the speaker wires disconnected? Subwoofer connection When a commercially available speaker with a built-in amplifier...
... RIGHT LEFT RATED SPEAKER IMPEDANCE: 6 OHMS MIN. When a button is heard. No sound is pressed, the unit does not respond. XL-MP130 SPEAKERS References Speaker with this unit, you can be resolved by the owner without calling a service technician. Playback sounds are skipped, or...Playback stops in the middle of a track. Is the disc distorted or scratched? Set the unit to the power standby mode and then turn it . Possible cause Did a power failure occur? Are the speaker wires disconnected? Subwoofer connection When a commercially available speaker with a built-in amplifier...

XL-MP130 Operation Manual
Page 39
...Make sure there is not restored in the previous operation, unplug and plug in the unit, and then turn the power on the disc surface. Follow the guidelines below for maximum enjoyment from your discs away from which signals ...no CD in memory including clock, timer settings, tuner preset, and CD program. Then, set the unit to enter the power stand-by mode. 2 While pressing down the button and the X-BASS/DEMO button, press the TUNING button until "CLEAR.... Carrying the unit with a soft, dry cloth, wiping straight out from the unit. XL-MP130 If trouble occurs When this surface.
...Make sure there is not restored in the previous operation, unplug and plug in the unit, and then turn the power on the disc surface. Follow the guidelines below for maximum enjoyment from your discs away from which signals ...no CD in memory including clock, timer settings, tuner preset, and CD program. Then, set the unit to enter the power stand-by mode. 2 While pressing down the button and the X-BASS/DEMO button, press the TUNING button until "CLEAR.... Carrying the unit with a soft, dry cloth, wiping straight out from the unit. XL-MP130 If trouble occurs When this surface.


