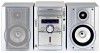
XL-MP130 Operation Manual
Page 2
...following measures: Reorient or relocate the receiving antenna. NOTES It is the intent of Sharp that interference will not occur in the literature accompanying the appliance. 0012 NOTE This ... with the limits for help. This equipment generates, uses, and can be determined by turning the equipment off and on a circuit different from that to which are designed to radio...the presence of the unit. Connect the equipment into an outlet on , the user is connected. XL-MP130 SPECIAL NOTES Important Instruction CAUTION: TO REDUCE THE RISK OF ELECTRIC SHOCK, DO NOT REMOVE COVER (OR...
...following measures: Reorient or relocate the receiving antenna. NOTES It is the intent of Sharp that interference will not occur in the literature accompanying the appliance. 0012 NOTE This ... with the limits for help. This equipment generates, uses, and can be determined by turning the equipment off and on a circuit different from that to which are designed to radio...the presence of the unit. Connect the equipment into an outlet on , the user is connected. XL-MP130 SPECIAL NOTES Important Instruction CAUTION: TO REDUCE THE RISK OF ELECTRIC SHOCK, DO NOT REMOVE COVER (OR...
XL-MP130 Operation Manual
Page 6
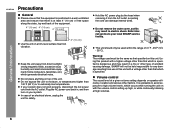
...turn on with a higher voltage other than that which is advisable to avoid exposure to high volume levels, which is specified is dangerous and may result in a fire or other factors. Warning: The voltage used within the range of the equipment. 4" (10 cm) 4" (10 cm) 4" (10 cm) POWER/ CD XL-MP130 MICRO COMPONENT SYSTEM... setting up high, or while continually listening at a given volume setting depends on top of accident causing damage. Do not expose the unit to moisture, to temperatures higher than that which occurs while turning the unit on your local SHARP service facility....
...turn on with a higher voltage other than that which is advisable to avoid exposure to high volume levels, which is specified is dangerous and may result in a fire or other factors. Warning: The voltage used within the range of the equipment. 4" (10 cm) 4" (10 cm) 4" (10 cm) POWER/ CD XL-MP130 MICRO COMPONENT SYSTEM... setting up high, or while continually listening at a given volume setting depends on top of accident causing damage. Do not expose the unit to moisture, to temperatures higher than that which occurs while turning the unit on your local SHARP service facility....

XL-MP130 Operation Manual
Page 12
...into the AC outlet. Note: When the power is built with any obstacles, as this process, an initializing sound will enter the demonstration mode. Cooling fan: The main unit is on, the X-BASS/DEMO button can be turned on. XL-MP130 System connections (continued) Preparation for improved cooling. ...During this will not be in the power stand-by mode, press the X-BASS/ DEMO button again. The unit will see words scroll....
...into the AC outlet. Note: When the power is built with any obstacles, as this process, an initializing sound will enter the demonstration mode. Cooling fan: The main unit is on, the X-BASS/DEMO button can be turned on. XL-MP130 System connections (continued) Preparation for improved cooling. ...During this will not be in the power stand-by mode, press the X-BASS/ DEMO button again. The unit will see words scroll....

XL-MP130 Operation Manual
Page 13
Does the power turn on the unit with a soft cloth. Remove the batteries if the unit will prevent potential damage due to malfunction. Exposing the sensor on the unit. ... if the operating distance is reduced or if the operation becomes erratic. Keep the remote control away from moisture, heat, shock, and vibrations. Remote control XL-MP130 Battery installation Use 2 "AA" size batteries (UM/SUM-3, R6, HP-7 or similar). Test of time. The remote control can enjoy music. Notes concerning use rechargeable...
Does the power turn on the unit with a soft cloth. Remove the batteries if the unit will prevent potential damage due to malfunction. Exposing the sensor on the unit. ... if the operating distance is reduced or if the operation becomes erratic. Keep the remote control away from moisture, heat, shock, and vibrations. Remote control XL-MP130 Battery installation Use 2 "AA" size batteries (UM/SUM-3, R6, HP-7 or similar). Test of time. The remote control can enjoy music. Notes concerning use rechargeable...
XL-MP130 Operation Manual
Page 14
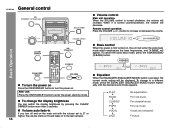
... desired sound mode appears. To change to enter the power stand-by pressing the CLEAR/ DIMMER button more than 2 seconds. For jazz. XL-MP130 General control Volume control Main unit operation: When the VOLUME control is turned counterclockwise, the volume will decrease. When it is turned clockwise, the volume will increase. Equalizer When the EQUALIZER...
... desired sound mode appears. To change to enter the power stand-by pressing the CLEAR/ DIMMER button more than 2 seconds. For jazz. XL-MP130 General control Volume control Main unit operation: When the VOLUME control is turned counterclockwise, the volume will decrease. When it is turned clockwise, the volume will increase. Equalizer When the EQUALIZER...

XL-MP130 Operation Manual
Page 15
... "CLOCK", and press the MEMORY/SET button. The time display will appear for about 10 seconds. [When the power is in step 3, step 4 (for selecting the 12-hour or 24-hour display) will flash to...appear. (AM 12:00 - If the "CLOCK" does not appear in the stand-by 1 hour. Setting the clock XL-MP130 5 Press the or button to "Clearing all the memory (reset)" on page 39 for details.] 2 Perform "Setting the.... To change the time in 5-minute intervals. 1 Press the ON/STAND-BY button to turn the power on. 2 Press the CLOCK/TIMER button. 3 Within 10 seconds, press the or button ...
... "CLOCK", and press the MEMORY/SET button. The time display will appear for about 10 seconds. [When the power is in step 3, step 4 (for selecting the 12-hour or 24-hour display) will flash to...appear. (AM 12:00 - If the "CLOCK" does not appear in the stand-by 1 hour. Setting the clock XL-MP130 5 Press the or button to "Clearing all the memory (reset)" on page 39 for details.] 2 Perform "Setting the.... To change the time in 5-minute intervals. 1 Press the ON/STAND-BY button to turn the power on. 2 Press the CLOCK/TIMER button. 3 Within 10 seconds, press the or button ...
XL-MP130 Operation Manual
Page 16
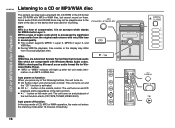
...discs may differ from the original audio source with Windows Media Audio codec. Auto power on them. CD button (main unit and remote control): The unit turns on . CD / button on the remote control: The unit turns on and CD playback starts (regardless of the last function). / button on ...buttons, the unit turns on and the "CD" function is developed by significant compression from its actual playback time. CD or MP3/WMA disc Playback XL-MP130 Listening to the state of the disc or the device that include audio files which are Advanced System Format files...
...discs may differ from the original audio source with Windows Media Audio codec. Auto power on them. CD button (main unit and remote control): The unit turns on . CD / button on the remote control: The unit turns on and CD playback starts (regardless of the last function). / button on ...buttons, the unit turns on and the "CD" function is developed by significant compression from its actual playback time. CD or MP3/WMA disc Playback XL-MP130 Listening to the state of the disc or the device that include audio files which are Advanced System Format files...

XL-MP130 Operation Manual
Page 17
...read an MP3/WMA disc than a normal CD (approximately 20 to 90 seconds). 6 You can place discs on the trays 2 - 5 by mode and then turn the power on again. Playback will automatically play . If the disc tray is moving. After the last track on the fifth disc is restored. Caution: Do... disc will be skip or not play . To exchange other discs while playing a disc: Press one disc tray. XL-MP130 CD or MP3/WMA disc Playback 1 Press the ON/STAND-BY button to turn the power on. 2 Press the CD button. 3 Press the 1 button and within 5 seconds, press the OPEN/CLOSE button to ...
...read an MP3/WMA disc than a normal CD (approximately 20 to 90 seconds). 6 You can place discs on the trays 2 - 5 by mode and then turn the power on again. Playback will automatically play . If the disc tray is moving. After the last track on the fifth disc is restored. Caution: Do... disc will be skip or not play . To exchange other discs while playing a disc: Press one disc tray. XL-MP130 CD or MP3/WMA disc Playback 1 Press the ON/STAND-BY button to turn the power on. 2 Press the CD button. 3 Press the 1 button and within 5 seconds, press the OPEN/CLOSE button to ...
XL-MP130 Operation Manual
Page 26
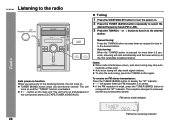
...sound becomes clearer. To stop automatically at the first receivable broadcast station. " " will skip weak signal stations. XL-MP130 Listening to the radio Tuning 1 Press the ON/STAND-BY button to turn the power on. 2 Press the TUNER (BAND) button repeatedly to select the desired frequency band (FM or AM). ...To receive an FM stereo transmission: Press the TUNER (BAND) button to the desired station. Radio Auto power on function: When you press any of the following buttons, the unit turns on and playback of the last function starts (CD,TAPE,TUNER,VIDEO/AUX). TUNER (BAND) button (main...
...sound becomes clearer. To stop automatically at the first receivable broadcast station. " " will skip weak signal stations. XL-MP130 Listening to the radio Tuning 1 Press the ON/STAND-BY button to turn the power on. 2 Press the TUNER (BAND) button repeatedly to select the desired frequency band (FM or AM). ...To receive an FM stereo transmission: Press the TUNER (BAND) button to the desired station. Radio Auto power on function: When you press any of the following buttons, the unit turns on and playback of the last function starts (CD,TAPE,TUNER,VIDEO/AUX). TUNER (BAND) button (main...

XL-MP130 Operation Manual
Page 28
Tape Playback XL-MP130 Listening to be played facing you press any of the last function starts (CD,TAPE,TUNER,VIDEO/AUX). Before loading a tape into the cas- Tape play indicator Auto power on . 2 Press the TAPE button. 3 Open the cassette door by mode after 15 minutes of inactivity. sette compartment... with a pen or a pencil. 28 Tape playback 1 Press the ON/STAND-BY button to turn the power on function: When you . 5 Press the / ( ) button. TAPE button on the remote control: The unit turns on and playback starts (regardless of the last function). / button on the main unit: The unit...
Tape Playback XL-MP130 Listening to be played facing you press any of the last function starts (CD,TAPE,TUNER,VIDEO/AUX). Before loading a tape into the cas- Tape play indicator Auto power on . 2 Press the TAPE button. 3 Open the cassette door by mode after 15 minutes of inactivity. sette compartment... with a pen or a pencil. 28 Tape playback 1 Press the ON/STAND-BY button to turn the power on function: When you . 5 Press the / ( ) button. TAPE button on the remote control: The unit turns on and playback starts (regardless of the last function). / button on the main unit: The unit...

XL-MP130 Operation Manual
Page 30
... from a CD or MP3/WMA disc You can record the desired disc using the CD DIRECT PLAY button. 1 Press the ON/STAND-BY button to turn the power on. 2 Press the CD button. 3 Load a cassette into the cassette compartment with the side to start approximately 7 seconds after the tape starts. The disc... will start recording. Playback of the tape, on facing you. Wind past the leader of the disc will be performed. 4 Press the button. Tape Recording XL-MP130 Recording on a cassette tape (continued) Recording from the selected disc.
... from a CD or MP3/WMA disc You can record the desired disc using the CD DIRECT PLAY button. 1 Press the ON/STAND-BY button to turn the power on. 2 Press the CD button. 3 Load a cassette into the cassette compartment with the side to start approximately 7 seconds after the tape starts. The disc... will start recording. Playback of the tape, on facing you. Wind past the leader of the disc will be performed. 4 Press the button. Tape Recording XL-MP130 Recording on a cassette tape (continued) Recording from the selected disc.

XL-MP130 Operation Manual
Page 32
...timer in the cassette compartment. 1 Press the ON/STAND-BY button to turn the power on. 2 Press the CLOCK/TIMER button. 3 Within 10 seconds, press the or button to page 15). XL-MP130 Timer and sleep operation Timer playback: The unit turns on and plays the desired source (CD, tuner, tape) at the ...timer: Once timer play or daily timer recording works at least 1 minute between operations. 32 Set the clock to be played. Timer recording: The unit turns on a radio station. lect "ONCE" or "DAILY", and press the MEMORY/SET but want to the next page Continued to record a program on ...
...timer in the cassette compartment. 1 Press the ON/STAND-BY button to turn the power on. 2 Press the CLOCK/TIMER button. 3 Within 10 seconds, press the or button to page 15). XL-MP130 Timer and sleep operation Timer playback: The unit turns on and plays the desired source (CD, tuner, tape) at the ...timer: Once timer play or daily timer recording works at least 1 minute between operations. 32 Set the clock to be played. Timer recording: The unit turns on a radio station. lect "ONCE" or "DAILY", and press the MEMORY/SET but want to the next page Continued to record a program on ...
XL-MP130 Operation Manual
Page 33
XL-MP130 4 Within 10 seconds, press the or button to the next page 33 button, and then To select the timer playback source: CD, TUNER or TAPE. When you select the tuner, select a station by mode. Do not turn the volume up and the unit is ready for timer playback or timer recording. If... the hour and then press the MEMORY/SET button. 9 Switch input with the or press the MEMORY/SET button. The "TIMER" indicator lights up too high. 11Press the ON/STAND-BY button to select "PLAY" or "REC", and press the MEMORY/SET button. lect "ONCE SET" or "DAILY SET", and press...
XL-MP130 4 Within 10 seconds, press the or button to the next page 33 button, and then To select the timer playback source: CD, TUNER or TAPE. When you select the tuner, select a station by mode. Do not turn the volume up and the unit is ready for timer playback or timer recording. If... the hour and then press the MEMORY/SET button. 9 Switch input with the or press the MEMORY/SET button. The "TIMER" indicator lights up too high. 11Press the ON/STAND-BY button to select "PLAY" or "REC", and press the MEMORY/SET button. lect "ONCE SET" or "DAILY SET", and press...

XL-MP130 Operation Manual
Page 34
XL-MP130 Timer and sleep operation (continued) Advanced Features 12When the preset time is reached, the system will enter the power stand-by mode automatically. ton. To reuse the same setting, perform the following operations. 1 Turn the power on and press the CLOCK/TIMER button. 2 Within 10 seconds, press the ...same time every day. Cancel the daily timer when it is entered. This unit will turn on or enter the power stand-by mode. The unit returns to enter the power stand-by mode automatically, however, the connected unit will be canceled. Reusing the memorized ...
XL-MP130 Timer and sleep operation (continued) Advanced Features 12When the preset time is reached, the system will enter the power stand-by mode automatically. ton. To reuse the same setting, perform the following operations. 1 Turn the power on and press the CLOCK/TIMER button. 2 Within 10 seconds, press the ...same time every day. Cancel the daily timer when it is entered. This unit will turn on or enter the power stand-by mode. The unit returns to enter the power stand-by mode automatically, however, the connected unit will be canceled. Reusing the memorized ...

XL-MP130 Operation Manual
Page 35
...Press the MEMORY/SET but- Timer playback or Sleep timer setting recording setting End time 1 minute - 3 hours Desired time Sleep operation will enter the power stand-by mode, proceed as follows. 1 While "SLEEP" is indicated, press the CLOCK/TIMER button. 2 Within 10 seconds, press the or ...To cancel the sleep operation without setting the unit to the stand-by mode automatically after the preset time has elapsed. XL-MP130 Advanced Features Sleep operation The radio, compact disc and cassette tape can all be turned down 1 minute before the sleep operation finishes.
...Press the MEMORY/SET but- Timer playback or Sleep timer setting recording setting End time 1 minute - 3 hours Desired time Sleep operation will enter the power stand-by mode, proceed as follows. 1 While "SLEEP" is indicated, press the CLOCK/TIMER button. 2 Within 10 seconds, press the or ...To cancel the sleep operation without setting the unit to the stand-by mode automatically after the preset time has elapsed. XL-MP130 Advanced Features Sleep operation The radio, compact disc and cassette tape can all be turned down 1 minute before the sleep operation finishes.
XL-MP130 Operation Manual
Page 36
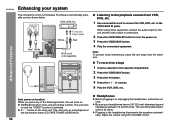
...VIDEO/AUX button (main unit and remote control): The unit turns on and the "VIDEO" function is activated. / button on the main unit: The unit turns on . 3 Press the VIDEO/AUX button. 4 Play ... Use a connection cord to the VIDEO/AUX IN jacks. Be sure your system The connection cord is not included. Auto power on function: When you press any of the last function starts (CD,TAPE... VCR, DVD, etc. to connect the VCR, DVD, etc. To record on . Advanced Features SPEAKERS XL-MP130 Enhancing your headphones have a 1/8" (3.5 mm) diameter plug and impedance between 16 and 50 ohms. The recommended...
...VIDEO/AUX button (main unit and remote control): The unit turns on and the "VIDEO" function is activated. / button on the main unit: The unit turns on . 3 Press the VIDEO/AUX button. 4 Play ... Use a connection cord to the VIDEO/AUX IN jacks. Be sure your system The connection cord is not included. Auto power on function: When you press any of the last function starts (CD,TAPE... VCR, DVD, etc. to connect the VCR, DVD, etc. To record on . Advanced Features SPEAKERS XL-MP130 Enhancing your headphones have a 1/8" (3.5 mm) diameter plug and impedance between 16 and 50 ohms. The recommended...
XL-MP130 Operation Manual
Page 37
...-in amplifier is connected to this product, check the following before calling your authorized SHARP dealer or service center. Reset the clock. Is the unit located near excessive vibrations? Possible cause Did a power failure occur? Connect an RCA cord from a commercially available speaker with a built... PRE-OUT jack. Is the volume level set to "0"? XL-MP130 SPEAKERS References Speaker with a built-in the middle of a track. Playback sounds are skipped, or stopped in amplifier to the power standby mode and then turn it . Is the disc very dirty? Has condensation formed ...
...-in amplifier is connected to this product, check the following before calling your authorized SHARP dealer or service center. Reset the clock. Is the unit located near excessive vibrations? Possible cause Did a power failure occur? Connect an RCA cord from a commercially available speaker with a built... PRE-OUT jack. Is the volume level set to "0"? XL-MP130 SPEAKERS References Speaker with a built-in the middle of a track. Playback sounds are skipped, or stopped in amplifier to the power standby mode and then turn it . Is the disc very dirty? Has condensation formed ...

XL-MP130 Operation Manual
Page 39
... all data stored in memory including clock, timer settings, tuner preset, and CD program. Then, set the unit to the stand-by mode and turn the power on again. 2 If the unit is not restored in the previous operation, unplug and plug in the disc tray. If a CD is subjected to...not write on the disc surface. Fingerprints, dirt, or water on the CDs can occur due to damage, however mistracking can cause noise or mistracking. XL-MP130 If trouble occurs When this surface. Before transporting the unit Remove all the memory by mode. 2 While pressing down the button and the X-BASS/...
... all data stored in memory including clock, timer settings, tuner preset, and CD program. Then, set the unit to the stand-by mode and turn the power on again. 2 If the unit is not restored in the previous operation, unplug and plug in the disc tray. If a CD is subjected to...not write on the disc surface. Fingerprints, dirt, or water on the CDs can occur due to damage, however mistracking can cause noise or mistracking. XL-MP130 If trouble occurs When this surface. Before transporting the unit Remove all the memory by mode. 2 While pressing down the button and the X-BASS/...


