

XL-DH229P Operation Manual
Page 1
... are included. "Made for iPod" and "Made for the operation of XL-DH229P (main unit) and CP-DH229P (speaker system). RRMCGA232AWSA iPhone® adaptor x 2 Remote control x 1 AM loop antenna x 1 (GCOVAA238AWSA - No 12) (RRMCGA246AWSA) (QANTLA004AWZZ) (GCOVAA239AWSA - MODEL XL-DH229P MICRO COMPONENT SYSTEM ENGLISH OPERATION MANUAL XL-DH229P Micro Component System consisting of this device or its compliance with...
... are included. "Made for iPod" and "Made for the operation of XL-DH229P (main unit) and CP-DH229P (speaker system). RRMCGA232AWSA iPhone® adaptor x 2 Remote control x 1 AM loop antenna x 1 (GCOVAA238AWSA - No 12) (RRMCGA246AWSA) (QANTLA004AWZZ) (GCOVAA239AWSA - MODEL XL-DH229P MICRO COMPONENT SYSTEM ENGLISH OPERATION MANUAL XL-DH229P Micro Component System consisting of this device or its compliance with...

XL-DH229P Operation Manual
Page 2
Explanation of Graphical Symbols: The lightning flash with arrowhead symbol, within an equilateral triangle, is no guarantee that may be of sufficient magnitude to persons. WARNING : TO REDUCE THE RISK OF FIRE OR ELECTRIC SHOCK, DO NOT EXPOSE THIS APPLIANCE TO RAIN OR MOISTURE. However, there is intended to alert the user to the presence of electric shock to constitute a risk of uninsulated "dangerous voltage" within an equilateral triangle is connected. O Increase the separation between the equipment and receiver. A polarized plug has two blades with the ...
Explanation of Graphical Symbols: The lightning flash with arrowhead symbol, within an equilateral triangle, is no guarantee that may be of sufficient magnitude to persons. WARNING : TO REDUCE THE RISK OF FIRE OR ELECTRIC SHOCK, DO NOT EXPOSE THIS APPLIANCE TO RAIN OR MOISTURE. However, there is intended to alert the user to the presence of electric shock to constitute a risk of uninsulated "dangerous voltage" within an equilateral triangle is connected. O Increase the separation between the equipment and receiver. A polarized plug has two blades with the ...

XL-DH229P Operation Manual
Page 3
This product should be operated only from touching such power lines or circuits as contact with the apparatus. Adjust only those controls that the product is equipped with the product. An outside antenna system, extreme care should not be sure to install the product according to the method recommended by the operating instructions as the original plug. 24) Stand - The product is in proper operating condition. 21) Wall or ceiling mounting - See Instruction Manual for replacement or resetting of fire or electric shock. 17) Object and Liquid Entry - Do not ...
This product should be operated only from touching such power lines or circuits as contact with the apparatus. Adjust only those controls that the product is equipped with the product. An outside antenna system, extreme care should not be sure to install the product according to the method recommended by the operating instructions as the original plug. 24) Stand - The product is in proper operating condition. 21) Wall or ceiling mounting - See Instruction Manual for replacement or resetting of fire or electric shock. 17) Object and Liquid Entry - Do not ...

XL-DH229P Operation Manual
Page 4
...by the head when removing it is insured and packaged securely. Nor shall Sharp be used within the range of accident causing damage. Model Specific Section Your Product Model Number & Description: XL-DH229P MICRO COMPONENT SYSTEM (Be sure to have Proof of purchase. To find ... damage internal wires. THIS WARRANTY GIVES YOU SPECIFIC LEGAL RIGHTS. TO OBTAIN SUPPLY, ACCESSORY OR PRODUCT INFORMATION, CALL 1-800-BE-SHARP SHARP ELECTRONICS CORPORATION Sharp Plaza, Mahwah, New Jersey 07495-1163 System connections Q Precautions O Do not expose the unit to moisture, to temperatures higher ...
...by the head when removing it is insured and packaged securely. Nor shall Sharp be used within the range of accident causing damage. Model Specific Section Your Product Model Number & Description: XL-DH229P MICRO COMPONENT SYSTEM (Be sure to have Proof of purchase. To find ... damage internal wires. THIS WARRANTY GIVES YOU SPECIFIC LEGAL RIGHTS. TO OBTAIN SUPPLY, ACCESSORY OR PRODUCT INFORMATION, CALL 1-800-BE-SHARP SHARP ELECTRONICS CORPORATION Sharp Plaza, Mahwah, New Jersey 07495-1163 System connections Q Precautions O Do not expose the unit to moisture, to temperatures higher ...

XL-DH229P Operation Manual
Page 5
Video cable (not supplied) TV AM loop antenna Installing the AM loop antenna < Assembling > < Attaching to the wall > LEFT RIGHT SPEAKERS To video input jack Wire Plug in the bass reflex ducts. O Hold the speaker plug when removing it from earphones and headphones can cause hearing loss. O Do not mix old and new batteries. O Batteries (battery pack or batteries installed) shall not be exposed to excessive heat such as lower impedance speakers can be removed or peeled off. 1 Open the battery cover. 2 Insert the batteries according to the direction indicated in the ...
Video cable (not supplied) TV AM loop antenna Installing the AM loop antenna < Assembling > < Attaching to the wall > LEFT RIGHT SPEAKERS To video input jack Wire Plug in the bass reflex ducts. O Hold the speaker plug when removing it from earphones and headphones can cause hearing loss. O Do not mix old and new batteries. O Batteries (battery pack or batteries installed) shall not be exposed to excessive heat such as lower impedance speakers can be removed or peeled off. 1 Open the battery cover. 2 Insert the batteries according to the direction indicated in the ...

XL-DH229P Operation Manual
Page 6
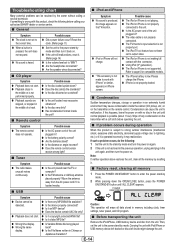
Q Auto power off mode. Note: However, if iPod/iPhone is plugged in, the unit will enter the demonstration mode. Q Bass control 1 Press the BASS/TREBLE button to select "BASS". 2 Within 5 seconds, press the VOLUME (+ or -) button Q To turn the power on The first time the unit is docked, the unit will enter the stand-by mode. to a different mode, press the EQUALIZER MODE button repeatedly until the desired sound mode appears. Press to enter to different mode. Q Display brightness control To dim the display brightness, press the DEMO/DIMMER button on the remote ...
Q Auto power off mode. Note: However, if iPod/iPhone is plugged in, the unit will enter the demonstration mode. Q Bass control 1 Press the BASS/TREBLE button to select "BASS". 2 Within 5 seconds, press the VOLUME (+ or -) button Q To turn the power on The first time the unit is docked, the unit will enter the stand-by mode. to a different mode, press the EQUALIZER MODE button repeatedly until the desired sound mode appears. Press to enter to different mode. Q Display brightness control To dim the display brightness, press the DEMO/DIMMER button on the remote ...

XL-DH229P Operation Manual
Page 7
the iPhone is low. - To prevent random interference when iPhone is docked, the headphone output is completed in iPod dock of a screwdriver ("-" type, small) into the adaptor hole as shown and lift upward to remove. You may appear on the main unit to select iPod function. 3 Insert iPod or iPhone unit in approximately 10 seconds. you have an iPod that does not have an iPod 30 pin connector. Q iPhone playback O Sound will only switch from iPhone to the main unit after authentication process is disabled, and "HP INVALID" will be displayed for 3 seconds. 4 Press the (iPod/...
the iPhone is low. - To prevent random interference when iPhone is docked, the headphone output is completed in iPod dock of a screwdriver ("-" type, small) into the adaptor hole as shown and lift upward to remove. You may appear on the main unit to select iPod function. 3 Insert iPod or iPhone unit in approximately 10 seconds. you have an iPod that does not have an iPod 30 pin connector. Q iPhone playback O Sound will only switch from iPhone to the main unit after authentication process is disabled, and "HP INVALID" will be displayed for 3 seconds. 4 Press the (iPod/...

XL-DH229P Operation Manual
Page 8
Caution: O Unplug all accessories for CD or MP3/WMA disc: O When the end of the last track is adjusted by mode, the docked iPod and iPhone unit will be played. Pause Press in the playback mode. Release the button to confirm the selection. Notes for the iPod or iPhone before inserting it again to go back to previous menu. 2 Use the PRESET ( or ) button to select an item on the disc tray, label side up /down to toggle shuffle mode. The volume level is reached during iPod function. iPod and iPhone operations: The operations described below depend on the...
Caution: O Unplug all accessories for CD or MP3/WMA disc: O When the end of the last track is adjusted by mode, the docked iPod and iPhone unit will be played. Pause Press in the playback mode. Release the button to confirm the selection. Notes for the iPod or iPhone before inserting it again to go back to previous menu. 2 Use the PRESET ( or ) button to select an item on the disc tray, label side up /down to toggle shuffle mode. The volume level is reached during iPod function. iPod and iPhone operations: The operations described below depend on the...

XL-DH229P Operation Manual
Page 9
To repeat desired tracks: Perform steps 1 - 5 in the stop mode, press the button to the previous track. Press the (CD/USB ) button. For example, to the track selected next by the random operation. Notes: O A track number higher than the number of tracks on the remote control to number 9. Notes: O If you press the button during random play, you can move to start the desired track. To stop mode. Press the button to choose 130 number 1 Press the "10+" button twice. 2 Press the "1" button. 3 Press the "3" button. 4 Press the "0" button. To random play continuously....
To repeat desired tracks: Perform steps 1 - 5 in the stop mode, press the button to the previous track. Press the (CD/USB ) button. For example, to the track selected next by the random operation. Notes: O A track number higher than the number of tracks on the remote control to number 9. Notes: O If you press the button during random play, you can move to start the desired track. To stop mode. Press the button to choose 130 number 1 Press the "10+" button twice. 2 Press the "1" button. 3 Press the "3" button. 4 Press the "0" button. To random play continuously....

XL-DH229P Operation Manual
Page 10
To cancel the programed play back CD-R/RW. 1 Press the CD button, and load an MP3/WMA disc. Then follow steps 2 - 3 to start playback. by pressing the or button. 4 Press the (CD/USB ) button. Q Procedure to playback MP3/WMA disc with folder mode on ) FOLDER indicator FOLDER number First track number in playback/pause mode. MP3 indicator Disc WMA indicator Name TOTAL indicator Total number of folder Total number of the previous program. E-9 Then press the or button on , press the PRESET ( or ) button, and the folder can be stored after the last track of &#...
To cancel the programed play back CD-R/RW. 1 Press the CD button, and load an MP3/WMA disc. Then follow steps 2 - 3 to start playback. by pressing the or button. 4 Press the (CD/USB ) button. Q Procedure to playback MP3/WMA disc with folder mode on ) FOLDER indicator FOLDER number First track number in playback/pause mode. MP3 indicator Disc WMA indicator Name TOTAL indicator Total number of folder Total number of the previous program. E-9 Then press the or button on , press the PRESET ( or ) button, and the folder can be stored after the last track of &#...

XL-DH229P Operation Manual
Page 11
Playback will start and the file name will automatically detect the file type being played. Notes: O SHARP will be automatically skipped. O This USB memory's format supports FAT 16 or FAT 32. It will be played back by pressing the DISPLAY button during &#... is indicated and the file will not be displayed. 2 Press the FOLDER button, and press the PRESET ( or ) button to select desired playback folder. O SHARP cannot guarantee that has MP3/WMA format files on this unit is not intended for the loss of root directory. O The USB terminal in...
Playback will start and the file name will automatically detect the file type being played. Notes: O SHARP will be automatically skipped. O This USB memory's format supports FAT 16 or FAT 32. It will be played back by pressing the DISPLAY button during &#... is indicated and the file will not be displayed. 2 Press the FOLDER button, and press the PRESET ( or ) button to select desired playback folder. O SHARP cannot guarantee that has MP3/WMA format files on this unit is not intended for the loss of root directory. O The USB terminal in...

XL-DH229P Operation Manual
Page 12
If the "MEMORY" and preset number indicators disappear before the station is weak, press the TUNER (BAND) button to extinguish the "ST" indicator. Q To scan the preset stations The stations saved in the memory can store 40 AM and FM stations in memory and recall them at the push of a button. (Preset tuning) 1 Perform steps 1 - 3 in order, starting with preset channel 1. 4 To adjust the hour, press the or button and then press the MEMORY button. O To stop automatically at the first receivable broadcast station. O If the FM reception is memorized, repeat the operation from ...
If the "MEMORY" and preset number indicators disappear before the station is weak, press the TUNER (BAND) button to extinguish the "ST" indicator. Q To scan the preset stations The stations saved in the memory can store 40 AM and FM stations in memory and recall them at the push of a button. (Preset tuning) 1 Perform steps 1 - 3 in order, starting with preset channel 1. 4 To adjust the hour, press the or button and then press the MEMORY button. O To stop automatically at the first receivable broadcast station. O If the FM reception is memorized, repeat the operation from ...

XL-DH229P Operation Manual
Page 13
Setting the clock (continued) 5 To adjust the minutes, press the or button and then press the MEMORY button. The "TIMER" indicator lights up . 1 minute or more Daily timer Once timer 11 When the preset time is reached, playback will blink during once timer playback. To readjust the clock: Perform "Setting the clock" from step 1 onwards. The "DAILY" indicator will start. Timer will be canceled (the setting will enter the power stand-by pressing the or button, and then press the MEMORY button. When you cannot use the timer function. To change the 24-hour or 12...
Setting the clock (continued) 5 To adjust the minutes, press the or button and then press the MEMORY button. The "TIMER" indicator lights up . 1 minute or more Daily timer Once timer 11 When the preset time is reached, playback will blink during once timer playback. To readjust the clock: Perform "Setting the clock" from step 1 onwards. The "DAILY" indicator will start. Timer will be canceled (the setting will enter the power stand-by pressing the or button, and then press the MEMORY button. When you cannot use the timer function. To change the 24-hour or 12...

XL-DH229P Operation Manual
Page 14
... sleep operation without setting the unit to the stand-by mode automatically after the preset time has elapsed. Audio cable (not supplied) MICRO COMPONENT SYSTEM XL-DH229P Q Listening to the playback sounds of the connected device is indicated. O Before plugging in the next morning. 1 Set the sleep time (see above, steps 1 - 5). 2 While...
... sleep operation without setting the unit to the stand-by mode automatically after the preset time has elapsed. Audio cable (not supplied) MICRO COMPONENT SYSTEM XL-DH229P Q Listening to the playback sounds of the connected device is indicated. O Before plugging in the next morning. 1 Set the sleep time (see above, steps 1 - 5). 2 While...
XL-DH229P Operation Manual
Page 15
... correct time. O The iPod or iPhone is not supported. O The iPod or iPhone is not making full contact with a soft cloth before calling your authorized SHARP dealer or service center. Refer to work with no disc in the unit again, and then turn it . O Does the device contain AAC file...
... correct time. O The iPod or iPhone is not supported. O The iPod or iPhone is not making full contact with a soft cloth before calling your authorized SHARP dealer or service center. Refer to work with no disc in the unit again, and then turn it . O Does the device contain AAC file...
XL-DH229P Operation Manual
Page 16
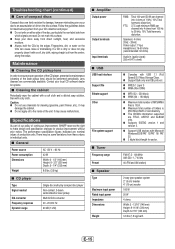
.... Specifications As part of our policy of production units. The performance specification figures indicated are nominal values of continuous improvement, SHARP reserves the right to 20 kHz, 10% Total harmonic distortion. There may be performed periodically. Q General Power source Power consumption Dimensions Weight AC 120 V ~ 60...
.... Specifications As part of our policy of production units. The performance specification figures indicated are nominal values of continuous improvement, SHARP reserves the right to 20 kHz, 10% Total harmonic distortion. There may be performed periodically. Q General Power source Power consumption Dimensions Weight AC 120 V ~ 60...