
XL3000 Operation Manual
Page 13
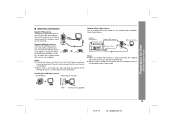
... the AM loop antenna: < Assembling > < Attaching to the AM and GND terminals. Consult your dealer. Wall Screws (not supplied) 13 01/1/17 XL-3000(U2)2.fm Supplied AM loop antenna: Connect the AM loop antenna wire to the wall > Outdoor FM or AM antenna: Use an outdoor FM or ...connected. z When static is used, disconnect the supplied FM antenna wire from the unit for Use - Place the antenna away from the FM 75 OHMS jack. Position the AM loop antenna for optimum reception. System Connections - „ Antenna connection Supplied FM antenna: Connect the FM antenna wire to the FM ...
... the AM loop antenna: < Assembling > < Attaching to the AM and GND terminals. Consult your dealer. Wall Screws (not supplied) 13 01/1/17 XL-3000(U2)2.fm Supplied AM loop antenna: Connect the AM loop antenna wire to the wall > Outdoor FM or AM antenna: Use an outdoor FM or ...connected. z When static is used, disconnect the supplied FM antenna wire from the unit for Use - Place the antenna away from the FM 75 OHMS jack. Position the AM loop antenna for optimum reception. System Connections - „ Antenna connection Supplied FM antenna: Connect the FM antenna wire to the FM ...

XL3000 Operation Manual
Page 14
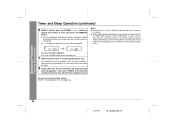
... speaker is connected to this unit into the AC outlet. Incorrect 14 Incorrect 01/1/17 XL-3000(U2)2.fm Speaker with the white line to the minus (-) terminal and the black wire to the AC power input jack, then plug the AC power cord of this unit, you face the unit. Otherwise, a malfunction... speakers can enjoy sound with a built-in amplifier White line Black Caution: z Connect the speaker wires to the speakers first, then to the SUBWOOFER OUT jack.
... speaker is connected to this unit into the AC outlet. Incorrect 14 Incorrect 01/1/17 XL-3000(U2)2.fm Speaker with the white line to the minus (-) terminal and the black wire to the AC power input jack, then plug the AC power cord of this unit, you face the unit. Otherwise, a malfunction... speakers can enjoy sound with a built-in amplifier White line Black Caution: z Connect the speaker wires to the speakers first, then to the SUBWOOFER OUT jack.
XL3000 Operation Manual
Page 26
... time is entered. Timer and Sleep Operation - To reset or change the timer setting: Perform "Timer playback" from the beginning. 26 01/1/17 XL-3000(U2)3.fm z When performing timer playback using another unit connected to start . It will start , then press the MEMORY button. Timer and Sleep ...Operation (continued) 6 Within 1 minute, press the PRESET ( or ) button to specify the minutes to the VIDEO/AUX IN jacks, select "VIDEO/AUX" in step 2. If you select TUNER, it reaches the volume you were listening at before your system enters the timer standby ...
... time is entered. Timer and Sleep Operation - To reset or change the timer setting: Perform "Timer playback" from the beginning. 26 01/1/17 XL-3000(U2)3.fm z When performing timer playback using another unit connected to start . It will start , then press the MEMORY button. Timer and Sleep ...Operation (continued) 6 Within 1 minute, press the PRESET ( or ) button to specify the minutes to the VIDEO/AUX IN jacks, select "VIDEO/AUX" in step 2. If you select TUNER, it reaches the volume you were listening at before your system enters the timer standby ...
XL3000 Operation Manual
Page 28
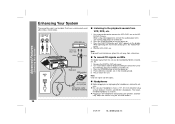
...signals on MDs The digital signal from this unit can be recorded by MiniDisc recorders, etc. 1 Remove the DIGITAL OUT jack cover. 2 Use a connection cable for digital recording „ Listening to the playback sounds from VCR, DVD, etc. ...appears on this unit and the video output to a television. 2 Press the POWER button to the VIDEO/AUX IN jacks. Adjust the volume using video equipment, connect the audio output to this unit. in or unplugging the headphones, reduce...a CD on the display. When using the VOLUME buttons. 28 01/1/17 XL-3000(U2)3.fm Advanced Features -
...signals on MDs The digital signal from this unit can be recorded by MiniDisc recorders, etc. 1 Remove the DIGITAL OUT jack cover. 2 Use a connection cable for digital recording „ Listening to the playback sounds from VCR, DVD, etc. ...appears on this unit and the video output to a television. 2 Press the POWER button to the VIDEO/AUX IN jacks. Adjust the volume using video equipment, connect the audio output to this unit. in or unplugging the headphones, reduce...a CD on the display. When using the VOLUME buttons. 28 01/1/17 XL-3000(U2)3.fm Advanced Features -

XL3000 Operation Manual
Page 30
...operated incorrectly, it is not restored in step 1, unplug and plug in memory including clock, timer settings, tuner preset, and CD program. 30 01/1/17 XL-3000(U2)3.fm If such a problem occurs, do the following: 1 Set the unit to the stand-by mode. Troubleshooting Chart / Maintenance - Troubleshooting Chart (continued... not use chemicals for cleaning (gaso- While pressing down the MEMORY/SET button and the button, plug the AC power cord into the AC INPUT jack on . 3 If neither step 1 nor 2 restores the unit, do the following: Press the POWER button to the inside of the unit. line,...
...operated incorrectly, it is not restored in step 1, unplug and plug in memory including clock, timer settings, tuner preset, and CD program. 30 01/1/17 XL-3000(U2)3.fm If such a problem occurs, do the following: 1 Set the unit to the stand-by mode. Troubleshooting Chart / Maintenance - Troubleshooting Chart (continued... not use chemicals for cleaning (gaso- While pressing down the MEMORY/SET button and the button, plug the AC power cord into the AC INPUT jack on . 3 If neither step 1 nor 2 restores the unit, do the following: Press the POWER button to the inside of the unit. line,...