
SDEX220 Operation Manual
Page 2
... loss or theft, please record below the model number and serial number which can radiate radio frequency energy and, if not installed and used in particular, specifies that may cause harmful interference to persons. This equipment generates, uses, and can be determined by turning the equipment off and on, the user is connected. NO USER-SERVICEABLE PARTS INSIDE. The exclamation point within an equilateral...
... loss or theft, please record below the model number and serial number which can radiate radio frequency energy and, if not installed and used in particular, specifies that may cause harmful interference to persons. This equipment generates, uses, and can be determined by turning the equipment off and on, the user is connected. NO USER-SERVICEABLE PARTS INSIDE. The exclamation point within an equilateral...

SDEX220 Operation Manual
Page 3
... purpose of the polarized plug. Important safety instructions - 1 Read Instructions - If replacement of the product should follow the manufacturer's instructions, and should use instructions should not be sure the service technician has used a replacement plug specified by the manufacturer, or sold with a three-wire grounding-type plug, a plug having overload protection. The product may cause the product and cart combination to . 11 Power Sources - Slots and openings...
... purpose of the polarized plug. Important safety instructions - 1 Read Instructions - If replacement of the product should follow the manufacturer's instructions, and should use instructions should not be sure the service technician has used a replacement plug specified by the manufacturer, or sold with a three-wire grounding-type plug, a plug having overload protection. The product may cause the product and cart combination to . 11 Power Sources - Slots and openings...
SDEX220 Operation Manual
Page 4
..., and f) When the product exhibits a distinct change in fire, electric shock, or other hazards. 23 Safety Check - When installing an outside antenna or cable system is left unattended and unused for service. 22 Replacement Parts - When replacement parts are covered by the operating instructions as they may result in performance - Upon completion of other controls may expose you to grounding electrodes, and...
..., and f) When the product exhibits a distinct change in fire, electric shock, or other hazards. 23 Safety Check - When installing an outside antenna or cable system is left unattended and unused for service. 22 Replacement Parts - When replacement parts are covered by the operating instructions as they may result in performance - Upon completion of other controls may expose you to grounding electrodes, and...
SDEX220 Operation Manual
Page 5
The new ENERGY STAR® labeled models will mean more than $1 billion a year in use. If every American family replaced their electronic equipment with ENERGY STAR® labeled models, it 's good for Use Remote control 11 System connections 12 - 13 To install the main unit and speakers on and when they are off. ENERGY STAR® is a U.S. ENERGY STAR® is...
The new ENERGY STAR® labeled models will mean more than $1 billion a year in use. If every American family replaced their electronic equipment with ENERGY STAR® labeled models, it 's good for Use Remote control 11 System connections 12 - 13 To install the main unit and speakers on and when they are off. ENERGY STAR® is a U.S. ENERGY STAR® is...
SDEX220 Operation Manual
Page 7
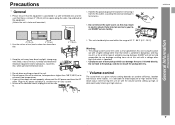
... low temperatures. SD-EX220 General Information - z Do not expose the unit to moisture, to temperatures higher than that which generate electrical noise. 4" (10 cm) z This unit should only be used must be the same as pulling the cord can damage the eyes if viewed directly. z If your local SHARP service facility. ty. „ Volume control The sound level at a given volume setting depends on speaker...
... low temperatures. SD-EX220 General Information - z Do not expose the unit to moisture, to temperatures higher than that which generate electrical noise. 4" (10 cm) z This unit should only be used must be the same as pulling the cord can damage the eyes if viewed directly. z If your local SHARP service facility. ty. „ Volume control The sound level at a given volume setting depends on speaker...

SDEX220 Operation Manual
Page 8
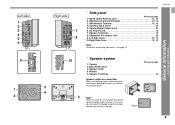
...; Display Reference page 1. FM Stereo Mode Indicator 23 6. Headphone Jack 27 5. Volume Up and Down Buttons 16 10.CD Cover Open/Close Button 18, 19 11.CD Track Down or Fast Reverse/Tuning Down Button . . . . . .19, 22 12.CD Track Up or Fast Forward/Tuning Up Button 19, 22 13.Bass/Treble Button 16 14.Power On/Stand-by Button 16 General Information - Random Play Indicator 20 8. SD-EX220 Controls...
...; Display Reference page 1. FM Stereo Mode Indicator 23 6. Headphone Jack 27 5. Volume Up and Down Buttons 16 10.CD Cover Open/Close Button 18, 19 11.CD Track Down or Fast Reverse/Tuning Down Button . . . . . .19, 22 12.CD Track Up or Fast Forward/Tuning Up Button 19, 22 13.Bass/Treble Button 16 14.Power On/Stand-by Button 16 General Information - Random Play Indicator 20 8. SD-EX220 Controls...
SDEX220 Operation Manual
Page 9
FM 75 Ohms Antenna Jack 12, 13 2. Optical Digital Output Jack 27 6. Bass Reflex Duct 3. In this case, you remove 3 the speaker grilles. 4 5 Note: When the speakers are hung on opening side covers, see page 12. Auxiliary Input Jacks 27 5. Subwoofer Pre-output Jack 28 9. Controls and indicators - 10 „ Speaker system Reference page 1. Woofer 5. AM Antenna Terminal 12, 13 4. Speaker Terminals 12 8. Left Side Cover 12, 13 10.Right Side Cover...
FM 75 Ohms Antenna Jack 12, 13 2. Optical Digital Output Jack 27 6. Bass Reflex Duct 3. In this case, you remove 3 the speaker grilles. 4 5 Note: When the speakers are hung on opening side covers, see page 12. Auxiliary Input Jacks 27 5. Subwoofer Pre-output Jack 28 9. Controls and indicators - 10 „ Speaker system Reference page 1. Woofer 5. AM Antenna Terminal 12, 13 4. Speaker Terminals 12 8. Left Side Cover 12, 13 10.Right Side Cover...

SDEX220 Operation Manual
Page 10
... 4. Program Clear Button 21 8. Timer Button 17, 24 10.Enter Button 17, 24 11.Power On/Stand-by Button 16 12.Auxiliary Button 27 13.CD Play Mode Select Button 20 14.Bass/Treble Button 16 15.Tuner (Band) Button 22 16.CD Track Up or Fast Forward/Tuning Up Button 19, 22 17.Volume Up and Down Buttons 16 18.CD/Tuner Direct Buttons 20, 23 19.CD Time Display Button 20 20.Clock Display/Dimmer Button...
... 4. Program Clear Button 21 8. Timer Button 17, 24 10.Enter Button 17, 24 11.Power On/Stand-by Button 16 12.Auxiliary Button 27 13.CD Play Mode Select Button 20 14.Bass/Treble Button 16 15.Tuner (Band) Button 22 16.CD Track Up or Fast Forward/Tuning Up Button 19, 22 17.Volume Up and Down Buttons 16 18.CD/Tuner Direct Buttons 20, 23 19.CD Time Display Button 20 20.Clock Display/Dimmer Button...

SDEX220 Operation Manual
Page 11
... on ? Remote control SD-EX220 „ Battery installation 1 Remove the battery cover. 2 Insert the supplied batteries according to battery leakage. When inserting or removing the batteries, push them toward the battery terminals. 3 Replace the cover. „ Test of the unit. The remote control can enjoy the music. Does the power turn on the unit with operation. Now, you can be used within the range shown...
... on ? Remote control SD-EX220 „ Battery installation 1 Remove the battery cover. 2 Insert the supplied batteries according to battery leakage. When inserting or removing the batteries, push them toward the battery terminals. 3 Replace the cover. „ Test of the unit. The remote control can enjoy the music. Does the power turn on the unit with operation. Now, you can be used within the range shown...

SDEX220 Operation Manual
Page 12
.... SD-EX220 System connections FM antenna AM loop antenna Right speaker Left speaker „ Speaker connection z Make sure to the unit. If the power is placed on , malfunction may be placed in the bass reflex ducts. Note: Place speakers with the gray line to the minus (-) terminal and the white wire to open side covers Open the right and left terminals of 4 ohms or...
.... SD-EX220 System connections FM antenna AM loop antenna Right speaker Left speaker „ Speaker connection z Make sure to the unit. If the power is placed on , malfunction may be placed in the bass reflex ducts. Note: Place speakers with the gray line to the minus (-) terminal and the white wire to open side covers Open the right and left terminals of 4 ohms or...

SDEX220 Operation Manual
Page 16
... the remote control. SD-EX220 General control „ Volume control Press the VOLUME (+ or -) button to increase or decrease the volume. 0 1 2 ..... 39 40 „ Bass control 1 Press the BASS/TREBLE button to select "BASS". 2 Within 3 seconds, press the VOLUME (+ or -) button to turn the power on. Wait a while. „ To change the display brightness (2 levels) When the power is plugged in properly. General control - „ To turn the power on Press the ON/STAND-BY button to adjust the bass. -5 +5 Preparation for Use...
... the remote control. SD-EX220 General control „ Volume control Press the VOLUME (+ or -) button to increase or decrease the volume. 0 1 2 ..... 39 40 „ Bass control 1 Press the BASS/TREBLE button to select "BASS". 2 Within 3 seconds, press the VOLUME (+ or -) button to turn the power on. Wait a while. „ To change the display brightness (2 levels) When the power is plugged in properly. General control - „ To turn the power on Press the ON/STAND-BY button to adjust the bass. -5 +5 Preparation for Use...

SDEX220 Operation Manual
Page 17
... change automatically to the correct time, you can only be set for the 12-hour (AM 12:00) display. 1 Press the ON/STAND-BY button to turn the power on. 2 Press the TIMER button. 3 Within 10 seconds, press the CURSOR ( or ) button to "Clearing all the memory (reset)" on page 29 for details.] 5 Press the CURSOR ( or ) but - Setting the clock SD-EX220...
... change automatically to the correct time, you can only be set for the 12-hour (AM 12:00) display. 1 Press the ON/STAND-BY button to turn the power on. 2 Press the TIMER button. 3 Within 10 seconds, press the CURSOR ( or ) button to "Clearing all the memory (reset)" on page 29 for details.] 5 Press the CURSOR ( or ) but - Setting the clock SD-EX220...

SDEX220 Operation Manual
Page 23
... of a button. (Preset tuning) 1 Perform steps 1 - 3 in memory. SD-EX220 23 z " " will appear when an FM broadcast is in a preset memory number, the preset station is stored in stereo. After use: Press the ON/STAND-BY button to enter the power stand-by the two-digit number. When another station is replaced. Preset channel Frequency and frequency band Radio - The reception changes to select the preset channel number. To receive an FM stereo transmission: Press the TUNER (BAND) button to change a preset sta...
... of a button. (Preset tuning) 1 Perform steps 1 - 3 in memory. SD-EX220 23 z " " will appear when an FM broadcast is in a preset memory number, the preset station is stored in stereo. After use: Press the ON/STAND-BY button to enter the power stand-by the two-digit number. When another station is replaced. Preset channel Frequency and frequency band Radio - The reception changes to select the preset channel number. To receive an FM stereo transmission: Press the TUNER (BAND) button to change a preset sta...

SDEX220 Operation Manual
Page 24
... plays the desired source (CD, tuner) at the preset time. ton to specify the hour to start, and press the ENTER button. 6 Press the CURSOR ( or ) but - Advanced Features - If it is changed, the ending time will automatically be turned off automatically. TER button. 5 Press the CURSOR ( or ) but - Sleep operation: The radio and compact disc player can be set , you cannot use the timer function. 2 Prepare the sound source...
... plays the desired source (CD, tuner) at the preset time. ton to specify the hour to start, and press the ENTER button. 6 Press the CURSOR ( or ) but - Advanced Features - If it is changed, the ending time will automatically be turned off automatically. TER button. 5 Press the CURSOR ( or ) but - Sleep operation: The radio and compact disc player can be set , you cannot use the timer function. 2 Prepare the sound source...

SDEX220 Operation Manual
Page 25
... set . Changing the timer setting: Turn the power on or off). The same operation can be canceled). When the finish time is reached: The unit is possible with a CD even if the repeat, random, or pro- The timer playback indicator flashes. Notes: z The timer playback is set the timer again. Set the unit to select the desired function (CD, TUNER or AUX). 10Press the ENTER button...
... set . Changing the timer setting: Turn the power on or off). The same operation can be canceled). When the finish time is reached: The unit is possible with a CD even if the repeat, random, or pro- The timer playback indicator flashes. Notes: z The timer playback is set the timer again. Set the unit to select the desired function (CD, TUNER or AUX). 10Press the ENTER button...

SDEX220 Operation Manual
Page 27
... input jack VCR, DVD, etc. Red (CD only) RCA cord (not supplied) Audio signal Connection cable for digital recording to connect the unit to connect the VCR, DVD, etc. z Be sure your system - Adjust the volume using the jack, replace the cap. in the recording mode. 6 Play a CD on this unit can be recorded by mode and turn the power on. 5 Put the MiniDisc recorder, etc. z Only CD signals can be output. „ Headphones z Before plugging...
... input jack VCR, DVD, etc. Red (CD only) RCA cord (not supplied) Audio signal Connection cable for digital recording to connect the unit to connect the VCR, DVD, etc. z Be sure your system - Adjust the volume using the jack, replace the cap. in the recording mode. 6 Play a CD on this unit can be recorded by mode and turn the power on. 5 Put the MiniDisc recorder, etc. z Only CD signals can be output. „ Headphones z Before plugging...

SDEX220 Operation Manual
Page 28
... using the SUBWOOFER PRE OUT jack. continuously. z The preset channel cannot be connected to "0"? z Are the speaker wires disconnected? z Is the FM/AM loop antenna placed properly? z If the unit still malfunctions, reset it back on the TV screen may not function properly. z When a radio or TV which an amplifier is placed near the unit, the picture on . To subwoofer output jack Audio cable (commercially available) Subwoofer signal Commercially available subwoofer (amplifier built in . SD-EX220 Troubleshooting...
... using the SUBWOOFER PRE OUT jack. continuously. z The preset channel cannot be connected to "0"? z Are the speaker wires disconnected? z Is the FM/AM loop antenna placed properly? z If the unit still malfunctions, reset it back on the TV screen may not function properly. z When a radio or TV which an amplifier is placed near the unit, the picture on . To subwoofer output jack Audio cable (commercially available) Subwoofer signal Commercially available subwoofer (amplifier built in . SD-EX220 Troubleshooting...

SDEX220 Operation Manual
Page 29
... memory (reset) 1 Press the ON/STAND-BY button to the unit or the CD. Please open the CD cover to the power stand-by mode and turn the power on the remote control. z Has condensation formed inside the unit? „ Remote control Symptom Possible cause z The remote control does not oper- z Has condensation formed inside the unit? z Is the battery polarity correct? SD-EX220 References...
... memory (reset) 1 Press the ON/STAND-BY button to the unit or the CD. Please open the CD cover to the power stand-by mode and turn the power on the remote control. z Has condensation formed inside the unit? „ Remote control Symptom Possible cause z The remote control does not oper- z Has condensation formed inside the unit? z Is the battery polarity correct? SD-EX220 References...

SDEX220 Operation Manual
Page 31
...) 8.2 lbs. (3.7 kg) Speakers: 4 ohms Headphones: 16 - 50 ohms (recommended: 32 ohms) Optical digital output Subwoofer pre-out (audio signal): 200 mV/10 k ohms at 70 Hz Auxiliary input: 500 mV/47 k ohms „ Amplifier Amplification system Power output A/D noise shaping 64fs 1-bit switching (Remarks: fs = 44.1 kHz) 80 watts minimum RMS per channel into 4 ohms from 40 Hz to make design and specification changes for product improvement without prior notice. Specifications As part of our...
...) 8.2 lbs. (3.7 kg) Speakers: 4 ohms Headphones: 16 - 50 ohms (recommended: 32 ohms) Optical digital output Subwoofer pre-out (audio signal): 200 mV/10 k ohms at 70 Hz Auxiliary input: 500 mV/47 k ohms „ Amplifier Amplification system Power output A/D noise shaping 64fs 1-bit switching (Remarks: fs = 44.1 kHz) 80 watts minimum RMS per channel into 4 ohms from 40 Hz to make design and specification changes for product improvement without prior notice. Specifications As part of our...
SDEX220 Operation Manual
Page 32
... rights under this information available when you . Model Specific Section Your Product Model Number & Description: SD-EX220 1-Bit Digital Audio System Warranty Period for the period(s) set forth below. Be sure to have Proof of purchase. If you . Neither the sales personnel of the seller nor any other person is...the nearest Sharp Authorized Servicer, call Sharp toll free at no event shall Sharp be liable or in the manner and for your Product to you ship the Product, be the sole and exclusive remedy available to you need service for the period of time described herein,...
... rights under this information available when you . Model Specific Section Your Product Model Number & Description: SD-EX220 1-Bit Digital Audio System Warranty Period for the period(s) set forth below. Be sure to have Proof of purchase. If you . Neither the sales personnel of the seller nor any other person is...the nearest Sharp Authorized Servicer, call Sharp toll free at no event shall Sharp be liable or in the manner and for your Product to you ship the Product, be the sole and exclusive remedy available to you need service for the period of time described herein,...


