MX-M550 | MX-M620 | MX-M700 Operation Manual
Page 11
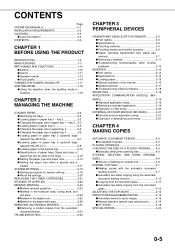
... the auditing mode is loaded 2-17 SYSTEM SETTINGS 2-18 ● General procedure for system settings 2-18 ● About the settings 2-20 REPLACING THE TONER CARTRIDGES 2-21 STORAGE OF SUPPLIES 2-22 MISFEED REMOVAL 2-23 ● Misfeed removal guidance 2-23 ● Misfeed in the transport area, fusing area, and ...● Specifications of paper trays (Types and sizes of the inserter 3-15 ● Misfeed removal 3-17 ● Troubleshooting inserter problems 3-18 SHARP OSA 3-19 APPLICATION COMMUNICATION MODULE (MX- tray 2 2-2 ● Changing the paper size in paper tray 1 -
... the auditing mode is loaded 2-17 SYSTEM SETTINGS 2-18 ● General procedure for system settings 2-18 ● About the settings 2-20 REPLACING THE TONER CARTRIDGES 2-21 STORAGE OF SUPPLIES 2-22 MISFEED REMOVAL 2-23 ● Misfeed removal guidance 2-23 ● Misfeed in the transport area, fusing area, and ...● Specifications of paper trays (Types and sizes of the inserter 3-15 ● Misfeed removal 3-17 ● Troubleshooting inserter problems 3-18 SHARP OSA 3-19 APPLICATION COMMUNICATION MODULE (MX- tray 2 2-2 ● Changing the paper size in paper tray 1 -
MX-M550 | MX-M620 | MX-M700 Operation Manual
Page 22
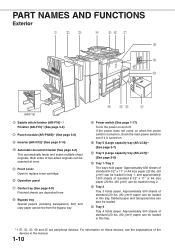
... Tray 3 Tray 3 holds paper. If the power does not come on when the power switch is turned on, check the main power switch to replace toner cartridge. 6 Operation panel 7 Center tray (See page 4-9) Finished sheets are peripheral devices. PART NAMES AND FUNCTIONS Exterior (AR-F15) 1 Saddle stitch finisher (AR-F16)*1 / Finisher (AR...
... Tray 3 Tray 3 holds paper. If the power does not come on when the power switch is turned on, check the main power switch to replace toner cartridge. 6 Operation panel 7 Center tray (See page 4-9) Finished sheets are peripheral devices. PART NAMES AND FUNCTIONS Exterior (AR-F15) 1 Saddle stitch finisher (AR-F16)*1 / Finisher (AR...
MX-M550 | MX-M620 | MX-M700 Operation Manual
Page 23
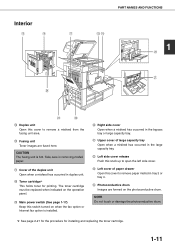
... in removing misfed paper. 17 Cover of paper drawer Open this cover to remove paper misfed in duplex unit. 18 Toner cartridge*2 This holds toner for installing and replacing the toner cartridge. 1-11 NOTE Do not touch or damage the photoconductive drum. *2 See page 2-21 for the procedure for printing....FUNCTIONS 1 15 Duplex unit Open this cover to remove a misfeed from the fusing unit area. 16 Fusing unit Toner images are formed on the photoconductive drum. The toner cartridge must be replaced when indicated on the operation panel. 19 Main power switch (See page 1-17) Keep this switch...
... in removing misfed paper. 17 Cover of paper drawer Open this cover to remove paper misfed in duplex unit. 18 Toner cartridge*2 This holds toner for installing and replacing the toner cartridge. 1-11 NOTE Do not touch or damage the photoconductive drum. *2 See page 2-21 for the procedure for printing....FUNCTIONS 1 15 Duplex unit Open this cover to remove a misfeed from the fusing unit area. 16 Fusing unit Toner images are formed on the photoconductive drum. The toner cartridge must be replaced when indicated on the operation panel. 19 Main power switch (See page 1-17) Keep this switch...
MX-M550 | MX-M620 | MX-M700 Operation Manual
Page 31
It also contains information about supplies. CHAPTER 2 MANAGING THE MACHINE This chapter explains how to load paper, replace the toner cartridge, and remove paper misfeeds. tray 2 2-3 ● Loading paper in paper tray 3 2-5 ● Changing the paper size in paper tray 3 2-5... special size is loaded 2-17 SYSTEM SETTINGS 2-18 ● General procedure for system settings 2-18 ● About the settings 2-20 REPLACING THE TONER CARTRIDGES 2-21 STORAGE OF SUPPLIES 2-22 MISFEED REMOVAL 2-23 ● Misfeed removal guidance 2-23 ● Misfeed in the transport area, fusing area, and...
It also contains information about supplies. CHAPTER 2 MANAGING THE MACHINE This chapter explains how to load paper, replace the toner cartridge, and remove paper misfeeds. tray 2 2-3 ● Loading paper in paper tray 3 2-5 ● Changing the paper size in paper tray 3 2-5... special size is loaded 2-17 SYSTEM SETTINGS 2-18 ● General procedure for system settings 2-18 ● About the settings 2-20 REPLACING THE TONER CARTRIDGES 2-21 STORAGE OF SUPPLIES 2-22 MISFEED REMOVAL 2-23 ● Misfeed removal guidance 2-23 ● Misfeed in the transport area, fusing area, and...

MX-M550 | MX-M620 | MX-M700 Operation Manual
Page 51
... the bag, insert it in as shown at left. 2 2 Remove the toner cartridge gently. 4 Insert the new toner cartridge. Align the toner cartridge with both hands as shown in the diagram in order to replace the toner cartridge. 1 Open the front cover. The percentage of toner remaining, hold down the [COPY] key during printing or when the machine is...
... the bag, insert it in as shown at left. 2 2 Remove the toner cartridge gently. 4 Insert the new toner cartridge. Align the toner cartridge with both hands as shown in the diagram in order to replace the toner cartridge. 1 Open the front cover. The percentage of toner remaining, hold down the [COPY] key during printing or when the machine is...

MX-M550 | MX-M620 | MX-M700 Operation Manual
Page 52
... down within the scope of the ordinary use only Sharp Genuine Supplies which are those parts which may curl or become damp, resulting in a location that can replaced by the user include paper, toner cartridges, and staple cartridges for the finisher. Do not store it standing on...tested to direct sunlight. 2. For best copying results, be considered as spare parts. Paper stored in the wrapper and lying flat. 3. Store a new toner cartridge box horizontally. Supply and Consumables The supply of spare parts for a repair of the appliance is : ● clean and dry, ● at ...
... down within the scope of the ordinary use only Sharp Genuine Supplies which are those parts which may curl or become damp, resulting in a location that can replaced by the user include paper, toner cartridges, and staple cartridges for the finisher. Do not store it standing on...tested to direct sunlight. 2. For best copying results, be considered as spare parts. Paper stored in the wrapper and lying flat. 3. Store a new toner cartridge box horizontally. Supply and Consumables The supply of spare parts for a repair of the appliance is : ● clean and dry, ● at ...

MX-M550 | MX-M620 | MX-M700 Operation Manual
Page 62
...power switch, unplug the power cord. The printer is warming up. (Warm-up time is A message appears saying that requires service. Replace the toner cartridge. (Page 2-21) Message indicating a paper misfeed displayed? Remove misfed paper. (Page 2-23) Copying/printing not possible. Use paper that can...about 10 seconds, and then turn off ? is approximately 120 seconds.) Wait until the READY indicator lights up. If you contact your Sharp dealer, please tell your Sharp dealer. switch. (Page 1-17) The machine does not operate. Do not place more than the maximum number of paper sizes 11"...
...power switch, unplug the power cord. The printer is warming up. (Warm-up time is A message appears saying that requires service. Replace the toner cartridge. (Page 2-21) Message indicating a paper misfeed displayed? Remove misfed paper. (Page 2-23) Copying/printing not possible. Use paper that can...about 10 seconds, and then turn off ? is approximately 120 seconds.) Wait until the READY indicator lights up. If you contact your Sharp dealer, please tell your Sharp dealer. switch. (Page 1-17) The machine does not operate. Do not place more than the maximum number of paper sizes 11"...

MX-M550 | MX-M620 | MX-M700 Operation Manual
Page 196
...Quick File folder 7-3 [QUICK FILE FOLDER] key 7-5 ■R [READ-END] key 4-12, 5-8 to 5-9 Reduction 4-15 Reduction/Enlargement 1-4, 4-15 Replacing the toner cartridges 2-21 Right side cover 1-11 Rotation copying 4-4 ■S Saddle stitch 1-8, 3-5 Saddle stitch finisher 1-10, 3-2 Saddle stitch tray 3-2 [SADDLE STITCH] key 3-6 ...20 Sending address list 2-20 Setting the paper size 2-14 to 2-17 Setting the paper type 2-14 to 2-16 Sharing 7-3 Sharp OSA 3-19 Sort 1-3, 3-4, 4-9 [SORT] key 3-6 Special modes (Copier operation 5-2 Special modes (Document filing function 7-12 Special...
...Quick File folder 7-3 [QUICK FILE FOLDER] key 7-5 ■R [READ-END] key 4-12, 5-8 to 5-9 Reduction 4-15 Reduction/Enlargement 1-4, 4-15 Replacing the toner cartridges 2-21 Right side cover 1-11 Rotation copying 4-4 ■S Saddle stitch 1-8, 3-5 Saddle stitch finisher 1-10, 3-2 Saddle stitch tray 3-2 [SADDLE STITCH] key 3-6 ...20 Sending address list 2-20 Setting the paper size 2-14 to 2-17 Setting the paper type 2-14 to 2-16 Sharing 7-3 Sharp OSA 3-19 Sort 1-3, 3-4, 4-9 [SORT] key 3-6 Special modes (Copier operation 5-2 Special modes (Document filing function 7-12 Special...


