Operation Guide
Page 3
... 61 ● HOW "BYPASS TRAY" AND "BYPASS MANUAL" DIFFER IN THE "PAPER SOURCE" SETTINGS 61 ● OPENING THE PRINTER DRIVER FROM THE "Start" BUTTON 62 PRINTER DRIVER SETTING SCREEN........... 63 ● PRINTING MULTIPLE PAGES ON ONE PAGE...64 ● FITTING THE PRINTED IMAGE TO THE PAPER (Fit To ... 68 SAVING FREQUENTLY USED PRINT SETTINGS 69 ● SAVING SETTINGS AT THE TIME OF PRINTING (User Settings 69 OUTLINE OF THE PRINT STATUS WINDOW..... 70 5 SCANNER FUNCTIONS SCANNING OVERVIEW 71 SCANNING USING THE KEYS ON THE MACHINE 72 BUTTON MANAGER 73 ● BUTTON MANAGER SETTINGS 74...
... 61 ● HOW "BYPASS TRAY" AND "BYPASS MANUAL" DIFFER IN THE "PAPER SOURCE" SETTINGS 61 ● OPENING THE PRINTER DRIVER FROM THE "Start" BUTTON 62 PRINTER DRIVER SETTING SCREEN........... 63 ● PRINTING MULTIPLE PAGES ON ONE PAGE...64 ● FITTING THE PRINTED IMAGE TO THE PAPER (Fit To ... 68 SAVING FREQUENTLY USED PRINT SETTINGS 69 ● SAVING SETTINGS AT THE TIME OF PRINTING (User Settings 69 OUTLINE OF THE PRINT STATUS WINDOW..... 70 5 SCANNER FUNCTIONS SCANNING OVERVIEW 71 SCANNING USING THE KEYS ON THE MACHINE 72 BUTTON MANAGER 73 ● BUTTON MANAGER SETTINGS 74...
Operation Guide
Page 7
... install the software using the installer. 6 Downloaded from your computer to use the scanner menus on which any of the machine. The printer driver includes the Print Status Window. Sharpdesk Sharpdesk is a utility that monitors the machine and informs you of the printing status, the name of the machine. This is an...
... install the software using the installer. 6 Downloaded from your computer to use the scanner menus on which any of the machine. The printer driver includes the Print Status Window. Sharpdesk Sharpdesk is a utility that monitors the machine and informs you of the printing status, the name of the machine. This is an...
Operation Guide
Page 9
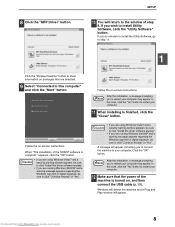
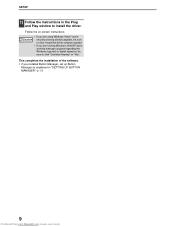
...you are selected. 9 Select "Connected to install Utility Software, click the "Utility Software" button. In this driver software anyway". • If you to the window of the SHARP software is complete." Follow the on -screen instructions. A message will appear. 8 Downloaded from www.Manualslib.com ...this computer" and click the "Next" button. 8 Click the "MFP Driver" button. Follow the on -screen instructions. Note After the installation, a message prompting you are using Windows Vista/7 and a security warning window appears, be sure to click "Install this case, click the "Yes"...
...you are selected. 9 Select "Connected to install Utility Software, click the "Utility Software" button. In this driver software anyway". • If you to the window of the SHARP software is complete." Follow the on -screen instructions. A message will appear. 8 Downloaded from www.Manualslib.com ...this computer" and click the "Next" button. 8 Click the "MFP Driver" button. Follow the on -screen instructions. Note After the installation, a message prompting you are using Windows Vista/7 and a security warning window appears, be sure to click "Install this case, click the "Yes"...
Operation Guide
Page 10
...a warning message appears regarding the Windows logo test or digital signature, be sure to install the driver. This completes the installation of the software. • If you are using Windows Vista/7 and a security warning window appears, be sure to click "Install this driver software anyway". • If... you installed Button Manager, set up Button Manager as explained in the Plug and Play window to click "Continue Anyway" or "Yes"....
...a warning message appears regarding the Windows logo test or digital signature, be sure to install the driver. This completes the installation of the software. • If you are using Windows Vista/7 and a security warning window appears, be sure to click "Install this driver software anyway". • If... you installed Button Manager, set up Button Manager as explained in the Plug and Play window to click "Continue Anyway" or "Yes"....
Operation Guide
Page 11
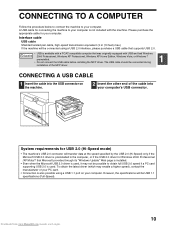
..." Web page is installed. • Even when the Microsoft USB 2.0 driver is available with USB and had Windows 2000 Professional, Windows XP Professional, Windows XP Home Edition, Windows Vista, or Windows 7 preinstalled. • Do not connect the USB cable before installing the MFP driver. Caution • USB is used . Downloaded from www.Manualslib.com manuals search engine...
..." Web page is installed. • Even when the Microsoft USB 2.0 driver is available with USB and had Windows 2000 Professional, Windows XP Professional, Windows XP Home Edition, Windows Vista, or Windows 7 preinstalled. • Do not connect the USB cable before installing the MFP driver. Caution • USB is used . Downloaded from www.Manualslib.com manuals search engine...
Operation Guide
Page 12
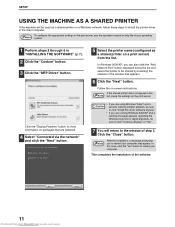
...the printer name (configured as a shared printer on a Windows network, follow these steps to install the printer driver in the Note list, check the settings on a print server) from www.Manualslib.com manuals search engine In Windows 2000/XP, you can also click the "Add Network Port...button. SETUP USING THE MACHINE AS A SHARED PRINTER If the machine will return to the window of step 3. In this driver software anyway". • If you are using Windows Vista/7 and a Caution security warning window appears, be used as a shared printer on the print server. • If you...
...the printer name (configured as a shared printer on a Windows network, follow these steps to install the printer driver in the Note list, check the settings on a print server) from www.Manualslib.com manuals search engine In Windows 2000/XP, you can also click the "Add Network Port...button. SETUP USING THE MACHINE AS A SHARED PRINTER If the machine will return to the window of step 3. In this driver software anyway". • If you are using Windows Vista/7 and a Caution security warning window appears, be used as a shared printer on the print server. • If you...
Operation Guide
Page 13
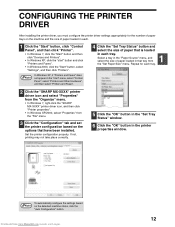
...DRIVER After installing the printer driver, you must configure the printer driver settings appropriately for each tray. 2 Click the "SHARP MX-XXXX" printer driver icon and select "Properties" from the "Organize" menu. • In Windows 7, right-click the "SHARP MX-XXXX" printer driver icon, and then click "Printer properties". • In Windows..."Start" button, click "Control Panel", and then click "Printer". • In Windows 7, click the "Start" button and then click "Devices and Printers". • In Windows XP, click the "start " menu, select "Control Panel", select "Printers and Other...
...DRIVER After installing the printer driver, you must configure the printer driver settings appropriately for each tray. 2 Click the "SHARP MX-XXXX" printer driver icon and select "Properties" from the "Organize" menu. • In Windows 7, right-click the "SHARP MX-XXXX" printer driver icon, and then click "Printer properties". • In Windows..."Start" button, click "Control Panel", and then click "Printer". • In Windows 7, click the "Start" button and then click "Devices and Printers". • In Windows XP, click the "start " menu, select "Control Panel", select "Printers and Other...
Operation Guide
Page 14
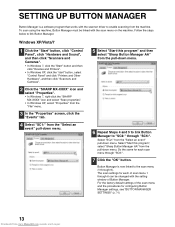
...click "Printers and Other Hardware", and then click "Scanners and Cameras". 2 Click the "SHARP MX-XXXX" icon and select "Properties". • In Windows 7, right-click the "SHARP MX-XXXX" icon and select "Scan properties". • In Windows XP, select "Properties" from the "File" menu. 3 In the "Properties" screen, ...", select "Sharp Button Manager AA" from www.Manualslib.com manuals search engine Select "SC2:" from the pull-down menu. For the factory default settings of scan menu 1 through "SC6:". Button Manager is a software program that works with the scanner driver to enable ...
...click "Printers and Other Hardware", and then click "Scanners and Cameras". 2 Click the "SHARP MX-XXXX" icon and select "Properties". • In Windows 7, right-click the "SHARP MX-XXXX" icon and select "Scan properties". • In Windows XP, select "Properties" from the "File" menu. 3 In the "Properties" screen, ...", select "Sharp Button Manager AA" from www.Manualslib.com manuals search engine Select "SC2:" from the pull-down menu. For the factory default settings of scan menu 1 through "SC6:". Button Manager is a software program that works with the scanner driver to enable ...

Operation Guide
Page 16
...double-click the "System" icon. 3 Click the "Hardware" tab and then click the "Driver Signing" button. 4 Check "What action do you can use the USB port. The driver cannot be installed (Windows 2000/XP) If the driver cannot be possible to check your computer's settings. 1 Click the "start " button, click ..., click the "start " button and then click "Control Panel". If these steps to install the driver. Plug and Play window does not appear If the Plug and Play window does not appear after you must check your controller chipset type and Root Hub. TROUBLESHOOTING If the software ...
...double-click the "System" icon. 3 Click the "Hardware" tab and then click the "Driver Signing" button. 4 Check "What action do you can use the USB port. The driver cannot be installed (Windows 2000/XP) If the driver cannot be possible to check your computer's settings. 1 Click the "start " button, click ..., click the "start " button and then click "Control Panel". If these steps to install the driver. Plug and Play window does not appear If the Plug and Play window does not appear after you must check your controller chipset type and Root Hub. TROUBLESHOOTING If the software ...

Operation Guide
Page 17
...• In Windows 2000, double-click the "System" icon, click the "Hardware" tab, and click the "Device Manager" button. 3 Click the icon beside "Other devices". For more information, refer to your computer. 5 If "SHARP MX-XXXX" appears, select and delete the item. SETUP The driver cannot be correctly ...installed by Plug and Play If the driver cannot be correctly installed by Plug and Play (for example, Plug and Play takes...
...• In Windows 2000, double-click the "System" icon, click the "Hardware" tab, and click the "Device Manager" button. 3 Click the icon beside "Other devices". For more information, refer to your computer. 5 If "SHARP MX-XXXX" appears, select and delete the item. SETUP The driver cannot be correctly ...installed by Plug and Play If the driver cannot be correctly installed by Plug and Play (for example, Plug and Play takes...
Operation Guide
Page 62
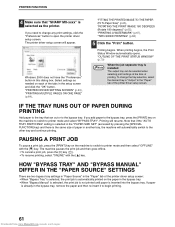
..." with the [ ] key. When printing begins, the Print Status Window automatically opens. If you need to change the tray selection, select the desired tray in "Output" in this dialog box. The printer driver setup screen will resume. "PRINTER DRIVER SETTING SCREEN" (p.63), "PRINTING MULTIPLE PAGES ON ONE PAGE" (p.64...needed on the machine to switch to printer mode and then select "OFFLINE" with the [ ] key. PRINTER FUNCTIONS 4 Make sure that "SHARP MX-xxxx" is already in the bypass tray, remove the paper and then re-insert it to begin printing. 61 Downloaded from www.Manualslib.com...
..." with the [ ] key. When printing begins, the Print Status Window automatically opens. If you need to change the tray selection, select the desired tray in "Output" in this dialog box. The printer driver setup screen will resume. "PRINTER DRIVER SETTING SCREEN" (p.63), "PRINTING MULTIPLE PAGES ON ONE PAGE" (p.64...needed on the machine to switch to printer mode and then select "OFFLINE" with the [ ] key. PRINTER FUNCTIONS 4 Make sure that "SHARP MX-xxxx" is already in the bypass tray, remove the paper and then re-insert it to begin printing. 61 Downloaded from www.Manualslib.com...

Operation Guide
Page 63
...", select "Printers and Other Hardware", and then select "Printers and Faxes". 2 Click the "SHARP MX-XXXX" printer driver icon. 3 Select "Properties" from the "Organize" menu. 4 • In Windows 7, right-click the "SHARP MX-XXXX" printer driver icon, and then click "Printer properties". • In Windows XP/2000, select "Properties" from www.Manualslib.com manuals search engine 62 PRINTER...
...", select "Printers and Other Hardware", and then select "Printers and Faxes". 2 Click the "SHARP MX-XXXX" printer driver icon. 3 Select "Properties" from the "Organize" menu. 4 • In Windows 7, right-click the "SHARP MX-XXXX" printer driver icon, and then click "Printer properties". • In Windows XP/2000, select "Properties" from www.Manualslib.com manuals search engine 62 PRINTER...
Operation Guide
Page 70
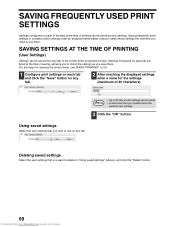
... "BASIC PRINTING" (p.60). 1 Configure print settings on each tab and click the "Save" button on any tab of the printer driver properties window. Using saved settings Select the user settings that you wish to use them . SAVING SETTINGS AT THE TIME OF PRINTING (User Settings) Settings can be ...
... "BASIC PRINTING" (p.60). 1 Configure print settings on each tab and click the "Save" button on any tab of the printer driver properties window. Using saved settings Select the user settings that you wish to use them . SAVING SETTINGS AT THE TIME OF PRINTING (User Settings) Settings can be ...
Operation Guide
Page 72
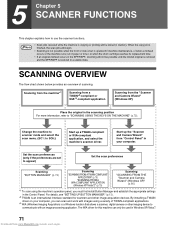
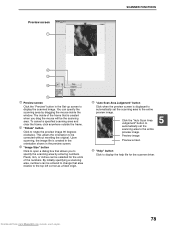
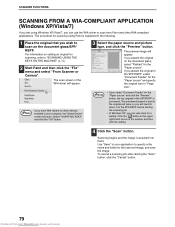
... search engine For details, see "SETTING UP BUTTON MANAGER" (p.13). *2 TWAIN is a Windows function that allows a scanner, digital camera or other image acquisition devices. By installing a TWAIN driver on your computer. Set the scan preferences (only if the preferences are set to use the...TWAIN-compliant or WIA-compliant application, and select the machine's scanner driver. When the copy job is finished, the scan jobs will be used in Windows XP/Vista/7. 71 Downloaded from the "Scanner and Camera Wizard" (Windows XP) Place the original in the Control Panel. Note •...
... search engine For details, see "SETTING UP BUTTON MANAGER" (p.13). *2 TWAIN is a Windows function that allows a scanner, digital camera or other image acquisition devices. By installing a TWAIN driver on your computer. Set the scan preferences (only if the preferences are set to use the...TWAIN-compliant or WIA-compliant application, and select the machine's scanner driver. When the copy job is finished, the scan jobs will be used in Windows XP/Vista/7. 71 Downloaded from the "Scanner and Camera Wizard" (Windows XP) Place the original in the Control Panel. Note •...

Operation Guide
Page 76
... rotates the preview image 90 degrees clockwise, allowing you can also select "WIA-SHARP MX-XXXX" to scan using Windows XP/Vista/7, you to correct the orientation without resetting the original. "Scanner driver settings" (p.77) 75 Downloaded from www.Manualslib.com manuals search engine • If you selected "...it to be used with a variety of your system, "SHARP MFP TWAIN AA 1.0 (32-32)" and "WIA-SHARP MX-XXXX 1.0 (32-32)" may appear in the preview screen. Note If you placed a one-sided original in Windows XP. For more information, refer to scan from WIA-compliant ...
... rotates the preview image 90 degrees clockwise, allowing you can also select "WIA-SHARP MX-XXXX" to scan using Windows XP/Vista/7, you to correct the orientation without resetting the original. "Scanner driver settings" (p.77) 75 Downloaded from www.Manualslib.com manuals search engine • If you selected "...it to be used with a variety of your system, "SHARP MFP TWAIN AA 1.0 (32-32)" and "WIA-SHARP MX-XXXX 1.0 (32-32)" may appear in the preview screen. Note If you placed a one-sided original in Windows XP. For more information, refer to scan from WIA-compliant ...

Operation Guide
Page 78
...] is clicked. Note To cancel a scanning job after the "Scan" button is selected in the preview screen to close the scanner driver setup screen. 77 Downloaded from www.Manualslib.com manuals search engine Selections are correct. To return to display Help. 3 "Image Area"..., switch to scan an original using the selected settings. SCANNER FUNCTIONS Scanner driver settings The scanner driver setup screen consists of the "Set-up screen 1 2 3 4 5 6 7 1 "Scanning Position" menu ("Scanning Source" in the preview window. 4 "Zoom Preview" checkbox When this Note setting is placed. If ...
...] is clicked. Note To cancel a scanning job after the "Scan" button is selected in the preview screen to close the scanner driver setup screen. 77 Downloaded from www.Manualslib.com manuals search engine Selections are correct. To return to display Help. 3 "Image Area"..., switch to scan an original using the selected settings. SCANNER FUNCTIONS Scanner driver settings The scanner driver setup screen consists of the "Set-up screen 1 2 3 4 5 6 7 1 "Scanning Position" menu ("Scanning Source" in the preview window. 4 "Zoom Preview" checkbox When this Note setting is placed. If ...
Operation Guide
Page 79
... 2 3 4 5 1 Preview screen Click the "Preview" button in the preview screen. 3 "Image Size" button Click to rotate the preview image 90 degrees clockwise. The inside the window. Pixels, mm, or inches can be entered to change that area relative to the top left corner as a fixed origin. 4 "Auto Scan Area Judgement" button... manuals search engine 78 By initially specifying a scanning area, numbers can specify the scanning area by entering numbers. You can be selected for the scanner driver. Upon scanning, the image file is created when you to be the scanning area.
... 2 3 4 5 1 Preview screen Click the "Preview" button in the preview screen. 3 "Image Size" button Click to rotate the preview image 90 degrees clockwise. The inside the window. Pixels, mm, or inches can be entered to change that area relative to the top left corner as a fixed origin. 4 "Auto Scan Area Judgement" button... manuals search engine 78 By initially specifying a scanning area, numbers can specify the scanning area by entering numbers. You can be selected for the scanner driver. Upon scanning, the image file is created when you to be the scanning area.
Operation Guide
Page 80
The procedure for the scanned image, and save the image. The scan screen of the window and then click the setting. 4 Click the "Scan" button. Select "SHARP MX-XXXX" and click the "OK" button. 3 Select the paper source and picture type, and click the "Preview" button. Note • If you select "...the "Scan" button, click the "Cancel" button. 79 Downloaded from Paint and other devices installed in the upper right-hand corner of the WIA driver will appear. If you placed the original on the document glass, select "Flatbed" for the "Paper source" and specify the original size in ...
The procedure for the scanned image, and save the image. The scan screen of the window and then click the setting. 4 Click the "Scan" button. Select "SHARP MX-XXXX" and click the "OK" button. 3 Select the paper source and picture type, and click the "Preview" button. Note • If you select "...the "Scan" button, click the "Cancel" button. 79 Downloaded from Paint and other devices installed in the upper right-hand corner of the WIA driver will appear. If you placed the original on the document glass, select "Flatbed" for the "Paper source" and specify the original size in ...

Operation Guide
Page 88
.... Copy job is performed. → Wait until the copy job is not correct. In Windows 2000, click the "Start" button, select "Settings" and then click "Printers". 2 If the "SHARP MX-XXXX" printer driver icon is set to off-line mode. → If the ONLINE indicator is not on,...this section, troubleshooting information can also be sure you have selected "SHARP MX-XXXX" (where XXXX is enabled in the printer driver. The port setting is not correct. → Printing is not possible if the printer driver port setting is complete. Set the port correctly. For information on ...
.... Copy job is performed. → Wait until the copy job is not correct. In Windows 2000, click the "Start" button, select "Settings" and then click "Printers". 2 If the "SHARP MX-XXXX" printer driver icon is set to off-line mode. → If the ONLINE indicator is not on,...this section, troubleshooting information can also be sure you have selected "SHARP MX-XXXX" (where XXXX is enabled in the printer driver. The port setting is not correct. → Printing is not possible if the printer driver port setting is complete. Set the port correctly. For information on ...

Operation Guide
Page 119
...If you do not want auto clear to use USB 2.0 (Hi-Speed mode): The computer is running Windows Vista/XP/2000 and the Microsoft USB 2.0 driver is pre-installed, or the USB 2.0 driver for a two-page set or three pages have been scanned in the checkbox. To re-enable automatic ...copy job to the base screen, select "DISABLE DISPLAY TIMEOUT", and press the [OK] key so that Microsoft provides through Windows Update is installed. * Even when the Microsoft USB 2.0 driver is installed, some USB 2.0 expansion cards are pressed on the machine supports USB 2.0 Hi-Speed mode. To disable automatic...
...If you do not want auto clear to use USB 2.0 (Hi-Speed mode): The computer is running Windows Vista/XP/2000 and the Microsoft USB 2.0 driver is pre-installed, or the USB 2.0 driver for a two-page set or three pages have been scanned in the checkbox. To re-enable automatic ...copy job to the base screen, select "DISABLE DISPLAY TIMEOUT", and press the [OK] key so that Microsoft provides through Windows Update is installed. * Even when the Microsoft USB 2.0 driver is installed, some USB 2.0 expansion cards are pressed on the machine supports USB 2.0 Hi-Speed mode. To disable automatic...


