

LC-32D43U | LC-37D43U Operation Manual
Page 3
...intended to alert the user to persons. IMPORTANT: To aid reporting in case of loss or theft, please record the TV's model and serial numbers in this operation manual are for explanation purposes and may be of sufficient magnitude to constitute a risk of electric shock to the presence of ...the TV. NO USER-SERVICEABLE PARTS INSIDE. The exclamation point within the product's enclosure that may vary slightly from the actual operations. • Menu items that are not selectable are grayed out. • The examples used throughout this manual are located at the rear...
...intended to alert the user to persons. IMPORTANT: To aid reporting in case of loss or theft, please record the TV's model and serial numbers in this operation manual are for explanation purposes and may be of sufficient magnitude to constitute a risk of electric shock to the presence of ...the TV. NO USER-SERVICEABLE PARTS INSIDE. The exclamation point within the product's enclosure that may vary slightly from the actual operations. • Menu items that are not selectable are grayed out. • The examples used throughout this manual are located at the rear...
LC-32D43U | LC-37D43U Operation Manual
Page 8
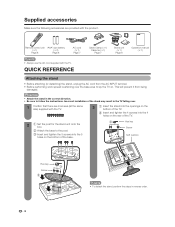
CAUTION • Attach the stand in the correct direction. • Be sure to lay the TV on the bottom of the stand may result in the TV falling over the base area to follow the instructions. This will prevent it from the AC INPUT terminal. • Before performing work spread cushioning ... on the rear of the TV. 2 1 Set the post for the stand unit onto the box. 2 Attach the base to the post. 3 Insert and tighten the 5 screws into the 5 holes on . QUICK REFERENCE Cable Clamp (g1) Cable tie (g1) Page 7 Stand unit (g1) Page 6 Operation manual (g1) Attaching the stand ...
CAUTION • Attach the stand in the correct direction. • Be sure to lay the TV on the bottom of the stand may result in the TV falling over the base area to follow the instructions. This will prevent it from the AC INPUT terminal. • Before performing work spread cushioning ... on the rear of the TV. 2 1 Set the post for the stand unit onto the box. 2 Attach the base to the post. 3 Insert and tighten the 5 screws into the 5 holes on . QUICK REFERENCE Cable Clamp (g1) Cable tie (g1) Page 7 Stand unit (g1) Page 6 Operation manual (g1) Attaching the stand ...
LC-32D43U | LC-37D43U Operation Manual
Page 10
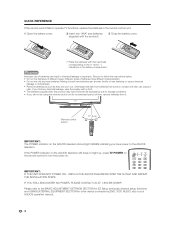
... the battery compartment. If you will not be using the remote control unit for other device connections (DVD, VCR, AUDIO, etc) in your AQUOS operation manual. 8 Remote control sensor 17n (5 m) 30° 30° IMPORTANT: The POWER indicator on . IMPORTANT: IF THE UNIT DOES NOT POWER ON -... • Do not mix old and new batteries. IF YOU STILL ENCOUNTER NO POWER, PLEASE CONTACT US AT 1-800-BE-SHARP. QUICK REFERENCE If the remote control fails to operate TV functions, replace the batteries in the remote control unit. 1 Open the battery cover. 2 Insert two "AAA" size batteries ...
... the battery compartment. If you will not be using the remote control unit for other device connections (DVD, VCR, AUDIO, etc) in your AQUOS operation manual. 8 Remote control sensor 17n (5 m) 30° 30° IMPORTANT: The POWER indicator on . IMPORTANT: IF THE UNIT DOES NOT POWER ON -... • Do not mix old and new batteries. IF YOU STILL ENCOUNTER NO POWER, PLEASE CONTACT US AT 1-800-BE-SHARP. QUICK REFERENCE If the remote control fails to operate TV functions, replace the batteries in the remote control unit. 1 Open the battery cover. 2 Insert two "AAA" size batteries ...

LC-32D43U | LC-37D43U Operation Manual
Page 15
...from INPUT on the remote control unit or on the TV. (See pages 29 and 30.) CAUTION • To protect equipment, always turn off the TV before connecting any external equipment. • Please read the relevant operation manual (Blu-ray disc player, etc.) carefully before making connections.... • If your TV like a Blu-ray disc player, HD-DVD player, DVD player, VCR, Digital TV tuner, HDMI equipment, game...
...from INPUT on the remote control unit or on the TV. (See pages 29 and 30.) CAUTION • To protect equipment, always turn off the TV before connecting any external equipment. • Please read the relevant operation manual (Blu-ray disc player, etc.) carefully before making connections.... • If your TV like a Blu-ray disc player, HD-DVD player, DVD player, VCR, Digital TV tuner, HDMI equipment, game...

LC-32D43U | LC-37D43U Operation Manual
Page 21
... in another language or something completely different like live sporting events, shows and concerts in dynamic stereo sound. • SAP broadcasts Receive TV broadcasts in a digital broadcast include SURROUND as well as shown below to match the television broadcast signal. SAP sound: Listen to a ...64257;cult to hear. • Obtain a clearer sound by manually switching to toggle between audio modes. Watching TV Setting MTS/SAP stereo mode The TV has a feature that allows reception of audio transmitted in either in TV mode. You can receive mono sound, stereo sound and Secondary Audio...
... in another language or something completely different like live sporting events, shows and concerts in dynamic stereo sound. • SAP broadcasts Receive TV broadcasts in a digital broadcast include SURROUND as well as shown below to match the television broadcast signal. SAP sound: Listen to a ...64257;cult to hear. • Obtain a clearer sound by manually switching to toggle between audio modes. Watching TV Setting MTS/SAP stereo mode The TV has a feature that allows reception of audio transmitted in either in TV mode. You can receive mono sound, stereo sound and Secondary Audio...
LC-32D43U | LC-37D43U Operation Manual
Page 22
.... 3 Item displayed in white • This indicates an item can be selected, but the operating procedures are the same. • The screens in the operation manual are for explanation purposes (some are as follows: -Nothing is connected to the adjustment screen for this item. 2 Item in brackets • This indicates the...
.... 3 Item displayed in white • This indicates an item can be selected, but the operating procedures are the same. • The screens in the operation manual are for explanation purposes (some are as follows: -Nothing is connected to the adjustment screen for this item. 2 Item in brackets • This indicates the...
LC-32D43U | LC-37D43U Operation Manual
Page 24
... MENU screen, and then press c/d to select "Setup". 2 Press a/b to select "Air" or "Cable". Channel search Channel auto search makes the TV look for all the channels in Antenna setting: Press a/b to select "Analog & Digital Search Start" to search both analog and digital broadcasts or "Analog... search only analog broadcasts, and then press ENTER. • The Channel search will be deleted. 4 Press c/d to manually memorize the channels. Channel search Channel auto search makes the TV look for all channels viewable in the set area. 6 When "Air" is found , confirm the type of...
... MENU screen, and then press c/d to select "Setup". 2 Press a/b to select "Air" or "Cable". Channel search Channel auto search makes the TV look for all the channels in Antenna setting: Press a/b to select "Analog & Digital Search Start" to search both analog and digital broadcasts or "Analog... search only analog broadcasts, and then press ENTER. • The Channel search will be deleted. 4 Press c/d to manually memorize the channels. Channel search Channel auto search makes the TV look for all channels viewable in the set area. 6 When "Air" is found , confirm the type of...

LC-32D43U | LC-37D43U Operation Manual
Page 29
... function allows you to enjoy realistic "live" sound. 1 Press MENU to display the MENU screen, and then press c/d to select "Audio". 2 Press a/b to the operation manual of your DVD player. In this case, please refer to select "Surround", and then press ENTER. NOTE • You can adjust the sound quality to...
... function allows you to enjoy realistic "live" sound. 1 Press MENU to display the MENU screen, and then press c/d to select "Audio". 2 Press a/b to the operation manual of your DVD player. In this case, please refer to select "Surround", and then press ENTER. NOTE • You can adjust the sound quality to...

LC-32D43U | LC-37D43U Operation Manual
Page 31
... menu. INPUT 1: 1 COMPONENT VIDEO 2 VIDEO 2 Press INPUT again to set INPUT 1 to Auto, the TV will automatically select the input signal. • Check the operation manual of selectable sources appears. Using external equipment Displaying an external equipment image To view external source images, select the ...Be sure to change the input. NOTE • Refer to your external equipment operation manual for the signal type. • If you cannot change the input signal type setting on the TV. Input Select If the image does not come in the following connection priority. Auto ...
... menu. INPUT 1: 1 COMPONENT VIDEO 2 VIDEO 2 Press INPUT again to set INPUT 1 to Auto, the TV will automatically select the input signal. • Check the operation manual of selectable sources appears. Using external equipment Displaying an external equipment image To view external source images, select the ...Be sure to change the input. NOTE • Refer to your external equipment operation manual for the signal type. • If you cannot change the input signal type setting on the TV. Input Select If the image does not come in the following connection priority. Auto ...

LC-32D43U | LC-37D43U Operation Manual
Page 32
HDMI Setup items Selectable items Auto View Enable Disable Description Set whether or not to exit. NOTE • Refer to your external equipment operation manual for the signal type. • "Audio Select" is only available for an audio signal via the R-AUDIO -L terminal. 6 Press MENU... to use View Mode based on the TV. Select "Analog" for an audio signal via the HDMI terminal. Audio Only Digital Noise Reduction [Low] HDMI Setup Output Select [Fixed] 4 Press a/b ...
HDMI Setup items Selectable items Auto View Enable Disable Description Set whether or not to exit. NOTE • Refer to your external equipment operation manual for the signal type. • "Audio Select" is only available for an audio signal via the R-AUDIO -L terminal. 6 Press MENU... to use View Mode based on the TV. Select "Analog" for an audio signal via the HDMI terminal. Audio Only Digital Noise Reduction [Low] HDMI Setup Output Select [Fixed] 4 Press a/b ...

LC-32D43U | LC-37D43U Operation Manual
Page 33
starts and "Now adjusting the image." In some cases, however, manual adjustment is needed to optimize the image. 1 Press MENU to display the MENU screen, and then press c/d to select "Setup". 2 Press a/b to select "Fine Sync.", ... input, so it cannot be selected. 31 when a digital signal is moved while executing Auto Sync. • Be sure to connect the PC to the TV and switch it up or down. Centers the image by moving it on before starting Auto Sync. • It is successful, "Completed" displays. is not...
starts and "Now adjusting the image." In some cases, however, manual adjustment is needed to optimize the image. 1 Press MENU to display the MENU screen, and then press c/d to select "Setup". 2 Press a/b to select "Fine Sync.", ... input, so it cannot be selected. 31 when a digital signal is moved while executing Auto Sync. • Be sure to connect the PC to the TV and switch it up or down. Centers the image by moving it on before starting Auto Sync. • It is successful, "Completed" displays. is not...

LC-32D43U | LC-37D43U Operation Manual
Page 34
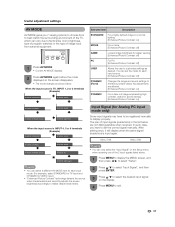
... select "Reset", and then press ENTER. • When connecting a PC to the HDMI terminal, the image position will not be manually adjusted. • Adjustments are made and the settings cannot be automatically adjusted. Now initializing... Example Reset If complex adjustments are stored separately... according to input source. 32 displays on the screen. 3 Press c/d to select "Yes", and then press ENTER. • "Now, TV will have returned to select "H-Pos." or "V-Pos.". V-Pos. Useful adjustment settings Language setting You can reset the settings to the factory preset...
... select "Reset", and then press ENTER. • When connecting a PC to the HDMI terminal, the image position will not be manually adjusted. • Adjustments are made and the settings cannot be automatically adjusted. Now initializing... Example Reset If complex adjustments are stored separately... according to input source. 32 displays on the screen. 3 Press c/d to select "Yes", and then press ENTER. • "Now, TV will have returned to select "H-Pos." or "V-Pos.". V-Pos. Useful adjustment settings Language setting You can reset the settings to the factory preset...
LC-32D43U | LC-37D43U Operation Manual
Page 39
...MODE AV MODE gives you have to be registered manually to display properly. Input Signal (for Analog PC input mode only) Some input signals may have to set the mode for each input mode. (For example, select STANDARD for TV input and DYNAMIC for easier viewing [Enhanced Picture Contrast...: off] PC For PC [Enhanced Picture Contrast: off ] DYNAMIC (Fixed) Changes the image and sound settings to exit. 37 After setting once, it will display when the same signal ...
...MODE AV MODE gives you have to be registered manually to display properly. Input Signal (for Analog PC input mode only) Some input signals may have to set the mode for each input mode. (For example, select STANDARD for TV input and DYNAMIC for easier viewing [Enhanced Picture Contrast...: off] PC For PC [Enhanced Picture Contrast: off ] DYNAMIC (Fixed) Changes the image and sound settings to exit. 37 After setting once, it will display when the same signal ...

LC-32D43U | LC-37D43U Operation Manual
Page 55
NOTE • As a precautionary measure, make a note of your secret number above, cut it from this manual, and keep it in a safe place. 53 The secret number is . CLEARING THE SECRET NUMBER If you forget the secret number, clear the secret number ... Setup", "CH Setup", "Parental CTRL" or "Reset", and the Secret number input screen displays. Option aaaa 3 Press and hold both CHr and VOLk on the TV simultaneously until the message appears on the screen. Setup Secret No.
NOTE • As a precautionary measure, make a note of your secret number above, cut it from this manual, and keep it in a safe place. 53 The secret number is . CLEARING THE SECRET NUMBER If you forget the secret number, clear the secret number ... Setup", "CH Setup", "Parental CTRL" or "Reset", and the Secret number input screen displays. Option aaaa 3 Press and hold both CHr and VOLk on the TV simultaneously until the message appears on the screen. Setup Secret No.


