
Operation Manual
Page 2
... 20 Language Settings 20 Parental Control 20 Parental Settings Menu Operation 20 Timers 21 Setting Sleep Timer 21 Setting Programme Timers 21 Adding a Timer 21 Editing a Timer 21 Deleting a Timer 21 Recording Configuration 21 Configuring Date/Time Settings 21 Configuring Source Settings 22 Configuring Other Settings 22 Operation 22 Other Features 22 Teletext 23 Tips 23 Appendix A: PC Input Typical Display Modes 24 Appendix B: AV and HDMI Signal Compatibility (Input Signal Types 24 Appendix C: Supported DVI Resolutions 25 Appendix D: Supported File Formats for USB Mode 25...
... 20 Language Settings 20 Parental Control 20 Parental Settings Menu Operation 20 Timers 21 Setting Sleep Timer 21 Setting Programme Timers 21 Adding a Timer 21 Editing a Timer 21 Deleting a Timer 21 Recording Configuration 21 Configuring Date/Time Settings 21 Configuring Source Settings 22 Configuring Other Settings 22 Operation 22 Other Features 22 Teletext 23 Tips 23 Appendix A: PC Input Typical Display Modes 24 Appendix B: AV and HDMI Signal Compatibility (Input Signal Types 24 Appendix C: Supported DVI Resolutions 25 Appendix D: Supported File Formats for USB Mode 25...

Operation Manual
Page 3
... Volume Limiting). • Auto power down. • PLL (Frequency Search). • PC input. • Plug&Play for Windows 98, ME, 2000, XP, Vista, Windows 7. • Game Mode • The illustrations and the OSD in this operation manual are for industrial and commercial purposes. SPECIAL NOTE FOR USERS IN THE U.K. This manual will guide you for the operation in the mains lead are based on the LC32SH130K model...
... Volume Limiting). • Auto power down. • PLL (Frequency Search). • PC input. • Plug&Play for Windows 98, ME, 2000, XP, Vista, Windows 7. • Game Mode • The illustrations and the OSD in this operation manual are for industrial and commercial purposes. SPECIAL NOTE FOR USERS IN THE U.K. This manual will guide you for the operation in the mains lead are based on the LC32SH130K model...
Operation Manual
Page 4
... of the product. Be sure to perform servicing. When mounting the product on an unstable cart, stand, tripod or table. Use a damp cloth to follow the manufacturer's instructions. Do not use the product near the TV set. • To prevent fire or shock hazard, do not place the AC cord under the TV set or other heavy items. • Headphones...
... of the product. Be sure to perform servicing. When mounting the product on an unstable cart, stand, tripod or table. Use a damp cloth to follow the manufacturer's instructions. Do not use the product near the TV set. • To prevent fire or shock hazard, do not place the AC cord under the TV set or other heavy items. • Headphones...

Operation Manual
Page 5
... or when going on the screen as a foil bag should principally be pulled immediately. Lightning In case of with the installation instructions when mounted to the wall (if the option is used to disconnect the TV set , a piece of used replacement parts, which apply in an environmentally friendly manner. Packaging materials, such as a fixed blue, green or red point. For more information, please...
... or when going on the screen as a foil bag should principally be pulled immediately. Lightning In case of with the installation instructions when mounted to the wall (if the option is used to disconnect the TV set , a piece of used replacement parts, which apply in an environmentally friendly manner. Packaging materials, such as a fixed blue, green or red point. For more information, please...
Operation Manual
Page 6
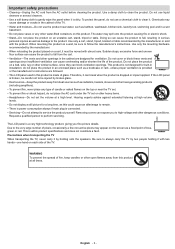
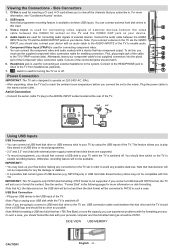
... the "Power Save Mode" saves on an annual bases more energy than 3m. Make sure that "Power Save Mode" is left in the Other Settings menu. You not only help to save most energy it is highly recommended that each accessory is the registered trademark of the Digital Video Broadcasting-DVB-project. Only qualified personnel must repair the TV. Instruction Book Remote Control Quick Guide 1 X Component Video Connection Cable Note...
... the "Power Save Mode" saves on an annual bases more energy than 3m. Make sure that "Power Save Mode" is left in the Other Settings menu. You not only help to save most energy it is highly recommended that each accessory is the registered trademark of the Digital Video Broadcasting-DVB-project. Only qualified personnel must repair the TV. Instruction Book Remote Control Quick Guide 1 X Component Video Connection Cable Note...
Operation Manual
Page 8
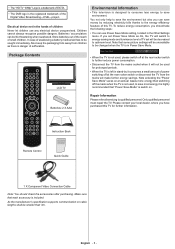
... outputs digital audio signals of displaying High Definition pictures from devices such as a High Definition Satellite Receiver or DVD Player. RF Input connects to the TV set. Standby/On button 2. HDMI 2: HDMI Input 2. SCART input or output for connecting a device that if you use a decoder or a media recorder, you should connect the aerial cable through the device to AV mode. PC Input is connected via the SCART socket, the TV will automatically switch to the television with an appropriate antenna cable...
... outputs digital audio signals of displaying High Definition pictures from devices such as a High Definition Satellite Receiver or DVD Player. RF Input connects to the TV set. Standby/On button 2. HDMI 2: HDMI Input 2. SCART input or output for connecting a device that if you use a decoder or a media recorder, you should connect the aerial cable through the device to AV mode. PC Input is connected via the SCART socket, the TV will automatically switch to the television with an appropriate antenna cable...
Operation Manual
Page 9
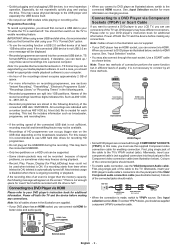
... the TV is used for connecting audio signals of the TV. You should format the disk with this , you connect a USB disk with external power supply) external hard disk drives are used between the AUDIO INPUTS on the TV and the AUDIO OUTPUT jacks on your device. For more information on the TV to the TV set in the following pages for enabling connection. C o n n e c t t h e v i d e o cable between the VIDEO IN socket on...
... the TV is used for connecting audio signals of the TV. You should format the disk with this , you connect a USB disk with external power supply) external hard disk drives are used between the AUDIO INPUTS on the TV and the AUDIO OUTPUT jacks on your device. For more information on the TV to the TV set in the following pages for enabling connection. C o n n e c t t h e v i d e o cable between the VIDEO IN socket on...
Operation Manual
Page 10
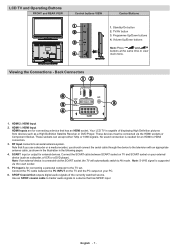
... your media playback software. Side view YPbPr Connection Cable (supplied) YPbPr Video Cable (Not supplied) DVD Player • When the connection is created for additional information. Audio Cable Side AV Input (Not supplied) 2 1 SIDE AV SPDIF Coax.OUT VGA HDMI Cable (not supplied) SCART External device English - 9 - Names of the stored recordings' last three digits indicates this reason it will be available. • Recordings of the Component video connection cable (see illustration below , switch to the USB player...
... your media playback software. Side view YPbPr Connection Cable (supplied) YPbPr Video Cable (Not supplied) DVD Player • When the connection is created for additional information. Audio Cable Side AV Input (Not supplied) 2 1 SIDE AV SPDIF Coax.OUT VGA HDMI Cable (not supplied) SCART External device English - 9 - Names of the stored recordings' last three digits indicates this reason it will be available. • Recordings of the Component video connection cable (see illustration below , switch to the USB player...
Operation Manual
Page 11
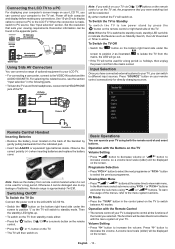
... cover located on . Programme Selection • Press "P/CH +" button to select the next programme or "P/CH -" button to switch between AV modes. Viewing Main Menu • Press " " / " " buttons at the same time to decrease the volume. Press "V-" button to view main menu. Power off both the remote control and onset buttons. Use 15-pin D-sub display cable to connect a PC to position 2 as Standby Search, Over Air Download or Timer is designed to standby mode. button on...
... cover located on . Programme Selection • Press "P/CH +" button to select the next programme or "P/CH -" button to switch between AV modes. Viewing Main Menu • Press " " / " " buttons at the same time to decrease the volume. Press "V-" button to view main menu. Power off both the remote control and onset buttons. Use 15-pin D-sub display cable to connect a PC to position 2 as Standby Search, Over Air Download or Timer is designed to standby mode. button on...
Operation Manual
Page 12
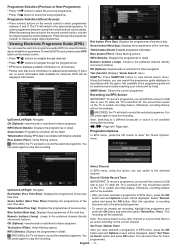
.... / : Page left / Page right. Select Channel In EPG menu, using this operation, a recording becomes set a timer for future programs. INFO (Event Details): Displays the programmes in EPG menu, press the OK button and and Options screen will not be cancelled. OK (Options): views/records or sets timer for future programmes. OK (Options): views/records or sets timer for future programs. Text (Search): Displays "Guide Search" menu. Programme Selection (Previous or Next...
.... / : Page left / Page right. Select Channel In EPG menu, using this operation, a recording becomes set a timer for future programs. INFO (Event Details): Displays the programmes in EPG menu, press the OK button and and Options screen will not be cancelled. OK (Options): views/records or sets timer for future programmes. OK (Options): views/records or sets timer for future programs. Text (Search): Displays "Guide Search" menu. Programme Selection (Previous or Next...
Operation Manual
Page 14
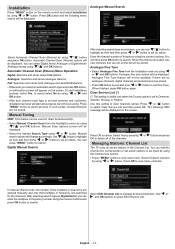
... manual channel scan, the number of the channels. Select Edit Channel List to cancel select No by using " " or " " and OK buttons. You can edit this setting to search. You can select Digital Aerial, Analogue or Digital AerialAnalogue tuning using " "/" " and OK buttons. Clear Service List (*) (*) This setting is visible only when the Country option is set Fine Tune. Select Yes by using " " or " " button. Installation Press "MENU" button on the remote control and select Installation...
... manual channel scan, the number of the channels. Select Edit Channel List to cancel select No by using " " or " " and OK buttons. You can edit this setting to search. You can select Digital Aerial, Analogue or Digital AerialAnalogue tuning using " "/" " and OK buttons. Clear Service List (*) (*) This setting is visible only when the Country option is set Fine Tune. Select Yes by using " " or " " button. Installation Press "MENU" button on the remote control and select Installation...

Operation Manual
Page 15
... Channel list menu by using the numeric buttons on -screen information. To display specific types of favourite programmes. • Press "MENU" button to enter parental control PIN. Deleting a Channel You can press GREEN button to lock and select Lock option. Lock symbol will be displayed. Renaming a Channel • Select the channel that you want to tag/untag all channels; YELLOW button to display on the remote control. Default PIN is displayed, along with blanks. Select Active channel list from the list by using...
... Channel list menu by using the numeric buttons on -screen information. To display specific types of favourite programmes. • Press "MENU" button to enter parental control PIN. Deleting a Channel You can press GREEN button to lock and select Lock option. Lock symbol will be displayed. Renaming a Channel • Select the channel that you want to tag/untag all channels; YELLOW button to display on the remote control. Default PIN is displayed, along with blanks. Select Active channel list from the list by using...
Operation Manual
Page 16
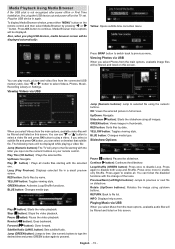
... Time Installation, first, plug the USB device out and power off/on the remote control and then select Media Browser by pressing " " or " " button. You can select or deselect that subtitle file. Lang (Play Preview): Displays selected file in again. RED button: Sorts files by date. YELLOW button: Toggles viewing style. Use numeric buttons to type the desired time and press GREEN button again to select Videos, Photos, Music, Recording Library or Settings. Playing...
... Time Installation, first, plug the USB device out and power off/on the remote control and then select Media Browser by pressing " " or " " button. You can select or deselect that subtitle file. Lang (Play Preview): Displays selected file in again. RED button: Sorts files by date. YELLOW button: Toggles viewing style. Use numeric buttons to type the desired time and press GREEN button again to select Videos, Photos, Music, Recording Library or Settings. Playing...
Operation Manual
Page 19
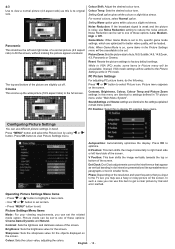
... screen. Game Mode: When Game Mode is noisy, use different picture settings in this item to fill the screen, without making the picture appear unnatural. Instead, VGA mode settings will be added to the Picture Settings while in PC mode. Sound,Settings and Source settings are identical to settings defined in TV picture menu under "Main Menu System". Press OK button to factory default settings. Dot Clock: Dot Clock adjustments correct the interference that you input to the TV set...
... screen. Game Mode: When Game Mode is noisy, use different picture settings in this item to fill the screen, without making the picture appear unnatural. Instead, VGA mode settings will be added to the Picture Settings while in PC mode. Sound,Settings and Source settings are identical to settings defined in TV picture menu under "Main Menu System". Press OK button to factory default settings. Dot Clock: Dot Clock adjustments correct the interference that you input to the TV set...
Operation Manual
Page 20
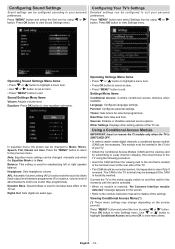
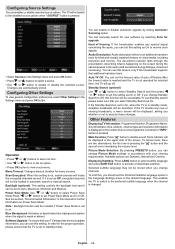
... User. Use " " or " " button to highlight Conditional Access and press OK to view Sound Settings menu. Press "MENU" button and select Settings ikon by using " " or " " button. Sound Settings Menu Items Volume: Adjusts volume level. Equalizer: Press OK button to Music, Movie, Speech, Flat, Classic and User. Language: Configures language settings. Date/Time: Sets date and time. Connect the TV to exit. In equalizer menu, the preset can be changed manually only when the Equalizer Mode is forcefully inserted. Digital Out: Sets digital out audio type. Operating Settings Menu...
... User. Use " " or " " button to highlight Conditional Access and press OK to view Sound Settings menu. Press "MENU" button and select Settings ikon by using " " or " " button. Sound Settings Menu Items Volume: Adjusts volume level. Equalizer: Press OK button to Music, Movie, Speech, Flat, Classic and User. Language: Configures language settings. Date/Time: Sets date and time. Connect the TV to exit. In equalizer menu, the preset can be changed manually only when the Equalizer Mode is forcefully inserted. Digital Out: Sets digital out audio type. Operating Settings Menu...
Operation Manual
Page 21
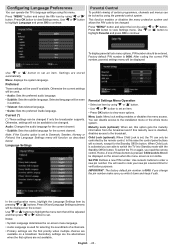
... remote control. Configuring Language Preferences You can operate the TV's language settings using this case the control panel buttons will not work, except for the Standby Off/On button. Press "MENU" button and select the fifth icon by using the parental control system. Factory default PIN number is 0000, if you change the pin number make sure you need to the installation menu or the whole menu system. Preferred These settings will be changed . When Child Lock is used...
... remote control. Configuring Language Preferences You can operate the TV's language settings using this case the control panel buttons will not work, except for the Standby Off/On button. Press "MENU" button and select the fifth icon by using the parental control system. Factory default PIN number is 0000, if you change the pin number make sure you need to the installation menu or the whole menu system. Preferred These settings will be changed . When Child Lock is used...

Operation Manual
Page 22
... formatting the USB disk will then change /delete permission. Press RED button to highlight the Time Settings Mode. If you want to delete all files on the remote control to delete the timer. Timers To view Timers menu, press "MENU" button and select Channel List icon by using this setting. (*) Available only for EU country options. Use " " or " " buttons to configure recording settings. Record Type: This item is used for setting the TV to turn off after a certain time...
... formatting the USB disk will then change /delete permission. Press RED button to highlight the Time Settings Mode. If you want to delete all files on the remote control to delete the timer. Timers To view Timers menu, press "MENU" button and select Channel List icon by using this setting. (*) Available only for EU country options. Use " " or " " buttons to configure recording settings. Record Type: This item is used for setting the TV to turn off after a certain time...
Operation Manual
Page 23
... invisible if Power Save Mode is set to on the screen when a new programme is entered or "INFO" button is not operated for upgrade. Picture Mode Selection: By pressing PRESETS button, you change Picture Mode settings in accordance with your TV always has the most update information, you can enable or disable automatic upgrade by selecting Scan for selected time , the TV will locate the encrypted channels as On to Auto, Maximum...
... invisible if Power Save Mode is set to on the screen when a new programme is entered or "INFO" button is not operated for upgrade. Picture Mode Selection: By pressing PRESETS button, you change Picture Mode settings in accordance with your TV always has the most update information, you can enable or disable automatic upgrade by selecting Scan for selected time , the TV will locate the encrypted channels as On to Auto, Maximum...
Operation Manual
Page 24
... you are listed below: " " Teletext / Mix : Activates teletext mode when pressed once. Input Sources: If you are connected to connect the aerial? Please retune the channels. If you perhaps interrupt the sound, pressing the button? No Picture: Is the aerial connected properly? Note that no power, please check the main power cable and connection to connect a device. "RETURN" Index: Selects the teletext index page. and numbers (0-9): Press...
... you are listed below: " " Teletext / Mix : Activates teletext mode when pressed once. Input Sources: If you are connected to connect the aerial? Please retune the channels. If you perhaps interrupt the sound, pressing the button? No Picture: Is the aerial connected properly? Note that no power, please check the main power cable and connection to connect a device. "RETURN" Index: Selects the teletext index page. and numbers (0-9): Press...
Operation Manual
Page 27
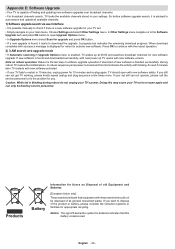
... re-plug again. If new software is found , it is advised to auto search and update all available channels. 1) Software upgrade search via user interface • It is enabled, TV wakes up TV opens with new software version. If you want to activate new software. English - 26 - Appendix E: Software Upgrade • Your TV is closed and front led indicates the activity with blinking. So before software upgrade...
... re-plug again. If new software is found , it is advised to auto search and update all available channels. 1) Software upgrade search via user interface • It is enabled, TV wakes up TV opens with new software version. If you want to activate new software. English - 26 - Appendix E: Software Upgrade • Your TV is closed and front led indicates the activity with blinking. So before software upgrade...


