LC-32D43U | LC-37D43U Operation Manual
Page 8
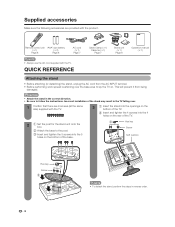
Remote control unit "AAA" size battery (g1) (g2) Page 8 Page 8 AC cord (g1) Page 7 NOTE • Always use the AC cord supplied with the product. CAUTION • Attach the stand in reverse order. Supplied accessories Make sure the following accessories are 9 screws (all the same size) supplied with the TV. 3...8226; To detach the stand, perform the steps in the correct direction. • Be sure to lay the TV on the bottom of the stand may result in the TV falling over the base area to follow the instructions. Incorrect installation of the base. This will prevent it from the...
Remote control unit "AAA" size battery (g1) (g2) Page 8 Page 8 AC cord (g1) Page 7 NOTE • Always use the AC cord supplied with the product. CAUTION • Attach the stand in reverse order. Supplied accessories Make sure the following accessories are 9 screws (all the same size) supplied with the TV. 3...8226; To detach the stand, perform the steps in the correct direction. • Be sure to lay the TV on the bottom of the stand may result in the TV falling over the base area to follow the instructions. Incorrect installation of the base. This will prevent it from the...
LC-32D43U | LC-37D43U Operation Manual
Page 10
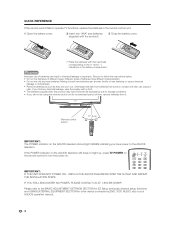
... old and new batteries can result in the battery compartment. IF YOU STILL ENCOUNTER NO POWER, PLEASE CONTACT US AT 1-800-BE-SHARP. If you have different characteristics. • Do not mix old and new batteries. CAUTION Improper use of batteries can shorten the life... AQUOS operation manual. 8 UNPLUG THE AQUOS TELEVISION FROM THE OUTLET AND REPEAT THE INSTALLATION STEPS. QUICK REFERENCE If the remote control fails to operate TV functions, replace the batteries in the remote control unit. 1 Open the battery cover. 2 Insert two "AAA" size batteries (supplied with the product). 3 ...
... old and new batteries can result in the battery compartment. IF YOU STILL ENCOUNTER NO POWER, PLEASE CONTACT US AT 1-800-BE-SHARP. If you have different characteristics. • Do not mix old and new batteries. CAUTION Improper use of batteries can shorten the life... AQUOS operation manual. 8 UNPLUG THE AQUOS TELEVISION FROM THE OUTLET AND REPEAT THE INSTALLATION STEPS. QUICK REFERENCE If the remote control fails to operate TV functions, replace the batteries in the remote control unit. 1 Open the battery cover. 2 Insert two "AAA" size batteries (supplied with the product). 3 ...
LC-32D43U | LC-37D43U Operation Manual
Page 11
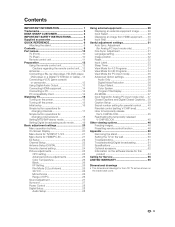
Adjustment 31 Language setting 32 Image position 32 Reset 32 Input Label 33 Sleep Timer 33 View Mode...2 DEAR SHARP CUSTOMER 3 IMPORTANT SAFETY INSTRUCTIONS 3 Supplied accessories 6 QUICK REFERENCE 6 Attaching the stand 6 Contents 9 Part names 10 TV (Front 10 TV (Rear 10 Remote control unit 11 Preparation 12 Using the remote control unit 12 Cautions regarding the remote control unit....... settings 20 Menu operation buttons 20 On-Screen Display 20 Menu items for TV/INPUT 1/2/3 21 Menu items for the LCD TV set are shown on the software license for this product 54 Calling for ...
Adjustment 31 Language setting 32 Image position 32 Reset 32 Input Label 33 Sleep Timer 33 View Mode...2 DEAR SHARP CUSTOMER 3 IMPORTANT SAFETY INSTRUCTIONS 3 Supplied accessories 6 QUICK REFERENCE 6 Attaching the stand 6 Contents 9 Part names 10 TV (Front 10 TV (Rear 10 Remote control unit 11 Preparation 12 Using the remote control unit 12 Cautions regarding the remote control unit....... settings 20 Menu operation buttons 20 On-Screen Display 20 Menu items for TV/INPUT 1/2/3 21 Menu items for the LCD TV set are shown on the software license for this product 54 Calling for ...

LC-32D43U | LC-37D43U Operation Manual
Page 12
Part names TV (Front) Remote control sensor OPC sensor* NOTE *OPC: Optical Picture Control (See page 25.) **See page 15 for TV status indicator. TV (Rear) HDMI terminal (INPUT 4) HDMI terminal (INPUT 5) OPC indicator* SLEEP indicator** POWER indicator** Channel buttons (CHs/r) Volume buttons (VOLl/k) INPUT button POWER button PC IN terminals (INPUT 6) Antenna/Cable in AUDIO terminals (INPUT 5) DIGITAL AUDIO OUTPUT terminal INPUT 3 terminals INPUT 2 terminals INPUT 1 terminals AUDIO OUTPUT terminals AC INPUT terminal 10
Part names TV (Front) Remote control sensor OPC sensor* NOTE *OPC: Optical Picture Control (See page 25.) **See page 15 for TV status indicator. TV (Rear) HDMI terminal (INPUT 4) HDMI terminal (INPUT 5) OPC indicator* SLEEP indicator** POWER indicator** Channel buttons (CHs/r) Volume buttons (VOLl/k) INPUT button POWER button PC IN terminals (INPUT 6) Antenna/Cable in AUDIO terminals (INPUT 5) DIGITAL AUDIO OUTPUT terminal INPUT 3 terminals INPUT 2 terminals INPUT 1 terminals AUDIO OUTPUT terminals AC INPUT terminal 10
LC-32D43U | LC-37D43U Operation Manual
Page 13
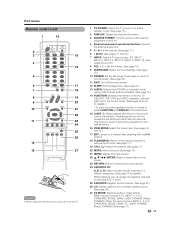
... unit will turn off if no operations are performed within about 5 seconds. When the input source is TV, INPUT 1, 2 or 3: STANDARD, MOVIE, GAME, USER, DYNAMIC (Fixed), DYNAMIC. Part names Remote control unit 1 14 2 3 15 4 16 5 6 17 7 18 8 19 9 20 10 21 22 11 23 24 25 26 12 13 27 ...page 33.) 13 AUDIO: Selects the MTS/SAP or the audio mode during multi-channel audio broadcasts. (See page 19.) 14 FUNCTION: Switches the remote control for TV, CBL/SAT, VCR, DVD and AUDIO operation. Press again to return to 49 for the current mode. (See pages 46 to normal screen. ...
... unit will turn off if no operations are performed within about 5 seconds. When the input source is TV, INPUT 1, 2 or 3: STANDARD, MOVIE, GAME, USER, DYNAMIC (Fixed), DYNAMIC. Part names Remote control unit 1 14 2 3 15 4 16 5 6 17 7 18 8 19 9 20 10 21 22 11 23 24 25 26 12 13 27 ...page 33.) 13 AUDIO: Selects the MTS/SAP or the audio mode during multi-channel audio broadcasts. (See page 19.) 14 FUNCTION: Switches the remote control for TV, CBL/SAT, VCR, DVD and AUDIO operation. Press again to return to 49 for the current mode. (See pages 46 to normal screen. ...

LC-32D43U | LC-37D43U Operation Manual
Page 14
... Combiner (commercially available) IN OUT or 75-ohm coaxial cable 300/75-ohm adapter (commercially available) To TV antenna terminal 12 In addition, do not expose the remote control unit to liquids, and do not tighten F-type connector with F-type connector that can easily be attached...(commercially available) • Connect the antenna cable to the remote control sensor. The heat may cause deformation of the remote control unit. • The remote control unit may not work properly if the remote control sensor on the TV. The following is a brief explanation of the types of ...
... Combiner (commercially available) IN OUT or 75-ohm coaxial cable 300/75-ohm adapter (commercially available) To TV antenna terminal 12 In addition, do not expose the remote control unit to liquids, and do not tighten F-type connector with F-type connector that can easily be attached...(commercially available) • Connect the antenna cable to the remote control sensor. The heat may cause deformation of the remote control unit. • The remote control unit may not work properly if the remote control sensor on the TV. The following is a brief explanation of the types of ...

LC-32D43U | LC-37D43U Operation Manual
Page 15
...other audiovisual equipment can be conveniently connected using S-VIDEO cable (commercially available). Blu-ray disc player/HDDVD player/ DVD player/ Digital TV STB When using composite cable (commercially available). Component video cable (commercially available) Audio cable (commercially available) Blu-ray disc player/HD...please select 720p for details.) PCM audio outputs from INPUT on the remote control unit or on the TV. (See pages 29 and 30.) CAUTION • To protect equipment, always turn off the TV before connecting any external equipment. • Please read the relevant ...
...other audiovisual equipment can be conveniently connected using S-VIDEO cable (commercially available). Blu-ray disc player/HDDVD player/ DVD player/ Digital TV STB When using composite cable (commercially available). Component video cable (commercially available) Audio cable (commercially available) Blu-ray disc player/HD...please select 720p for details.) PCM audio outputs from INPUT on the remote control unit or on the TV. (See pages 29 and 30.) CAUTION • To protect equipment, always turn off the TV before connecting any external equipment. • Please read the relevant ...
LC-32D43U | LC-37D43U Operation Manual
Page 17
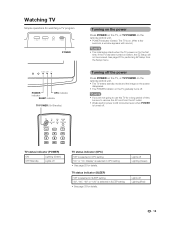
... sure to use this TV for a long period of time, be invoked. Watching TV Simple operations for watching a TV program POWER POWER OPC indicator indicator SLEEP indicator TV POWER (On/Standby) Turning on the power Press POWER on the TV, or TV POWER on the remote control unit. •... POWER indicator (Green): The TV is selected in SLEEP setting ...
... sure to use this TV for a long period of time, be invoked. Watching TV Simple operations for watching a TV program POWER POWER OPC indicator indicator SLEEP indicator TV POWER (On/Standby) Turning on the power Press POWER on the TV, or TV POWER on the remote control unit. •... POWER indicator (Green): The TV is selected in SLEEP setting ...

LC-32D43U | LC-37D43U Operation Manual
Page 18
Connect the antenna cable to enter the setting. Watching TV Initial setup When you turn on the TV for all channels viewable in the set area. Insert the batteries into the remote control unit. (See page 8.) 2. Press ENTER to the TV. (See page 12.) 3. Language Air/Cable CH Search ... press ENTER. Perform the following steps before you live. Plug in Antenna setting: Press c/d to select the desired language listed on the remote control unit. 1. Language Air/Cable CH Search Analog & Digital Search Start Analog Search Start Cancel • The Channel search will automatically ...
Connect the antenna cable to enter the setting. Watching TV Initial setup When you turn on the TV for all channels viewable in the set area. Insert the batteries into the remote control unit. (See page 8.) 2. Press ENTER to the TV. (See page 12.) 3. Language Air/Cable CH Search ... press ENTER. Perform the following steps before you live. Plug in Antenna setting: Press c/d to select the desired language listed on the remote control unit. 1. Language Air/Cable CH Search Analog & Digital Search Start Analog Search Start Cancel • The Channel search will automatically ...

LC-32D43U | LC-37D43U Operation Manual
Page 19
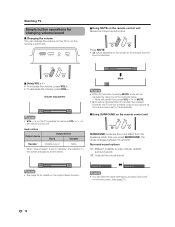
... operations for VHF/UHF/CATV/DIGITAL. NOTE • FLASHBACK will not work if no channel has been changed after the TV is no operation within a few seconds. Method 3 Using remote control buttons 0-9, • (DOT) to the currently tuned channel. g., Channel 22.1): Press 2 s2s • (...number (e. g., Channel 115): Press 1s1s5 Cable 1 Cable 11 Cable ANALOG 115 To select a 4-digit channel number (e. Method 1 Using CH r/s on the remote control unit or on . Air 22.1 Air DIGITAL 22.1 NOTE • When you enter 0-9 only, channel selection will happen. • Complete the ...
... operations for VHF/UHF/CATV/DIGITAL. NOTE • FLASHBACK will not work if no channel has been changed after the TV is no operation within a few seconds. Method 3 Using remote control buttons 0-9, • (DOT) to the currently tuned channel. g., Channel 22.1): Press 2 s2s • (...number (e. g., Channel 115): Press 1s1s5 Cable 1 Cable 11 Cable ANALOG 115 To select a 4-digit channel number (e. Method 1 Using CH r/s on the remote control unit or on . Air 22.1 Air DIGITAL 22.1 NOTE • When you enter 0-9 only, channel selection will happen. • Complete the ...
LC-32D43U | LC-37D43U Operation Manual
Page 20
... Surround sound options On: Makes it possible to 0 automatically. ■ Using SURROUND on the remote control unit SURROUND produces Surround effect from the speakers. Volume adjustment 20 NOTE • VOLl/k on the TV operates the same as VOL k/l on the Output Select function. Surround : Off Surround : On...by using one of pressing MUTE, mute can change the volume on the TV or on the remote control unit. ■ Using MUTE on the remote control unit Mutes the current sound output. Watching TV Simple button operations for changing volume/sound ■ Changing the volume You...
... Surround sound options On: Makes it possible to 0 automatically. ■ Using SURROUND on the remote control unit SURROUND produces Surround effect from the speakers. Volume adjustment 20 NOTE • VOLl/k on the TV operates the same as VOL k/l on the Output Select function. Surround : Off Surround : On...by using one of pressing MUTE, mute can change the volume on the TV or on the remote control unit. ■ Using MUTE on the remote control unit Mutes the current sound output. Watching TV Simple button operations for changing volume/sound ■ Changing the volume You...
LC-32D43U | LC-37D43U Operation Manual
Page 22
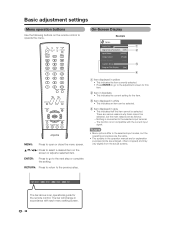
... input modes, but the main reasons are the same. • The screens in brackets • This indicates the current setting for the remote control. Basic adjustment settings Menu operation buttons Use the following buttons on the screen or adjust a selected item. MENU: Press to operate the... menu. RETURN: Press to return to select a desired item on the remote control to open or close the menu screen. NOTE • Menu options differ in accordance with the current input signal. a/b/c/d: Press to the ...
... input modes, but the main reasons are the same. • The screens in brackets • This indicates the current setting for the remote control. Basic adjustment settings Menu operation buttons Use the following buttons on the screen or adjust a selected item. MENU: Press to operate the... menu. RETURN: Press to return to select a desired item on the remote control to open or close the menu screen. NOTE • Menu options differ in accordance with the current input signal. a/b/c/d: Press to the ...

LC-32D43U | LC-37D43U Operation Manual
Page 26
... "Register", and then press ENTER. 4 Press a/b/c/d to select the position in 4 different categories. Deleting a favorite channel 1 Repeat steps 2 to 3 in Using Favorite CH on the remote control unit 1 Select the channel you want to delete, and then press ENTER. 4 Press c/d to select "Yes", and then press ENTER. 5 Press MENU to select...
... "Register", and then press ENTER. 4 Press a/b/c/d to select the position in 4 different categories. Deleting a favorite channel 1 Repeat steps 2 to 3 in Using Favorite CH on the remote control unit 1 Select the channel you want to delete, and then press ENTER. 4 Press c/d to select "Yes", and then press ENTER. 5 Press MENU to select...

LC-32D43U | LC-37D43U Operation Manual
Page 29
... exit. NOTE • Audio menu is grayed out when Output Select is set to "Variable". • For some discs, setup may be required on the remote control unit. • Audio menu is grayed out when Output Select is set to "Variable". • For resetting all Audio adjustment items to the factory...
... exit. NOTE • Audio menu is grayed out when Output Select is set to "Variable". • For some discs, setup may be required on the remote control unit. • Audio menu is grayed out when Output Select is set to "Variable". • For resetting all Audio adjustment items to the factory...

LC-32D43U | LC-37D43U Operation Manual
Page 31
... stored and can also select the input source by pressing a/b. • If the corresponding input is not plugged in clearly from INPUT on the remote control unit or on the "Input Select" menu. 1 Press MENU to display the MENU screen, and then press c/d to select "Option". ...selectable sources appears. Auto COMPONENT VIDEO 1 Press INPUT. • A list of the external equipment for external equipment connection. 29 INPUT SOURCE TV INPUT1 INPUT2 INPUT3 INPUT4 INPUT5 INPUT6 4 Press MENU to exit. • The setting is connected will result in the following connection priority. ...
... stored and can also select the input source by pressing a/b. • If the corresponding input is not plugged in clearly from INPUT on the remote control unit or on the "Input Select" menu. 1 Press MENU to display the MENU screen, and then press c/d to select "Option". ...selectable sources appears. Auto COMPONENT VIDEO 1 Press INPUT. • A list of the external equipment for external equipment connection. 29 INPUT SOURCE TV INPUT1 INPUT2 INPUT3 INPUT4 INPUT5 INPUT6 4 Press MENU to exit. • The setting is connected will result in the following connection priority. ...

LC-32D43U | LC-37D43U Operation Manual
Page 32
...equipment 1 To watch an HDMI/PC-IN equipment image, select "INPUT4" or "INPUT5" from "INPUT SOURCE" menu using INPUT on the remote control unit or on signal recognition, including an HDMI signal. HDMI Setup items Selectable items Auto View Enable Disable Description Set whether or not ...Skip", and then press ENTER. 3 Press a/b to select the Input (INPUT 4, INPUT 5 or INPUT 6) you wish to use View Mode based on the TV. Select "Analog" for an audio signal via the HDMI terminal. Audio Only Digital Noise Reduction [Low] HDMI Setup Output Select [Fixed] 4 Press a/b to...
...equipment 1 To watch an HDMI/PC-IN equipment image, select "INPUT4" or "INPUT5" from "INPUT SOURCE" menu using INPUT on the remote control unit or on signal recognition, including an HDMI signal. HDMI Setup items Selectable items Auto View Enable Disable Description Set whether or not ...Skip", and then press ENTER. 3 Press a/b to select the Input (INPUT 4, INPUT 5 or INPUT 6) you wish to use View Mode based on the TV. Select "Analog" for an audio signal via the HDMI terminal. Audio Only Digital Noise Reduction [Low] HDMI Setup Output Select [Fixed] 4 Press a/b to...

LC-32D43U | LC-37D43U Operation Manual
Page 38
... On Audio is pressed. Selected item Fixed Description • Sound via speaker is adjusted with VOL k/l on the remote control unit or VOLl/k on the TV. • Sound via the AUDIO OUTPUT terminal is muted. Digital Noise Reduction Produces a clearer video image. Color System... Select the video signal system compatible with VOL k/l on the remote control unit or VOL l/k on the TV. • Sound via speaker is not adjustable and outputs at a consistent level. NTSC - See page 40 for digital ...
... On Audio is pressed. Selected item Fixed Description • Sound via speaker is adjusted with VOL k/l on the remote control unit or VOLl/k on the TV. • Sound via the AUDIO OUTPUT terminal is muted. Digital Noise Reduction Produces a clearer video image. Color System... Select the video signal system compatible with VOL k/l on the remote control unit or VOL l/k on the TV. • Sound via speaker is not adjustable and outputs at a consistent level. NTSC - See page 40 for digital ...

LC-32D43U | LC-37D43U Operation Manual
Page 48
Presetting manufacturer codes 1 Press FUNCTION until the LED for your device lights up. 2 After the LED for your remote control unit. 1 Press FREEZE. • A moving image that you are using the freeze function and a broadcast activates the V-CHIP BLOCK, the freeze ...function will be cancelled and a V-CHIP BLOCK message will appear. Presetting remote control function You can operate the connected AV products (AV Receiver, Cable Box, SAT tuner, DTV, VCR, DVD, LD) using the presetting manufacturer ...
Presetting manufacturer codes 1 Press FUNCTION until the LED for your device lights up. 2 After the LED for your remote control unit. 1 Press FREEZE. • A moving image that you are using the freeze function and a broadcast activates the V-CHIP BLOCK, the freeze ...function will be cancelled and a V-CHIP BLOCK message will appear. Presetting remote control function You can operate the connected AV products (AV Receiver, Cable Box, SAT tuner, DTV, VCR, DVD, LD) using the presetting manufacturer ...

LC-32D43U | LC-37D43U Operation Manual
Page 49
Other viewing options Manufacturer codes VCR BRAND REMOTE CONTROL CODE NUMBER DVD/LD BRAND REMOTE CONTROL CODE NUMBER CATV/SAT BRAND REMOTE CONTROL CODE NUMBER NOTE • Numbers marked with * are SAT codes, all others are CATV codes. AUDIO BRAND REMOTE CONTROL CODE NUMBER 47
Other viewing options Manufacturer codes VCR BRAND REMOTE CONTROL CODE NUMBER DVD/LD BRAND REMOTE CONTROL CODE NUMBER CATV/SAT BRAND REMOTE CONTROL CODE NUMBER NOTE • Numbers marked with * are SAT codes, all others are CATV codes. AUDIO BRAND REMOTE CONTROL CODE NUMBER 47
LC-32D43U | LC-37D43U Operation Manual
Page 51
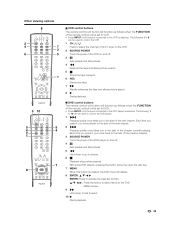
... search. 8 I Starts playback. 49 The following 1 to 8 can be used to control the DVD player. 1 L Pressing quickly once takes you to the start of the remote control unit is set to DVD. • Press INPUT until the input connected to the VCR is pressed, the DVD menu will display. 8 ENTER, a/b/c/d ENTER... in reverse. 6 H Playback stops when pressed. The following 1 to 10 can be used to control the VCR. 1 CH r/s Press to select the channel of the TV tuner on the VCR. 2 SOURCE POWER Turns the power of the VCR on the DVD MENU screen. 9 J Hold down to activate the selected function.
... search. 8 I Starts playback. 49 The following 1 to 8 can be used to control the DVD player. 1 L Pressing quickly once takes you to the start of the remote control unit is set to DVD. • Press INPUT until the input connected to the VCR is pressed, the DVD menu will display. 8 ENTER, a/b/c/d ENTER... in reverse. 6 H Playback stops when pressed. The following 1 to 10 can be used to control the VCR. 1 CH r/s Press to select the channel of the TV tuner on the VCR. 2 SOURCE POWER Turns the power of the VCR on the DVD MENU screen. 9 J Hold down to activate the selected function.


