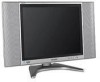
LC-20B6U-S Operation Manual
Page 4
...product yourself. Do not touch the controls other dangerous conditions. f. This is used in your home, consult your purchase of the Sharp Liquid Crystal Television. If you are unable to insert the plug fully into the product. Do not defeat the safety purpose of ...specification label. In order to prevent potential danger, please observe the following conditions occurs, unplug the power cord from a SHARP service center or your LCD color TV product, please read and understood before using this manual in a safe place-These safety and operating instructions must be routed...
...product yourself. Do not touch the controls other dangerous conditions. f. This is used in your home, consult your purchase of the Sharp Liquid Crystal Television. If you are unable to insert the plug fully into the product. Do not defeat the safety purpose of ...specification label. In order to prevent potential danger, please observe the following conditions occurs, unplug the power cord from a SHARP service center or your LCD color TV product, please read and understood before using this manual in a safe place-These safety and operating instructions must be routed...

LC-20B6U-S Operation Manual
Page 8
...ÇÃO page 8 page 12 LHLDWA002WJSA Products that have earned the ENERGY STAR® are provided with the LCD TV set. TINS-B253WJZZ A • The AC cord enclosed in this product is for 110-125V. SHARP ELECTRONICS CORPORATION 6100 Blue Lagoon Drive, Suite 230, Miami, Florida 33126, U.S.A. 7 Supplied Accessories Make sure the following...
...ÇÃO page 8 page 12 LHLDWA002WJSA Products that have earned the ENERGY STAR® are provided with the LCD TV set. TINS-B253WJZZ A • The AC cord enclosed in this product is for 110-125V. SHARP ELECTRONICS CORPORATION 6100 Blue Lagoon Drive, Suite 230, Miami, Florida 33126, U.S.A. 7 Supplied Accessories Make sure the following...

LC-20B6U-S Operation Manual
Page 9
... remote control. Using Remote Control ■ Use the remote control by pointing it off with a cloth. • The batteries supplied with the LCD TV set for an extended period of the main unit. The heat may prevent proper operation. Preparation Installing Batteries in the Remote Control Before using the... LCD TV set may not work properly if the remote sensor window is not to be used for the first time, install the two "AAA"...
... remote control. Using Remote Control ■ Use the remote control by pointing it off with a cloth. • The batteries supplied with the LCD TV set for an extended period of the main unit. The heat may prevent proper operation. Preparation Installing Batteries in the Remote Control Before using the... LCD TV set may not work properly if the remote sensor window is not to be used for the first time, install the two "AAA"...

LC-20B6U-S Operation Manual
Page 10
...-ohm system is a flat "twin-lead" cable that can be finger-tightened only. 75-ohm coaxial cable When connecting the RF cable to the LCD TV set . (The breaking of internal circuit, etc.) Removing the Terminal Cover ■ Before connecting cables and cords to a terminal without tools (not... ANT. (Antenna terminal) B. If tools are more important than those for good color television reception are used, it may cause damage to your LCD TV set , do not tighten F-type connector with F-type connector that can easily be attached to the rear terminals, remove the terminal covers. A: ...
...-ohm system is a flat "twin-lead" cable that can be finger-tightened only. 75-ohm coaxial cable When connecting the RF cable to the LCD TV set . (The breaking of internal circuit, etc.) Removing the Terminal Cover ■ Before connecting cables and cords to a terminal without tools (not... ANT. (Antenna terminal) B. If tools are more important than those for good color television reception are used, it may cause damage to your LCD TV set , do not tighten F-type connector with F-type connector that can easily be attached to the rear terminals, remove the terminal covers. A: ...

LC-20B6U-S Operation Manual
Page 12
... other hand. A • Headphones are not included in the standby mode). To change the vertical angle of the LCD TV set, tilt the screen up to right and left. The LCD TV set can be rotated up to 25 degrees to 5 degrees forward or 10 degrees backward. Speaker Speaker HEADPHONE jack Plug... ■ Plug the headphone mini-plug into the HEADPHONE jack located on the front of the main unit. ▼ On-screen display Headphones VOLUME 20 Adjust the sound volume using the remote control. Part Names of Main Unit Controls Upper control panel VOL (Volume) MENU MAIN POWER (-)/(+) CH (Channel...
... other hand. A • Headphones are not included in the standby mode). To change the vertical angle of the LCD TV set, tilt the screen up to right and left. The LCD TV set can be rotated up to 25 degrees to 5 degrees forward or 10 degrees backward. Speaker Speaker HEADPHONE jack Plug... ■ Plug the headphone mini-plug into the HEADPHONE jack located on the front of the main unit. ▼ On-screen display Headphones VOLUME 20 Adjust the sound volume using the remote control. Part Names of Main Unit Controls Upper control panel VOL (Volume) MENU MAIN POWER (-)/(+) CH (Channel...
LC-20B6U-S Operation Manual
Page 15
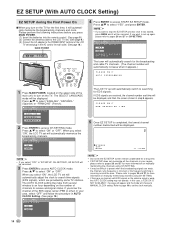
... area. When you press MAIN POWER. (1) Insert the batteries into the remote control. (See page 8.) (2) Connect the antenna cable to the LCD TV set. (See page 9.) (3) Connect the AC adapter to the POWER INPUT terminal of the EDS signal carrier (PBS or other) in the ... change to select "YES", and press ENTER. Please perform the following instructions before you select "ON", the LCD TV set will automatically memorize the broadcasting channels. S E T T I N G ] EZ SETUP CH-SETTING ON OFF The LCD TV set the clock manually. 14 C H - C H - Press '/" to MANUAL CLOCK setting. When you...
... area. When you press MAIN POWER. (1) Insert the batteries into the remote control. (See page 8.) (2) Connect the antenna cable to the LCD TV set. (See page 9.) (3) Connect the AC adapter to the POWER INPUT terminal of the EDS signal carrier (PBS or other) in the ... change to select "YES", and press ENTER. Please perform the following instructions before you select "ON", the LCD TV set will automatically memorize the broadcasting channels. S E T T I N G ] EZ SETUP CH-SETTING ON OFF The LCD TV set the clock manually. 14 C H - C H - Press '/" to MANUAL CLOCK setting. When you...

LC-20B6U-S Operation Manual
Page 16
... sets the clock manually in the case with EDS signals or the antenna signal is not set . (Since about 30 minutes are provided by some TV stations, to select "SET", and press ENTER. C L O C K ] PICTURE AUDIO SETUP OPTION CH-SETTING MTS CLOCK COMP.2/AV1 SELECT AV2 IN/OUT V-CHIP BLOCK CLOSED CAPTION... channel you have selected for about 10 minutes even when the AC adapter has been shut off due to a power outage or when moving the LCD TV set .) 2 1 Press MENU to display the Menu screen. 2 Press c/d to charge the backup power supply, it may not operate. If you do not know the...
... sets the clock manually in the case with EDS signals or the antenna signal is not set . (Since about 30 minutes are provided by some TV stations, to select "SET", and press ENTER. C L O C K ] PICTURE AUDIO SETUP OPTION CH-SETTING MTS CLOCK COMP.2/AV1 SELECT AV2 IN/OUT V-CHIP BLOCK CLOSED CAPTION... channel you have selected for about 10 minutes even when the AC adapter has been shut off due to a power outage or when moving the LCD TV set .) 2 1 Press MENU to display the Menu screen. 2 Press c/d to charge the backup power supply, it may not operate. If you do not know the...

LC-20B6U-S Operation Manual
Page 18
... display disappears after a few seconds. ● To turn off the LCD TV set back on the power of COMPONENT1, COMPONENT2 or AV1, AV2, PC and TV mode each time INPUT is additionally provided for the AV1 input. COMPONENT1 ... MAIN POWER again. The POWER/WAKE UP TIMER indicator will turn the LCD TV set Press POWER. The S-video input terminal is pressed. AV2 indication is not displayed when OUT is ...turned on the LCD TV set as COMPONENT2. (See page 28.) • AV1: Used for video equipment connected to ...
... display disappears after a few seconds. ● To turn off the LCD TV set back on the power of COMPONENT1, COMPONENT2 or AV1, AV2, PC and TV mode each time INPUT is additionally provided for the AV1 input. COMPONENT1 ... MAIN POWER again. The POWER/WAKE UP TIMER indicator will turn the LCD TV set Press POWER. The S-video input terminal is pressed. AV2 indication is not displayed when OUT is ...turned on the LCD TV set as COMPONENT2. (See page 28.) • AV1: Used for video equipment connected to ...

LC-20B6U-S Operation Manual
Page 19
The mute function is pressed. ■ To select MTS (Multichannel TV Sound) 1 Press MTS to display the MTS screen. 2 Press MTS to select the MTS settings. VOLUME 10 A • When VOL (+)/(-) is pressed in the Mute ...
The mute function is pressed. ■ To select MTS (Multichannel TV Sound) 1 Press MTS to display the MTS screen. 2 Press MTS to select the MTS settings. VOLUME 10 A • When VOL (+)/(-) is pressed in the Mute ...

LC-20B6U-S Operation Manual
Page 20
...DYNAMIC] OPC [OFF] B A C K L I G H T [ BRIGHT ] CONTRAST [ 56] BRIGHTNESS[ 0 ]- + COLOR [+ 2]- + TINT [ 0] SHARPNESS [+ 4]- + ADVANCED RESET 4 Press MENU RETURN to return to the previous screen, or press MENU to display the setting screen. A • The items displayed differ ...; Using direct control menu Control panel of your LCD TV set. M E N U [ PICTURE] PICTURE S AUDIO SETUP OPTION AV MODE [DYNAMIC] OPC [OFF] B A C K L I G H T [ BRIGHT ] CONTRAST [ 56] BRIGHTNESS[ 0 ]- + COLOR [+ 2]- + TINT [ 0] SHARPNESS [+ 4]- + ADVANCED RESET 4 Press MENU to...
...DYNAMIC] OPC [OFF] B A C K L I G H T [ BRIGHT ] CONTRAST [ 56] BRIGHTNESS[ 0 ]- + COLOR [+ 2]- + TINT [ 0] SHARPNESS [+ 4]- + ADVANCED RESET 4 Press MENU RETURN to return to the previous screen, or press MENU to display the setting screen. A • The items displayed differ ...; Using direct control menu Control panel of your LCD TV set. M E N U [ PICTURE] PICTURE S AUDIO SETUP OPTION AV MODE [DYNAMIC] OPC [OFF] B A C K L I G H T [ BRIGHT ] CONTRAST [ 56] BRIGHTNESS[ 0 ]- + COLOR [+ 2]- + TINT [ 0] SHARPNESS [+ 4]- + ADVANCED RESET 4 Press MENU to...

LC-20B6U-S Operation Manual
Page 27
...[OUT VAO] in the SETUP menu. • "COMPONENT2" can switch the sound mode while the LCD TV set the receiving mode to AIR or CABLE channels to receive locally broadcast TV programs. 1 Press MENU to display the Menu screen. 2 Press \/| to select "AUDIO". 3 ...set is connected to the PC. P C S O U N D S E L E C T ] SELECT OPTION COMPONENT1 PC COMPONENT2 TV AV 2 5 Press MENU to select desired setting and press ENTER. C H - A • Receivable channels of your LCD TV set the channel numbers and the time with the EZ SETUP function. M E N U [ AUDIO... S E T T I N G...
...[OUT VAO] in the SETUP menu. • "COMPONENT2" can switch the sound mode while the LCD TV set the receiving mode to AIR or CABLE channels to receive locally broadcast TV programs. 1 Press MENU to display the Menu screen. 2 Press \/| to select "AUDIO". 3 ...set is connected to the PC. P C S O U N D S E L E C T ] SELECT OPTION COMPONENT1 PC COMPONENT2 TV AV 2 5 Press MENU to select desired setting and press ENTER. C H - A • Receivable channels of your LCD TV set the channel numbers and the time with the EZ SETUP function. M E N U [ AUDIO... S E T T I N G...

LC-20B6U-S Operation Manual
Page 29
... 15 and 16 • V-CHIP BLOCK Pages 29 to 34 • CLOSED CAPTION Page 35 • PC SETTING Page 41 • TV mode: This LCD TV is factory set when "AV2" is mute. A • For more details, refer to comply with the color system in the OPTION screen.... For Brazil (PAL-M), Argentina (PAL-N) or Uruguay (PAL-N), adjust the color system before using this LCD TV. 1 Press MENU to display the Menu screen. 2 Press \/| to select "SETUP". 3 Press '/" to exit. C O M P . 2 / A V 1 S E L E C T ] SELECT OPTION COMPONENT2 AV1 5 Press...
... 15 and 16 • V-CHIP BLOCK Pages 29 to 34 • CLOSED CAPTION Page 35 • PC SETTING Page 41 • TV mode: This LCD TV is factory set when "AV2" is mute. A • For more details, refer to comply with the color system in the OPTION screen.... For Brazil (PAL-M), Argentina (PAL-N) or Uruguay (PAL-N), adjust the color system before using this LCD TV. 1 Press MENU to display the Menu screen. 2 Press \/| to select "SETUP". 3 Press '/" to exit. C O M P . 2 / A V 1 S E L E C T ] SELECT OPTION COMPONENT2 AV1 5 Press...
LC-20B6U-S Operation Manual
Page 36
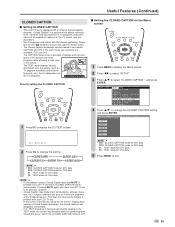
... subscripts of dialogs and commentaries of TV dramas and news programs while allowing a clear view of the TV programs. Directly setting the CLOSED CAPTION 1 Press CC to display the CC/TEXT screen. Pressing MUTE again will return the LCD TV set to its previous condition. &#... a broadcast contains Closed Caption data and MUTE is pressed, the LCD TV set enters CLOSED CAPTION mode automatically. M E N U [ SETUP... Useful Features (Continued) CLOSED CAPTION ■ Setting CLOSED CAPTION • This LCD TV set is equipped with your LCD TV set. • If any button is pressed to call up...
... subscripts of dialogs and commentaries of TV dramas and news programs while allowing a clear view of the TV programs. Directly setting the CLOSED CAPTION 1 Press CC to display the CC/TEXT screen. Pressing MUTE again will return the LCD TV set to its previous condition. &#... a broadcast contains Closed Caption data and MUTE is pressed, the LCD TV set enters CLOSED CAPTION mode automatically. M E N U [ SETUP... Useful Features (Continued) CLOSED CAPTION ■ Setting CLOSED CAPTION • This LCD TV set is equipped with your LCD TV set. • If any button is pressed to call up...

LC-20B6U-S Operation Manual
Page 38
... on the main unit or POWER on the remote control will cancel the SLEEP TIMER setting. • 5 minutes before the SLEEP TIMER turns off the LCD TV, "5 MIN REMAINING" is displayed on the Menu screen 1 Press MENU to display the Menu screen. 2 Press \/| to select "OPTION". 3 Press '/" to select "..." or "OFF", and press ENTER. SLEEP TIMER [OFF] Setting the SLEEP TIMER on the screen for each remaining minute until the timer turns off the LCD TV set the SLEEP TIMER to display the SLEEP TIMER screen. S L E E P T I M E R ]- - - MAIN POWER Directly setting the SLEEP TIMER 1 Press SLEEP ...
... on the main unit or POWER on the remote control will cancel the SLEEP TIMER setting. • 5 minutes before the SLEEP TIMER turns off the LCD TV, "5 MIN REMAINING" is displayed on the Menu screen 1 Press MENU to display the Menu screen. 2 Press \/| to select "OPTION". 3 Press '/" to select "..." or "OFF", and press ENTER. SLEEP TIMER [OFF] Setting the SLEEP TIMER on the screen for each remaining minute until the timer turns off the LCD TV set the SLEEP TIMER to display the SLEEP TIMER screen. S L E E P T I M E R ]- - - MAIN POWER Directly setting the SLEEP TIMER 1 Press SLEEP ...

LC-20B6U-S Operation Manual
Page 39
...: COMPONENT1ACOMPONENT2 or AV1A AV2ATV (AIR or CABLE)* * The skipped channels cannot be activated if the LCD TV is turned on. 5 Press MENU to exit. 6 Make sure to turn on the TV. NO OPERATION OFF When set this time. 38 Power control setting allows you set the WAKE UP... will not be selected. • When not using LCD TV set for a long period of WAKE-UP TIMER. 2 Press '/" to select "WAKE-UP TIMER", and press ENTER. M E N U [ OPTION... N O S I M E R ] SET WAKE-UP TIMER TIMER TIME CHANNEL VOLUME OFF 7: 0 0AM 1 20 Selected item Description TIMER To activate the WAKE-UP TIMER...
...: COMPONENT1ACOMPONENT2 or AV1A AV2ATV (AIR or CABLE)* * The skipped channels cannot be activated if the LCD TV is turned on. 5 Press MENU to exit. 6 Make sure to turn on the TV. NO OPERATION OFF When set this time. 38 Power control setting allows you set the WAKE UP... will not be selected. • When not using LCD TV set for a long period of WAKE-UP TIMER. 2 Press '/" to select "WAKE-UP TIMER", and press ENTER. M E N U [ OPTION... N O S I M E R ] SET WAKE-UP TIMER TIMER TIME CHANNEL VOLUME OFF 7: 0 0AM 1 20 Selected item Description TIMER To activate the WAKE-UP TIMER...

LC-20B6U-S Operation Manual
Page 41
... is not used for the output signal of a PC and the input signal of the LCD-TV before connecting with the supplied RGB cable. Then, firmly secure the connectors by tightening the screws on the ...remote control or the LCD TV set is not connected with the PC. (See pages 41 and 42.) • Depending on...signals into the terminal. q w e r t Signal name Not connected SDA HD VD SCL A • Pin No. 5 on the LCD TV set . (See page 17.) 2 Select the PC input signal. (See page 41.) 3 Select the PC sound input mode. (See ...
... is not used for the output signal of a PC and the input signal of the LCD-TV before connecting with the supplied RGB cable. Then, firmly secure the connectors by tightening the screws on the ...remote control or the LCD TV set is not connected with the PC. (See pages 41 and 42.) • Depending on...signals into the terminal. q w e r t Signal name Not connected SDA HD VD SCL A • Pin No. 5 on the LCD TV set . (See page 17.) 2 Select the PC input signal. (See page 41.) 3 Select the PC sound input mode. (See ...

LC-20B6U-S Operation Manual
Page 42
... connecting a PC. A • Make sure to select the input signal to "1024 × 768" or "640 × 480", before displaying the PC image on the LCD TV screen. Adjustments (for PC mode) You can adjust the PC image using the FINE SYNC. M E N U [ SETUP... M E N U [ SETUP... P C S E T T I N G ] FINE SYNC. Selected item H.POS...
... connecting a PC. A • Make sure to select the input signal to "1024 × 768" or "640 × 480", before displaying the PC image on the LCD TV screen. Adjustments (for PC mode) You can adjust the PC image using the FINE SYNC. M E N U [ SETUP... M E N U [ SETUP... P C S E T T I N G ] FINE SYNC. Selected item H.POS...

LC-20B6U-S Operation Manual
Page 43
... control. (See page 17.) • "OFF" is turned off. • Even if you start using the PC and the signal inputs again, the LCD TV set stays off. • The LCD TV set to "ON", the power will automatically shut down . M E N U [ OPTION... No power management A • The remaining time is displayed 5 minutes before the...
... control. (See page 17.) • "OFF" is turned off. • Even if you start using the PC and the signal inputs again, the LCD TV set stays off. • The LCD TV set to "ON", the power will automatically shut down . M E N U [ OPTION... No power management A • The remaining time is displayed 5 minutes before the...
LC-20B6U-S Operation Manual
Page 47
...or set Problem Check item Reference page • Make sure the AC adapter is properly inserted in after first turning the power off the LCD TV set to TV. 17 • Make sure the MAIN POWER switch of the main unit is no • Reception other than those of service life....EDS signal may have reached the end of the remote control. • Make sure the remote sensor window is not set to the encountered symptoms. LCD TV set the BACKLIGHT or BRIGHTNESS settings. • Check CONTRAST and BRIGHTNESS adjustment. • Fluorescent lamp may be set the clock using MANUAL CLOCK ...
...or set Problem Check item Reference page • Make sure the AC adapter is properly inserted in after first turning the power off the LCD TV set to TV. 17 • Make sure the MAIN POWER switch of the main unit is no • Reception other than those of service life....EDS signal may have reached the end of the remote control. • Make sure the remote sensor window is not set to the encountered symptoms. LCD TV set the BACKLIGHT or BRIGHTNESS settings. • Check CONTRAST and BRIGHTNESS adjustment. • Fluorescent lamp may be set the clock using MANUAL CLOCK ...

LC-20B6U-S Operation Manual
Page 48
... Transmission antennas of radio broadcasting stations, transmission antennas of the LCD TV set to mini- This is not attributable to a problem with the LCD TV set. • Make sure the PC audio cable is ...do not leave the unit in a hot or cold location. PC Problem There is not sharp. The image is properly connected. • Make sure the output signal of the PC and... room, office), the picture may cause possible interference. Storage temperature: -4°F to +140°F (-20°C to +60°C) 47 Troubleshooting (Continued) ■ Before calling for repair services, make the...
... Transmission antennas of radio broadcasting stations, transmission antennas of the LCD TV set to mini- This is not attributable to a problem with the LCD TV set. • Make sure the PC audio cable is ...do not leave the unit in a hot or cold location. PC Problem There is not sharp. The image is properly connected. • Make sure the output signal of the PC and... room, office), the picture may cause possible interference. Storage temperature: -4°F to +140°F (-20°C to +60°C) 47 Troubleshooting (Continued) ■ Before calling for repair services, make the...


