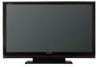
LC-65D93U Operation Manual
Page 7
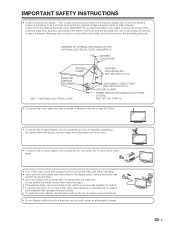
... type of candle or flames on the product. • To prevent fire or shock hazard, do not place the AC cord under the TV set . • To prevent fire or shock hazard, do not use a dirty cloth, liquid cleaners or chemical cloth to clean it . • To protect the... panel, do not expose this could cause an afterimage to the television equipment, be placed on the top or near the TV set or other heavy items. • Turn off the main power and unplug the AC cord from the wall outlet before handling. • Use a soft cloth...
... type of candle or flames on the product. • To prevent fire or shock hazard, do not place the AC cord under the TV set . • To prevent fire or shock hazard, do not use a dirty cloth, liquid cleaners or chemical cloth to clean it . • To protect the... panel, do not expose this could cause an afterimage to the television equipment, be placed on the top or near the TV set or other heavy items. • Turn off the main power and unplug the AC cord from the wall outlet before handling. • Use a soft cloth...
LC-65D93U Operation Manual
Page 10
... they are worn out. IF YOU STILL ENCOUNTER NO POWER, PLEASE CONTACT US AT 1-800-BE-SHARP. Mixing old and new batteries can cause a rash. If you have power to the AQUOS television...VCR, AUDIO, etc.) in your AQUOS operation manual. 8 Please refer to the BASIC ADJUSTMENT SETTINGS SECTION for EZ Setup and basic channel setup functions and USING EXTERNAL EQUIPMENT SECTION for an extended... or explosion. If the POWER indicator on the AQUOS television still does not light up, press TV POWER on the AQUOS television should light BLUE indicating you find any chemical leakage, wipe ...
... they are worn out. IF YOU STILL ENCOUNTER NO POWER, PLEASE CONTACT US AT 1-800-BE-SHARP. Mixing old and new batteries can cause a rash. If you have power to the AQUOS television...VCR, AUDIO, etc.) in your AQUOS operation manual. 8 Please refer to the BASIC ADJUSTMENT SETTINGS SECTION for EZ Setup and basic channel setup functions and USING EXTERNAL EQUIPMENT SECTION for an extended... or explosion. If the POWER indicator on the AQUOS television still does not light up, press TV POWER on the AQUOS television should light BLUE indicating you find any chemical leakage, wipe ...
LC-65D93U Operation Manual
Page 11
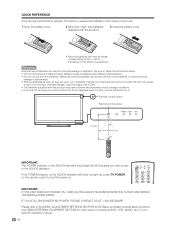
...LCD TV set are shown on the inside back cover. 9 adjustment (for DVI input mode only 33 Language setting 34 Image position 34 Reset 34 Input Label 35 Sleep Timer 35 View Mode for 4:3 Programs 36 View Mode for HD Programs 36 View Mode for PC input mode 37 Advanced Option settings... ........ 32 Input Skip 32 Useful adjustment settings 33 Auto Sync. Contents IMPORTANT INFORMATION 1 Trademarks 2 DEAR SHARP CUSTOMER 3 IMPORTANT SAFETY INSTRUCTIONS 3 Supplied accessories 6 QUICK REFERENCE 7 Contents 9 Part names 10 TV (Front 10 TV (Rear 10 Remote control unit 11 Preparation...
...LCD TV set are shown on the inside back cover. 9 adjustment (for DVI input mode only 33 Language setting 34 Image position 34 Reset 34 Input Label 35 Sleep Timer 35 View Mode for 4:3 Programs 36 View Mode for HD Programs 36 View Mode for PC input mode 37 Advanced Option settings... ........ 32 Input Skip 32 Useful adjustment settings 33 Auto Sync. Contents IMPORTANT INFORMATION 1 Trademarks 2 DEAR SHARP CUSTOMER 3 IMPORTANT SAFETY INSTRUCTIONS 3 Supplied accessories 6 QUICK REFERENCE 7 Contents 9 Part names 10 TV (Front 10 TV (Rear 10 Remote control unit 11 Preparation...

LC-65D93U Operation Manual
Page 13
...RETURN: Return to 32.) 8 VOL k/l: Set the volume. (See page 19.) 16 9 SURROUND: Select Surround settings. (See page 19.) 10 FREEZE: Set the still image. Part names Remote control unit 1 14 2 3 4 5 6 7 8 9 10 11 12 13 1 TV POWER: Switch the TV power on or enters standby. (See page... equipment on and off. 4 External equipment operational buttons: Operate the external equipment. 5 0 - 9: Set the channel. (See page 18.) 6 • (DOT): (See pages 18 and 50.) 15 7 INPUT: Select a TV input source. (TV, INPUT 1, INPUT 2, INPUT 3, INPUT 4, INPUT 5, INPUT 6, INPUT 7) (See pages 30 to...
...RETURN: Return to 32.) 8 VOL k/l: Set the volume. (See page 19.) 16 9 SURROUND: Select Surround settings. (See page 19.) 10 FREEZE: Set the still image. Part names Remote control unit 1 14 2 3 4 5 6 7 8 9 10 11 12 13 1 TV POWER: Switch the TV power on or enters standby. (See page... equipment on and off. 4 External equipment operational buttons: Operate the external equipment. 5 0 - 9: Set the channel. (See page 18.) 6 • (DOT): (See pages 18 and 50.) 15 7 INPUT: Select a TV input source. (TV, INPUT 1, INPUT 2, INPUT 3, INPUT 4, INPUT 5, INPUT 6, INPUT 7) (See pages 30 to...

LC-65D93U Operation Manual
Page 14
In such cases, change the angle of the lighting or the TV, or operate the remote control unit closer to the TV set, do not tighten F-type connector with high humidity. • Do not install or place the remote control unit under direct sunlight or ... for a coaxial cable. The heat may cause deformation of the remote control unit. • The remote control unit may prevent proper operation. If your TV set. (The breaking of internal circuit, etc.) F-type connector 75-ohm coaxial cable Connecting Antenna Cable 1 Cable without tools (Commercially available). F-type connector 75...
In such cases, change the angle of the lighting or the TV, or operate the remote control unit closer to the TV set, do not tighten F-type connector with high humidity. • Do not install or place the remote control unit under direct sunlight or ... for a coaxial cable. The heat may cause deformation of the remote control unit. • The remote control unit may prevent proper operation. If your TV set. (The breaking of internal circuit, etc.) F-type connector 75-ohm coaxial cable Connecting Antenna Cable 1 Cable without tools (Commercially available). F-type connector 75...

LC-65D93U Operation Manual
Page 15
...using component cable. (INPUT 1 or 3) Component video cable (commercially available) Blu-ray disc player/HD-DVD player/ DVD player/Digital TV STB When using a component or DVI cable and set the equipment to 1080p output. • See page 14 for connecting a Blu-ray disc player, HD-DVD player, DVD player or... a Digital TV STB to the HDMI terminal. 13 Connecting a Blu-ray disc player, HD-DVD player, DVD player or a Digital TV STB (Air or Cable) ...
...using component cable. (INPUT 1 or 3) Component video cable (commercially available) Blu-ray disc player/HD-DVD player/ DVD player/Digital TV STB When using a component or DVI cable and set the equipment to 1080p output. • See page 14 for connecting a Blu-ray disc player, HD-DVD player, DVD player or... a Digital TV STB to the HDMI terminal. 13 Connecting a Blu-ray disc player, HD-DVD player, DVD player or a Digital TV STB (Air or Cable) ...
LC-65D93U Operation Manual
Page 16
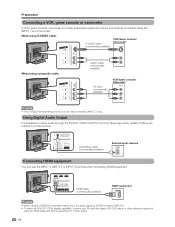
... audio outputs from the terminal. Preparation Connecting a VCR, game console or camcorder A VCR, game console, camcorder and other external equipment using an HDMI cable and set the equipment to 1080p output. 14 S-VIDEO cable (commercially available) VCR/Game console/ Camcorder When using S-VIDEO cable.
... audio outputs from the terminal. Preparation Connecting a VCR, game console or camcorder A VCR, game console, camcorder and other external equipment using an HDMI cable and set the equipment to 1080p output. 14 S-VIDEO cable (commercially available) VCR/Game console/ Camcorder When using S-VIDEO cable.

LC-65D93U Operation Manual
Page 17
... Microsystems, Inc. Power Management is a registered trademark of Video Electronics Standards Association. PC compatibility chart It is necessary to set PC input signals. VGA and XGA are connecting the TV to a PC with an HDMI terminal. (INPUT 4, 5 or 6) PC HDMI cable (commercially available) NOTE •... The HDMI terminals only support digital signal. Refer to page 39 to set the PC format correctly to display XGA and WXGA ...
... Microsystems, Inc. Power Management is a registered trademark of Video Electronics Standards Association. PC compatibility chart It is necessary to set PC input signals. VGA and XGA are connecting the TV to a PC with an HDMI terminal. (INPUT 4, 5 or 6) PC HDMI cable (commercially available) NOTE •... The HDMI terminals only support digital signal. Refer to page 39 to set the PC format correctly to display XGA and WXGA ...

LC-65D93U Operation Manual
Page 18
... period of time, be invoked. Watching TV Simple operations for watching a TV program POWER Turning on the power Press POWER on the TV, or TV POWER on the remote control unit. • POWER indicator (Blue): The TV is selected in SLEEP setting • See page 35 for details. TV POWER (On/Standby) TV status indicator (POWER) ON Lighting...
... period of time, be invoked. Watching TV Simple operations for watching a TV program POWER Turning on the power Press POWER on the TV, or TV POWER on the remote control unit. • POWER indicator (Blue): The TV is selected in SLEEP setting • See page 35 for details. TV POWER (On/Standby) TV status indicator (POWER) ON Lighting...

LC-65D93U Operation Manual
Page 19
... 20 ] Air ANALOG 2 Audio : MONO NOTE • If no channel is selected in the set area. Watching TV Initial setup When you turn on the TV for all channels viewable in Antenna setting: Press c/d to select "Start", and then press ENTER. Insert the batteries into the remote control... unit. (See page 8.) 2. Perform the following steps before you press TV POWER on the remote control unit. 1. Connect the antenna cable to enter the setting. Language setting Select from among 3 languages: English, French and Spanish. 1 Press a/b to select "Air" or...
... 20 ] Air ANALOG 2 Audio : MONO NOTE • If no channel is selected in the set area. Watching TV Initial setup When you turn on the TV for all channels viewable in Antenna setting: Press c/d to select "Start", and then press ENTER. Insert the batteries into the remote control... unit. (See page 8.) 2. Perform the following steps before you press TV POWER on the remote control unit. 1. Connect the antenna cable to enter the setting. Language setting Select from among 3 languages: English, French and Spanish. 1 Press a/b to select "Air" or...

LC-65D93U Operation Manual
Page 21
...However, the TV will be canceled after 30 minutes have the same settings by using one of pressing MUTE, mute can change the volume on the TV or on the... remote control unit. ■ Using MUTE on the remote control unit Mutes the current sound output. Each time you press VOLk/l or MUTE. • Mute will not suddenly output a loud sound as the volume level is set...Output device Speaker Output Select Fixed Variable Variable sound Mute * When "Output Select" is set to enjoy natural, realistic surround sound. SURROUND produces Surround effect from the speakers. Surround ...
...However, the TV will be canceled after 30 minutes have the same settings by using one of pressing MUTE, mute can change the volume on the TV or on the... remote control unit. ■ Using MUTE on the remote control unit Mutes the current sound output. Each time you press VOLk/l or MUTE. • Mute will not suddenly output a loud sound as the volume level is set...Output device Speaker Output Select Fixed Variable Variable sound Mute * When "Output Select" is set to enjoy natural, realistic surround sound. SURROUND produces Surround effect from the speakers. Surround ...

LC-65D93U Operation Manual
Page 22
...ST) Air ANALOG 2 Audio : MONO 20 The SAP feature allows a TV station to match the television broadcast signal. Watching TV Setting MTS/SAP stereo mode The TV has a feature that allows reception of audio transmitted in mono or stereo). The TV with MTS can change MTS as MONO and STEREO. NOTE • ... SAP sound. Examples: when receiving MTS and SAP STEREO mode MAINkSAP mode Air ANALOG 2 Audio : STEREO Air ANALOG 2 Audio : MAIN Setting Digital broadcasting audio mode The types of sound other than the main audio for multiple audio tracks to toggle between audio modes.
...ST) Air ANALOG 2 Audio : MONO 20 The SAP feature allows a TV station to match the television broadcast signal. Watching TV Setting MTS/SAP stereo mode The TV has a feature that allows reception of audio transmitted in mono or stereo). The TV with MTS can change MTS as MONO and STEREO. NOTE • ... SAP sound. Examples: when receiving MTS and SAP STEREO mode MAINkSAP mode Air ANALOG 2 Audio : STEREO Air ANALOG 2 Audio : MAIN Setting Digital broadcasting audio mode The types of sound other than the main audio for multiple audio tracks to toggle between audio modes.
LC-65D93U Operation Manual
Page 23
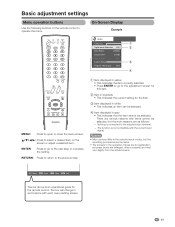
... slightly from the actual screens. : Select ENTER : Enter RETURN : Back MENU : Exit The bar above is not compatible with each menu setting screen. 21 On-Screen Display Example Option Audio Only 1 Digital Noise Reduction [Off] 2 Input Select [VIDEO] Output select [Fixed] Color System... [Auto] Caption Setup 3 Program Title Display [No] 4 MENU: Press to the selected input terminal. - Basic adjustment settings Menu operation buttons Use the following buttons on the screen or adjust a selected item. The bar will change in grey • This indicates ...
... slightly from the actual screens. : Select ENTER : Enter RETURN : Back MENU : Exit The bar above is not compatible with each menu setting screen. 21 On-Screen Display Example Option Audio Only 1 Digital Noise Reduction [Off] 2 Input Select [VIDEO] Output select [Fixed] Color System... [Auto] Caption Setup 3 Program Title Display [No] 4 MENU: Press to the selected input terminal. - Basic adjustment settings Menu operation buttons Use the following buttons on the screen or adjust a selected item. The bar will change in grey • This indicates ...
LC-65D93U Operation Manual
Page 24
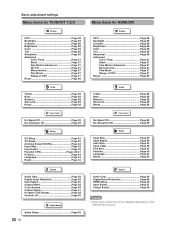
Basic adjustment settings Menu items for TV/INPUT 1/2/3 Picture OPC Page 26 Backlight Page 26 Contrast Page 26 Brightness Page 26 Color Page 26 Tint Page 26 Sharpness Page 26 Advanced Color Temp Page 27 Black Page 27 Fine Motion Advanced Page 27 3D-Y/C Page 27 Monochrome Page 27 Film Mode Page 27 ... 22 Menu items for HDMI/DVI Picture OPC Page 26 Backlight Page 26 Contrast Page 26 Brightness Page 26 Color Page 26 Tint Page 26 Sharpness Page 26 Advanced Color Temp Page 27 Black Page 27 Fine Motion Advanced Page 27 Monochrome Page 27 Film Mode Page 27 Range of OPC...
Basic adjustment settings Menu items for TV/INPUT 1/2/3 Picture OPC Page 26 Backlight Page 26 Contrast Page 26 Brightness Page 26 Color Page 26 Tint Page 26 Sharpness Page 26 Advanced Color Temp Page 27 Black Page 27 Fine Motion Advanced Page 27 3D-Y/C Page 27 Monochrome Page 27 Film Mode Page 27 ... 22 Menu items for HDMI/DVI Picture OPC Page 26 Backlight Page 26 Contrast Page 26 Brightness Page 26 Color Page 26 Tint Page 26 Sharpness Page 26 Advanced Color Temp Page 27 Black Page 27 Fine Motion Advanced Page 27 Monochrome Page 27 Film Mode Page 27 Range of OPC...
LC-65D93U Operation Manual
Page 25
... MENU to manually memorize the channels. NOTE • If no channel is selected in Antenna setting: Press c/d to exit. Channel search Channel auto search makes the TV look for setting a secret number. 3 Press a/b to select "Air/Cable", and then press ENTER. 4 Press a/b to select "EZ Setup...to select "Setup". 2 Press a/b to select the desired language listed on the screen, and then press ENTER. Antenna setting Make sure what kind of connection made with your TV when selecting "Air" or "Cable". 5 Press c/d to select "Start", and then press ENTER. Basic adjustment...
... MENU to manually memorize the channels. NOTE • If no channel is selected in Antenna setting: Press c/d to exit. Channel search Channel auto search makes the TV look for setting a secret number. 3 Press a/b to select "Air/Cable", and then press ENTER. 4 Press a/b to select "EZ Setup...to select "Setup". 2 Press a/b to select the desired language listed on the screen, and then press ENTER. Antenna setting Make sure what kind of connection made with your TV when selecting "Air" or "Cable". 5 Press c/d to select "Start", and then press ENTER. Basic adjustment...

LC-65D93U Operation Manual
Page 26
...3 Input the 2-digit channel number to select "Signal Strength". • The signal strength of the selected channel. • Make sure the signal is available for setting a secret number. 3 Press a/b to select "CH Memory", and then press ENTER. 4 Press a/b to select ANALOG (Air), ANALOG (Cable), DIGITAL (Air)...and then press b to move down. 2 Press c/d to exit. NOTE • Make sure what kind of connection is made with your TV. 3 Press a/b to check the signal strength of DIGITAL channel is based on the current channel. If necessary, adjust the direction of the ...
...3 Input the 2-digit channel number to select "Signal Strength". • The signal strength of the selected channel. • Make sure the signal is available for setting a secret number. 3 Press a/b to select "CH Memory", and then press ENTER. 4 Press a/b to select ANALOG (Air), ANALOG (Cable), DIGITAL (Air)...and then press b to move down. 2 Press c/d to exit. NOTE • Make sure what kind of connection is made with your TV. 3 Press a/b to check the signal strength of DIGITAL channel is based on the current channel. If necessary, adjust the direction of the ...

LC-65D93U Operation Manual
Page 27
...category, and then press ENTER to register. 6 Press MENU to exit. Using FAVORITE CH on the remote control unit 1 Select the channel you can also set your favorite channels easily. Yes A B Air 3 No C D Air 10.1 25 A B C D Air 3 Deleting a favorite channel 1 Press ... to select the position in Using Favorite CH on the menu screen You can select your favorite channels in 4 different categories. Basic adjustment settings Favorite channel setting This function allows you want to delete, and then press ENTER. 4 Press c/d to select "Yes", and then press ENTER. 5 Press...
...category, and then press ENTER to register. 6 Press MENU to exit. Using FAVORITE CH on the remote control unit 1 Select the channel you can also set your favorite channels easily. Yes A B Air 3 No C D Air 10.1 25 A B C D Air 3 Deleting a favorite channel 1 Press ... to select the position in Using Favorite CH on the menu screen You can select your favorite channels in 4 different categories. Basic adjustment settings Favorite channel setting This function allows you want to delete, and then press ENTER. 4 Press c/d to select "Yes", and then press ENTER. 5 Press...

LC-65D93U Operation Manual
Page 28
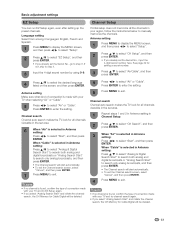
...On Backlight [b12] a16 Contrast [b30] 0 Brightness [ 0] a30 Color [ 0] a30 Tint [ 0] a30 Sharpness [ b2] a10 Advanced Reset On : Display b16 b40 b30 b30 b30 b10 NOTE • When set to "On", the OPC senses the surrounding light and automatically adjusts the backlight brightness. OPC... adjusts Displays the OPC effect on the screen while the OPC adjusts the screen brightness. Picture Audio 4 Press MENU to set in "Backlight". Selected item cbutton dbutton Backlight The screen dims The screen brightens Contrast For less contrast For more contrast Brightness...
...On Backlight [b12] a16 Contrast [b30] 0 Brightness [ 0] a30 Color [ 0] a30 Tint [ 0] a30 Sharpness [ b2] a10 Advanced Reset On : Display b16 b40 b30 b30 b30 b10 NOTE • When set to "On", the OPC senses the surrounding light and automatically adjusts the backlight brightness. OPC... adjusts Displays the OPC effect on the screen while the OPC adjusts the screen brightness. Picture Audio 4 Press MENU to set in "Backlight". Selected item cbutton dbutton Backlight The screen dims The screen brightens Contrast For less contrast For more contrast Brightness...

LC-65D93U Operation Manual
Page 29
... of OPC". 4 Press a/b (or c/d) to select the desired parameter. • See the table for the selectable parameters. 5 Press MENU to exit. Basic adjustment settings Advanced picture adjustments This TV provides various advanced functions for optimizing the picture quality. 1 Press MENU to display the MENU screen, and then press c/d to select "Picture". 2 Press...
... of OPC". 4 Press a/b (or c/d) to select the desired parameter. • See the table for the selectable parameters. 5 Press MENU to exit. Basic adjustment settings Advanced picture adjustments This TV provides various advanced functions for optimizing the picture quality. 1 Press MENU to display the MENU screen, and then press c/d to select "Picture". 2 Press...

LC-65D93U Operation Manual
Page 30
... c/d to select "Audio". 2 Press a/b to select "Yes", and then press ENTER. 28 NOTE • Audio menu is grayed out when Output Select is set to "Variable". • For resetting all Audio adjustment items to the factory preset values, press a/b to select "Reset", press ENTER, press c/d to select "Surround...some discs, setup may be required on the remote control unit. (See page 19.) • Audio menu is grayed out when Output Select is set to the desired level. NOTE • You can adjust the sound quality to exit. Audio Power Control 1 Press MENU to display the MENU ...
... c/d to select "Audio". 2 Press a/b to select "Yes", and then press ENTER. 28 NOTE • Audio menu is grayed out when Output Select is set to "Variable". • For resetting all Audio adjustment items to the factory preset values, press a/b to select "Reset", press ENTER, press c/d to select "Surround...some discs, setup may be required on the remote control unit. (See page 19.) • Audio menu is grayed out when Output Select is set to the desired level. NOTE • You can adjust the sound quality to exit. Audio Power Control 1 Press MENU to display the MENU ...


