LC-46D62U | LC-52D62U Operation Manual
Page 2
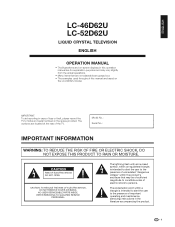
... • Menu items that may be of sufficient magnitude to constitute a risk of loss or theft, please record the TV's model and serial numbers in the literature accompanying the product. 1 The lightning flash with arrow-head symbol, within an ...screen displays in this operation manual are located at the rear of important operating and maintenance (servicing) instructions in the space provided. CAUTION RISK OF ELECTRIC SHOCK DO NOT OPEN CAUTION: TO REDUCE THE RISK OF ELECTRIC SHOCK, DO NOT REMOVE COVER (OR BACK). REFER SERVICING TO QUALIFIED SERVICE PERSONNEL. ENGLISH LC-46D62U LC...
... • Menu items that may be of sufficient magnitude to constitute a risk of loss or theft, please record the TV's model and serial numbers in the literature accompanying the product. 1 The lightning flash with arrow-head symbol, within an ...screen displays in this operation manual are located at the rear of important operating and maintenance (servicing) instructions in the space provided. CAUTION RISK OF ELECTRIC SHOCK DO NOT OPEN CAUTION: TO REDUCE THE RISK OF ELECTRIC SHOCK, DO NOT REMOVE COVER (OR BACK). REFER SERVICING TO QUALIFIED SERVICE PERSONNEL. ENGLISH LC-46D62U LC...
LC-46D62U | LC-52D62U Operation Manual
Page 5
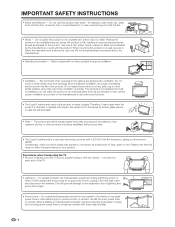
..., be situated away from touching such power lines or circuits as a fixed point of the product. When mounting the product on the screen as contact with 6,220,800 thin film transistors, giving you fine picture details. The vents and other openings in the cabinet ...surface, since insufficient ventilation can cause the product to lightning and power-line surges. • Power Lines - Precautions when transporting the TV • Be sure to keep from heat sources such as a bookcase or rack, unless proper ventilation is dropped or applied with two hands -...
..., be situated away from touching such power lines or circuits as a fixed point of the product. When mounting the product on the screen as contact with 6,220,800 thin film transistors, giving you fine picture details. The vents and other openings in the cabinet ...surface, since insufficient ventilation can cause the product to lightning and power-line surges. • Power Lines - Precautions when transporting the TV • Be sure to keep from heat sources such as a bookcase or rack, unless proper ventilation is dropped or applied with two hands -...
LC-46D62U | LC-52D62U Operation Manual
Page 8
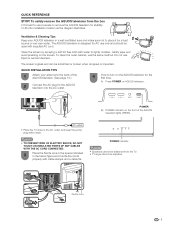
... AQUOS television into the AC outlet. 4 How to lightly moisten. The AQUOS television is glass and can be used with water to turn on the screen. Do not use the same method. A) Press POWER on the front of the AQUOS television. (See page 12.) 2 Connect the AC plug for stability.... not to place it by spraying a soft lint free cloth with supplied AC cord. To safely remove the AQUOS television from the TV. • TV angle cannot be adjusted. QUICK REFERENCE STOP! Clean the screen by a heat source or use 2 people to the AC outlet, and keep the power plug within reach.
... AQUOS television into the AC outlet. 4 How to lightly moisten. The AQUOS television is glass and can be used with water to turn on the screen. Do not use the same method. A) Press POWER on the front of the AQUOS television. (See page 12.) 2 Connect the AC plug for stability.... not to place it by spraying a soft lint free cloth with supplied AC cord. To safely remove the AQUOS television from the TV. • TV angle cannot be adjusted. QUICK REFERENCE STOP! Clean the screen by a heat source or use 2 people to the AC outlet, and keep the power plug within reach.
LC-46D62U | LC-52D62U Operation Manual
Page 10
...SHARP CUSTOMER 3 IMPORTANT SAFETY INSTRUCTIONS 3 Supplied accessories 6 QUICK REFERENCE 6 Attaching the stand 6 Contents 9 Part names 10 TV (Front 10 TV ...ray disc player, HD-DVD player, DVD player or a Digital TV STB (Air or Cable) .... 13 Connecting a VCR, game console...PC format 14 PC format compatibility chart 14 Watching TV 15 Turning on the power 15 Turning off the ... 20 Menu operation buttons 20 On-Screen Display 20 Menu items for TV/INPUT 1/2/3 21 Menu items for HDMI...Appendix 49 Removing the stand 49 Setting the TV on the wall 49 Troubleshooting 50 Troubleshooting-Digital ...
...SHARP CUSTOMER 3 IMPORTANT SAFETY INSTRUCTIONS 3 Supplied accessories 6 QUICK REFERENCE 6 Attaching the stand 6 Contents 9 Part names 10 TV (Front 10 TV ...ray disc player, HD-DVD player, DVD player or a Digital TV STB (Air or Cable) .... 13 Connecting a VCR, game console...PC format 14 PC format compatibility chart 14 Watching TV 15 Turning on the power 15 Turning off the ... 20 Menu operation buttons 20 On-Screen Display 20 Menu items for TV/INPUT 1/2/3 21 Menu items for HDMI...Appendix 49 Removing the stand 49 Setting the TV on the wall 49 Troubleshooting 50 Troubleshooting-Digital ...
LC-46D62U | LC-52D62U Operation Manual
Page 12
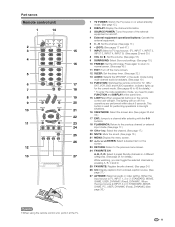
... the TV power on or enters standby mode. (See page 15.) 2 DISPLAY: Display the channel information. 3 SOURCE POWER: Turns the power of the external equipment on and off if no 20 operations are performed within about 5 seconds. Indicator lights up 18 for the current mode. (See pages 45 to normal screen. ...page 45.) 11 EXIT: Turn off the menu screen. 12 SLEEP: Set the sleep timer. (See page 32.) 13 AUDIO: Selects the MTS/SAP or the audio mode during multi-channel audio broadcasts. (See page 19.) 17 14 FUNCTION: Switches the remote control for TV, CBL/ SAT, VCR, DVD and AUDIO ...
... the TV power on or enters standby mode. (See page 15.) 2 DISPLAY: Display the channel information. 3 SOURCE POWER: Turns the power of the external equipment on and off if no 20 operations are performed within about 5 seconds. Indicator lights up 18 for the current mode. (See pages 45 to normal screen. ...page 45.) 11 EXIT: Turn off the menu screen. 12 SLEEP: Set the sleep timer. (See page 32.) 13 AUDIO: Selects the MTS/SAP or the audio mode during multi-channel audio broadcasts. (See page 19.) 17 14 FUNCTION: Switches the remote control for TV, CBL/ SAT, VCR, DVD and AUDIO ...
LC-46D62U | LC-52D62U Operation Manual
Page 16
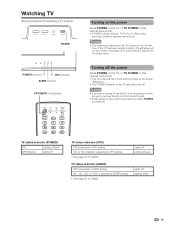
Turning off the power Press POWER on the TV, or TV POWER on the remote control unit. • The TV enters standby mode and the image on the screen disappears. • The POWER indicator on the TV gradually turns off Lighting (Red) 15 TV status indicator (SLEEP) "Off" is selected in SLEEP setting "30", "60", "... off . See page 22 for performing EZ Setup from the AC outlet. • Weak electric power is still consumed even when POWER is turned off TV status indicator (OPC) "Off" is selected in OPC setting "On" or "On: Display" is selected in SLEEP setting • See page 32 for...
Turning off the power Press POWER on the TV, or TV POWER on the remote control unit. • The TV enters standby mode and the image on the screen disappears. • The POWER indicator on the TV gradually turns off Lighting (Red) 15 TV status indicator (SLEEP) "Off" is selected in SLEEP setting "30", "60", "... off . See page 22 for performing EZ Setup from the AC outlet. • Weak electric power is still consumed even when POWER is turned off TV status indicator (OPC) "Off" is selected in OPC setting "On" or "On: Display" is selected in SLEEP setting • See page 32 for...

LC-46D62U | LC-52D62U Operation Manual
Page 17
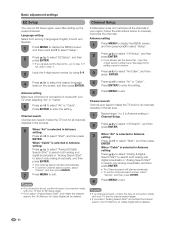
...enter the setting. Language setting Select from among 3 languages: English, French and Spanish. 1 Press a/b to select the desired language listed on the screen, and then press ENTER. 3 When "Air" is selected in Antenna setting: Press c/d to select "Air" or "Cable". Perform the following steps... Search Start" to the AC outlet. (See page 7.) Channel search Channel auto search makes the TV look for the first time, it will start automatically. • To exit the Channel search screen, select "Cancel", and then press ENTER. Insert the batteries into the remote control unit. (See...
...enter the setting. Language setting Select from among 3 languages: English, French and Spanish. 1 Press a/b to select the desired language listed on the screen, and then press ENTER. 3 When "Air" is selected in Antenna setting: Press c/d to select "Air" or "Cable". Perform the following steps... Search Start" to the AC outlet. (See page 7.) Channel search Channel auto search makes the TV look for the first time, it will start automatically. • To exit the Channel search screen, select "Cancel", and then press ENTER. Insert the batteries into the remote control unit. (See...
LC-46D62U | LC-52D62U Operation Manual
Page 19
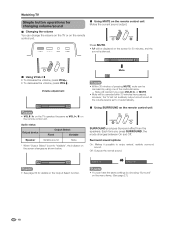
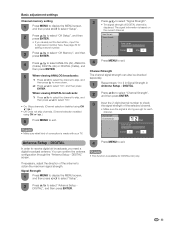
Watching TV Simple button operations for changing volume/sound ■ Changing the volume You can be canceled by choosing "Surround" on the menu items. (See page 27.) 18 Press MUTE. • M will be displayed on the screen for details on the Output Select function. Surround : Off Surround : On NOTE...minutes have the same settings by using one of pressing MUTE, mute can change the volume on the TV or on the remote control unit. ■ Using MUTE on the screen changes as VOL k/l on the remote control unit SURROUND produces Surround effect from the speakers. Surround ...
Watching TV Simple button operations for changing volume/sound ■ Changing the volume You can be canceled by choosing "Surround" on the menu items. (See page 27.) 18 Press MUTE. • M will be displayed on the screen for details on the Output Select function. Surround : Off Surround : On NOTE...minutes have the same settings by using one of pressing MUTE, mute can change the volume on the TV or on the remote control unit. ■ Using MUTE on the screen changes as VOL k/l on the remote control unit SURROUND produces Surround effect from the speakers. Surround ...
LC-46D62U | LC-52D62U Operation Manual
Page 21
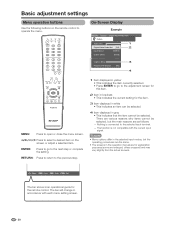
... reasons are enlarged, others cropped) and may vary slightly from the actual screens. : Select ENTER : Enter RETURN : Back MENU : Exit The bar above is connected to open or close the menu screen. Nothing is an operational guide for explanation purposes (some are as follows...select [Fixed] Color System [Auto] Caption Setup 3 Program Title Display [No] 4 MENU: Press to the selected input terminal. - On-Screen Display Example MENU [Option ... There are various reasons why items cannot be selected. Basic adjustment settings Menu operation buttons Use the following buttons ...
... reasons are enlarged, others cropped) and may vary slightly from the actual screens. : Select ENTER : Enter RETURN : Back MENU : Exit The bar above is connected to open or close the menu screen. Nothing is an operational guide for explanation purposes (some are as follows...select [Fixed] Color System [Auto] Caption Setup 3 Program Title Display [No] 4 MENU: Press to the selected input terminal. - On-Screen Display Example MENU [Option ... There are various reasons why items cannot be selected. Basic adjustment settings Menu operation buttons Use the following buttons ...
LC-46D62U | LC-52D62U Operation Manual
Page 23
... ENTER. 3 When "Air" is selected in Antenna setting: Press c/d to select "Start", and then press ENTER When "Cable" is made with your TV and try channel search again. • If you select "Analog Search Start" and initiate the channel search, the CH Memory for setting a secret number....again, even after setting up the preset channels. Language setting Select from among 3 languages: English, French and Spanish. 1 Press MENU to display the MENU screen, and then press c/d to select "Setup". 2 Press a/b to select "EZ Setup", and then press ENTER. • If you already set the ...
... ENTER. 3 When "Air" is selected in Antenna setting: Press c/d to select "Start", and then press ENTER When "Cable" is made with your TV and try channel search again. • If you select "Analog Search Start" and initiate the channel search, the CH Memory for setting a secret number....again, even after setting up the preset channels. Language setting Select from among 3 languages: English, French and Spanish. 1 Press MENU to display the MENU screen, and then press c/d to select "Setup". 2 Press a/b to select "EZ Setup", and then press ENTER. • If you already set the ...
LC-46D62U | LC-52D62U Operation Manual
Page 24
... using CH r/s.) 6 Press MENU to select "On", and then press ENTER. NOTE • Make sure what kind of connection is made with your TV. 3 Press a/b to select "Signal Strength". • The signal strength of DIGITAL channel is available for DIGITAL (Air) only. 2 Press a/b to...signal strength of the antenna to exit. You can also be checked separately. 1 Repeat steps 1 to 2 in Signal Strength in Antenna Setup - DIGITAL" screen. The signal information is strong enough for setting a secret number. 3 Press a/b to select "CH Memory", and then press ENTER. 4 Press a/b to...
... using CH r/s.) 6 Press MENU to select "On", and then press ENTER. NOTE • Make sure what kind of connection is made with your TV. 3 Press a/b to select "Signal Strength". • The signal strength of DIGITAL channel is available for DIGITAL (Air) only. 2 Press a/b to...signal strength of the antenna to exit. You can also be checked separately. 1 Repeat steps 1 to 2 in Signal Strength in Antenna Setup - DIGITAL" screen. The signal information is strong enough for setting a secret number. 3 Press a/b to select "CH Memory", and then press ENTER. 4 Press a/b to...

LC-46D62U | LC-52D62U Operation Manual
Page 25
...the category, and then press ENTER to register. 6 Press MENU to exit. Using Favorite CH on the menu screen You can select your favorite channels in "Option" on the menu screen. 2 Press a/b to select "1 Data Clear", and then press ENTER. • To delete all the favorite... setting This function allows you to delete, and then press ENTER. A B C D Air 3 Deleting a favorite channel 1 Press FAVORITE and the favorite channel screen displays. 2 Press a/b to select "1 Data Clear", and then press ENTER. • To delete all the favorite channels, select "All Data Clear", and...
...the category, and then press ENTER to register. 6 Press MENU to exit. Using Favorite CH on the menu screen You can select your favorite channels in "Option" on the menu screen. 2 Press a/b to select "1 Data Clear", and then press ENTER. • To delete all the favorite... setting This function allows you to delete, and then press ENTER. A B C D Air 3 Deleting a favorite channel 1 Press FAVORITE and the favorite channel screen displays. 2 Press a/b to select "1 Data Clear", and then press ENTER. • To delete all the favorite channels, select "All Data Clear", and...
LC-46D62U | LC-52D62U Operation Manual
Page 26
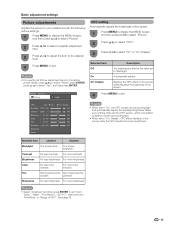
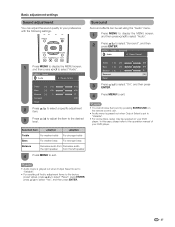
... become Skin tones become purplish greenish Sharpness For less sharpness For more sharpness NOTE • Select "Advanced" and then press ENTER to set in "Backlight". Basic adjustment settings Picture adjustments Adjusts the picture to your preference with the following picture settings. 1 Press MENU to display the MENU screen, and then press c/d to select "Picture...
... become Skin tones become purplish greenish Sharpness For less sharpness For more sharpness NOTE • Select "Advanced" and then press ENTER to set in "Backlight". Basic adjustment settings Picture adjustments Adjusts the picture to your preference with the following picture settings. 1 Press MENU to display the MENU screen, and then press c/d to select "Picture...
LC-46D62U | LC-52D62U Operation Manual
Page 27
... a maximum of e16 and a minimum of an image for easier viewing. Basic adjustment settings Advanced picture adjustments This TV provides various advanced functions for optimizing the picture quality. 1 Press MENU to display the MENU screen, and then press c/d to select "Picture". 2 Press a/b to select "Advanced", and then press ENTER. 3 Press a/b to select...
... a maximum of e16 and a minimum of an image for easier viewing. Basic adjustment settings Advanced picture adjustments This TV provides various advanced functions for optimizing the picture quality. 1 Press MENU to display the MENU screen, and then press c/d to select "Picture". 2 Press a/b to select "Advanced", and then press ENTER. 3 Press a/b to select...
LC-46D62U | LC-52D62U Operation Manual
Page 28
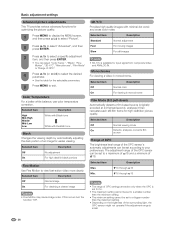
... c/d to adjust the item to "Variable". • For some discs, setup may be set using the "Audio" menu. 1 Press MENU to display the MENU screen, and then press c/d to select "Audio". 2 Press a/b to select "Surround", and then press ENTER. NOTE • You can choose Surround by pressing SURROUND on... your DVD player. Surround] Audio Power Control 1 Press MENU to display the MENU screen, and then press c/d to select "Yes", and then press ENTER. 27 NOTE • Audio menu is grayed out when Output Select is set ...
... c/d to adjust the item to "Variable". • For some discs, setup may be set using the "Audio" menu. 1 Press MENU to display the MENU screen, and then press c/d to select "Audio". 2 Press a/b to select "Surround", and then press ENTER. NOTE • You can choose Surround by pressing SURROUND on... your DVD player. Surround] Audio Power Control 1 Press MENU to display the MENU screen, and then press c/d to select "Yes", and then press ENTER. 27 NOTE • Audio menu is grayed out when Output Select is set ...

LC-46D62U | LC-52D62U Operation Manual
Page 29
... an AV amplifier or similar device whose DIGITAL AUDIO INPUT terminal is no operation for 15 minutes. 1 Press MENU to display the MENU screen, and then press c/d to select "Power Control". 2 Press a/b to select "No Signal Off", and then press ENTER. 3 Press c/d to exit... Power Control Power control setting allows you to the DIGITAL AUDIO OUTPUT terminal on the TV. Enable Disable Digital Setup This setting allows you are watching and the equipment connected. 1 Press MENU to display the MENU screen, and then press c/d to select "Digital Setup". 2 Press a/b to select "...
... an AV amplifier or similar device whose DIGITAL AUDIO INPUT terminal is no operation for 15 minutes. 1 Press MENU to display the MENU screen, and then press c/d to select "Power Control". 2 Press a/b to select "No Signal Off", and then press ENTER. 3 Press c/d to exit... Power Control Power control setting allows you to the DIGITAL AUDIO OUTPUT terminal on the TV. Enable Disable Digital Setup This setting allows you are watching and the equipment connected. 1 Press MENU to display the MENU screen, and then press c/d to select "Digital Setup". 2 Press a/b to select "...
LC-46D62U | LC-52D62U Operation Manual
Page 30
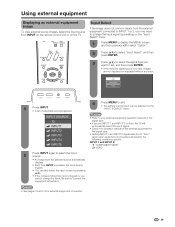
...Each time INPUT is pressed, the input source toggles. • You can be selected on the "Input Select" menu. 1 Press MENU to display the MENU screen, and then press c/d to select "Option". 2 Press a/b to select "Input Select", and then press ENTER. 3 Press a/b to select the signal type ...you may need to change the input. INPUT SOURCE TV INPUT1 INPUT2 INPUT3 INPUT4 INPUT5 4 Press MENU to exit. • The setting is stored and can also select the input source by pressing a/b. •...
...Each time INPUT is pressed, the input source toggles. • You can be selected on the "Input Select" menu. 1 Press MENU to display the MENU screen, and then press c/d to select "Option". 2 Press a/b to select "Input Select", and then press ENTER. 3 Press a/b to select the signal type ...you may need to change the input. INPUT SOURCE TV INPUT1 INPUT2 INPUT3 INPUT4 INPUT5 4 Press MENU to exit. • The setting is stored and can also select the input source by pressing a/b. •...
LC-46D62U | LC-52D62U Operation Manual
Page 31
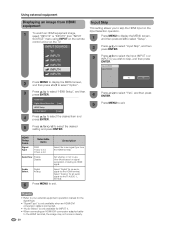
... then press ENTER. Input Skip This setting allows you to skip the HDMI Input on the Input Selection operation. 1 Press MENU to display the MENU screen, and then press c/d to select "Setup". 2 Press a/b to select "Input Skip", and then press ENTER. 3 Press a/b to select the Input ...to the HDMI terminal, the image may not come in clearly. 30 INPUT SOURCE TV INPUT1 INPUT2 INPUT3 INPUT4 INPUT5 2 Press MENU to display the MENU screen, and then press c/d to use View Mode based on the TV. Audio Select Digital Analog Select "Digital" for INPUT 4. • When connecting ...
... then press ENTER. Input Skip This setting allows you to skip the HDMI Input on the Input Selection operation. 1 Press MENU to display the MENU screen, and then press c/d to select "Setup". 2 Press a/b to select "Input Skip", and then press ENTER. 3 Press a/b to select the Input ...to the HDMI terminal, the image may not come in clearly. 30 INPUT SOURCE TV INPUT1 INPUT2 INPUT3 INPUT4 INPUT5 2 Press MENU to display the MENU screen, and then press c/d to use View Mode based on the TV. Audio Select Digital Analog Select "Digital" for INPUT 4. • When connecting ...
LC-46D62U | LC-52D62U Operation Manual
Page 32
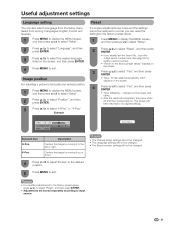
...39 for setting a secret number. • "Return to the factory preset values" displays on the screen. 4 Press c/d to select "Yes", and then press ENTER. • "Now, TV will restart automatically. displays on the screen. 3 Press c/d to select "Yes", and then press ENTER. • "Now initializing..." H-Pos...The Language settings will not be changed . Image position For adjusting a picture's horizontal and vertical position. 1 Press MENU to display the MENU screen, and then press c/d to select "Setup". 2 Press a/b to select "Position", and then press ENTER. 3 Press a/b to its ...
...39 for setting a secret number. • "Return to the factory preset values" displays on the screen. 4 Press c/d to select "Yes", and then press ENTER. • "Now, TV will restart automatically. displays on the screen. 3 Press c/d to select "Yes", and then press ENTER. • "Now initializing..." H-Pos...The Language settings will not be changed . Image position For adjusting a picture's horizontal and vertical position. 1 Press MENU to display the MENU screen, and then press c/d to select "Setup". 2 Press a/b to select "Position", and then press ENTER. 3 Press a/b to its ...

LC-46D62U | LC-52D62U Operation Manual
Page 33
... input terminal displayed when using the INPUT SOURCE menu or channel display. Useful adjustment settings Input Label Lets you to set a time when the TV automatically switches to standby. 1 Press SLEEP. • The remaining time displays when the sleep timer has been set. Off 30 60 4 ... time reaches zero. • When the sleep timer is TV. 32 Sleep Timer Allows you set , its indicator on the TV lights red. Sleep Timer: Remaining 30 1 Press INPUT to select the desired input source. 2 Press MENU to display the MENU screen, and then press c/d to select "Setup". 3 Press ...
... input terminal displayed when using the INPUT SOURCE menu or channel display. Useful adjustment settings Input Label Lets you to set a time when the TV automatically switches to standby. 1 Press SLEEP. • The remaining time displays when the sleep timer has been set. Off 30 60 4 ... time reaches zero. • When the sleep timer is TV. 32 Sleep Timer Allows you set , its indicator on the TV lights red. Sleep Timer: Remaining 30 1 Press INPUT to select the desired input source. 2 Press MENU to display the MENU screen, and then press c/d to select "Setup". 3 Press ...


