
LC-45GD7U Operation Manual
Page 7
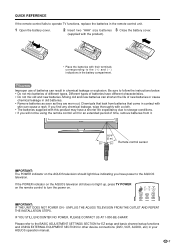
... (5 m) 30° 30° Remote control sensor IMPORTANT: The POWER indicator on the remote control to the BASIC ADJUSTMENT SETTINGS SECTION for EZ setup and basic channel setup functions and USING EXTERNAL EQUIPMENT SECTION for an extended period of new batteries or cause chemical leakage in old batteries. • Remove batteries as... life of time, remove batteries from batteries that come in the battery compartment. IF YOU STILL ENCOUNTER NO POWER, PLEASE CONTACT US AT 1-800-BE-SHARP.
... (5 m) 30° 30° Remote control sensor IMPORTANT: The POWER indicator on the remote control to the BASIC ADJUSTMENT SETTINGS SECTION for EZ setup and basic channel setup functions and USING EXTERNAL EQUIPMENT SECTION for an extended period of new batteries or cause chemical leakage in old batteries. • Remove batteries as... life of time, remove batteries from batteries that come in the battery compartment. IF YOU STILL ENCOUNTER NO POWER, PLEASE CONTACT US AT 1-800-BE-SHARP.
LC-45GD7U Operation Manual
Page 8
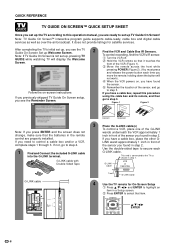
... 1 inch in front of the sensor, and go to the TV as over-the-air broadcast. a/b/c/d ENTER 8 QUICK REFERENCE TV GUIDE ON SCREEN™ QUICK SETUP SHEET Once you set up the TV according to this procedure using the cable box and its remote, and then go to step 3. Note: If... Guide On Screen! holding down the button will not work). 4 When the VCR powers on -screen instructions If you previously skipped TV Guide On Screen setup, you press ENTER and the screen does not change, make sure that it touches the front of the sensor you see the Reminder Screen. 2 Find...
... 1 inch in front of the sensor, and go to the TV as over-the-air broadcast. a/b/c/d ENTER 8 QUICK REFERENCE TV GUIDE ON SCREEN™ QUICK SETUP SHEET Once you set up the TV according to this procedure using the cable box and its remote, and then go to step 3. Note: If... Guide On Screen! holding down the button will not work). 4 When the VCR powers on -screen instructions If you previously skipped TV Guide On Screen setup, you press ENTER and the screen does not change, make sure that it touches the front of the sensor you see the Reminder Screen. 2 Find...

LC-45GD7U Operation Manual
Page 9
...are registered marks of Transcontinental Inc., 8 This screen asks you if the settings are and is "YES", you do not have successfully completed setup for details. International, Inc. Follow the on step 3 in step 8 about confirming all of its affiliates. If the answer is "...input used under license by Gemstar-TV Guide correct, so far. When successfully completed, you can change any incorrect information by repeating the Setup process. If the answer is a registered mark of Gemstar-TV Guide International, Inc. with the process. In Canada, TV GUIDE is...
...are registered marks of Transcontinental Inc., 8 This screen asks you if the settings are and is "YES", you do not have successfully completed setup for details. International, Inc. Follow the on step 3 in step 8 about confirming all of its affiliates. If the answer is "...input used under license by Gemstar-TV Guide correct, so far. When successfully completed, you can change any incorrect information by repeating the Setup process. If the answer is a registered mark of Gemstar-TV Guide International, Inc. with the process. In Canada, TV GUIDE is...
LC-45GD7U Operation Manual
Page 10
... Timer 65 Program Title Display 65 Closed Captions and Digital Closed Captions 66 Caption Setup 67 Secret number setting for PC source 44 Digital Setup 45 Video Setup 45 Audio Setup 45 Using external equipment 46 Displaying an external equipment image ...... 46 Connecting a ...switching to temporarily release the V-CHIP BLOCK 73 Reactivating the temporarily released V-CHIP BLOCK 73 10 Contents IMPORTANT INFORMATION 1 DEAR SHARP CUSTOMER 3 IMPORTANT SAFETY INSTRUCTIONS 3 QUICK REFERENCE 6 Contents 10 Trademarks 11 COPYRIGHT AND LICENSE NOTICE 11 PATENT NOTICE 11 Supplied ...
... Timer 65 Program Title Display 65 Closed Captions and Digital Closed Captions 66 Caption Setup 67 Secret number setting for PC source 44 Digital Setup 45 Video Setup 45 Audio Setup 45 Using external equipment 46 Displaying an external equipment image ...... 46 Connecting a ...switching to temporarily release the V-CHIP BLOCK 73 Reactivating the temporarily released V-CHIP BLOCK 73 10 Contents IMPORTANT INFORMATION 1 DEAR SHARP CUSTOMER 3 IMPORTANT SAFETY INSTRUCTIONS 3 QUICK REFERENCE 6 Contents 10 Trademarks 11 COPYRIGHT AND LICENSE NOTICE 11 PATENT NOTICE 11 Supplied ...

LC-45GD7U Operation Manual
Page 17
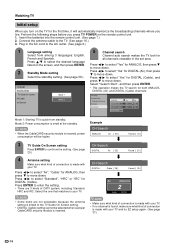
If the TV has been turned on before, the EZ setup will not be sure to remove the AC cord from the Setup menu. Watching TV Simple operations for watching a TV program Turning on the power POWER OPC indicator DL indicator POWER indicator TV POWER Press POWER on ... control. • POWER indicator (Blue): The TV is on. (After a few seconds, a window appears with sound.) NOTE • The initial setup starts when the TV powers on for performing EZ setup from the power outlet. NOTE • If you are not going to start timer Lighting (Red) recording or display reminder screen...
If the TV has been turned on before, the EZ setup will not be sure to remove the AC cord from the Setup menu. Watching TV Simple operations for watching a TV program Turning on the power POWER OPC indicator DL indicator POWER indicator TV POWER Press POWER on ... control. • POWER indicator (Blue): The TV is on. (After a few seconds, a window appears with sound.) NOTE • The initial setup starts when the TV powers on for performing EZ setup from the power outlet. NOTE • If you are not going to start timer Lighting (Red) recording or display reminder screen...
LC-45GD7U Operation Manual
Page 18
... to the TV Guide On Screen setting. • DIGITAL (Cable) setting cannot be higher. Select the one that matches to your TV and try EZ setup again. (See page 37.) 18 Press c/d to select "Yes" for DIGITAL (Cable). Insert the batteries into the remote control unit. (See page 7.) 2. Mode 2: Power consumption... your TV. Press c/d to select "Air", "Cable" for the first time, it will be selected when a proper CableCARD security module is inserted. Watching TV Initial setup When you turn on the TV for ANALOG, then press b to move down.
... to the TV Guide On Screen setting. • DIGITAL (Cable) setting cannot be higher. Select the one that matches to your TV and try EZ setup again. (See page 37.) 18 Press c/d to select "Yes" for DIGITAL (Cable). Insert the batteries into the remote control unit. (See page 7.) 2. Mode 2: Power consumption... your TV. Press c/d to select "Air", "Cable" for the first time, it will be selected when a proper CableCARD security module is inserted. Watching TV Initial setup When you turn on the TV for ANALOG, then press b to move down.
LC-45GD7U Operation Manual
Page 19
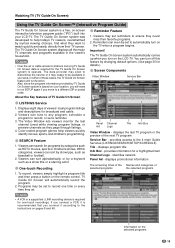
... the TV Guide On Screen™ (Interactive Program Guide) The TV Guide On Screen system is based on your location, you will need to run SETUP again if you move to a different ZIP or postal code. Within categories, viewers can sort alphabetically, or by show title or a starring actor. If you... or the preview of the next TV program Service Bar - The TV Guide On Screen system was developed to the 4 main Guide Services (LISTINGS/SEARCH/SETUP/SCHEDULE) Tile -
... the TV Guide On Screen™ (Interactive Program Guide) The TV Guide On Screen system is based on your location, you will need to run SETUP again if you move to a different ZIP or postal code. Within categories, viewers can sort alphabetically, or by show title or a starring actor. If you... or the preview of the next TV program Service Bar - The TV Guide On Screen system was developed to the 4 main Guide Services (LISTINGS/SEARCH/SETUP/SCHEDULE) Tile -
LC-45GD7U Operation Manual
Page 20
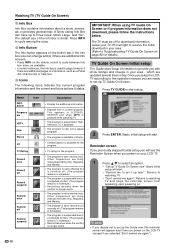
... The program is set to Record but is currently off to cycle between Info box sizes, as a Panel Ad, Channel Ad, or help . Once you setup the LCDTV according to this reminder screen will see the Reminder Screen when you with show , service, ad, or provides general help text. Name INFO... will appear each time you power on the button bar, if the Info box size can have up TV Guide On Screen now": Basic initial setup will start . • "Remind me again"). 20 q Icons The following icons indicate the current program information and the current and future actions & status. Basic ...
... The program is set to Record but is currently off to cycle between Info box sizes, as a Panel Ad, Channel Ad, or help . Once you setup the LCDTV according to this reminder screen will see the Reminder Screen when you with show , service, ad, or provides general help text. Name INFO... will appear each time you power on the button bar, if the Info box size can have up TV Guide On Screen now": Basic initial setup will start . • "Remind me again"). 20 q Icons The following icons indicate the current program information and the current and future actions & status. Basic ...
LC-45GD7U Operation Manual
Page 21
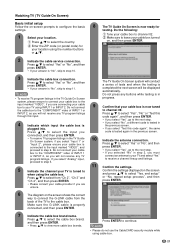
... your cable box to your cable provider if you are unsure. Confirm the settings displayed on the screen and press a/b to select "Yes, end setup" or "No, repeat setup process", and then press ENTER. 6 The diagram on the screen shows the correct way to connect the G-LINK cable from "Ch 2", "Ch 3"... 2, as you must connect an antenna to your TV is tuned to when using INPUT 1 or INPUT 2. Watching TV (TV Guide On Screen) Basic initial setup Follow the on-screen prompts to configure the basic settings. 1 Select your location. 1 Press a/b to select the country. 2 Enter the ZIP code (or ...
... your cable box to your cable provider if you are unsure. Confirm the settings displayed on the screen and press a/b to select "Yes, end setup" or "No, repeat setup process", and then press ENTER. 6 The diagram on the screen shows the correct way to connect the G-LINK cable from "Ch 2", "Ch 3"... 2, as you must connect an antenna to your TV is tuned to when using INPUT 1 or INPUT 2. Watching TV (TV Guide On Screen) Basic initial setup Follow the on-screen prompts to configure the basic settings. 1 Select your location. 1 Press a/b to select the country. 2 Enter the ZIP code (or ...

LC-45GD7U Operation Manual
Page 22
... cord.) • To record a TV program, make sure your cable box is now ready for all eight days of listings to select "Yes, end setup" or "No, repeat setup process", and then press ENTER. Confirm that your LCD-TV is in the previous screen. • If you : - Confirm the settings displayed on... model. 7 Press ENTER twice to a new ZIP or postal code. - Press ENTER to select the VCR brand, and then press ENTER. Press a/b to complete the SETUP. Press a/b to select "Yes", "No" or "Test this code again", and then press ENTER. • If you select "Yes", go to the next step. &#...
... cord.) • To record a TV program, make sure your cable box is now ready for all eight days of listings to select "Yes, end setup" or "No, repeat setup process", and then press ENTER. Confirm that your LCD-TV is in the previous screen. • If you : - Confirm the settings displayed on... model. 7 Press ENTER twice to a new ZIP or postal code. - Press ENTER to select the VCR brand, and then press ENTER. Press a/b to complete the SETUP. Press a/b to select "Yes", "No" or "Test this code again", and then press ENTER. • If you select "Yes", go to the next step. &#...

LC-45GD7U Operation Manual
Page 23
... up or one page down in this manual are downloaded from within LISTINGS • Press DAYl or DAYk to indicate the status of four services: SETUP, LISTINGS, SEARCH and SCHEDULE. Changes the day from the TV Guide On Screen service to be available in yellow. • To cancel the Guide screen...
... up or one page down in this manual are downloaded from within LISTINGS • Press DAYl or DAYk to indicate the status of four services: SETUP, LISTINGS, SEARCH and SCHEDULE. Changes the day from the TV Guide On Screen service to be available in yellow. • To cancel the Guide screen...

LC-45GD7U Operation Manual
Page 26
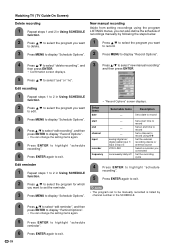
... connected recording device (VCR) directly from LISTINGS and of programs you have set to "yes", the TV will be automatically changed . Setup items Selectable items Description frequency once/regularly/weekly/ off on time/120 min early ... 120 min late on time/120 min early ......you of recording Set the external recording device 4 Press ENTER to highlight "schedule recording". 5 Press ENTER again to set the following items. Setup items frequency start timing of recording Set the end timing of the screening times for . Using Episode Options 3 Press a/b/c/d to exit. Press...
... connected recording device (VCR) directly from LISTINGS and of programs you have set to "yes", the TV will be automatically changed . Setup items Selectable items Description frequency once/regularly/weekly/ off on time/120 min early ... 120 min late on time/120 min early ......you of recording Set the external recording device 4 Press ENTER to highlight "schedule recording". 5 Press ENTER again to set the following items. Setup items frequency start timing of recording Set the end timing of the screening times for . Using Episode Options 3 Press a/b/c/d to exit. Press...
LC-45GD7U Operation Manual
Page 28
Set a date to highlight "schedule reminder". Setup items date start time to record Set an end time to record Set a channel to record using the program LISTINGS menus, you can also define ...
Set a date to highlight "schedule reminder". Setup items date start time to record Set an end time to record Set a channel to record using the program LISTINGS menus, you can also define ...
LC-45GD7U Operation Manual
Page 29
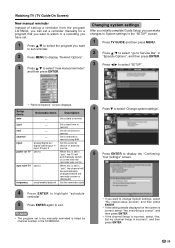
... system settings". 5 Press ENTER to display the "Confirming Your Settings" screen. 4 Press ENTER to highlight "schedule reminder". 5 Press ENTER again to select "SETUP" . • "Remind Options" screen displays. end - When this is displayed. Set a date to remind start time to remind Set an end time ...2 Press a/b to select "go to Service Bar" in the SCHEDULE. • If you want to change System settings, select "No, repeat setup process" and then press ENTER. • If the setting details displayed on the screen is correct, select "Yes, everything is correct", and then...
... system settings". 5 Press ENTER to display the "Confirming Your Settings" screen. 4 Press ENTER to highlight "schedule reminder". 5 Press ENTER again to select "SETUP" . • "Remind Options" screen displays. end - When this is displayed. Set a date to remind start time to remind Set an end time ...2 Press a/b to select "go to Service Bar" in the SCHEDULE. • If you want to change System settings, select "No, repeat setup process" and then press ENTER. • If the setting details displayed on the screen is correct, select "Yes, everything is correct", and then...

LC-45GD7U Operation Manual
Page 30
...select "General default options", and press ENTER. 2 Press a/b to select "go to Service Bar" in "Episode Options", and then press ENTER. 3 Press c/d to select "SETUP" . 4 Press a/b to select "Change channel display", and then press ENTER. 3 Press MENU to display "General Defaults". 5 Press ENTER to display the "Grid Options"...turn on the TV 5 When you have finished, press a/b to select "done", and then press ENTER again to select "service". 30 Setup items Info box size box cycle auto guide Selectable items last used/no/small/ large all/no only/small only/ large only/no & small...
...select "General default options", and press ENTER. 2 Press a/b to select "go to Service Bar" in "Episode Options", and then press ENTER. 3 Press c/d to select "SETUP" . 4 Press a/b to select "Change channel display", and then press ENTER. 3 Press MENU to display "General Defaults". 5 Press ENTER to display the "Grid Options"...turn on the TV 5 When you have finished, press a/b to select "done", and then press ENTER again to select "service". 30 Setup items Info box size box cycle auto guide Selectable items last used/no/small/ large all/no only/small only/ large only/no & small...

LC-45GD7U Operation Manual
Page 31
...is displayed. Watching TV (TV Guide On Screen) Record default options 1 Press TV GUIDE and then press MENU. When this is set the following items. Setup items start end recorder Selectable items Description on time/120 min early ... 120 min late on time/120 min early ... 120 min late VCR Set... external recording device 6 When you have finished, press a/b to select "done", and then press ENTER again to exit. 5 Press a/b/c/d to set the following items. Setup items power on TV Selectable items yes/no auto tune TV yes/no when on time/30 sec - 15 min early ... 30 sec 15 min...
...is displayed. Watching TV (TV Guide On Screen) Record default options 1 Press TV GUIDE and then press MENU. When this is set the following items. Setup items start end recorder Selectable items Description on time/120 min early ... 120 min late on time/120 min early ... 120 min late VCR Set... external recording device 6 When you have finished, press a/b to select "done", and then press ENTER again to exit. 5 Press a/b/c/d to set the following items. Setup items power on TV Selectable items yes/no auto tune TV yes/no when on time/30 sec - 15 min early ... 30 sec 15 min...
LC-45GD7U Operation Manual
Page 35
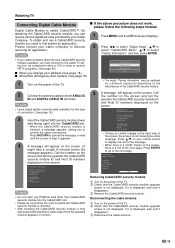
.... NOTE s If the above procedure does not work, please follow the following steps instead. 1 Press MENU and the MENU screen displays. 2 Press c/d to select "Digital Setup", a/b to select "CableCARD Menu", a/b to select "Pairing Information", and then press ENTER. • If your cable company does not have CableCARD security module available, you...
.... NOTE s If the above procedure does not work, please follow the following steps instead. 1 Press MENU and the MENU screen displays. 2 Press c/d to select "Digital Setup", a/b to select "CableCARD Menu", a/b to select "Pairing Information", and then press ENTER. • If your cable company does not have CableCARD security module available, you...
LC-45GD7U Operation Manual
Page 36
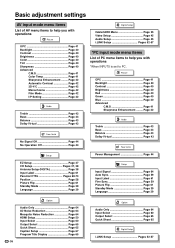
... Page 43 Balance Page 43 Dolby Virtual Page 43 Power Control No Signal Off Page 44 No Operation Off Page 44 Setup EZ Setup Page 37 CH Setup Pages 37, 38 Antenna Setup-DIGITAL Page 38 Input Label Page 61 Parental CTRL Pages 68-73 Position Page 58 Picture Flip Page 61 Standby Mode... Setup Pages 52-57 Basic adjustment settings AV input mode menu items List of PC menu items to help you with operations *When INPUT5 is set to help you with operations Picture OPC Page 41 Backlight Page 40 Contrast Page 40 Brightness Page 40 Color Page 40 Tint Page 40 Sharpness Page...
... Page 43 Balance Page 43 Dolby Virtual Page 43 Power Control No Signal Off Page 44 No Operation Off Page 44 Setup EZ Setup Page 37 CH Setup Pages 37, 38 Antenna Setup-DIGITAL Page 38 Input Label Page 61 Parental CTRL Pages 68-73 Position Page 58 Picture Flip Page 61 Standby Mode... Setup Pages 52-57 Basic adjustment settings AV input mode menu items List of PC menu items to help you with operations *When INPUT5 is set to help you with operations Picture OPC Page 41 Backlight Page 40 Contrast Page 40 Brightness Page 40 Color Page 40 Tint Page 40 Sharpness Page...

LC-45GD7U Operation Manual
Page 37
...and press b to manually memorize the channels. Antenna setting 1 Press MENU and the MENU screen displays. 2 Press c/d to select "Setup". 3 Press a/b to select "CH Setup", and then press ENTER. • If you will have to move down . Channel search Channel auto search makes the TV look...; Make sure what kind of connection is made with your TV. • If cable or antenna connection was selected for all the channels in Channel Setup. 2 Press c/d to select "Yes" for ANALOG, then press b to move down. 3 Press c/d to select "Yes" for ANALOG, then ...
...and press b to manually memorize the channels. Antenna setting 1 Press MENU and the MENU screen displays. 2 Press c/d to select "Setup". 3 Press a/b to select "CH Setup", and then press ENTER. • If you will have to move down . Channel search Channel auto search makes the TV look...; Make sure what kind of connection is made with your TV. • If cable or antenna connection was selected for all the channels in Channel Setup. 2 Press c/d to select "Yes" for ANALOG, then press b to move down. 3 Press c/d to select "Yes" for ANALOG, then ...

LC-45GD7U Operation Manual
Page 38
...already set the Secret No., input the 4digit secret number here. Signal Strength 1 Press MENU and the MENU screen displays. 2 Press c/d to select "Setup". 3 Press a/b to select "On" or "Off". See page 68 for DIGITAL (Air) only. 38 When viewing ANALOG broadcasts: 1 Press a/b,... and then press c/d to select the channel to skip or not. 2 Press a/b to select "Skip", and then press c/d to select "Antenna Setup - DIGITAL", and then press ENTER. • If you need a digital broadcast antenna. Signal Strength Channel Strength 1 2 CH Signal Strength Current 0 Max ...
...already set the Secret No., input the 4digit secret number here. Signal Strength 1 Press MENU and the MENU screen displays. 2 Press c/d to select "Setup". 3 Press a/b to select "On" or "Off". See page 68 for DIGITAL (Air) only. 38 When viewing ANALOG broadcasts: 1 Press a/b,... and then press c/d to select the channel to skip or not. 2 Press a/b to select "Skip", and then press c/d to select "Antenna Setup - DIGITAL", and then press ENTER. • If you need a digital broadcast antenna. Signal Strength Channel Strength 1 2 CH Signal Strength Current 0 Max ...

