
LC-45GD6U Operation Manual
Page 6
... to the television equipment, be placed on the product. • To prevent fire or shock hazard, do not place the AC power cord under the TV set or other heavy items. • Turn off the main power and unplug the AC cord from the wall outlet before handling. • Use a soft cloth... and gently wipe the surface of candle or flames on the top or near the TV set. • To prevent fire or shock hazard, do not use a dirty cloth, liquid cleaners or chemical cloth to clean it, such materials may scratch the...
... to the television equipment, be placed on the product. • To prevent fire or shock hazard, do not place the AC power cord under the TV set or other heavy items. • Turn off the main power and unplug the AC cord from the wall outlet before handling. • Use a soft cloth... and gently wipe the surface of candle or flames on the top or near the TV set. • To prevent fire or shock hazard, do not use a dirty cloth, liquid cleaners or chemical cloth to clean it, such materials may scratch the...
LC-45GD6U Operation Manual
Page 7
... notes on using memory card ...... 41 Card Setup mode menu items 43 Recording a still image 45 Displaying a still image 45 Displaying Slide Show 45 Setting Slide Show 46 My Program 46 Audio Select 46 Protecting/unprotecting still image files ...... 47 Deleting ...48 Rec. Contents IMPORTANT INFORMATION 1 DEAR SHARP CUSTOMER 3 IMPORTANT SAFETY INSTRUCTIONS 3 Contents 6 Trademarks 7 COPYRIGHT AND LICENSE NOTICE 7 Supplied accessories 8 Preparation 9 Where to place the TV 9 Setting the TV 10 Removing speakers 11 Removing the stand 12 Setting the Display on the wall 12 Inserting ...
... notes on using memory card ...... 41 Card Setup mode menu items 43 Recording a still image 45 Displaying a still image 45 Displaying Slide Show 45 Setting Slide Show 46 My Program 46 Audio Select 46 Protecting/unprotecting still image files ...... 47 Deleting ...48 Rec. Contents IMPORTANT INFORMATION 1 DEAR SHARP CUSTOMER 3 IMPORTANT SAFETY INSTRUCTIONS 3 Contents 6 Trademarks 7 COPYRIGHT AND LICENSE NOTICE 7 Supplied accessories 8 Preparation 9 Where to place the TV 9 Setting the TV 10 Removing speakers 11 Removing the stand 12 Setting the Display on the wall 12 Inserting ...
LC-45GD6U Operation Manual
Page 8
... cable television programming by your local cable operator. 7 S. COPYRIGHT AND LICENSE NOTICE • It is the intent of Sharp that this copyright protection technology must be obtained from copyright owners whenever necessary. • This product incorporates copyright protection technology that... by Macrovision. For more information call your cable operator is intended for parental control (AV input mode only 78 Parental control (setting V-CHIP level) ......... 80 How to view encrypted digital programming. and 6,516,132. • This digital television is protected ...
... cable television programming by your local cable operator. 7 S. COPYRIGHT AND LICENSE NOTICE • It is the intent of Sharp that this copyright protection technology must be obtained from copyright owners whenever necessary. • This product incorporates copyright protection technology that... by Macrovision. For more information call your cable operator is intended for parental control (AV input mode only 78 Parental control (setting V-CHIP level) ......... 80 How to view encrypted digital programming. and 6,516,132. • This digital television is protected ...
LC-45GD6U Operation Manual
Page 10
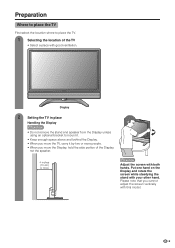
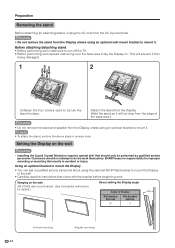
Preparation Where to place the TV First select the location where to mount it by two or more CAUTION Adjust the screen with your other hand. Display 2 Setting the TV in place Handling the Display CAUTION • Do not remove the stand and speaker from the Display unless using an ...optional bracket to place the TV. 1 Selecting the location of the Display, not the speaker. 4 inches...
Preparation Where to place the TV First select the location where to mount it by two or more CAUTION Adjust the screen with your other hand. Display 2 Setting the TV in place Handling the Display CAUTION • Do not remove the stand and speaker from the Display unless using an ...optional bracket to place the TV. 1 Selecting the location of the Display, not the speaker. 4 inches...

LC-45GD6U Operation Manual
Page 11
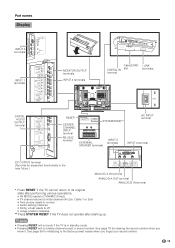
Preparation Setting the TV After putting the Display in the hole on the Display as shown. CAUTION • TO PREVENT RISK OF ELECTRIC SHOCK, DO NOT TOUCH UN-INSULATED PARTS OF ANY CABLES WITH THE AC CORD CONNECTED. 10 Use the cable clamp for bundling the cables. 1 Removing the terminal cover Display (rear view) Press down the hooks to remove the cover toward you. 2 Connecting the AC cord to the Display AC cord (with Ferrite core) 3 Bundling the cables with the clamp Cable clamp Insert the cable clamp in place, connect the AC cord.
Preparation Setting the TV After putting the Display in the hole on the Display as shown. CAUTION • TO PREVENT RISK OF ELECTRIC SHOCK, DO NOT TOUCH UN-INSULATED PARTS OF ANY CABLES WITH THE AC CORD CONNECTED. 10 Use the cable clamp for bundling the cables. 1 Removing the terminal cover Display (rear view) Press down the hooks to remove the cover toward you. 2 Connecting the AC cord to the Display AC cord (with Ferrite core) 3 Bundling the cables with the clamp Cable clamp Insert the cable clamp in place, connect the AC cord.
LC-45GD6U Operation Manual
Page 13
...edge of Display 10˚ With Speakers Removed With Speakers Attached 10˚ 0˚ Vertical mounting 12 Angular mounting SHARP bears no responsibility for details.) About setting the Display angle Angle of the base area.) CAUTION • Do not remove the stand and speaker from being damaged...to the wall. • Carefully read the instructions that results in reverse order. Setting the Display on . Before attaching/detaching stand • Before performing work make sure to turn off the TV. • Before performing work . Hanging on the wall AN-37AG2 wall mount bracket...
...edge of Display 10˚ With Speakers Removed With Speakers Attached 10˚ 0˚ Vertical mounting 12 Angular mounting SHARP bears no responsibility for details.) About setting the Display angle Angle of the base area.) CAUTION • Do not remove the stand and speaker from being damaged...to the wall. • Carefully read the instructions that results in reverse order. Setting the Display on . Before attaching/detaching stand • Before performing work make sure to turn off the TV. • Before performing work . Hanging on the wall AN-37AG2 wall mount bracket...
LC-45GD6U Operation Manual
Page 16
... after performing various operations. • AV MODE resets to DYNAMIC (Fixed) • TV channel returns to initial channel (Air:2ch, Cable:1 or 2ch) • Twin picture resets to normal • Audio setting initializes • Dolby virtual resets to the factory preset values when you know it. ...expanded functionality in standby mode. • Pressing RESET will not work if the TV is in the near future.) ANALOG A IN terminal ANALOG A OUT terminal ANALOG B IN terminal * Press RESET if the TV cannot return to its original state after starting up. See page 79 for clearing ...
... after performing various operations. • AV MODE resets to DYNAMIC (Fixed) • TV channel returns to initial channel (Air:2ch, Cable:1 or 2ch) • Twin picture resets to normal • Audio setting initializes • Dolby virtual resets to the factory preset values when you know it. ...expanded functionality in standby mode. • Pressing RESET will not work if the TV is in the near future.) ANALOG A IN terminal ANALOG A OUT terminal ANALOG B IN terminal * Press RESET if the TV cannot return to its original state after starting up. See page 79 for clearing ...
LC-45GD6U Operation Manual
Page 17
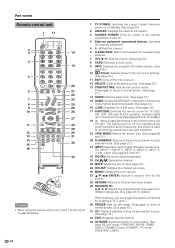
... operations in four different categories. (See page 32 for details.) While watching, you can toggle the selected channels by pressing A, B, C and D. 30 FREEZE: Sets the still image. Part names Remote control unit 1 17 2 3 18 4 19 5 20 6 21 22 7 23 8 24 9 25 10 26 27 ...69 and 70.) 20 FLASHBACK: Returns to the previous channel or input external mode. (See page 22.) 21 INPUT: Selects a Liquid Crystal Television input source. (TV, INPUT 1, INPUT 2, INPUT 3, INPUT 4, INPUT 5, i.LINK, Card) (See pages 51 and 67.) 22 DIGITAL: Receives digital broadcasts. 23 CH r/s: Selects...
... operations in four different categories. (See page 32 for details.) While watching, you can toggle the selected channels by pressing A, B, C and D. 30 FREEZE: Sets the still image. Part names Remote control unit 1 17 2 3 18 4 19 5 20 6 21 22 7 23 8 24 9 25 10 26 27 ...69 and 70.) 20 FLASHBACK: Returns to the previous channel or input external mode. (See page 22.) 21 INPUT: Selects a Liquid Crystal Television input source. (TV, INPUT 1, INPUT 2, INPUT 3, INPUT 4, INPUT 5, i.LINK, Card) (See pages 51 and 67.) 22 DIGITAL: Receives digital broadcasts. 23 CH r/s: Selects...
LC-45GD6U Operation Manual
Page 18
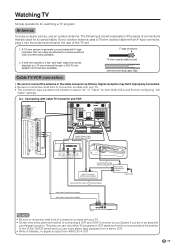
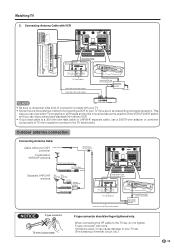
...converter as follows. A 300-ohm system is generally a round cable with an F-type connector, plug it into the antenna terminal at the rear of the TV set. 1. A-1. This way you can enjoy stereo tape playback from ANALOG-A OUT. 17 The following is output from a stereo VCR. • While in... or VCR tapes and not be attached to select "Air" or "Cable" for both ANALOG-A and B when configuring "Air/ Cable" settings. Watching TV Simple operations for a coaxial cable. Signal reception may fail if improperly connected. • Be sure to remember what kind of connections that ...
...converter as follows. A 300-ohm system is generally a round cable with an F-type connector, plug it into the antenna terminal at the rear of the TV set. 1. A-1. This way you can enjoy stereo tape playback from ANALOG-A OUT. 17 The following is output from a stereo VCR. • While in... or VCR tapes and not be attached to select "Air" or "Cable" for both ANALOG-A and B when configuring "Air/ Cable" settings. Watching TV Simple operations for a coaxial cable. Signal reception may fail if improperly connected. • Be sure to remember what kind of connections that ...
LC-45GD6U Operation Manual
Page 20
... twin-lead cable or UHF/VHF separate cable, use a 300/75-ohm adapter or combiner (output side is 75-ohm coaxial) to connect to the TV set . (The breaking of internal circuit, etc.) 19 This way you can enjoy stereo tape playback from stereo VCR. • If your... TV set , do not tighten F-type connector with tools. When connecting the RF cable to the TV (see below). Watching TV C. If tools are in VIDEO AUDIO OUT IN NOTE VCR • Be sure to remember what kind...
... twin-lead cable or UHF/VHF separate cable, use a 300/75-ohm adapter or combiner (output side is 75-ohm coaxial) to connect to the TV set . (The breaking of internal circuit, etc.) 19 This way you can enjoy stereo tape playback from stereo VCR. • If your... TV set , do not tighten F-type connector with tools. When connecting the RF cable to the TV (see below). Watching TV C. If tools are in VIDEO AUDIO OUT IN NOTE VCR • Be sure to remember what kind...
LC-45GD6U Operation Manual
Page 22
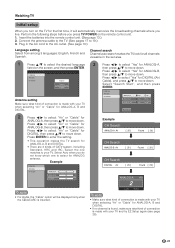
... memorize the broadcasting channels where you live. Language Air/Cable CH Search English Français Español Antenna setting Make sure what kind of connection is made with your TV when selecting "Air" or "Cable" for ANALOG-A, B and DIGITAL. 3 Press c/d to select "Yes" for DIGITAL, ...the first time, it will be displayed only when the CableCARD is inserted. Plug in the set area. 1 Press a/b to move down . Press c/d to select "Air" or "Cable" for ANALOG-A, then press a/b to your TV and try EZ Setup again (see page 28). 21 Example CH Search ANALOG-A Air [...
... memorize the broadcasting channels where you live. Language Air/Cable CH Search English Français Español Antenna setting Make sure what kind of connection is made with your TV when selecting "Air" or "Cable" for ANALOG-A, B and DIGITAL. 3 Press c/d to select "Yes" for DIGITAL, ...the first time, it will be displayed only when the CableCARD is inserted. Plug in the set area. 1 Press a/b to move down . Press c/d to select "Air" or "Cable" for ANALOG-A, then press a/b to your TV and try EZ Setup again (see page 28). 21 Example CH Search ANALOG-A Air [...
LC-45GD6U Operation Manual
Page 24
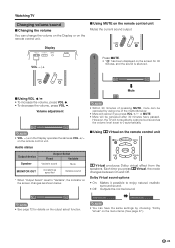
...suddenly output a loud sound as VOL k/l on the remote control unit Mutes the current sound output. However, the TV will be canceled after 30 minutes have the same settings by using one of pressing MUTE, mute can be canceled by choosing "Dolby Virtual" on the screen changes as ...specified Variable sound * When "Output Select" is set to 0 automatically. NOTE • Within 30 minutes of the methods below . Volume adjustment 20 NOTE • VOL l/kon the Display operates the ...
...suddenly output a loud sound as VOL k/l on the remote control unit Mutes the current sound output. However, the TV will be canceled after 30 minutes have the same settings by using one of pressing MUTE, mute can be canceled by choosing "Dolby Virtual" on the screen changes as ...specified Variable sound * When "Output Select" is set to 0 automatically. NOTE • Within 30 minutes of the methods below . Volume adjustment 20 NOTE • VOL l/kon the Display operates the ...
LC-45GD6U Operation Manual
Page 25
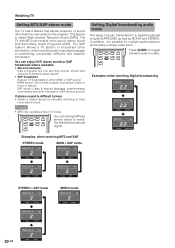
... language or something completely different like live sporting events, shows and concerts in dynamic stereo sound. • SAP broadcasts Receive TV broadcasts in either in TV mode. Watching TV Setting MTS/SAP stereo mode The TV has a feature that allows reception of audio transmitted in a digital broadcast include SURROUND as well as shown below to...
... language or something completely different like live sporting events, shows and concerts in dynamic stereo sound. • SAP broadcasts Receive TV broadcasts in either in TV mode. Watching TV Setting MTS/SAP stereo mode The TV has a feature that allows reception of audio transmitted in a digital broadcast include SURROUND as well as shown below to...
LC-45GD6U Operation Manual
Page 26
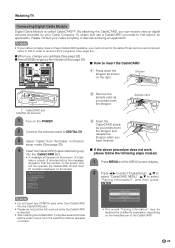
...to select "Pairing Information", and then press ENTER. To obtain and use a CableCARD you have CableCARD available, you must connect to the cable-TV set-top box via component video or DVI in Channel setup mode. (See page 29) 4 Insert the CableCARD (upper side facing up) into the.... Conditional Access Pairing Information Diagnostic Screen ECM • The words "Pairing Information" may take a couple of the CableCARD. 25 Watching TV Connecting Digital Cable Module Digital Cable Module is inserted. • After inserting the CableCARD, it may be replaced by your Cable Company.
...to select "Pairing Information", and then press ENTER. To obtain and use a CableCARD you have CableCARD available, you must connect to the cable-TV set-top box via component video or DVI in Channel setup mode. (See page 29) 4 Insert the CableCARD (upper side facing up) into the.... Conditional Access Pairing Information Diagnostic Screen ECM • The words "Pairing Information" may take a couple of the CableCARD. 25 Watching TV Connecting Digital Cable Module Digital Cable Module is inserted. • After inserting the CableCARD, it may be replaced by your Cable Company.
LC-45GD6U Operation Manual
Page 29
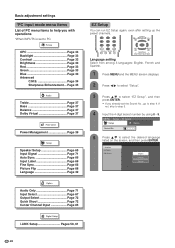
Picture OPC Page 34 Backlight Page 33 Contrast Page 33 Brightness Page 33 Red Page 33 Green Page 33 Blue Page 33 Advanced C.M.S Page 34 Sharpness Enhancement ... If not, skip to select the desired language listed on the screen, and then press ENTER. Page 35 Audio Treble Page 37 Bass Page... Shoot Page 72 Center Channel Input Page 85 Digital Setup i.LINK Setup Pages 58, 61 EZ Setup You can run EZ Setup again, even after setting up the preset channels. Language Air/Cable CH Search English Français Español 28 EZ Setup] Setup Option Secret No. ---- 5 Press a/b ...
Picture OPC Page 34 Backlight Page 33 Contrast Page 33 Brightness Page 33 Red Page 33 Green Page 33 Blue Page 33 Advanced C.M.S Page 34 Sharpness Enhancement ... If not, skip to select the desired language listed on the screen, and then press ENTER. Page 35 Audio Treble Page 37 Bass Page... Shoot Page 72 Center Channel Input Page 85 Digital Setup i.LINK Setup Pages 58, 61 EZ Setup You can run EZ Setup again, even after setting up the preset channels. Language Air/Cable CH Search English Français Español 28 EZ Setup] Setup Option Secret No. ---- 5 Press a/b ...

LC-45GD6U Operation Manual
Page 30
...press a/b to move down. Select Auto when you do not know which one matches to move down . Basic adjustment settings Antenna setting Make sure what kind of connection is made with your TV when selecting "Air" or "Cable" for ANALOG-A, B and DIGITAL. Select the one to select for DIGITAL (Air... of connection is made with your region, follow the instructions below to move down . Channel search Channel auto search makes the TV look for all the channels in the set the Secret No., input the 4digit secret number here. Press c/d to select "Yes" for ANALOG-B, then press a/b to ...
...press a/b to move down. Select Auto when you do not know which one matches to move down . Basic adjustment settings Antenna setting Make sure what kind of connection is made with your TV when selecting "Air" or "Cable" for ANALOG-A, B and DIGITAL. Select the one to select for DIGITAL (Air... of connection is made with your region, follow the instructions below to move down . Channel search Channel auto search makes the TV look for all the channels in the set the Secret No., input the 4digit secret number here. Press c/d to select "Yes" for ANALOG-B, then press a/b to ...

LC-45GD6U Operation Manual
Page 31
CH Setup ... MENU [Setup ... Basic adjustment settings Channel search Channel auto search makes the TV look for setting a secret number. 4 Press a/b to select "CH Memory", and then press ENTER. 5 Press a/b to select ANALOG-A, B or DIGITAL (Air), DIGITAL (Cable), CableCARD, and then ...[ 25 ] NOTE • Make sure what kind of connection is made with your TV when selecting "Air" or "Cable" for ANALOG-A, then press a/b to select "CH Setup", and then press ENTER. • If you already set the Secret No., input the 4digit secret number here. CH Setup ... Air/Cable CH...
CH Setup ... MENU [Setup ... Basic adjustment settings Channel search Channel auto search makes the TV look for setting a secret number. 4 Press a/b to select "CH Memory", and then press ENTER. 5 Press a/b to select ANALOG-A, B or DIGITAL (Air), DIGITAL (Cable), CableCARD, and then ...[ 25 ] NOTE • Make sure what kind of connection is made with your TV when selecting "Air" or "Cable" for ANALOG-A, then press a/b to select "CH Setup", and then press ENTER. • If you already set the Secret No., input the 4digit secret number here. CH Setup ... Air/Cable CH...

LC-45GD6U Operation Manual
Page 32
...0 31 See page 78 for DIGITAL (Air) only. 1 Input the channel number. (See page 22.) 2 Repeat steps 1 to 3 in Antenna setting. 3 Press a/b to select "Channel Strength", and then press ENTER. 4 Adjust the direction of the antenna to select "Signal Strength". Basic adjustment... settings Antenna Setup - You can set the Secret No., input the 4digit secret number here. Signal Strength Channel Strength Signal Strength Current 0 Max 0 Make sure ...
...0 31 See page 78 for DIGITAL (Air) only. 1 Input the channel number. (See page 22.) 2 Repeat steps 1 to 3 in Antenna setting. 3 Press a/b to select "Channel Strength", and then press ENTER. 4 Adjust the direction of the antenna to select "Signal Strength". Basic adjustment... settings Antenna Setup - You can set the Secret No., input the 4digit secret number here. Signal Strength Channel Strength Signal Strength Current 0 Max 0 Make sure ...

LC-45GD6U Operation Manual
Page 33
..." in step 2 in Delete favorite channel. 3 Press a/b to select the desired language listed on the screen, and then press ENTER. Language setting Register 1 Data Clear All Data Clear You can select your favorite channels easily. 3 Press a/b/c/d to select the channel you to program 4 favorite... channels, in the area, and then press ENTER to delete, and then press ENTER. By setting the favorite channels in advance, you can also select a language from among 3 languages: English, French and Spanish. 1 Press MENU and the MENU...
..." in step 2 in Delete favorite channel. 3 Press a/b to select the desired language listed on the screen, and then press ENTER. Language setting Register 1 Data Clear All Data Clear You can select your favorite channels easily. 3 Press a/b/c/d to select the channel you to program 4 favorite... channels, in the area, and then press ENTER to delete, and then press ENTER. By setting the favorite channels in advance, you can also select a language from among 3 languages: English, French and Spanish. 1 Press MENU and the MENU...
LC-45GD6U Operation Manual
Page 34
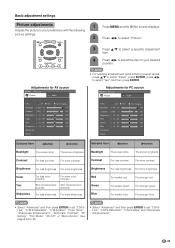
... For resetting all adjustment items to factory preset values, press a/b to select "Reset", press ENTER, press c/d to set "C.M.SHue", "C.M.S-Saturation", "C.M.S-Value" and "Sharpness Enhancement". 33 Adjustments for AV source MENU [Picture] Picture Audio OPC Off On Backlight [+16] -16 Contrast [+30...specific adjustment item. 4 Press c/d to adjust the item to select "Picture". Basic adjustment settings Picture adjustments Adjusts the picture to your preference with the following picture settings. 1 Press MENU and the MENU screen displays. 2 Press c/d to your desired position....
... For resetting all adjustment items to factory preset values, press a/b to select "Reset", press ENTER, press c/d to set "C.M.SHue", "C.M.S-Saturation", "C.M.S-Value" and "Sharpness Enhancement". 33 Adjustments for AV source MENU [Picture] Picture Audio OPC Off On Backlight [+16] -16 Contrast [+30...specific adjustment item. 4 Press c/d to adjust the item to select "Picture". Basic adjustment settings Picture adjustments Adjusts the picture to your preference with the following picture settings. 1 Press MENU and the MENU screen displays. 2 Press c/d to your desired position....


