
LC-32D59U | LC42D69U Operation Manual
Page 3
... DO NOT OPEN CAUTION: TO REDUCE THE RISK OF ELECTRIC SHOCK, DO NOT REMOVE COVER (OR BACK). ENGLISH LC-32D59U LC-42D69U LIQUID CRYSTAL TELEVISION ENGLISH OPERATION MANUAL IMPORTANT: To aid reporting in case of the TV. The numbers are located at the rear of loss or theft, please record the... TV's model and serial numbers in the space provided. The lightning flash with arrow-head symbol,within an equilateral ...
... DO NOT OPEN CAUTION: TO REDUCE THE RISK OF ELECTRIC SHOCK, DO NOT REMOVE COVER (OR BACK). ENGLISH LC-32D59U LC-42D69U LIQUID CRYSTAL TELEVISION ENGLISH OPERATION MANUAL IMPORTANT: To aid reporting in case of the TV. The numbers are located at the rear of loss or theft, please record the... TV's model and serial numbers in the space provided. The lightning flash with arrow-head symbol,within an equilateral ...

LC-32D59U | LC42D69U Operation Manual
Page 4
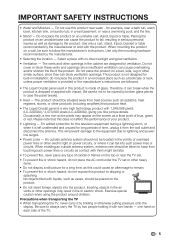
... . Connect the equipment into an outlet on , the user is selected for help. Consult the dealer or an experienced radio/TV technician for "Location". This product qualifies for ENERGY STAR when "Home" is encouraged to try to correct the interference... Electronic Industries Alliance:www.eiae.org,the lamp recycling organization: www.lamprecycle.org or Sharp at 1-800-BE-SHARP (For U.S.A only) DECLARATION OF CONFORMITY: SHARP LIQUID CRYSTAL TELEVISION, MODEL LC-32D59U/ LC-42D69U This device complies with the limits for connections. IMPORTANT INFORMATION CAUTION: TO PREVENT ELECTRIC...
... . Connect the equipment into an outlet on , the user is selected for help. Consult the dealer or an experienced radio/TV technician for "Location". This product qualifies for ENERGY STAR when "Home" is encouraged to try to correct the interference... Electronic Industries Alliance:www.eiae.org,the lamp recycling organization: www.lamprecycle.org or Sharp at 1-800-BE-SHARP (For U.S.A only) DECLARATION OF CONFORMITY: SHARP LIQUID CRYSTAL TELEVISION, MODEL LC-32D59U/ LC-42D69U This device complies with the limits for connections. IMPORTANT INFORMATION CAUTION: TO PREVENT ELECTRIC...
LC-32D59U | LC42D69U Operation Manual
Page 7
...ventilation openings. do not expose this product is dropped or applied with liquids, such as contact with 1,049,088 pixels (LC-32D59U) / 2,073,600 pixels (LC-42D69U), giving you fine picture details. The product should be injured by holding it from heat sources such as radiators, ...heat registers, stoves, or other products (including amplifiers) that this product near the TV set. • To prevent fire ...
...ventilation openings. do not expose this product is dropped or applied with liquids, such as contact with 1,049,088 pixels (LC-32D59U) / 2,073,600 pixels (LC-42D69U), giving you fine picture details. The product should be injured by holding it from heat sources such as radiators, ...heat registers, stoves, or other products (including amplifiers) that this product near the TV set. • To prevent fire ...
LC-32D59U | LC42D69U Operation Manual
Page 10
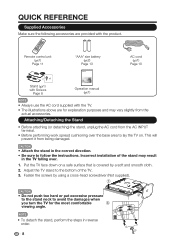
... stand in the correct direction. • Be sure to the bottom of the stand may vary slightly from the actual accessories. Incorrect installation of the TV. 3. Fasten the screws by a soft and smooth cloth. 2. CAUTION • Do not push too hard or put excessive pressure 2 to the stand ...; The illustrations above are for the most comfortable 3 viewing angle. 32" 42" • To detach the stand, perform the steps in reverse order. 8 Put the TV face down on . Remote control unit ( X1) Page 11 42" 32" Stand ( X1) with Screws Page 8 "AAA" size battery ( X2) Page 13 Operation ...
... stand in the correct direction. • Be sure to the bottom of the stand may vary slightly from the actual accessories. Incorrect installation of the TV. 3. Fasten the screws by a soft and smooth cloth. 2. CAUTION • Do not push too hard or put excessive pressure 2 to the stand ...; The illustrations above are for the most comfortable 3 viewing angle. 32" 42" • To detach the stand, perform the steps in reverse order. 8 Put the TV face down on . Remote control unit ( X1) Page 11 42" 32" Stand ( X1) with Screws Page 8 "AAA" size battery ( X2) Page 13 Operation ...

LC-32D59U | LC42D69U Operation Manual
Page 11
...''/42'' Stand Cover • To attach the stand neck, perform the steps in the correct direction. • Do not remove the stand neck from the TV unless using a cross-head screwdriver. QUICK REFERENCE Detaching the stand neck for wall mounting CAUTION • Please use care when disassembling cabinet, stand, and pillar...
...''/42'' Stand Cover • To attach the stand neck, perform the steps in the correct direction. • Do not remove the stand neck from the TV unless using a cross-head screwdriver. QUICK REFERENCE Detaching the stand neck for wall mounting CAUTION • Please use care when disassembling cabinet, stand, and pillar...
LC-32D59U | LC42D69U Operation Manual
Page 12
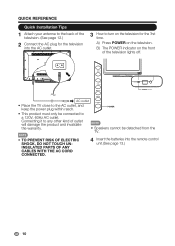
... invalidate the warranty. • Speakers cannot be connected to a 120V, 60Hz AC outlet. CH + VOL MENU POWER indicator INPUT AC outlet POWER • Place the TV close to the AC outlet, and POWER keep the power plug within reach. • This product must only be detached from the... TV. • TO PREVENT RISK OF ELECTRIC SHOCK, DO NOT TOUCH UNINSULATED PARTS OF ANY CABLES WITH THE AC CORD CONNECTED. 4 Insert the batteries into the ...
... invalidate the warranty. • Speakers cannot be connected to a 120V, 60Hz AC outlet. CH + VOL MENU POWER indicator INPUT AC outlet POWER • Place the TV close to the AC outlet, and POWER keep the power plug within reach. • This product must only be detached from the... TV. • TO PREVENT RISK OF ELECTRIC SHOCK, DO NOT TOUCH UNINSULATED PARTS OF ANY CABLES WITH THE AC CORD CONNECTED. 4 Insert the batteries into the ...
LC-32D59U | LC42D69U Operation Manual
Page 13
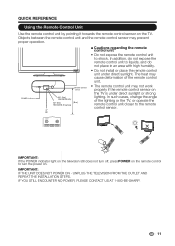
... direct sunlight or strong 45º (4m) Horizontal only 30º (5m) Horizontal & Vertical (8 m) lighting. The heat may cause deformation of the lighting or the TV, or operate the remote control unit closer to the remote control sensor. 0º INPUT 2 4 5 6 7 8 9 0 ENT DIS P LAY F RE E Z E AUDIO FLASHBACK MUTE... POWER on the remote control to turn the power on. IF YOU STILL ENCOUNLTCDTEV R NO POWER, PLEASE CONTACT US AT 1-800-BE-SHARP. QUICK REFERENCE Using the Remote Control Unit Use the remote control unit by pointing it towards the remote control sensor on the...
... direct sunlight or strong 45º (4m) Horizontal only 30º (5m) Horizontal & Vertical (8 m) lighting. The heat may cause deformation of the lighting or the TV, or operate the remote control unit closer to the remote control sensor. 0º INPUT 2 4 5 6 7 8 9 0 ENT DIS P LAY F RE E Z E AUDIO FLASHBACK MUTE... POWER on the remote control to turn the power on. IF YOU STILL ENCOUNLTCDTEV R NO POWER, PLEASE CONTACT US AT 1-800-BE-SHARP. QUICK REFERENCE Using the Remote Control Unit Use the remote control unit by pointing it towards the remote control sensor on the...

LC-32D59U | LC42D69U Operation Manual
Page 14
...it may cause damage to your outdoor antenna uses a 75-ohm coaxial cable with F-type connector that are used for a coaxial cable. If your TV set. (The breaking of internal circuit, etc.) F-type connector 75-ohm coaxial cable Connecting Antenna Cable • Connect the antenna cable to the...(Commercially available). F-type connector 75-ohm coaxial cable (round) 300-ohm twin-lead cable (flat) When connecting the RF cable to the TV using one of the TV set , do not tighten F-type connector with tools. If tools are used , it into the antenna terminal at ) 4 Separate VHF/UHF ...
...it may cause damage to your outdoor antenna uses a 75-ohm coaxial cable with F-type connector that are used for a coaxial cable. If your TV set. (The breaking of internal circuit, etc.) F-type connector 75-ohm coaxial cable Connecting Antenna Cable • Connect the antenna cable to the...(Commercially available). F-type connector 75-ohm coaxial cable (round) 300-ohm twin-lead cable (flat) When connecting the RF cable to the TV using one of the TV set , do not tighten F-type connector with tools. If tools are used , it into the antenna terminal at ) 4 Separate VHF/UHF ...

LC-32D59U | LC42D69U Operation Manual
Page 15
... a cloth. • The batteries supplied with skin can cause a rash. Preparation Installing Batteries in the Remote Control Unit If the remote control fails to operate TV functions, replace the batteries in the remote control unit. 1 Open the battery cover. 3 Close the battery cover. 2 Insert two "AAA" size batteries (supplied with the...
... a cloth. • The batteries supplied with skin can cause a rash. Preparation Installing Batteries in the Remote Control Unit If the remote control fails to operate TV functions, replace the batteries in the remote control unit. 1 Open the battery cover. 3 Close the battery cover. 2 Insert two "AAA" size batteries (supplied with the...
LC-32D59U | LC42D69U Operation Manual
Page 16
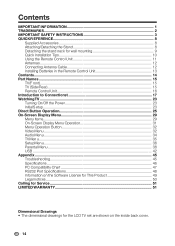
... the Remote Control Unit 11 Antennas ...12 Connecting Antenna Cable 12 Installing Batteries in the Remote Control Unit 13 Contents...14 Part Names ...15 TV(F ront)...15 TV (Side/Rear)...15 Remote Control Unit 16 Introduction to Connectionst 17 WatchingTV ...23 Turning On/Off the Power 23 InitialS etup...23 Direct Button... Software License for This Product 49 Legal notices ...50 Calling for Service ...51 LIMITED W ARRANTY 51 Dimensional Drawings • The dimensional drawings for the LCD TV set are shown on the inside back cover. 14
... the Remote Control Unit 11 Antennas ...12 Connecting Antenna Cable 12 Installing Batteries in the Remote Control Unit 13 Contents...14 Part Names ...15 TV(F ront)...15 TV (Side/Rear)...15 Remote Control Unit 16 Introduction to Connectionst 17 WatchingTV ...23 Turning On/Off the Power 23 InitialS etup...23 Direct Button... Software License for This Product 49 Legal notices ...50 Calling for Service ...51 LIMITED W ARRANTY 51 Dimensional Drawings • The dimensional drawings for the LCD TV set are shown on the inside back cover. 14
LC-32D59U | LC42D69U Operation Manual
Page 17
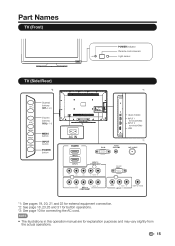
...) POWER indicator Remote control sensor Light sensor TV (Side/Rear) *2 Channel buttons CH (CH / ) + VOL MENU INPUT POWER Volume buttons (VOL+ / _) MENU button INPUT button POWER button *3 AC IN *1 HEAD PHONE HEAD PHONE ...
...) POWER indicator Remote control sensor Light sensor TV (Side/Rear) *2 Channel buttons CH (CH / ) + VOL MENU INPUT POWER Volume buttons (VOL+ / _) MENU button INPUT button POWER button *3 AC IN *1 HEAD PHONE HEAD PHONE ...
LC-32D59U | LC42D69U Operation Manual
Page 18
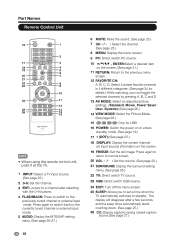
... B C D CC VIEW MODE AV MODE 10 11 12 13 14 15 LCDTV GJ221 • When using the remote control unit, point it at the TV. 1 INPUT: Select a TV input source. (See page 25.) 2 0-9: Set the channel. 3 ENT: Jumps to a channel after a few seconds, and the sleep timer automatically starts counting down....return to normal screen. 20 VOL , /. : Set the volume. (See page 25.) 21 SURROUND: Display the surround setting menu. (See page 26.) 22 TV: Direct switch TV source. 23 USB: Direct switch USB source. 24 EXIT: Turn off the menu screen. 25 SLEEP: Allows you can toggle the selected channels by...
... B C D CC VIEW MODE AV MODE 10 11 12 13 14 15 LCDTV GJ221 • When using the remote control unit, point it at the TV. 1 INPUT: Select a TV input source. (See page 25.) 2 0-9: Set the channel. 3 ENT: Jumps to a channel after a few seconds, and the sleep timer automatically starts counting down....return to normal screen. 20 VOL , /. : Set the volume. (See page 25.) 21 SURROUND: Display the surround setting menu. (See page 26.) 22 TV: Direct switch TV source. 23 USB: Direct switch USB source. 24 EXIT: Turn off the menu screen. 25 SLEEP: Allows you can toggle the selected channels by...
LC-32D59U | LC42D69U Operation Manual
Page 19
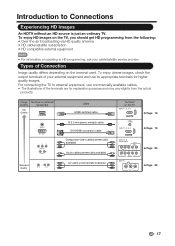
...equipment • For information on updating to Connections Experiencing HD Images An HDTV without an HD source is just an ordinary TV. To enjoy clearer images, check the output terminals of the terminals are for higher quality images. Image Terminal on external ...commercially available) Terminal on the terminal used. AUDIO -R Page 20 Page 20 17 AUDIO -R INPUT 7 VIDEO L- Types of Connection Image quality differs depending on the TV INPUT 1, 2, 3, 4 Page 19 INPUT 1, 2, 3, 4 Page 19 INPUT 5, 6 (COMPONENT) Y PB PR L- Introduction to HD programming, ask your ...
...equipment • For information on updating to Connections Experiencing HD Images An HDTV without an HD source is just an ordinary TV. To enjoy clearer images, check the output terminals of the terminals are for higher quality images. Image Terminal on external ...commercially available) Terminal on the terminal used. AUDIO -R Page 20 Page 20 17 AUDIO -R INPUT 7 VIDEO L- Types of Connection Image quality differs depending on the TV INPUT 1, 2, 3, 4 Page 19 INPUT 1, 2, 3, 4 Page 19 INPUT 5, 6 (COMPONENT) Y PB PR L- Introduction to HD programming, ask your ...
LC-32D59U | LC42D69U Operation Manual
Page 20
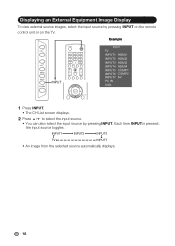
.... Example CH + VOL MENU INPUT POWER < < INPUT POWER INPUT 1 2 3 4 5 6 7 8 9 /0 ENT DIS P LAY F RE E Z E AUDIO FLASHBACK + `VOL MUTE SURROUND TV USB PC CH MENU EXIT ENTER RETURN Input TV INPUT1 HDMI1 INPUT2 HDMI2 INPUT3 HDMI3 INPUT4 HDMI4 INPUT5 COMP1 INPUT6 COMP2 INPUT7 AV PC IN USB 1 Press INPUT. • The... to select the input source. • You can also select the input source by pressing INPUT on the remote control unit or on the TV. Displaying an External Equipment Image Display To view external source images, select the input source by pressing INPUT.
.... Example CH + VOL MENU INPUT POWER < < INPUT POWER INPUT 1 2 3 4 5 6 7 8 9 /0 ENT DIS P LAY F RE E Z E AUDIO FLASHBACK + `VOL MUTE SURROUND TV USB PC CH MENU EXIT ENTER RETURN Input TV INPUT1 HDMI1 INPUT2 HDMI2 INPUT3 HDMI3 INPUT4 HDMI4 INPUT5 COMP1 INPUT6 COMP2 INPUT7 AV PC IN USB 1 Press INPUT. • The... to select the input source. • You can also select the input source by pressing INPUT on the remote control unit or on the TV. Displaying an External Equipment Image Display To view external source images, select the input source by pressing INPUT.
LC-32D59U | LC42D69U Operation Manual
Page 21
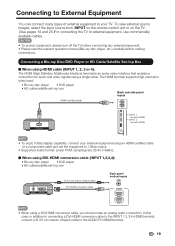
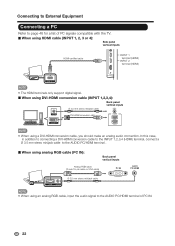
...;ed cable HDMI OUT INPUT 1 INPUT 1 INPUT 2 terminal (HDMI) INPUT 2 terminal (HDMI) USB • To enjoy 1080p display capability, connect your TV. Connecting a Blu-ray Disc/DVD Player or HD Cable/Satellite Set-top Box When using HDMI cable (INPUT 1, 2, 3 or 4): The HDMI (High... output. • Supported Audio format: Linear PCM, sampling rate 32/44.1/48kHz. CAUTION • To protect equipment, always turn off the TV before connecting any external equipment. • Please read the relevant operation manual (Blu-ray disc player, etc.) carefully before making connections. In ...
...;ed cable HDMI OUT INPUT 1 INPUT 1 INPUT 2 terminal (HDMI) INPUT 2 terminal (HDMI) USB • To enjoy 1080p display capability, connect your TV. Connecting a Blu-ray Disc/DVD Player or HD Cable/Satellite Set-top Box When using HDMI cable (INPUT 1, 2, 3 or 4): The HDMI (High... output. • Supported Audio format: Linear PCM, sampling rate 32/44.1/48kHz. CAUTION • To protect equipment, always turn off the TV before connecting any external equipment. • Please read the relevant operation manual (Blu-ray disc player, etc.) carefully before making connections. In ...
LC-32D59U | LC42D69U Operation Manual
Page 23
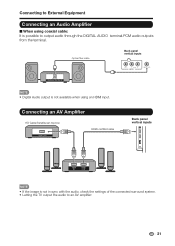
... not available when using coaxial cable: It is not in sync with the audio, check the settings of the connected surround system. • Letting the TV output the audio to output audio through the DIGITAL AUDIO terminal.PCM audio outputs from the terminal. Connecting an AV Amplifier HD Cable...
... not available when using coaxial cable: It is not in sync with the audio, check the settings of the connected surround system. • Letting the TV output the audio to output audio through the DIGITAL AUDIO terminal.PCM audio outputs from the terminal. Connecting an AV Amplifier HD Cable...
LC-32D59U | LC42D69U Operation Manual
Page 24
... PC/HDMI terminal . When using an analog RGB cable, input the audio signal to the AUDIO PC/HDMI terminal of PC signals compatible with the TV. When using analog RGB cable (PC IN): Back panel vertical inputs Analog RGB cable (D-sub 15-pin cable or VGA cable) RGB AUDIO Ø 3.5 mm...
... PC/HDMI terminal . When using an analog RGB cable, input the audio signal to the AUDIO PC/HDMI terminal of PC signals compatible with the TV. When using analog RGB cable (PC IN): Back panel vertical inputs Analog RGB cable (D-sub 15-pin cable or VGA cable) RGB AUDIO Ø 3.5 mm...
LC-32D59U | LC42D69U Operation Manual
Page 25
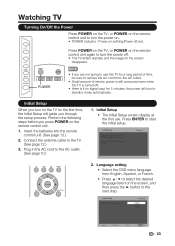
... turned off. • there is If no signal input for 5 minutes, the power will guide you are not going to use this TV for the first time, the Initial Setup will turn to standby mode automatically. POWER POWER • Small amount of time, INPUT 1 2 3 be sure ...to remove the AC cord from English, Spanish, or French. • Press ▲ / ▼ to the TV. (See page 12.) 3. Connect the antenna cable to select the desired language listed on the remote control unit. 1. Language setting • Select the OSD menu...
... turned off. • there is If no signal input for 5 minutes, the power will guide you are not going to use this TV for the first time, the Initial Setup will turn to standby mode automatically. POWER POWER • Small amount of time, INPUT 1 2 3 be sure ...to remove the AC cord from English, Spanish, or French. • Press ▲ / ▼ to the TV. (See page 12.) 3. Connect the antenna cable to select the desired language listed on the remote control unit. 1. Language setting • Select the OSD menu...

LC-32D59U | LC42D69U Operation Manual
Page 26
... until you skip this step,the channel scan could be performed in Menu. Initial Setup First,please connect cable and/or antenna. Please select your TV when selecting "Air" or "Cable". • Press ▲ / ▼ to select "Air" or "Cable" and press ► to complete. Please press... press RETURN, the process will then switch automatically to the previous step. • If you see the Auto programming complete message. The TV will return to the first channel found. 24 Store mode is destined for time zone. 7. Initial Setup Please select your current ...
... until you skip this step,the channel scan could be performed in Menu. Initial Setup First,please connect cable and/or antenna. Please select your TV when selecting "Air" or "Cable". • Press ▲ / ▼ to select "Air" or "Cable" and press ► to complete. Please press... press RETURN, the process will then switch automatically to the previous step. • If you see the Auto programming complete message. The TV will return to the first channel found. 24 Store mode is destined for time zone. 7. Initial Setup Please select your current ...
LC-32D59U | LC42D69U Operation Manual
Page 27
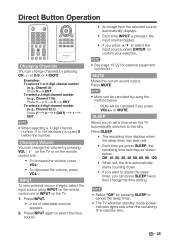
... If you want to adjust the sleep timer, you can be canceled if you to set a time when the TV automatically switches to cancel the sleep timer. • The TV will be canceled by using INPUT on the remote control unit or INPUT on the remote control unit. • ...not necessary to confirm your selection. • See page 19-22 for external equipment connection. g., Channel 115): Press 1 1 5 ENT. on the TV or on the TV. 1. Press INPUT. • A list of selectable sources appears. 2. MUTE Mutes the current sound output. g., Channel 5): Press 5 ENT. INPUT To view external...
... If you want to adjust the sleep timer, you can be canceled if you to set a time when the TV automatically switches to cancel the sleep timer. • The TV will be canceled by using INPUT on the remote control unit or INPUT on the remote control unit. • ...not necessary to confirm your selection. • See page 19-22 for external equipment connection. g., Channel 115): Press 1 1 5 ENT. on the TV or on the TV. 1. Press INPUT. • A list of selectable sources appears. 2. MUTE Mutes the current sound output. g., Channel 5): Press 5 ENT. INPUT To view external...


