
LC-22SV2U Operation Manual
Page 4
... parts. When the product displays an abnormal condition. This plug will fit into the product. I Entering of the Sharp LCD Color TV product. Check the cords at the plugs and product. I Follow instructions-All operating instructions must be routed properly to prevent people from stepping on the specification label. f. High voltage flows in the product, and inserting an object can result in the operating instructions. I Power source...
... parts. When the product displays an abnormal condition. This plug will fit into the product. I Entering of the Sharp LCD Color TV product. Check the cords at the plugs and product. I Follow instructions-All operating instructions must be routed properly to prevent people from stepping on the specification label. f. High voltage flows in the product, and inserting an object can result in the operating instructions. I Power source...

LC-22SV2U Operation Manual
Page 5
..., it can cause the product to follow the manufacturer's instructions. Do not place the product on an unstable cart, stand, tripod or table. I Ventilation-The vents and other openings in installation; I The LCD panel used in this does not affect the performance of the product. Use only a cart, stand, tripod, bracket or table recommended by the manufacturer or sold with impact...
..., it can cause the product to follow the manufacturer's instructions. Do not place the product on an unstable cart, stand, tripod or table. I Ventilation-The vents and other openings in installation; I The LCD panel used in this does not affect the performance of the product. Use only a cart, stand, tripod, bracket or table recommended by the manufacturer or sold with impact...

LC-22SV2U Operation Manual
Page 6
... supporting structure, grounding of the lead-in the vicinity of overhead power lines or other electric light or power circuits, or where it is connected to the television equipment, be located in wire to an antenna discharge unit, size of grounding conductors, location of antenna-discharge unit, connection to grounding electrodes, and requirements for long period of time, unplug it from touching such power...
... supporting structure, grounding of the lead-in the vicinity of overhead power lines or other electric light or power circuits, or where it is connected to the television equipment, be located in wire to an antenna discharge unit, size of grounding conductors, location of antenna-discharge unit, connection to grounding electrodes, and requirements for long period of time, unplug it from touching such power...
LC-22SV2U Operation Manual
Page 7
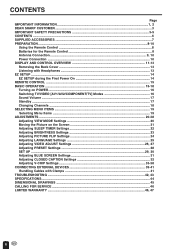
... Remote Control 8 Antenna Connection ...9, 10 Power Connection ...10 DISPLAY AND CONTROL OVERVIEW 11-13 Removing the Back Cover ...13 Listening with Headphones ...13 EZ SETUP ...14 EZ SETUP during the First Power On 14 REMOTE CONTROL ...15 BASIC OPERATION ...15-18 Turning on POWER ...16 Switching TV/VIDEO [AV1/AV2/COMPONENT/TV] Modes 16 Sound Volume ...17 Standby ...17 Changing Channels ...18 SELECTING MENU ITEMS ...19 Selecting Menu Items ...19 ADJUSTMENTS ...20-38 Adjusting VIEW MODE Settings 20 Moving the Picture on the Screen 21 Adjusting SLEEP TIMER Settings 22 Adjusting BRIGHTNESS...
... Remote Control 8 Antenna Connection ...9, 10 Power Connection ...10 DISPLAY AND CONTROL OVERVIEW 11-13 Removing the Back Cover ...13 Listening with Headphones ...13 EZ SETUP ...14 EZ SETUP during the First Power On 14 REMOTE CONTROL ...15 BASIC OPERATION ...15-18 Turning on POWER ...16 Switching TV/VIDEO [AV1/AV2/COMPONENT/TV] Modes 16 Sound Volume ...17 Standby ...17 Changing Channels ...18 SELECTING MENU ITEMS ...19 Selecting Menu Items ...19 ADJUSTMENTS ...20-38 Adjusting VIEW MODE Settings 20 Moving the Picture on the Screen 21 Adjusting SLEEP TIMER Settings 22 Adjusting BRIGHTNESS...

LC-22SV2U Operation Manual
Page 9
... into the battery housing and slide shut. POWER OPC SLEEP SLEEP indicator OPC indicator POWER indicator OPC sensor Remote control sensor Batteries for the Remote Control Before using the LCD TV set , or operate the remote control closer to the remote control sensor window. Be sure to storage conditions. • If the remote control will not be used for the first time, install two ("AAA" size, UM/SUM-4) batteries (supplied). Mixing old and new batteries can shorten...
... into the battery housing and slide shut. POWER OPC SLEEP SLEEP indicator OPC indicator POWER indicator OPC sensor Remote control sensor Batteries for the Remote Control Before using the LCD TV set , or operate the remote control closer to the remote control sensor window. Be sure to storage conditions. • If the remote control will not be used for the first time, install two ("AAA" size, UM/SUM-4) batteries (supplied). Mixing old and new batteries can shorten...

LC-22SV2U Operation Manual
Page 11
... Power Connection MAIN POWER VIDEO AV-IN 2/OUT L AUDIO R COMPONENT Y PB PR L AUDIO R PHHOENAED VIDEO AV-IN 1 L AUDIO R S-VIDEO ANT. If this is unknown, consult your cable TV company is explained below. This converter/descrambler is necessary for a long period of these channels is required (not supplied). PDINOCPW1U3EVTR PDIONCPW1U3ETVR POWER INPUT terminal (DC 13V) Household power outlet AC adapter AC cord A • Use a commercially available AC plug adapter, if necessary, depending on installing cable TV...
... Power Connection MAIN POWER VIDEO AV-IN 2/OUT L AUDIO R COMPONENT Y PB PR L AUDIO R PHHOENAED VIDEO AV-IN 1 L AUDIO R S-VIDEO ANT. If this is unknown, consult your cable TV company is explained below. This converter/descrambler is necessary for a long period of these channels is required (not supplied). PDINOCPW1U3EVTR PDIONCPW1U3ETVR POWER INPUT terminal (DC 13V) Household power outlet AC adapter AC cord A • Use a commercially available AC plug adapter, if necessary, depending on installing cable TV...
LC-22SV2U Operation Manual
Page 12
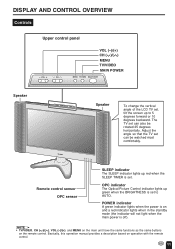
... on and a red indicator lights when in the standby mode (the indicator will not light when the main power is set to 5 degrees forward or 10 degrees backward. DISPLAY AND CONTROL OVERVIEW Controls Upper control panel VOL CH VOL (-)/(+) CH ( )/( ) MENU TV/VIDEO MAIN POWER MENU TV/VIDEO MAIN POWER Speaker Speaker To change the vertical angle of the LCD TV set, tilt the screen up red when the SLEEP TIMER is set. Basically, this operation manual provides a description based on the remote control. Adjust the angle...
... on and a red indicator lights when in the standby mode (the indicator will not light when the main power is set to 5 degrees forward or 10 degrees backward. DISPLAY AND CONTROL OVERVIEW Controls Upper control panel VOL CH VOL (-)/(+) CH ( )/( ) MENU TV/VIDEO MAIN POWER MENU TV/VIDEO MAIN POWER Speaker Speaker To change the vertical angle of the LCD TV set, tilt the screen up red when the SLEEP TIMER is set. Basically, this operation manual provides a description based on the remote control. Adjust the angle...

LC-22SV2U Operation Manual
Page 14
... 2 hooks on the rear of the cover VIDEO AV-IN 2/OUT L AUDIO ANT. M On-screen display Headphones VIDEO AV-IN 2/OUT L AUDIO R COMPONENT Y PB PR L AUDIO R PHHOENAED c Rear terminal VOLUME 20 Adjust the sound volume using VOL (e)/(f). Push in the supplied accessories. • No sound is heard from the main unit speakers when a headphone mini-plug is connected into the rear terminals, remove the back covers. DISPLAY AND CONTROL OVERVIEW (Continued) Removing the Back Cover I Before connecting cables...
... 2 hooks on the rear of the cover VIDEO AV-IN 2/OUT L AUDIO ANT. M On-screen display Headphones VIDEO AV-IN 2/OUT L AUDIO R COMPONENT Y PB PR L AUDIO R PHHOENAED c Rear terminal VOLUME 20 Adjust the sound volume using VOL (e)/(f). Push in the supplied accessories. • No sound is heard from the main unit speakers when a headphone mini-plug is connected into the rear terminals, remove the back covers. DISPLAY AND CONTROL OVERVIEW (Continued) Removing the Back Cover I Before connecting cables...

LC-22SV2U Operation Manual
Page 15
...)". SLEEP VIEW MODE PIC. If you press MAIN POWER. (1) Insert the batteries into the remote control. (See page 8.) (2) Connect the antenna cable to the TV set. (See page 9.) (3) Connect the AC adapter to the POWER INPUT terminal of the product and plug in your region, please refer to pages 29 and 30 for more information on manually memorizing the channels using CHANNEL SETTING. 14 YES NO EX I T MENU PLEASE WA I T MENU POWER 4 Press d. EZ SETUP...
...)". SLEEP VIEW MODE PIC. If you press MAIN POWER. (1) Insert the batteries into the remote control. (See page 8.) (2) Connect the antenna cable to the TV set. (See page 9.) (3) Connect the AC adapter to the POWER INPUT terminal of the product and plug in your region, please refer to pages 29 and 30 for more information on manually memorizing the channels using CHANNEL SETTING. 14 YES NO EX I T MENU PLEASE WA I T MENU POWER 4 Press d. EZ SETUP...
LC-22SV2U Operation Manual
Page 16
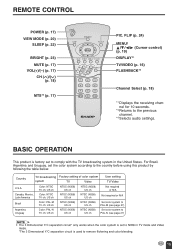
... is set to remove flickering and color bleeding. 15 For Brazil, Argentina and Uruguay, set the color system according to the previous channel. *3 Selects audio settings. Country TV broadcasting Factory setting of color system system TV Video User setting TV/Video U.S.A. FLIP (p. 24) MENU/ a/b/c/d (Cursor control) (p. 19) DISPLAY*1 TV/VIDEO (p. 16) FLASHBACK*2 Channel Select (p. 18) *1 Displays the receiving channel for 10 seconds. *2 Returns to the country before using this product by following the table below. REMOTE CONTROL POWER (p. 17) VIEW MODE (p. 20) SLEEP (p. 22...
... is set to remove flickering and color bleeding. 15 For Brazil, Argentina and Uruguay, set the color system according to the previous channel. *3 Selects audio settings. Country TV broadcasting Factory setting of color system system TV Video User setting TV/Video U.S.A. FLIP (p. 24) MENU/ a/b/c/d (Cursor control) (p. 19) DISPLAY*1 TV/VIDEO (p. 16) FLASHBACK*2 Channel Select (p. 18) *1 Displays the receiving channel for 10 seconds. *2 Returns to the country before using this product by following the table below. REMOTE CONTROL POWER (p. 17) VIEW MODE (p. 20) SLEEP (p. 22...
LC-22SV2U Operation Manual
Page 18
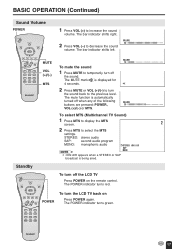
... (-) to select the MTS settings. The bar indicator shifts left. FLIP MENU 1 Press VOL (+) to the previous level. The MUTE mark is automatically turned off the sound. VOLUME 50 MUTE BRIGHT DISPLAY TV/VIDEO VOL CH FLASHBACK MUTE VOL (+)/(-) MTS To mute the sound 1 Press MUTE to temporarily turn the sound back to increase the sound volume. BASIC OPERATION (Continued) Sound Volume POWER POWER SLEEP VIEW MODE PIC. The mute function...
... (-) to select the MTS settings. The bar indicator shifts left. FLIP MENU 1 Press VOL (+) to the previous level. The MUTE mark is automatically turned off the sound. VOLUME 50 MUTE BRIGHT DISPLAY TV/VIDEO VOL CH FLASHBACK MUTE VOL (+)/(-) MTS To mute the sound 1 Press MUTE to temporarily turn the sound back to increase the sound volume. BASIC OPERATION (Continued) Sound Volume POWER POWER SLEEP VIEW MODE PIC. The mute function...
LC-22SV2U Operation Manual
Page 19
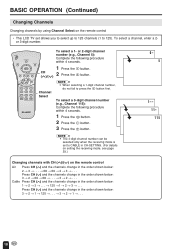
...; 3 → . . . POWER SLEEP VIEW MODE PIC. FLIP MENU MUTE BRIGHT DISPLAY TV/VIDEO CH ( )/( To select a 1- Cable Press CH ( ) and the channels change in the order shown below: 3 → 2 → 1 → 125 3 → 2 → 1 → . . . 18 BASIC OPERATION (Continued) Changing Channels Changing channels by using Channel Select on the remote control • This LCD TV set to CABLE in CH-SETTING. (For details on setting the receiving mode, see page 29.) 0- 5 1-- 11- 115 Changing channels with CH ( )/( ) on the remote control Air...
...; 3 → . . . POWER SLEEP VIEW MODE PIC. FLIP MENU MUTE BRIGHT DISPLAY TV/VIDEO CH ( )/( To select a 1- Cable Press CH ( ) and the channels change in the order shown below: 3 → 2 → 1 → 125 3 → 2 → 1 → . . . 18 BASIC OPERATION (Continued) Changing Channels Changing channels by using Channel Select on the remote control • This LCD TV set to CABLE in CH-SETTING. (For details on setting the receiving mode, see page 29.) 0- 5 1-- 11- 115 Changing channels with CH ( )/( ) on the remote control Air...
LC-22SV2U Operation Manual
Page 20
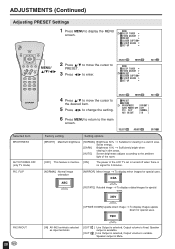
... with the special buttons: VIEW MODE, SLEEP, BRIGHT and PIC. SELECT AD J US T EX I GHT ] AUTO POWER OFF [ OFF ] PIC. REMA I N ] SELECT AD J US T (Pages 26, 27) V I DEO ADJUST ( TV ) RE TURN P I CTURE [ 30] T I NT [ 0] COLOR [ 0] BLACK LEVEL [ 0 ] SHARPNESS [ 0 ] COLOR SYSTEM [ N358 ] RESET EX I T MENU SELECT ENTER EX I T MENU (Pages 23, 24 and 28) PRESET RE TURN BR I GHTNESS [ BR I T MENU 19 POWER SLEEP VIEW MODE PIC. MENU SLEEP T IMER V I DEO ADJUST PRESET CLOSED CAPT I ON...
... with the special buttons: VIEW MODE, SLEEP, BRIGHT and PIC. SELECT AD J US T EX I GHT ] AUTO POWER OFF [ OFF ] PIC. REMA I N ] SELECT AD J US T (Pages 26, 27) V I DEO ADJUST ( TV ) RE TURN P I CTURE [ 30] T I NT [ 0] COLOR [ 0] BLACK LEVEL [ 0 ] SHARPNESS [ 0 ] COLOR SYSTEM [ N358 ] RESET EX I T MENU SELECT ENTER EX I T MENU (Pages 23, 24 and 28) PRESET RE TURN BR I GHTNESS [ BR I T MENU 19 POWER SLEEP VIEW MODE PIC. MENU SLEEP T IMER V I DEO ADJUST PRESET CLOSED CAPT I ON...

LC-22SV2U Operation Manual
Page 25
... select the desired picture flip setting. 6 Press MENU to return to PIC. MENU SLEEP T IMER V I DEO ADJUST PRESET CLOSED CAPT I ON V-CH I P BLOCK SET UP SELECT ENTER EX I T MENU PRESET RE TURN BR I GHTNESS [ BR I C. FLIP to display the PICTURE FLIP screen. 2 Press PIC. F L I P [NORMAL ] ABC P I GHT ] AUTO POWER OFF [ OFF ] PIC. FLIP MENU MUTE BRIGHT DISPLAY TV/VIDEO Directly setting the PICTURE FLIP 1 Press PIC. FLIP to change the PIC. FL...
... select the desired picture flip setting. 6 Press MENU to return to PIC. MENU SLEEP T IMER V I DEO ADJUST PRESET CLOSED CAPT I ON V-CH I P BLOCK SET UP SELECT ENTER EX I T MENU PRESET RE TURN BR I GHTNESS [ BR I C. FLIP to display the PICTURE FLIP screen. 2 Press PIC. F L I P [NORMAL ] ABC P I GHT ] AUTO POWER OFF [ OFF ] PIC. FLIP MENU MUTE BRIGHT DISPLAY TV/VIDEO Directly setting the PICTURE FLIP 1 Press PIC. FLIP to change the PIC. FL...

LC-22SV2U Operation Manual
Page 27
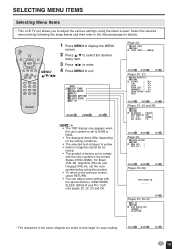
... [ 0] COLOR [ 0] BLACK LEVEL [ 0 ] SHARPNESS [ 0 ] COLOR SYSTEM [ N358 ] RESET EX I T MENU 26 FLIP MENU MUTE BRIGHT DISPLAY TV/VIDEO VOL CH FLASHBACK MENU/ a/b/c/d 2 Press a/b to move the cursor to the desired item. 5 Press c/d to enter. SLEEP T IMER V I DEO ADJUST PRESET CLOSED CAPT I ON V-CH I CTURE 30 - A • See page 27 for the settings. 7 Press MENU to return to display the MENU MENU screen. SELECT ENTER RE TURN P I P BLOCK POWER SET UP SLEEP VIEW MODE PIC. ADJUSTMENTS (Continued) Adjusting VIDEO ADJUST Settings Video adjustments have...
... [ 0] COLOR [ 0] BLACK LEVEL [ 0 ] SHARPNESS [ 0 ] COLOR SYSTEM [ N358 ] RESET EX I T MENU 26 FLIP MENU MUTE BRIGHT DISPLAY TV/VIDEO VOL CH FLASHBACK MENU/ a/b/c/d 2 Press a/b to move the cursor to the desired item. 5 Press c/d to enter. SLEEP T IMER V I DEO ADJUST PRESET CLOSED CAPT I ON V-CH I CTURE 30 - A • See page 27 for the settings. 7 Press MENU to return to display the MENU MENU screen. SELECT ENTER RE TURN P I P BLOCK POWER SET UP SLEEP VIEW MODE PIC. ADJUSTMENTS (Continued) Adjusting VIDEO ADJUST Settings Video adjustments have...
LC-22SV2U Operation Manual
Page 29
... input terminals [OUT [OUT ] Line Output is selected, Output volume is fixed, Speaker output is available. ] Line Output is selected, Output volume is variable, Speaker output is no signal for 5 minutes. [NORMAL] Normal image orientation [MIRROR] Mirror image → To display mirror images for viewing in dim areas. [AUTO] Screen brightness adjusts according to display the MENU screen. MENU SLEEP T IMER V I DEO ADJUST PRESET CLOSED CAPT I ON V-CH I P BLOCK SET UP SELECT ENTER MENU SLEEP T IMER V I DEO ADJUST PRESET CLOSED...
... input terminals [OUT [OUT ] Line Output is selected, Output volume is fixed, Speaker output is available. ] Line Output is selected, Output volume is variable, Speaker output is no signal for 5 minutes. [NORMAL] Normal image orientation [MIRROR] Mirror image → To display mirror images for viewing in dim areas. [AUTO] Screen brightness adjusts according to display the MENU screen. MENU SLEEP T IMER V I DEO ADJUST PRESET CLOSED CAPT I ON V-CH I P BLOCK SET UP SELECT ENTER MENU SLEEP T IMER V I DEO ADJUST PRESET CLOSED...

LC-22SV2U Operation Manual
Page 33
... the picture. MENU SLEEP T IMER V I DEO ADJUST PRESET CLOSED CAPT I ON V-CH I P BLOCK SET UP SELECT ENTER CLOSED CAPT I ON RE TURN MODE [ OFF ] DATA [ CH 1 ] EX I T MENU 5 Press c/d to the main screen. In this occur, switch the Closed Caption mode to ensure that is being received while viewing in VIEW MODE. For each mode, two channels are problems at the broadcast source. EX I ON ] DATA [ CH 2 ] 6 Press MENU to return to change the CLOSED CAPTION setting. SELECT...
... the picture. MENU SLEEP T IMER V I DEO ADJUST PRESET CLOSED CAPT I ON V-CH I P BLOCK SET UP SELECT ENTER CLOSED CAPT I ON RE TURN MODE [ OFF ] DATA [ CH 1 ] EX I T MENU 5 Press c/d to the main screen. In this occur, switch the Closed Caption mode to ensure that is being received while viewing in VIEW MODE. For each mode, two channels are problems at the broadcast source. EX I ON ] DATA [ CH 2 ] 6 Press MENU to return to change the CLOSED CAPTION setting. SELECT...
LC-22SV2U Operation Manual
Page 45
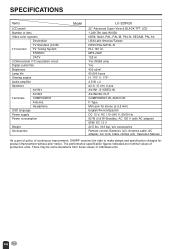
...° 2.5 W × 2 ø2 in individual units. 44 SPECIFICATIONS Items LCD panel Number of dots Video color systems Destination TV Standard (CCIR) TV function TV Tuning System STEREO CATV 3 Dimensional Y/C separation circuit Digital comb filter Brightness Lamp life Viewing angles Audio amplifier Speakers AV-IN1 AV-IN2 Terminals COMPONENT Antenna Headphone OSD language Power supply Power consumption Weight Accessories Model LC-22SV2U 22" Advanced Super View & BLACK TFT LCD 1,229,760 dots WVGA N358, N443, PAL, PAL...
...° 2.5 W × 2 ø2 in individual units. 44 SPECIFICATIONS Items LCD panel Number of dots Video color systems Destination TV Standard (CCIR) TV function TV Tuning System STEREO CATV 3 Dimensional Y/C separation circuit Digital comb filter Brightness Lamp life Viewing angles Audio amplifier Speakers AV-IN1 AV-IN2 Terminals COMPONENT Antenna Headphone OSD language Power supply Power consumption Weight Accessories Model LC-22SV2U 22" Advanced Super View & BLACK TFT LCD 1,229,760 dots WVGA N358, N443, PAL, PAL...

LC-22SV2U Operation Manual
Page 47
... to the purchaser. Some states do to Obtain Service: LC-22SV2U LCD Color Television (Be sure to have Proof of the nearest Sharp Authorized Servicer, call 1-800-BE-SHARP. To find the location of Purchase available. Specifically, ALL OTHER WARRANTIES OTHER THAN THOSE SET FORTH ABOVE ARE EXCLUDED. In no charge to the purchaser for parts or labor for any way responsible, for breach...
... to the purchaser. Some states do to Obtain Service: LC-22SV2U LCD Color Television (Be sure to have Proof of the nearest Sharp Authorized Servicer, call 1-800-BE-SHARP. To find the location of Purchase available. Specifically, ALL OTHER WARRANTIES OTHER THAN THOSE SET FORTH ABOVE ARE EXCLUDED. In no charge to the purchaser for parts or labor for any way responsible, for breach...

LC-22SV2U Operation Manual
Page 48
... employee is free, under normal use with the screen size of time or use as outlined in the owner's manual. (b) Any Sharp product tampered with, modified, adjusted or repaired by an Authorized Sharp Dealer: Sharp warrants that this warranty on this Sharp brand product, when shipped in material or workmanship relating to transmission line/power line voltage or liquid spillage. (g) Any product received without appropriate model, serial number and CSA...
... employee is free, under normal use with the screen size of time or use as outlined in the owner's manual. (b) Any Sharp product tampered with, modified, adjusted or repaired by an Authorized Sharp Dealer: Sharp warrants that this warranty on this Sharp brand product, when shipped in material or workmanship relating to transmission line/power line voltage or liquid spillage. (g) Any product received without appropriate model, serial number and CSA...


