
HT-SL50 Operation Manual
Page 1
HT-SL50 Sound Bar Home Theater system consisting of Sound Bar and Subwoofer. Recommended Connection: TV Type with HDMI ( ver1.4 with ARC) with HDMI HDMI TV without HDMI, headphone or RCA (variable output) connection is required...product is controlled via HDMI CEC (Consumer Electronics Control) specification, therefore for purchasing this manual carefully. It will guide you for HDMI connection, your SHARP product. MODEL HT-SL50 SOUND BAR HOME THEATER SYSTEM ENGLISH OPERATION MANUAL Thank you in operating your TV's CEC must be enabled. ● For TV without HDMI CEC, headphone ...
HT-SL50 Sound Bar Home Theater system consisting of Sound Bar and Subwoofer. Recommended Connection: TV Type with HDMI ( ver1.4 with ARC) with HDMI HDMI TV without HDMI, headphone or RCA (variable output) connection is required...product is controlled via HDMI CEC (Consumer Electronics Control) specification, therefore for purchasing this manual carefully. It will guide you for HDMI connection, your SHARP product. MODEL HT-SL50 SOUND BAR HOME THEATER SYSTEM ENGLISH OPERATION MANUAL Thank you in operating your TV's CEC must be enabled. ● For TV without HDMI CEC, headphone ...
HT-SL50 Operation Manual
Page 2
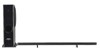
... Subwoofer Stand x 2 Audio cable x 1 HDMI cable x 1 (1pin - 2 pins) x 1 (GITAUA004AW01) (QCNWGA062AWPZ) (QCNWGA065AWPZ) (QCNWGA064AWPZ) Foot cushion x 4 (PCUSGA189AWZZ) Wall Mount Angle x 2 (LANGKA225AW01) Pattern Paper Speaker Wire Sound bar Stand x 2 (TCAUHA026AWZZ) (QCNWHA043AW01) (GITAUA012AWSA) Sound bar Stand Cushion x 2 (PCUSSA190AWZZ) Special Notes CAUTION: TO REDUCE THE RISK OF ELECTRIC SHOCK, DO NOT REMOVE COVER (OR BACK). RCA to provide reasonable...
... Subwoofer Stand x 2 Audio cable x 1 HDMI cable x 1 (1pin - 2 pins) x 1 (GITAUA004AW01) (QCNWGA062AWPZ) (QCNWGA065AWPZ) (QCNWGA064AWPZ) Foot cushion x 4 (PCUSGA189AWZZ) Wall Mount Angle x 2 (LANGKA225AW01) Pattern Paper Speaker Wire Sound bar Stand x 2 (TCAUHA026AWZZ) (QCNWHA043AW01) (GITAUA012AWSA) Sound bar Stand Cushion x 2 (PCUSSA190AWZZ) Special Notes CAUTION: TO REDUCE THE RISK OF ELECTRIC SHOCK, DO NOT REMOVE COVER (OR BACK). RCA to provide reasonable...
HT-SL50 Operation Manual
Page 5
...the sole and exclusive remedy available to a Sharp Authorized Servicer. THIS WARRANTY GIVES YOU SPECIFIC LEGAL RIGHTS. YOU MAY ALSO HAVE OTHER RIGHTS WHICH VARY FROM STATE TO STATE. Model Specific Section Your Product Model Number & Description: HT-SL50 Sound Bar Home Theater System (Be sure to have... this limited warranty, the purchaser should follow the steps set forth below and provide proof of purchase to have Proof of Purchase available. To find a location of Sharp. If you . The limited...
...the sole and exclusive remedy available to a Sharp Authorized Servicer. THIS WARRANTY GIVES YOU SPECIFIC LEGAL RIGHTS. YOU MAY ALSO HAVE OTHER RIGHTS WHICH VARY FROM STATE TO STATE. Model Specific Section Your Product Model Number & Description: HT-SL50 Sound Bar Home Theater System (Be sure to have... this limited warranty, the purchaser should follow the steps set forth below and provide proof of purchase to have Proof of Purchase available. To find a location of Sharp. If you . The limited...
HT-SL50 Operation Manual
Page 7
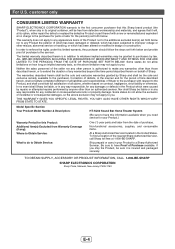
... Speaker terminal (White/Black) . . . . . 9 REAR VIEW 1 3 2 ACTIVE SUBWOOFER SYSTEM HT-SL50 4 5 7 8 6 Reference page 1. AC Power Cord 9 7. Speaker Terminal 9 8. Audio In (TV) Jack 12 E-6 Bass Reflex Duct Subwoofer FRONT VIEW R RL L 3 Reference page 4. Bass Reflect Duct 3. HDMI Input Jack 11 6. Controls and indicators Sound Bar 1 FRONT VIEW 2 REAR VIEW 4 5 R RL L 3 1. Right Front Speaker terminal (Red...
... Speaker terminal (White/Black) . . . . . 9 REAR VIEW 1 3 2 ACTIVE SUBWOOFER SYSTEM HT-SL50 4 5 7 8 6 Reference page 1. AC Power Cord 9 7. Speaker Terminal 9 8. Audio In (TV) Jack 12 E-6 Bass Reflex Duct Subwoofer FRONT VIEW R RL L 3 Reference page 4. Bass Reflect Duct 3. HDMI Input Jack 11 6. Controls and indicators Sound Bar 1 FRONT VIEW 2 REAR VIEW 4 5 R RL L 3 1. Right Front Speaker terminal (Red...
HT-SL50 Operation Manual
Page 8
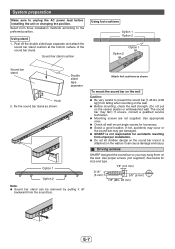
... (not supplied). If not, accidents may occur or the sound bar may get damaged. ● SHARP is not responsible for accidents resulting from the sound bar. System preparation Make sure to the preferred position. Using stand 1. The sound bar may hang them on the wall Caution: ● Be very...mounting on the wall. ● Before mounting, check the wall strength. (Do not put on the wall as shown. Driving screws SHARP designed the sound bar so you may fall.) If unsure, consult a qualified service technician. ● Mounting screws are not supplied. Peel off backward from ...
... (not supplied). If not, accidents may occur or the sound bar may get damaged. ● SHARP is not responsible for accidents resulting from the sound bar. System preparation Make sure to the preferred position. Using stand 1. The sound bar may hang them on the wall Caution: ● Be very...mounting on the wall. ● Before mounting, check the wall strength. (Do not put on the wall as shown. Driving screws SHARP designed the sound bar so you may fall.) If unsure, consult a qualified service technician. ● Mounting screws are not supplied. Peel off backward from ...
HT-SL50 Operation Manual
Page 9
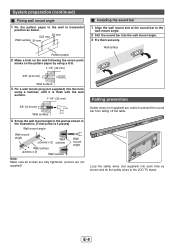
... sure all screws are fully tightened. (screws are not supplied) Falling prevention Safety wires (not supplied) are useful to the wall mount angle. 2 Slot the sound bar into the hole using a hammer, until it is flush with the wall surface. 1-1/4" (32 mm) 3/8" (8-9 mm) Wall surface 4 Screw the wall mount angle to the... the safety wires (not supplied) into each hole as shown in horizontal position as below. 30 mm 523 mm Wall surface 30 mm Installing the sound bar 1 Align the wall mount slot at the sound bar to prevent the sound bar from falling off the table.
... sure all screws are fully tightened. (screws are not supplied) Falling prevention Safety wires (not supplied) are useful to the wall mount angle. 2 Slot the sound bar into the hole using a hammer, until it is flush with the wall surface. 1-1/4" (32 mm) 3/8" (8-9 mm) Wall surface 4 Screw the wall mount angle to the... the safety wires (not supplied) into each hole as shown in horizontal position as below. 30 mm 523 mm Wall surface 30 mm Installing the sound bar 1 Align the wall mount slot at the sound bar to prevent the sound bar from falling off the table.
HT-SL50 Operation Manual
Page 10
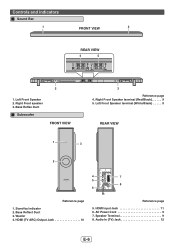
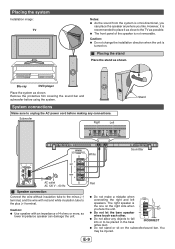
... cord before using the system. Placing the stand Place the stand as shown. The right speaker is not removable. Subwoofer Right Left Stand White Sound Bar AC outlet AC 120 V ~ 60 Hz Speaker connection Connect the wire without insulation tube to the minus (-) terminal, and the wire with ... the plus (+) terminal. You may be placed in the bass INCORRECT reflex duct. ● Do not stand or sit on the subwoofer/sound bar. Blu-ray DVD player ACTIVE SUBWOOFER SYSTEM HT-SL50 Place the system as shown. Placing the system Installation image: TV Notes: ● As the...
... cord before using the system. Placing the stand Place the stand as shown. The right speaker is not removable. Subwoofer Right Left Stand White Sound Bar AC outlet AC 120 V ~ 60 Hz Speaker connection Connect the wire without insulation tube to the minus (-) terminal, and the wire with ... the plus (+) terminal. You may be placed in the bass INCORRECT reflex duct. ● Do not stand or sit on the subwoofer/sound bar. Blu-ray DVD player ACTIVE SUBWOOFER SYSTEM HT-SL50 Place the system as shown. Placing the system Installation image: TV Notes: ● As the...


