ER-A410 | ER-A420 Operation Manual
Page 13
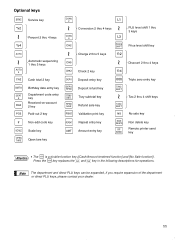
... 4 000 TAX2 SHIFT Triple zero entry key TAX4 SHIFT NS Tax 2 thru 4 shift keys No sale key NON DELETE RP SEND Non delete key Remote printer send key a n Attention • The CA/AT/NS is a double-function key ([Cash/Amount tendered function] and [No Sale function]). Press the CA/AT/NS...
... 4 000 TAX2 SHIFT Triple zero entry key TAX4 SHIFT NS Tax 2 thru 4 shift keys No sale key NON DELETE RP SEND Non delete key Remote printer send key a n Attention • The CA/AT/NS is a double-function key ([Cash/Amount tendered function] and [No Sale function]). Press the CA/AT/NS...

ER-A410 | ER-A420 Operation Manual
Page 180
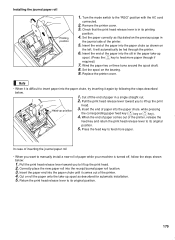
...Install the paper roll in . (44.5 ± 0.5 mm) Max. This may result in the machine, be fed through the printer. 6. The use paper rolls specified by SHARP. Therefore, when setting a new paper roll in nothing appearing at this location when printing is fixed with paste or tape, the paper... revolution (approx. 25 cm long). (How to set the paper roll) (How to set paper roll(s) prior to use of the printer. 5. Replace the printer cover. 178 Be careful then to cut the paper end correctly. Turn the mode switch to the deterioration of the heat-sensitive color development...
...Install the paper roll in . (44.5 ± 0.5 mm) Max. This may result in the machine, be fed through the printer. 6. The use paper rolls specified by SHARP. Therefore, when setting a new paper roll in nothing appearing at this location when printing is fixed with paste or tape, the paper... revolution (approx. 25 cm long). (How to set the paper roll) (How to set paper roll(s) prior to use of the printer. 5. Replace the printer cover. 178 Be careful then to cut the paper end correctly. Turn the mode switch to the deterioration of the heat-sensitive color development...
ER-A410 | ER-A420 Operation Manual
Page 181
...the mode switch to its original position. 5. Set the spool on the previous page in a single straight cut. 2. Replace the printer cover. When the end of paper comes out of the printer. 4. It will automatically be fed through if required.) 7. Note • When it is difficult to its printing ... "REG" position with the AC cord connected. 2. Pull the print head release lever toward you want to feed more paper through the printer. 6. Return the print head release lever to insert paper into the slit in its original position. 179 Press the feed key to manually...
...the mode switch to its original position. 5. Set the spool on the previous page in a single straight cut. 2. Replace the printer cover. When the end of paper comes out of the printer. 4. It will automatically be fed through if required.) 7. Note • When it is difficult to its printing ... "REG" position with the AC cord connected. 2. Pull the print head release lever toward you want to feed more paper through the printer. 6. Return the print head release lever to insert paper into the slit in its original position. 179 Press the feed key to manually...
ER-A410 | ER-A420 Operation Manual
Page 182
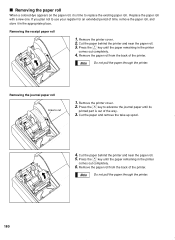
Press the key until the paper remaining in the printer comes out completely. 6. Removing the journal paper roll Area to replace the existing paper roll. Removing the paper roll When a colored dye appears on the paper roll, it in the printer comes out completely. 4. Removing the receipt paper roll 1....register for an extended period of time, remove the paper roll, and store it is out of the way. 3. Replace the paper roll with a new one. Remove the printer cover. Ô 2. Press the key until the paper remaining in the appropriate place. Remove the paper roll from the...
Press the key until the paper remaining in the printer comes out completely. 6. Removing the journal paper roll Area to replace the existing paper roll. Removing the paper roll When a colored dye appears on the paper roll, it in the printer comes out completely. 4. Removing the receipt paper roll 1....register for an extended period of time, remove the paper roll, and store it is out of the way. 3. Replace the paper roll with a new one. Remove the printer cover. Ô 2. Press the key until the paper remaining in the appropriate place. Remove the paper roll from the...
ER-A410 | ER-A420 Operation Manual
Page 183
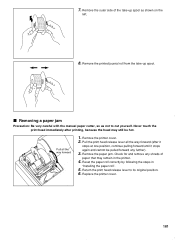
...printing, because the head may remain in "Installing the paper roll". 5. Remove the printed journal roll from the take -up spool. Remove the printer cover. 2. Remove the outer side of paper that may still be pulled forward any shreds of the take -up spool as not to its ...original position. 6. Reset the paper roll correctly by following the steps in the printer. 4. Replace the printer cover. 181 Never touch the print head immediately after it stops at one position, continue pulling forward until it stops again and cannot ...
...printing, because the head may remain in "Installing the paper roll". 5. Remove the printed journal roll from the take -up spool. Remove the printer cover. 2. Remove the outer side of paper that may still be pulled forward any shreds of the take -up spool as not to its ...original position. 6. Reset the paper roll correctly by following the steps in the printer. 4. Replace the printer cover. 181 Never touch the print head immediately after it stops at one position, continue pulling forward until it stops again and cannot ...
ER-A410 | ER-A420 Operation Manual
Page 184
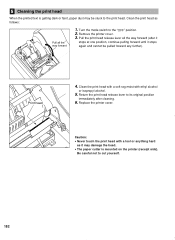
... forward until it may damage the head. • The paper cutter is getting dark or faint, paper dust may be pulled forward any further). Replace the printer cover. Clean the print head with a soft rag moist with a tool or anything hard as follows: Pull all the way forward (after cleaning.... 6. Print head 4. Caution: • Never touch the print head with ethyl alcohol or isopropyl alcohol. 5. Remove the printer cover. 3. Be careful not to the "OFF" position. 2. 5 Cleaning the print head When the printed text is mounted on the...
... forward until it may damage the head. • The paper cutter is getting dark or faint, paper dust may be pulled forward any further). Replace the printer cover. Clean the print head with a soft rag moist with a tool or anything hard as follows: Pull all the way forward (after cleaning.... 6. Print head 4. Caution: • Never touch the print head with ethyl alcohol or isopropyl alcohol. 5. Remove the printer cover. 3. Be careful not to the "OFF" position. 2. 5 Cleaning the print head When the printed text is mounted on the...


