
Operation Manual
Page 2
... copier. ● Use of controls or adjustments or performance of this area when removing misfed paper. ● Do not look directly at the light source. Always refit the fuse cover after replacing the fuse on a firm, level surface. ● Do not install the copier in a humid or dusty location. ● When the copier is on laser Wave length Pulse times Output power 785 nm...
... copier. ● Use of controls or adjustments or performance of this area when removing misfed paper. ● Do not look directly at the light source. Always refit the fuse cover after replacing the fuse on a firm, level surface. ● Do not install the copier in a humid or dusty location. ● When the copier is on laser Wave length Pulse times Output power 785 nm...
Operation Manual
Page 3
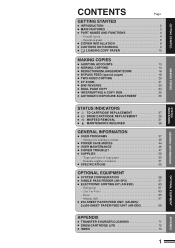
...; DRUM CARTRIDGE REPLACEMENT 29 ● MISFEED REMOVAL 31 ● MAINTENANCE REQUIRED 36 GENERAL INFORMATION ● USER PROGRAMS 37 - Margin shift 67 ● 250-SHEET PAPER FEED UNIT (AR-DE5)/ 2x250-SHEET PAPER FEED UNIT (AR-DE6 68 OPTIONAL EQUIPMENT APPENDIX APPENDIX ● TRANSFER CHARGER CLEANING 71 ● DRUM CARTRIDGE LIFE 72 ● INDEX 73 1 Types and sizes of copy paper 50 - Settings for auditing accounts 40 ● POWER SAVE MODES 44 ● USER MAINTENANCE 46 ● COPIER TROUBLE 47 ● SUPPLIES 50...
...; DRUM CARTRIDGE REPLACEMENT 29 ● MISFEED REMOVAL 31 ● MAINTENANCE REQUIRED 36 GENERAL INFORMATION ● USER PROGRAMS 37 - Margin shift 67 ● 250-SHEET PAPER FEED UNIT (AR-DE5)/ 2x250-SHEET PAPER FEED UNIT (AR-DE6 68 OPTIONAL EQUIPMENT APPENDIX APPENDIX ● TRANSFER CHARGER CLEANING 71 ● DRUM CARTRIDGE LIFE 72 ● INDEX 73 1 Types and sizes of copy paper 50 - Settings for auditing accounts 40 ● POWER SAVE MODES 44 ● USER MAINTENANCE 46 ● COPIER TROUBLE 47 ● SUPPLIES 50...
Operation Manual
Page 4
However, this manual, the following icons are used as a laser printer and as a facsimile machine by installing optional components. Notes provide information relevant to the copier regarding specifications, functions, performance, operation and such, that may result if the contents of the caution are not properly followed. Indicates a letter displayed in a handy location. This copier can be useful to the user. GETTING STARTED Introduction...
However, this manual, the following icons are used as a laser printer and as a facsimile machine by installing optional components. Notes provide information relevant to the copier regarding specifications, functions, performance, operation and such, that may result if the contents of the caution are not properly followed. Indicates a letter displayed in a handy location. This copier can be useful to the user. GETTING STARTED Introduction...

Operation Manual
Page 5
... ● Paper output tray is housed in the copier for space saving. ● Preheat mode and auto power shut-off mode are available. ● User programs allow the internal auditor to be controlled. √ Scan once/ Print many useful copier features to be affected by installing an optional printer expansion kit. ● This copier can be adjusted in five steps. ● The photo mode copying function allows clear copying of...
... ● Paper output tray is housed in the copier for space saving. ● Preheat mode and auto power shut-off mode are available. ● User programs allow the internal auditor to be controlled. √ Scan once/ Print many useful copier features to be affected by installing an optional printer expansion kit. ● This copier can be adjusted in five steps. ● The photo mode copying function allows clear copying of...

Operation Manual
Page 6
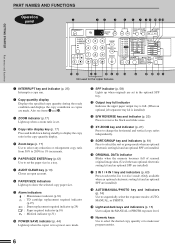
.... !4 Charger cleaner Use to clean the transfer charger. 4 r Power switch Press to the width of copy paper. t Operation panel All copier controls are deposited in the paper output tray. y Paper output tray Finished copies are located here for copier servicing. o Side cover Open to remove misfeeds and to service the copier. !0 Side cover handle Lift and pull to open the side cover. !1 Bypass tray guides Adjust to turn copier power on the original table and close the platen cover before copying starts. u Front cover Open to move...
.... !4 Charger cleaner Use to clean the transfer charger. 4 r Power switch Press to the width of copy paper. t Operation panel All copier controls are deposited in the paper output tray. y Paper output tray Finished copies are located here for copier servicing. o Side cover Open to remove misfeeds and to service the copier. !0 Side cover handle Lift and pull to open the side cover. !1 Bypass tray guides Adjust to turn copier power on the original table and close the platen cover before copying starts. u Front cover Open to move...

Operation Manual
Page 7
... manual 1 TD cartridge 1 Charger cleaner 1 5 Take care in removing paper. @2 Paper guide Open to remove misfed paper. The fusing unit is hot. PART NAMES AND FUNCTIONS GETTING STARTED Part names and functions !5 !6 !7 !8 !9 @2 @0 @1 !5 Drum cartridge handle Hold to pull out the drum cartridge. !6 Drum cartridge Copy images are formed on the photoconductive drum. !7 TD cartridge lock release lever Use to unlock the TD cartridge. !8 TD cartridge strap Lift to remove the TD cartridge. !9 TD cartridge Contains toner. @0 Roller rotating knob Turn to remove...
... manual 1 TD cartridge 1 Charger cleaner 1 5 Take care in removing paper. @2 Paper guide Open to remove misfed paper. The fusing unit is hot. PART NAMES AND FUNCTIONS GETTING STARTED Part names and functions !5 !6 !7 !8 !9 @2 @0 @1 !5 Drum cartridge handle Hold to pull out the drum cartridge. !6 Drum cartridge Copy images are formed on the photoconductive drum. !7 TD cartridge lock release lever Use to unlock the TD cartridge. !8 TD cartridge strap Lift to remove the TD cartridge. !9 TD cartridge Contains toner. @0 Roller rotating knob Turn to remove...
Operation Manual
Page 8
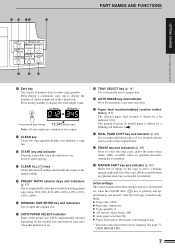
... sort or group mode when an optional electronic sorting kit and an optional SPF are installed. !6 ORIGINAL DATA indicator Blinks when the memory becomes full of scanned original image data. (Used when an optional electronic sorting kit and an optional SPF are installed) !7 2 IN 1 / 4 IN 1 key and indicators (p. 63) Press to display the copy ratio in 1% increments. y PAPER SIZE ENTER key (p.12) Use to make user program entries. 6 r Copy ratio display key (p. 17) Press...
... sort or group mode when an optional electronic sorting kit and an optional SPF are installed. !6 ORIGINAL DATA indicator Blinks when the memory becomes full of scanned original image data. (Used when an optional electronic sorting kit and an optional SPF are installed) !7 2 IN 1 / 4 IN 1 key and indicators (p. 63) Press to display the copy ratio in 1% increments. y PAPER SIZE ENTER key (p.12) Use to make user program entries. 6 r Copy ratio display key (p. 17) Press...
Operation Manual
Page 9
... paper feed location is shown by a blinking red indicator ( ). #1 DUAL PAGE COPY key and indicator (p. 24) Use to make individual copies of copies completed in any mode. ● Copy ratio: 100% ● Exposure: Automatic ● Copy quantity: 0 ● All special copier modes: Off ● Auto paper selection: On ● Paper feed station: Previously selected paper tray * This time (auto clear time) can be changed. The general location of misfed paper is shown by a lit indicator ( ). See page 37, USER PROGRAMS. 7 !3 !4 !5 !6 !7 PART...
... paper feed location is shown by a blinking red indicator ( ). #1 DUAL PAGE COPY key and indicator (p. 24) Use to make individual copies of copies completed in any mode. ● Copy ratio: 100% ● Exposure: Automatic ● Copy quantity: 0 ● All special copier modes: Off ● Auto paper selection: On ● Paper feed station: Previously selected paper tray * This time (auto clear time) can be changed. The general location of misfed paper is shown by a lit indicator ( ). See page 37, USER PROGRAMS. 7 !3 !4 !5 !6 !7 PART...

Operation Manual
Page 12
... adjustable front-loading trays, which are easily opened for paper loading. Maximum height line 10 ● Set the paper along the guides. ● The tray holds up when there is no copy paper in the selected paper feed station, or when the selected paper tray is not installed or is changed in place. 3 Fan the copy paper and insert it stops. See the next page. For best results, use only SHARP recommended paper. (See page 50.) The paper...
... adjustable front-loading trays, which are easily opened for paper loading. Maximum height line 10 ● Set the paper along the guides. ● The tray holds up when there is no copy paper in the selected paper feed station, or when the selected paper tray is not installed or is changed in place. 3 Fan the copy paper and insert it stops. See the next page. For best results, use only SHARP recommended paper. (See page 50.) The paper...
Operation Manual
Page 16
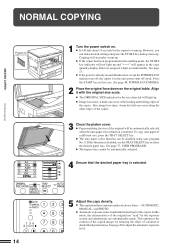
... auto paper select function is disabled, use the TRAY SELECT key to warm up. Normal copying 5 Adjust the copy density. ● This copier has three exposure modes to adjust the automatic exposure level. 14 See page 44, POWER SAVE MODES. 2 Place the original face down on the original table. Also image loss (max. 4 mm in the copy quantity display. MAKING COPIES NORMAL COPYING Power on 1 Turn the power switch on. ● It will light...
... auto paper select function is disabled, use the TRAY SELECT key to warm up. Normal copying 5 Adjust the copy density. ● This copier has three exposure modes to adjust the automatic exposure level. 14 See page 44, POWER SAVE MODES. 2 Place the original face down on the original table. Also image loss (max. 4 mm in the copy quantity display. MAKING COPIES NORMAL COPYING Power on 1 Turn the power switch on. ● It will light...

Operation Manual
Page 39
... number Changes account numbers for 2 in 1 or Enables or disables the border line which controls access to be specified respectively for 4 in 1* copying when an optional electronic sorting kit and an optional SPF are installed. GENERAL INFORMATION User programs 37 See page 44. 4 Stream feeding mode* Enables or disables the stream feeding mode when an optional single pass feeder (SPF) is printed in 2 in 1 or 4 in 1 4 in 1 copying. See page 63. 7 Rotation copy* Enables or disables rotation of the paper output tray. List...
... number Changes account numbers for 2 in 1 or Enables or disables the border line which controls access to be specified respectively for 4 in 1* copying when an optional electronic sorting kit and an optional SPF are installed. GENERAL INFORMATION User programs 37 See page 44. 4 Stream feeding mode* Enables or disables the stream feeding mode when an optional single pass feeder (SPF) is printed in 2 in 1 or 4 in 1 4 in 1 copying. See page 63. 7 Rotation copy* Enables or disables rotation of the paper output tray. List...

Operation Manual
Page 41
... the user program mode, press the light ( ) key. ● All the alarm indicators will go out. 39 Stream feeding mode * 0 e OFF 1 e ON Auto power shut-off setting 0 e OFF * 1 e ON Border line for 2 in 1 or 4 in 1 * 0 e OFF 1 e ON Rotation copy 0 e OFF * 1 e ON Auto paper select mode 0 e OFF * 1 e ON Auto tray switching 0 e OFF * 1 e ON Erase width adjustment 0 e 0 mm 1 e 5 mm Layout in 2 in 1 copy * 1 e Pattern 1 2 e Pattern 2 Layout in 4 in the copy quantity display...
... the user program mode, press the light ( ) key. ● All the alarm indicators will go out. 39 Stream feeding mode * 0 e OFF 1 e ON Auto power shut-off setting 0 e OFF * 1 e ON Border line for 2 in 1 or 4 in 1 * 0 e OFF 1 e ON Rotation copy 0 e OFF * 1 e ON Auto paper select mode 0 e OFF * 1 e ON Auto tray switching 0 e OFF * 1 e ON Erase width adjustment 0 e 0 mm 1 e 5 mm Layout in 2 in 1 copy * 1 e Pattern 1 2 e Pattern 2 Layout in 4 in the copy quantity display...

Operation Manual
Page 47
This time is set with user programs No. 3 and No. 5, the last program set manually. Copying from the auto power shut-off mode 1 Press the START key. ● The copier will exit the auto power shut-off mode and the POWER SAVE indicator will start to blink. 2 Make desired copier selections and press the START key using the normal copying procedure. ● When any key input is made...
This time is set with user programs No. 3 and No. 5, the last program set manually. Copying from the auto power shut-off mode 1 Press the START key. ● The copier will exit the auto power shut-off mode and the POWER SAVE indicator will start to blink. 2 Make desired copier selections and press the START key using the normal copying procedure. ● When any key input is made...
Operation Manual
Page 49
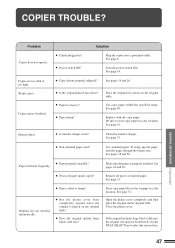
... include large black solid area? Store copy paper flat in the wrapper in ? ● Power switch ON? Turn the power switch ON. See page 14. If using special paper, feed the paper through the bypass tray. Original size not selected automatically. ● Paper curled or damp? ● Has the platen cover been completely opened when the original is properly installed. Remove all pieces of paper inside copier? GENERAL INFORMATION Copier trouble? Problem Copier...
... include large black solid area? Store copy paper flat in the wrapper in ? ● Power switch ON? Turn the power switch ON. See page 14. If using special paper, feed the paper through the bypass tray. Original size not selected automatically. ● Paper curled or damp? ● Has the platen cover been completely opened when the original is properly installed. Remove all pieces of paper inside copier? GENERAL INFORMATION Copier trouble? Problem Copier...
Operation Manual
Page 50
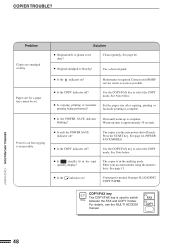
Use a clean original. Contact your account number using the numeric keys. Set the paper size after copying, printing or facsimile printing is approximately 35 seconds. ● Is only the POWER SAVE indicator on but copying is in the auditing mode. Warm-up is used to switch between the FAX and COPY modes. The copier is not possible. ● Is the POWER SAVE indicator blinking? For details, see the MULTI ACCESS manual. 48...
Use a clean original. Contact your account number using the numeric keys. Set the paper size after copying, printing or facsimile printing is approximately 35 seconds. ● Is only the POWER SAVE indicator on but copying is in the auditing mode. Warm-up is used to switch between the FAX and COPY modes. The copier is not possible. ● Is the POWER SAVE indicator blinking? For details, see the MULTI ACCESS manual. 48...
Operation Manual
Page 51
... and side covers securely. The TD cartridge must be replaced. See page 27, TD CARTRIDGE REPLACEMENT. ● Is the indicator blinking? An alphanumeric code will locate the problem and stop and a letter and a number appear alternately, contact your SHARP service centre immediately if a problem persists after checking the above. A misfeed has occurred. See page 31, MISFEED REMOVAL. ● Is the START key indicator blinking? Lighting fixture flickers. ● Is the same power outlet used...
... and side covers securely. The TD cartridge must be replaced. See page 27, TD CARTRIDGE REPLACEMENT. ● Is the indicator blinking? An alphanumeric code will locate the problem and stop and a letter and a number appear alternately, contact your SHARP service centre immediately if a problem persists after checking the above. A misfeed has occurred. See page 31, MISFEED REMOVAL. ● Is the START key indicator blinking? Lighting fixture flickers. ● Is the same power outlet used...

Operation Manual
Page 55
..., SHARP reserves the right to make design and specification changes for product improvement without platen cover) Operating conditions Optional equipment Approx. 35.7 kg TD and drum cartridges included 590 mm (W) x 531 mm (D) x 523 mm (H) Temperature: 15°C to 30°C (59°F to 86°F) Humidity: 20% to 85% Single pass feeder (AR-SP2) Electronic sorting kit (AR-EB3) 250-sheet paper feed unit...
..., SHARP reserves the right to make design and specification changes for product improvement without platen cover) Operating conditions Optional equipment Approx. 35.7 kg TD and drum cartridges included 590 mm (W) x 531 mm (D) x 523 mm (H) Temperature: 15°C to 30°C (59°F to 86°F) Humidity: 20% to 85% Single pass feeder (AR-SP2) Electronic sorting kit (AR-EB3) 250-sheet paper feed unit...

Operation Manual
Page 71
... blink. 1 Open the side cover of the paper feed unit and remove the misfed paper. ● Be sure to perform this step before pulling out the paper trays. If not, the paper may be torn as the trays are opened. 2 Gently lift and pull out the paper tray which indicates the paper feed unit will stop when a misfeed occurs. The misfeed ( ) indicator and the red indicator which was in use. Remove any misfed paper...
... blink. 1 Open the side cover of the paper feed unit and remove the misfed paper. ● Be sure to perform this step before pulling out the paper trays. If not, the paper may be torn as the trays are opened. 2 Gently lift and pull out the paper tray which indicates the paper feed unit will stop when a misfeed occurs. The misfeed ( ) indicator and the red indicator which was in use. Remove any misfed paper...
Operation Manual
Page 75
... feeding 18 Margin shift 67 Misfeed removal - part 4 O Operation panel 6 Options 56 Original table 4 P Paper - specifications 50 Paper output tray 4 Paper size 50 Paper tray 10 Part names 4 Photo mode 15 Platen cover 4 Power on handling 9 Copier trouble 47 Copying - through bypass tray 18 - replacement 29 Dual page copy 24 E Electronic sorting kit 60 Enlargement 16 Erase 65 Exposure adjustment 14 F Features 3 Fixed copy ratio 17 Fusing unit release lever 33 G Group 61 I Initial settings 7 Interrupt 25 L Light key 15, 38 Loading copy paper 10 M Maintenance...
... feeding 18 Margin shift 67 Misfeed removal - part 4 O Operation panel 6 Options 56 Original table 4 P Paper - specifications 50 Paper output tray 4 Paper size 50 Paper tray 10 Part names 4 Photo mode 15 Platen cover 4 Power on handling 9 Copier trouble 47 Copying - through bypass tray 18 - replacement 29 Dual page copy 24 E Electronic sorting kit 60 Enlargement 16 Erase 65 Exposure adjustment 14 F Features 3 Fixed copy ratio 17 Fusing unit release lever 33 G Group 61 I Initial settings 7 Interrupt 25 L Light key 15, 38 Loading copy paper 10 M Maintenance...

Operation Manual
Page 76
bypass tray paper feed roller 46 - platen cover 46 - copier 52 - original table 46 - transfer charger 71 User programs 37 X XY zoom 21 Z Zoom 17 74 Index APPENDIX INDEX S Single pass feeder (SPF 57 Sort 61 Special paper 18 Specifications - paper 50 SPF 57 Status indicators 27 Storage of supply 51 T TD cartridge replacement 27 Total output count 7 Troubleshooting 47 Two-sided copying 20 U User maintenance -
bypass tray paper feed roller 46 - platen cover 46 - copier 52 - original table 46 - transfer charger 71 User programs 37 X XY zoom 21 Z Zoom 17 74 Index APPENDIX INDEX S Single pass feeder (SPF 57 Sort 61 Special paper 18 Specifications - paper 50 SPF 57 Status indicators 27 Storage of supply 51 T TD cartridge replacement 27 Total output count 7 Troubleshooting 47 Two-sided copying 20 U User maintenance -


