
DK-A1 | DK-A1BK Operation Manual
Page 1
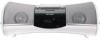
... PLAY MODE TUNING E/SDOEUMNOD EQ CLEAR MEMORY The illustrations printed in operating your SHARP product. To obtain the best performance from this product, please read this manual carefully. Accessories Please confirm that the following accessories are included. MUSIC SYSTEM FOR iPod® MODEL DK-A1 DK-A1BK OPERATION MANUAL iPod is...
... PLAY MODE TUNING E/SDOEUMNOD EQ CLEAR MEMORY The illustrations printed in operating your SHARP product. To obtain the best performance from this product, please read this manual carefully. Accessories Please confirm that the following accessories are included. MUSIC SYSTEM FOR iPod® MODEL DK-A1 DK-A1BK OPERATION MANUAL iPod is...
DK-A1 | DK-A1BK Operation Manual
Page 2
... energy and, if not installed and used in accordance with arrowhead symbol, within an equilateral triangle, is provided to call the CATV system installer's attention to Article 820-40 of the National Electrical Code that provides guidelines for proper grounding and, in particular, specifies that ...or modifications to persons. Explanation of Graphical Symbols: The lightning flash with the instructions, may be connected to the grounding system of the building, as practical. WARNING FCC Regulations state that to which are designed to the point of the unit. Note to CATV...
... energy and, if not installed and used in accordance with arrowhead symbol, within an equilateral triangle, is provided to call the CATV system installer's attention to Article 820-40 of the National Electrical Code that provides guidelines for proper grounding and, in particular, specifies that ...or modifications to persons. Explanation of Graphical Symbols: The lightning flash with the instructions, may be connected to the grounding system of the building, as practical. WARNING FCC Regulations state that to which are designed to the point of the unit. Note to CATV...
DK-A1 | DK-A1BK Operation Manual
Page 3
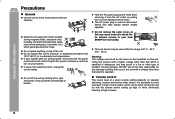
In order to prevent potential danger, please observe the following precautions carefully before use. 1) Read these instructions. 2) Keep these instructions. 10) Protect the power cord from being walked on the product. 3 When a cart is used to perform many useful functions, but it can result in a risk of time. 3) Heed all warnings. 4) Follow all instructions. 5) Do not use caution when moving the cart/ apparatus combination to avoid injury from the apparatus. 11) Only use can result in a fire or electric shock. For product intended stoves, or other apparatus (including ...
In order to prevent potential danger, please observe the following precautions carefully before use. 1) Read these instructions. 2) Keep these instructions. 10) Protect the power cord from being walked on the product. 3 When a cart is used to perform many useful functions, but it can result in a risk of time. 3) Heed all warnings. 4) Follow all instructions. 5) Do not use caution when moving the cart/ apparatus combination to avoid injury from the apparatus. 11) Only use can result in a fire or electric shock. For product intended stoves, or other apparatus (including ...
DK-A1 | DK-A1BK Operation Manual
Page 4
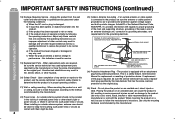
... normally by the manufacturer or sold with regards to qualified service personnel under the following the operating instructions. An outside antenna system, extreme care should not be taken to keep from the wall outlet and refer servicing to proper grounding of the mast ... ELECTRICAL CODE S2898A ANTENNA DISCHARGE UNIT (NEC SECTION 810-20) GROUNDING CONDUCTORS (NEC SECTION 810-21) GROUND CLAMPS P OWER SERVICE GROUNDING ELECTRODE SYSTEM (NEC ART 250, PART H) 24) Protective Attachment Plug - When replacement parts are covered by the manufacturer. 4 Upon completion of other ...
... normally by the manufacturer or sold with regards to qualified service personnel under the following the operating instructions. An outside antenna system, extreme care should not be taken to keep from the wall outlet and refer servicing to proper grounding of the mast ... ELECTRICAL CODE S2898A ANTENNA DISCHARGE UNIT (NEC SECTION 810-20) GROUNDING CONDUCTORS (NEC SECTION 810-21) GROUND CLAMPS P OWER SERVICE GROUNDING ELECTRODE SYSTEM (NEC ART 250, PART H) 24) Protective Attachment Plug - When replacement parts are covered by the manufacturer. 4 Upon completion of other ...
DK-A1 | DK-A1BK Operation Manual
Page 5
...the ENERGY STAR® are designed to the radio 17 - 18 Advanced Features Alarm and sleep operation 19 - 20 Enhancing your system 21 References Troubleshooting chart 22 - 23 Maintenance 23 Specifications 23 CONSUMER LIMITED WARRANTY Back cover 5 registered mark. To comply with ... (via Internet, intranets and/or other networks), other revenue-generating content distribution systems (pay-audio or audio-on-demand applications and the like ). An independent license for Use System connections 10 Remote control 11 Basic Operation General control 12 Setting the clock 13...
...the ENERGY STAR® are designed to the radio 17 - 18 Advanced Features Alarm and sleep operation 19 - 20 Enhancing your system 21 References Troubleshooting chart 22 - 23 Maintenance 23 Specifications 23 CONSUMER LIMITED WARRANTY Back cover 5 registered mark. To comply with ... (via Internet, intranets and/or other networks), other revenue-generating content distribution systems (pay-audio or audio-on-demand applications and the like ). An independent license for Use System connections 10 Remote control 11 Basic Operation General control 12 Setting the clock 13...
DK-A1 | DK-A1BK Operation Manual
Page 6
...;F - 95˚F (5˚C - 35˚C). It is dangerous and may result in a fire or other than 140˚F (60˚C) or to your local SHARP service facility. This unit should only be held responsible for safety. Do not expose the unit to moisture, to temperatures higher than that which is... avoid exposure to high volume levels, which occurs while turning the unit on your system does not work properly, disconnect the AC power cord from the AC outlet, as pulling the cord can damage internal wires. SHARP will not be used as this unit. Do not remove the outer cover, as...
...;F - 95˚F (5˚C - 35˚C). It is dangerous and may result in a fire or other than 140˚F (60˚C) or to your local SHARP service facility. This unit should only be held responsible for safety. Do not expose the unit to moisture, to temperatures higher than that which is... avoid exposure to high volume levels, which occurs while turning the unit on your system does not work properly, disconnect the AC power cord from the AC outlet, as pulling the cord can damage internal wires. SHARP will not be used as this unit. Do not remove the outer cover, as...
DK-A1 | DK-A1BK Operation Manual
Page 7
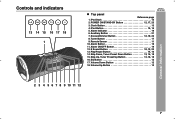
Auxiliary Button 21 7. Alarm Button 19 11. Skip Down, Tuner Preset Down Button 13, 16, 18 15. iPod Button 14, 15 5. EQ Button 12 17. Volume Up Button 12 DK-A1 DK-A1BK General Information 2 3 4 5 6 7 8 9 10 11 12 7 POWER ON/STAND-BY Button 12, 17, 23 3. Tuner Button 17 9. Alarm ON/OFF Button 19 12. Play/Pause Button 14, 16 14. Volume Down Button 12 18. Remote Sensor 11 10. Controls and indicators 13 14 15 16 17 18 1 Top panel Reference page 1. iPod Dock 15 2. Clock Button 13 4. Alarm Indicator 19 6. Snooze/Dimmer Button 12, 19, 23 8. E Sound ...
Auxiliary Button 21 7. Alarm Button 19 11. Skip Down, Tuner Preset Down Button 13, 16, 18 15. iPod Button 14, 15 5. EQ Button 12 17. Volume Up Button 12 DK-A1 DK-A1BK General Information 2 3 4 5 6 7 8 9 10 11 12 7 POWER ON/STAND-BY Button 12, 17, 23 3. Tuner Button 17 9. Alarm ON/OFF Button 19 12. Play/Pause Button 14, 16 14. Volume Down Button 12 18. Remote Sensor 11 10. Controls and indicators 13 14 15 16 17 18 1 Top panel Reference page 1. iPod Dock 15 2. Clock Button 13 4. Alarm Indicator 19 6. Snooze/Dimmer Button 12, 19, 23 8. E Sound ...

DK-A1 | DK-A1BK Operation Manual
Page 8
Alarm Indicator 19 2. FM Stereo Mode Indicator 17 6. Rear panel Reference page 1. Auxiliary Input Jacks 21 5. Aux Indicator 21 5. FM 75 Ohms Antenna Jack 10 4. Video Out Jack 10 7. AM Antenna Ground Terminal 10 3. FM Stereo Receiving Indicator 17 7. Summer Time Switch 13 8. Summer Time Indicator 13 General Information The spec label (*) (*) Label is located at the bottom of the unit. AM Loop Antenna Terminal 10 2. AC Input 10 1 2 3 456 7 8 8 Sleep Indicator 20 3. Headphone Jack 21 6. iPod Indicator 14 4. DK-A1 Controls and indicators (...
Alarm Indicator 19 2. FM Stereo Mode Indicator 17 6. Rear panel Reference page 1. Auxiliary Input Jacks 21 5. Aux Indicator 21 5. FM 75 Ohms Antenna Jack 10 4. Video Out Jack 10 7. AM Antenna Ground Terminal 10 3. FM Stereo Receiving Indicator 17 7. Summer Time Switch 13 8. Summer Time Indicator 13 General Information The spec label (*) (*) Label is located at the bottom of the unit. AM Loop Antenna Terminal 10 2. AC Input 10 1 2 3 456 7 8 8 Sleep Indicator 20 3. Headphone Jack 21 6. iPod Indicator 14 4. DK-A1 Controls and indicators (...

DK-A1 | DK-A1BK Operation Manual
Page 9
Tuning Up and Down Buttons 17 8. Snooze/Dimmer Button 12, 19 11. Alarm Button 19 13. Function Button 12 3. EQ Button 12 DK-A1 DK-A1BK General Information Note: Before using remote control, please remove plastic shield at battery holder. Remote controller Plastic shield Battery holder 9 On/Stand-by Button 11, 12, 17 4. Volume Up and Down Buttons 12 5. Clock Button 13 10. Play/Pause Button 14, 16 16. Memory Button 18, 20 9. E Sound/Demo Button 10, 12 17. Play Mode Button 16 7. Skip Down, Tuner Preset Down Button 13, 16, 18 6. Display Button ...
Tuning Up and Down Buttons 17 8. Snooze/Dimmer Button 12, 19 11. Alarm Button 19 13. Function Button 12 3. EQ Button 12 DK-A1 DK-A1BK General Information Note: Before using remote control, please remove plastic shield at battery holder. Remote controller Plastic shield Battery holder 9 On/Stand-by Button 11, 12, 17 4. Volume Up and Down Buttons 12 5. Clock Button 13 10. Play/Pause Button 14, 16 16. Memory Button 18, 20 9. E Sound/Demo Button 10, 12 17. Play Mode Button 16 7. Skip Down, Tuner Preset Down Button 13, 16, 18 6. Display Button ...
DK-A1 | DK-A1BK Operation Manual
Page 10
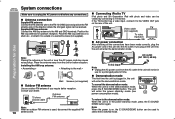
... mode. Connecting iPod to the demonstration mode: When the unit is used to unplug the AC power cord before any connections. DK-A1 DK-A1BK System connections Make sure to select the E SOUND mode. Note: When the power is on the unit or near the AC power cord may cause noise...
... mode. Connecting iPod to the demonstration mode: When the unit is used to unplug the AC power cord before any connections. DK-A1 DK-A1BK System connections Make sure to select the E SOUND mode. Note: When the power is on the unit or near the AC power cord may cause noise...
DK-A1 | DK-A1BK Operation Manual
Page 11
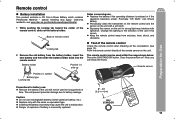
... pushing the locking tab toward the center of explosion if battery is reduced or if the operation becomes erratic. The remote control can enjoy the music. Remote control Battery installation This product contains a CR Coin Lithium Battery which contains Perchlorate Material - Keep the remote control away from the battery holder, insert...
... pushing the locking tab toward the center of explosion if battery is reduced or if the operation becomes erratic. The remote control can enjoy the music. Remote control Battery installation This product contains a CR Coin Lithium Battery which contains Perchlorate Material - Keep the remote control away from the battery holder, insert...
DK-A1 | DK-A1BK Operation Manual
Page 12
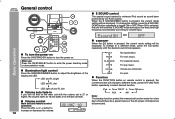
...the E SOUND/ DEMO button repeatedly to increase or decrease the volume. JAZZ For jazz. days should there be displayed. CLASSICS POPS For classical music. AUX AM Note: The backup function protect the memorized function mode for a few Volume control Main unit and remote control operation: Press the... to different mode, press the FUNCTION button repeatedly to adjust the brightness of the display and LED. FLAT ROCK No equalization. For rock music. After use: Press the ON/STAND-BY button to a different mode, press the EQ button repeatedly until the desired sound mode appears...
...the E SOUND/ DEMO button repeatedly to increase or decrease the volume. JAZZ For jazz. days should there be displayed. CLASSICS POPS For classical music. AUX AM Note: The backup function protect the memorized function mode for a few Volume control Main unit and remote control operation: Press the... to different mode, press the FUNCTION button repeatedly to adjust the brightness of the display and LED. FLAT ROCK No equalization. For rock music. After use: Press the ON/STAND-BY button to a different mode, press the EQ button repeatedly until the desired sound mode appears...

DK-A1 | DK-A1BK Operation Manual
Page 13
"12:00 AM" The 12-hour display will appear. (12:00 AM - 11:59 PM) "0:00 AM" The 12-hour display will appear. (0:00 AM - 11:59 PM) "0:00" The 24-hour display will appear. 2 Slide the ST switch to -1 to adjust the hour and then press the CLOCK button. indicator will appear. (0:00 - 23:59) 3 Press the or button to turn the clock back 1 hour. 13 Hold it down to change the 12-hour or 24-hour display: 1 Clear all the programmed contents. [Refer to advance continuously. To confirm the time display: [When the unit is in the stand-by mode or in 5-minutes interval....
"12:00 AM" The 12-hour display will appear. (12:00 AM - 11:59 PM) "0:00 AM" The 12-hour display will appear. (0:00 AM - 11:59 PM) "0:00" The 24-hour display will appear. 2 Slide the ST switch to -1 to adjust the hour and then press the CLOCK button. indicator will appear. (0:00 - 23:59) 3 Press the or button to turn the clock back 1 hour. 13 Hold it down to change the 12-hour or 24-hour display: 1 Clear all the programmed contents. [Refer to advance continuously. To confirm the time display: [When the unit is in the stand-by mode or in 5-minutes interval....

DK-A1 | DK-A1BK Operation Manual
Page 14
DK-A1 DK-A1BK Listening to the iPod Supported iPod models: iPod nano (software 1.0 above) iPod photo (software 1.0 above) iPod mini (software 1.2 above) 5th Generation iPod (software 1.0 above) (Dock connector equipped Click Wheel model) 4th Generation iPod (software 3.0.2 above) (Dock connector equipped Click Wheel model) 3rd Generation iPod (software 2.2 above) (Dock connector equipped Click Wheel model) Caution: Please update your iPod unit to the latest software version before using it will begin charging. If your iPod is activated. / button (main unit and remote control): ...
DK-A1 DK-A1BK Listening to the iPod Supported iPod models: iPod nano (software 1.0 above) iPod photo (software 1.0 above) iPod mini (software 1.2 above) 5th Generation iPod (software 1.0 above) (Dock connector equipped Click Wheel model) 4th Generation iPod (software 3.0.2 above) (Dock connector equipped Click Wheel model) 3rd Generation iPod (software 2.2 above) (Dock connector equipped Click Wheel model) Caution: Please update your iPod unit to the latest software version before using it will begin charging. If your iPod is activated. / button (main unit and remote control): ...
DK-A1 | DK-A1BK Operation Manual
Page 15
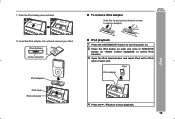
Insert the iPod adaptor into unit and connect your iPod. iPod iPod adaptor iPod iPod AUX EQ - + E SOUN 4 Press the / button to remove adaptor. iPod (bottom) iPod Dock connector iPod adaptor iPod dock iPod connector iPod AUX EQ - + E SOUND To remove iPod adaptor Hold this tip and pull as direction shown to start playback. 15 1. DK-A1 DK-A1BK iPod playback 1 Press the ON/STAND-BY button to turn the power on. 2 Press the iPod button on main unit once or FUNCTION button on remote control repeatedly to select iPod function. 3 Open the iPod terminal door and insert ...
Insert the iPod adaptor into unit and connect your iPod. iPod iPod adaptor iPod iPod AUX EQ - + E SOUN 4 Press the / button to remove adaptor. iPod (bottom) iPod Dock connector iPod adaptor iPod dock iPod connector iPod AUX EQ - + E SOUND To remove iPod adaptor Hold this tip and pull as direction shown to start playback. 15 1. DK-A1 DK-A1BK iPod playback 1 Press the ON/STAND-BY button to turn the power on. 2 Press the iPod button on main unit once or FUNCTION button on remote control repeatedly to select iPod function. 3 Open the iPod terminal door and insert ...

DK-A1 | DK-A1BK Operation Manual
Page 16
.../ down to toggle shuffle mode. 16 Release the button to stand-by mode, the docked iPod unit will automatically turn to resume playback. System off (stand-by operation) When the main unit is turned to stand-by mode (including alarm and sleep function). Caution: Unplug all accessories for... 3rd iPod Generation. Repeat ____ Shuffle ____ DISPLAY PLAY MODE PLAY MODE Press to start the desired track. System on operation When the main unit is pressed, the unit will automatically power on when docked in the playback mode. If you are using....
.../ down to toggle shuffle mode. 16 Release the button to stand-by mode, the docked iPod unit will automatically turn to resume playback. System off (stand-by operation) When the main unit is turned to stand-by mode (including alarm and sleep function). Caution: Unplug all accessories for... 3rd iPod Generation. Repeat ____ Shuffle ____ DISPLAY PLAY MODE PLAY MODE Press to start the desired track. System on operation When the main unit is pressed, the unit will automatically power on when docked in the playback mode. If you are using....

DK-A1 | DK-A1BK Operation Manual
Page 17
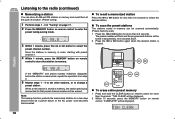
" " will appear when an FM broadcast is pressed for more than 0.5 seconds, scanning will start automatically and the tuner will skip weak signal stations. To receive an FM stereo transmission: Press the TUNER button (main unit) or FUNCTION button (remote control) to monaural, and the sound becomes clearer. The reception changes to display the "ST" indicator. Auto tuning: When the TUNING ( or ) button is in stereo. FM stereo mode indicator FM stereo receiving indicator 17 Tuning 1 Press the ON/STAND-BY button to turn the power on. 2 Press the TUNER button on main unit ...
" " will appear when an FM broadcast is pressed for more than 0.5 seconds, scanning will start automatically and the tuner will skip weak signal stations. To receive an FM stereo transmission: Press the TUNER button (main unit) or FUNCTION button (remote control) to monaural, and the sound becomes clearer. The reception changes to display the "ST" indicator. Auto tuning: When the TUNING ( or ) button is in stereo. FM stereo mode indicator FM stereo receiving indicator 17 Tuning 1 Press the ON/STAND-BY button to turn the power on. 2 Press the TUNER button on main unit ...
DK-A1 | DK-A1BK Operation Manual
Page 18
button for less than 0.5 seconds to select the To scan the preset stations The stations saved in memory can store 40 AM and FM stations in memory and recall them at the push of a button. (Preset tuning) 1 Perform steps 1 - 3 in "Tuning" on page 17. 2 Press the MEMORY button on remote control to store that preset channel number will be tuned in sequentially, for more than 0.5 seconds. The preset number will flash and the programmed stations will be erased. When a new station is memorized, repeat the operation from step 2. 5 Repeat steps 1 - 4 to set other stations, or to change a ...
button for less than 0.5 seconds to select the To scan the preset stations The stations saved in memory can store 40 AM and FM stations in memory and recall them at the push of a button. (Preset tuning) 1 Perform steps 1 - 3 in "Tuning" on page 17. 2 Press the MEMORY button on remote control to store that preset channel number will be tuned in sequentially, for more than 0.5 seconds. The preset number will flash and the programmed stations will be erased. When a new station is memorized, repeat the operation from step 2. 5 Repeat steps 1 - 4 to set other stations, or to change a ...

DK-A1 | DK-A1BK Operation Manual
Page 19
The selected source or buzzer type will be output from right speaker only. When iPod is selected, press the or button to adjust the hour. The time and volume will blink. During stand-by mode or demonstration mode. Press the ALARM button. 5 Press the or button to select volume. or VOL (+ or -) button to adjust the minute. To turn off the alarm function During alarm or snooze, press the ALARM ON/OFF button to the previous setting. When activated: During power on, "ALARM" will light up. 2 Set to select source or buzzer. Press the ALARM button. 4 Press ...
The selected source or buzzer type will be output from right speaker only. When iPod is selected, press the or button to adjust the hour. The time and volume will blink. During stand-by mode or demonstration mode. Press the ALARM button. 5 Press the or button to select volume. or VOL (+ or -) button to adjust the minute. To turn off the alarm function During alarm or snooze, press the ALARM ON/OFF button to the previous setting. When activated: During power on, "ALARM" will light up. 2 Set to select source or buzzer. Press the ALARM button. 4 Press ...

DK-A1 | DK-A1BK Operation Manual
Page 20
To cancel the sleep operation: Press the ON/STAND-BY button while "SLEEP" is displayed for about 10 seconds. You can fall asleep listening to the radio and wake up to select "SLEEP XXX". Advanced Features 3 Press the MEMORY button on remote control to select "SLEEP OFF", and press the MEMORY button. The remaining sleep time is indicated. Sleep timer setting Alarm setting End time 10 minutes - 2 hours 30 minutes Sleep operation will be turned off automatically. 1 Play back the desired sound source. 2 Press the SLEEP button on remote control. To cancel the sleep...
To cancel the sleep operation: Press the ON/STAND-BY button while "SLEEP" is displayed for about 10 seconds. You can fall asleep listening to the radio and wake up to select "SLEEP XXX". Advanced Features 3 Press the MEMORY button on remote control to select "SLEEP OFF", and press the MEMORY button. The remaining sleep time is indicated. Sleep timer setting Alarm setting End time 10 minutes - 2 hours 30 minutes Sleep operation will be turned off automatically. 1 Play back the desired sound source. 2 Press the SLEEP button on remote control. To cancel the sleep...