
DK-A1 | DK-A1BK Operation Manual
Page 1
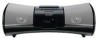
... manual are for purchasing this manual carefully. It will guide you for the model DK-A1. Remote control 1 FM antenna 1 RRMCGA106AWSA (DK-A1) AM loop antenna 1 QANTW0004AW09 (DK-A1) RRMCGA107AWSA (DK-A1BK) (QANTL0010AWZZ) 92LFANT1535A (DK-A1BK) AC power cord 1 QACCD0025AW09 (DK-A1) QACCD0025AWZZ (DK-A1BK) iPod adaptor 8 UACRTA007AW01 (DK-A1) UACRTA008AW01 (DK-A1BK) Note: Only the above accessories are included. FUNCTION CLOCK SDNIMOOMZEER/ VOL SLEEP ALARM DISPLAY PLAY MODE TUNING E/SDOEUMNOD EQ CLEAR MEMORY The illustrations printed in operating your SHARP product...
... manual are for purchasing this manual carefully. It will guide you for the model DK-A1. Remote control 1 FM antenna 1 RRMCGA106AWSA (DK-A1) AM loop antenna 1 QANTW0004AW09 (DK-A1) RRMCGA107AWSA (DK-A1BK) (QANTL0010AWZZ) 92LFANT1535A (DK-A1BK) AC power cord 1 QACCD0025AW09 (DK-A1) QACCD0025AWZZ (DK-A1BK) iPod adaptor 8 UACRTA007AW01 (DK-A1) UACRTA008AW01 (DK-A1BK) Note: Only the above accessories are included. FUNCTION CLOCK SDNIMOOMZEER/ VOL SLEEP ALARM DISPLAY PLAY MODE TUNING E/SDOEUMNOD EQ CLEAR MEMORY The illustrations printed in operating your SHARP product...
DK-A1 | DK-A1BK Operation Manual
Page 2
..., 5,878,080 or 5,960,037. REFER SERVICING TO QUALIFIED SERVICE PERSONNEL. Connect the equipment into an outlet on , the user is intended to alert the user to provide reasonable protection against harmful interference in the literature accompanying the appliance. Model number Serial number Date of purchase Place of important operating and maintenance (servicing) instructions in a residential installation. If this equipment not expressly approved...
..., 5,878,080 or 5,960,037. REFER SERVICING TO QUALIFIED SERVICE PERSONNEL. Connect the equipment into an outlet on , the user is intended to alert the user to provide reasonable protection against harmful interference in the literature accompanying the appliance. Model number Serial number Date of purchase Place of important operating and maintenance (servicing) instructions in a residential installation. If this equipment not expressly approved...
DK-A1 | DK-A1BK Operation Manual
Page 3
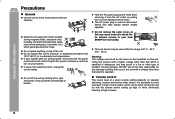
... following precautions carefully before use. 1) Read these instructions. 2) Keep these instructions. 10) Protect the power cord from being walked on the product. 3 Do not overload wall outlets, extension cords, or A grounding type plug has two blades and a third grounding prong. Never spill liquid of any heat sources such as powersupply cord or plug is used to perform many useful functions, but it can also...
... following precautions carefully before use. 1) Read these instructions. 2) Keep these instructions. 10) Protect the power cord from being walked on the product. 3 Do not overload wall outlets, extension cords, or A grounding type plug has two blades and a third grounding prong. Never spill liquid of any heat sources such as powersupply cord or plug is used to perform many useful functions, but it can also...
DK-A1 | DK-A1BK Operation Manual
Page 4
... keep from the wall outlet and refer servicing to qualified service personnel under the following the operating instructions. When replacement parts are covered by the manufacturer. 22) Power Lines - When installing an outside antenna system, extreme care should not be sure the antenna or cable system is a safety feature. Unplug this indicates a need for replacement or resetting of any way, and f) When the product exhibits a distinct change...
... keep from the wall outlet and refer servicing to qualified service personnel under the following the operating instructions. When replacement parts are covered by the manufacturer. 22) Power Lines - When installing an outside antenna system, extreme care should not be sure the antenna or cable system is a safety feature. Unplug this indicates a need for replacement or resetting of any way, and f) When the product exhibits a distinct change...
DK-A1 | DK-A1BK Operation Manual
Page 5
An independent license for Use System connections 10 Remote control 11 Basic Operation General control 12 Setting the clock 13 iPod Listening to the iPod 14 - 16 Radio Listening to the radio 17 - 18 Advanced Features Alarm and sleep operation 19 - 20 Enhancing your system 21 References Troubleshooting chart 22 - 23 Maintenance 23 Specifications 23 CONSUMER LIMITED WARRANTY Back cover 5 Special Note Supply of this product in revenue-generating broadcast...
An independent license for Use System connections 10 Remote control 11 Basic Operation General control 12 Setting the clock 13 iPod Listening to the iPod 14 - 16 Radio Listening to the radio 17 - 18 Advanced Features Alarm and sleep operation 19 - 20 Enhancing your system 21 References Troubleshooting chart 22 - 23 Maintenance 23 Specifications 23 CONSUMER LIMITED WARRANTY Back cover 5 Special Note Supply of this product in revenue-generating broadcast...
DK-A1 | DK-A1BK Operation Manual
Page 6
... surface free from vibration. SHARP will not be the same as disconnect device and shall always remain readily operable. If your local SHARP service facility. Plug the AC power cord back in, and then turn on top of accident causing damage. Refer internal service to high volume levels, which generate electrical noise. Warning: The voltage used must be held responsible for safety. Using this product...
... surface free from vibration. SHARP will not be the same as disconnect device and shall always remain readily operable. If your local SHARP service facility. Plug the AC power cord back in, and then turn on top of accident causing damage. Refer internal service to high volume levels, which generate electrical noise. Warning: The voltage used must be held responsible for safety. Using this product...
DK-A1 | DK-A1BK Operation Manual
Page 7
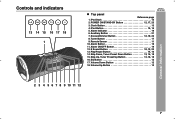
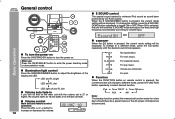
Snooze/Dimmer Button 12, 19, 23 8. E Sound Button 10, 12, 23 13. iPod Button 14, 15 5. Auxiliary Button 21 7. Alarm Button 19 11. Play/Pause Button 14, 16 14. Skip Down, Tuner Preset Down Button 13, 16, 18 15. Volume Up Button 12 DK-A1 DK-A1BK General Information 2 3 4 5 6 7 8 9 10 11 12 7 POWER ON/STAND-BY Button 12, 17, 23 3. Remote Sensor 11 10. Skip Up, Tuner Preset Up Button 13, 16, 18 16. EQ...
Snooze/Dimmer Button 12, 19, 23 8. E Sound Button 10, 12, 23 13. iPod Button 14, 15 5. Auxiliary Button 21 7. Alarm Button 19 11. Play/Pause Button 14, 16 14. Skip Down, Tuner Preset Down Button 13, 16, 18 15. Volume Up Button 12 DK-A1 DK-A1BK General Information 2 3 4 5 6 7 8 9 10 11 12 7 POWER ON/STAND-BY Button 12, 17, 23 3. Remote Sensor 11 10. Skip Up, Tuner Preset Up Button 13, 16, 18 16. EQ...

DK-A1 | DK-A1BK Operation Manual
Page 8
Aux Indicator 21 5. FM Stereo Mode Indicator 17 6. AM Loop Antenna Terminal 10 2. Headphone Jack 21 6. Summer Time Switch 13 8. Sleep Indicator 20 3. AM Antenna Ground Terminal 10 3. Alarm Indicator 19 2. AC Input 10 1 2 3 456 7 8 8 FM Stereo Receiving Indicator 17 7. Auxiliary Input Jacks 21 5. Summer Time Indicator 13 General Information The spec label (*) (*) Label is located at the bottom of the unit. FM 75 Ohms Antenna Jack 10 4. DK-A1 Controls and indicators...
Aux Indicator 21 5. FM Stereo Mode Indicator 17 6. AM Loop Antenna Terminal 10 2. Headphone Jack 21 6. Summer Time Switch 13 8. Sleep Indicator 20 3. AM Antenna Ground Terminal 10 3. Alarm Indicator 19 2. AC Input 10 1 2 3 456 7 8 8 FM Stereo Receiving Indicator 17 7. Auxiliary Input Jacks 21 5. Summer Time Indicator 13 General Information The spec label (*) (*) Label is located at the bottom of the unit. FM 75 Ohms Antenna Jack 10 4. DK-A1 Controls and indicators...

DK-A1 | DK-A1BK Operation Manual
Page 9
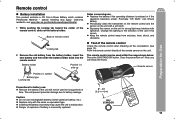
... shield Battery holder 9 Volume Up and Down Buttons 12 5. Snooze/Dimmer Button 12, 19 11. Display Button 13, 16 15. Tuning Up and Down Buttons 17 8. EQ Button 12 DK-A1 DK-A1BK General Information Note: Before using remote control, please remove plastic shield at battery holder. On/Stand-by Button 11, 12, 17 4. Memory Button 18, 20 9. Sleep Button 20 12. 1 9 2 FUNCTION CLOCK SDNIMOOMZEER/ 10 11 3 VOL SLEEP ALARM 12 13 4 14 DISPLAY 15 5 16 PLAY...
... shield Battery holder 9 Volume Up and Down Buttons 12 5. Snooze/Dimmer Button 12, 19 11. Display Button 13, 16 15. Tuning Up and Down Buttons 17 8. EQ Button 12 DK-A1 DK-A1BK General Information Note: Before using remote control, please remove plastic shield at battery holder. On/Stand-by Button 11, 12, 17 4. Memory Button 18, 20 9. Sleep Button 20 12. 1 9 2 FUNCTION CLOCK SDNIMOOMZEER/ 10 11 3 VOL SLEEP ALARM 12 13 4 14 DISPLAY 15 5 16 PLAY...
DK-A1 | DK-A1BK Operation Manual
Page 10
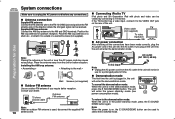
.... Installing the AM loop antenna: < Assembling > < Attaching to the demonstration mode: When the unit is on, the E SOUND/DEMO button can be in use for better reception. The unit will enter the demonstration mode. Note: When the power is in the unit first, the unit will enter the power stand-by mode, press the E SOUND/ DEMO button again. If you require better reception. DK-A1 DK-A1BK System connections Make...
.... Installing the AM loop antenna: < Assembling > < Attaching to the demonstration mode: When the unit is on, the E SOUND/DEMO button can be in use for better reception. The unit will enter the demonstration mode. Note: When the power is in the unit first, the unit will enter the power stand-by mode, press the E SOUND/ DEMO button again. If you require better reception. DK-A1 DK-A1BK System connections Make...
DK-A1 | DK-A1BK Operation Manual
Page 11
... if battery is reduced or if the operation becomes erratic. The remote control can enjoy the music. Caution: Do not use : Replace the battery if the operating distance is incorrectly replaced. 11 DK-A1 DK-A1BK Test of the remote control Check the remote control after checking all the connections (see www.dtsc.ca.gov/hazardouswaste/perchlorate/ 1 While pushing the locking tab toward the center of time. Does the power turn on...
... if battery is reduced or if the operation becomes erratic. The remote control can enjoy the music. Caution: Do not use : Replace the battery if the operating distance is incorrectly replaced. 11 DK-A1 DK-A1BK Test of the remote control Check the remote control after checking all the connections (see www.dtsc.ca.gov/hazardouswaste/perchlorate/ 1 While pushing the locking tab toward the center of time. Does the power turn on...
DK-A1 | DK-A1BK Operation Manual
Page 12
... use: Press the ON/STAND-BY button to the last set level. When the E SOUND/DEMO button is pressed, the current function will be a power failure or the AC power cord becomes disconnected. 12 For rock music. JAZZ For jazz. AUX AM Note: The backup function protect the memorized function mode for a few Volume control Main unit and remote control operation: Press the VOL (+ or -) button to adjust the brightness of the display and LED. days...
... use: Press the ON/STAND-BY button to the last set level. When the E SOUND/DEMO button is pressed, the current function will be a power failure or the AC power cord becomes disconnected. 12 For rock music. JAZZ For jazz. AUX AM Note: The backup function protect the memorized function mode for a few Volume control Main unit and remote control operation: Press the VOL (+ or -) button to adjust the brightness of the display and LED. days...

DK-A1 | DK-A1BK Operation Manual
Page 13
... (reset)" on remote control to adjust the hour and then press the CLOCK button. Notes: The clock will appear. (0:00 - 23:59) 3 Press the or button to toggle between the function information and clock display. To change the time in demonstration mode.] Press the CLOCK button to enter the clock function. [When the power is set for the 12-hour (12:00 AM) display. 1 Press the CLOCK button for details.] 2 Perform "Setting the clock" from step 1. Setting the clock DK-A1 DK...
... (reset)" on remote control to adjust the hour and then press the CLOCK button. Notes: The clock will appear. (0:00 - 23:59) 3 Press the or button to toggle between the function information and clock display. To change the time in demonstration mode.] Press the CLOCK button to enter the clock function. [When the power is set for the 12-hour (12:00 AM) display. 1 Press the CLOCK button for details.] 2 Perform "Setting the clock" from step 1. Setting the clock DK-A1 DK...

DK-A1 | DK-A1BK Operation Manual
Page 14
... (iPod, TUNER, AUX). If your iPod is in the stand-by mode. The number (3-10) shows which iPod fits 7 iPod Adaptor No. Your iPod will fit snuggly into the correct adaptor. iPod button (main unit): The unit turns on and the iPod function is connected to the unit it . iPod Notes: Once the iPod is activated. / button (main unit and remote control): The unit turns on . DK-A1 DK-A1BK Listening to the iPod Supported iPod models: iPod...
... (iPod, TUNER, AUX). If your iPod is in the stand-by mode. The number (3-10) shows which iPod fits 7 iPod Adaptor No. Your iPod will fit snuggly into the correct adaptor. iPod button (main unit): The unit turns on and the iPod function is connected to the unit it . iPod Notes: Once the iPod is activated. / button (main unit and remote control): The unit turns on . DK-A1 DK-A1BK Listening to the iPod Supported iPod models: iPod...

DK-A1 | DK-A1BK Operation Manual
Page 17
...) or FUNCTION button (remote control) to extinguish the "ST" indicator. DK-A1 DK-A1BK Radio Manual tuning: Press the TUNING ( or ) button as many times as required to tune in to the desired station. To stop automatically at the first receivable broadcast station. To receive an FM stereo transmission: Press the TUNER button (main unit) or FUNCTION button (remote control) to monaural, and the sound becomes clearer. Notes: When radio interference occurs, auto scan...
...) or FUNCTION button (remote control) to extinguish the "ST" indicator. DK-A1 DK-A1BK Radio Manual tuning: Press the TUNING ( or ) button as many times as required to tune in to the desired station. To stop automatically at the first receivable broadcast station. To receive an FM stereo transmission: Press the TUNER button (main unit) or FUNCTION button (remote control) to monaural, and the sound becomes clearer. Notes: When radio interference occurs, auto scan...
DK-A1 | DK-A1BK Operation Manual
Page 18
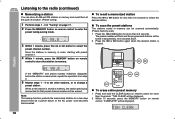
... remote control to enter the preset tuning saving mode. 3 Within 1 minute, press the or button to select the preset channel number. MEMORY FUNCTION VOL CLOCK SLEEP SNOOZE/ DIMMER ALARM PLAY MODE TUNING DISPLAY E SOUND /DEMO CLEAR EQ MEMORY To erase entire preset memory 1 Press and hold the CLEAR button on remote control. Store the stations in memory, in memory, the station previously memorized for a few days should there be a power failure or the AC power cord becomes disconnected. DK-A1 DK...
... remote control to enter the preset tuning saving mode. 3 Within 1 minute, press the or button to select the preset channel number. MEMORY FUNCTION VOL CLOCK SLEEP SNOOZE/ DIMMER ALARM PLAY MODE TUNING DISPLAY E SOUND /DEMO CLEAR EQ MEMORY To erase entire preset memory 1 Press and hold the CLEAR button on remote control. Store the stations in memory, in memory, the station previously memorized for a few days should there be a power failure or the AC power cord becomes disconnected. DK-A1 DK...

DK-A1 | DK-A1BK Operation Manual
Page 19
... the alarm function. Alarm and sleep operation Alarm The unit turns on and play desired source (iPod, TUNER or AUX) or Buzzer sound for 3 seconds. Before setting the alarm: 1 Check that the clock is selected. The unit will not turn on or off . 19 Notes: Buzzer sound will turn off . Press the ALARM button. 5 Press the or button to adjust the hour. Press the ALARM button. If TUNER is selected, press and hold the ALARM button. Once the snooze time...
... the alarm function. Alarm and sleep operation Alarm The unit turns on and play desired source (iPod, TUNER or AUX) or Buzzer sound for 3 seconds. Before setting the alarm: 1 Check that the clock is selected. The unit will not turn on or off . 19 Notes: Buzzer sound will turn off . Press the ALARM button. 5 Press the or button to adjust the hour. Press the ALARM button. If TUNER is selected, press and hold the ALARM button. Once the snooze time...

DK-A1 | DK-A1BK Operation Manual
Page 20
.... Sleep timer setting Alarm setting End time 10 minutes - 2 hours 30 minutes Sleep operation will enter the power stand-by pressing the SLEEP button (steps 2 - 3). To use alarm and sleep operation together Sleep and alarm: For example, you can fall asleep listening to the radio and wake up to select "SLEEP XXX". DK-A1 DK-A1BK Alarm and sleep operation (continued) Sleep operation The radio and iPod can be turned down 1 minute before the sleep operation finishes. 1 Set the sleep time (see left, steps 1 - 4). 2 While the sleep timer is set, set...
.... Sleep timer setting Alarm setting End time 10 minutes - 2 hours 30 minutes Sleep operation will enter the power stand-by pressing the SLEEP button (steps 2 - 3). To use alarm and sleep operation together Sleep and alarm: For example, you can fall asleep listening to the radio and wake up to select "SLEEP XXX". DK-A1 DK-A1BK Alarm and sleep operation (continued) Sleep operation The radio and iPod can be turned down 1 minute before the sleep operation finishes. 1 Set the sleep time (see left, steps 1 - 4). 2 While the sleep timer is set, set...

DK-A1 | DK-A1BK Operation Manual
Page 22
.../monitor. Did a power failure occur? References Remote control Symptom The remote control does not operate. Is the battery polarity correct? Is the battery dead? Tuner Symptom Possible cause The radio makes unusual noises continuously. If trouble occurs When this product, check the following : 1 Set the unit to the stand-by mode and turn it back on the transmitter with the iPod connector. If such a problem occurs, do...
.../monitor. Did a power failure occur? References Remote control Symptom The remote control does not operate. Is the battery polarity correct? Is the battery dead? Tuner Symptom Possible cause The radio makes unusual noises continuously. If trouble occurs When this product, check the following : 1 Set the unit to the stand-by mode and turn it back on the transmitter with the iPod connector. If such a problem occurs, do...

DK-A1 | DK-A1BK Operation Manual
Page 23
... with iPod left docked might damage both the unit and the iPod. Do not apply oil to the power standby mode. Specifications As part of our policy of production units. There may be operate on main unit only. Clearing all data stored in individual units. Before transporting the unit Remove the iPod from these values in memory including clock, alarm settings and tuner preset.
... with iPod left docked might damage both the unit and the iPod. Do not apply oil to the power standby mode. Specifications As part of our policy of production units. There may be operate on main unit only. Clearing all data stored in individual units. Before transporting the unit Remove the iPod from these values in memory including clock, alarm settings and tuner preset.


