
CD-SW200 Operation Manual
Page 2
... try to correct the interference by the manufacturer could void the user's authority to persons. use of controls or adjustments or performance of the following measures: Reorient or relocate the receiving antenna. NO USER-SERVICEABLE PARTS INSIDE. Model number Serial number Date of purchase Place of the FCC Rules. CD-SW200 SPECIAL NOTES Important Instruction CAUTION: TO REDUCE THE RISK OF ELECTRIC SHOCK, DO NOT...
... try to correct the interference by the manufacturer could void the user's authority to persons. use of controls or adjustments or performance of the following measures: Reorient or relocate the receiving antenna. NO USER-SERVICEABLE PARTS INSIDE. Model number Serial number Date of purchase Place of the FCC Rules. CD-SW200 SPECIAL NOTES Important Instruction CAUTION: TO REDUCE THE RISK OF ELECTRIC SHOCK, DO NOT...

CD-SW200 Operation Manual
Page 3
... . 4 Follow Instructions - IMPORTANT SAFETY INSTRUCTIONS CD-SW200 Important Instruction 1 Read Instructions - This product should be sure the service technician has used a replacement plug specified by items placed upon or against them, paying particular attention to replace your product dealer or local power company. Use a damp cloth for venti- If replacement of protective device. For products intended to replace your obsolete outlet. This is required, be operated only...
... . 4 Follow Instructions - IMPORTANT SAFETY INSTRUCTIONS CD-SW200 Important Instruction 1 Read Instructions - This product should be sure the service technician has used a replacement plug specified by items placed upon or against them, paying particular attention to replace your product dealer or local power company. Use a damp cloth for venti- If replacement of protective device. For products intended to replace your obsolete outlet. This is required, be operated only...

CD-SW200 Operation Manual
Page 4
...installing an outside antenna or cable system is in any kind on the product. 20 Servicing - Never spill liquid of any way, and f) When the product exhibits a distinct change in wire to an antenna discharge unit, size of grounding conductors, location of overhead power lines or other products (including amplifiers) that the product is connected to its normal operation...adjustment of other controls may touch dangerous voltage points or short-out parts that are required, be mounted to qualified service personnel under the following conditions: a) When the power-supply cord or plug...
...installing an outside antenna or cable system is in any kind on the product. 20 Servicing - Never spill liquid of any way, and f) When the product exhibits a distinct change in wire to an antenna discharge unit, size of grounding conductors, location of overhead power lines or other products (including amplifiers) that the product is connected to its normal operation...adjustment of other controls may touch dangerous voltage points or short-out parts that are required, be mounted to qualified service personnel under the following conditions: a) When the power-supply cord or plug...

CD-SW200 Operation Manual
Page 5
... demonstration mode, as described on a cassette tape 31 - 33 Advanced Features Timer and sleep operation 34 - 37 Enhancing your system 38 - 39 References Troubleshooting chart 39 - 41 Maintenance 42 Specifications 42 - 43 CONSUMER LIMITED WARRANTY Back cover 5 Contents CD-SW200 Page General Information Precautions 6 Controls and indicators 7 - 10 Preparation for Use System connections 11 - 13 Remote control 14 Basic Operation General control 15 Setting the...
... demonstration mode, as described on a cassette tape 31 - 33 Advanced Features Timer and sleep operation 34 - 37 Enhancing your system 38 - 39 References Troubleshooting chart 39 - 41 Maintenance 42 Specifications 42 - 43 CONSUMER LIMITED WARRANTY Back cover 5 Contents CD-SW200 Page General Information Precautions 6 Controls and indicators 7 - 10 Preparation for Use System connections 11 - 13 Remote control 14 Basic Operation General control 15 Setting the...

CD-SW200 Operation Manual
Page 6
..., level surface free from vibration. 4" (10 cm) Keep the unit away from use of this unit. Plug the AC power cord back in, and then turn on this unit with a voltage other factors. This unit should only be used within the range of 41˚F - 95˚F (5˚C 35˚C) Warning: The voltage used must be held responsible for safety. SHARP...
..., level surface free from vibration. 4" (10 cm) Keep the unit away from use of this unit. Plug the AC power cord back in, and then turn on this unit with a voltage other factors. This unit should only be used within the range of 41˚F - 95˚F (5˚C 35˚C) Warning: The voltage used must be held responsible for safety. SHARP...

CD-SW200 Operation Manual
Page 7
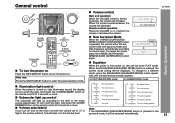
... 12 CD-SW200 Front panel Reference page 1. Clock/Timer Button 16, 34, 37 6. Tuning Up Button 28 7. Game/Video Input Jack 38 13. Memory/Set Button 16, 23, 29, 34, 37 18. Game/Video Button 38 General Information 7 Headphone Jack 39 12. Disc Tray Open/Close Button 18 16. Extra Bass (Surround)/Demo Mode Button 13, 15 21. Equalizer Mode Select Button 15 10. Tape (1 2) Button 30 26. Disc Track Down or Fast Reverse, Tape 2 Rewind, Tuner Preset Down, Time Down Button 16...
... 12 CD-SW200 Front panel Reference page 1. Clock/Timer Button 16, 34, 37 6. Tuning Up Button 28 7. Game/Video Input Jack 38 13. Memory/Set Button 16, 23, 29, 34, 37 18. Game/Video Button 38 General Information 7 Headphone Jack 39 12. Disc Tray Open/Close Button 18 16. Extra Bass (Surround)/Demo Mode Button 13, 15 21. Equalizer Mode Select Button 15 10. Tape (1 2) Button 30 26. Disc Track Down or Fast Reverse, Tape 2 Rewind, Tuner Preset Down, Time Down Button 16...

CD-SW200 Operation Manual
Page 8
... Power Cord 13 3. Video Out Jack 38 8. MP3 Indicator 18 5. MP3/WMA Total Indicator 25 11. FM Stereo Mode Indicator 28 13. FM 75 Ohms Antenna Terminal 12 4. AM Loop Antenna Jack 12 6. Subwoofer Terminals 12 9. Disc Repeat Play Indicator 22 18. Timer Recording Indicator 35 9. Disc Play Indicator 18 Rear panel Reference page 1. MP3/WMA Title Indicators 24 4. Tape Play Indicator 30 15. Disc Pause Indicator 19 19. CD-SW200 Controls and...
... Power Cord 13 3. Video Out Jack 38 8. MP3 Indicator 18 5. MP3/WMA Total Indicator 25 11. FM Stereo Mode Indicator 28 13. FM 75 Ohms Antenna Terminal 12 4. AM Loop Antenna Jack 12 6. Subwoofer Terminals 12 9. Disc Repeat Play Indicator 22 18. Timer Recording Indicator 35 9. Disc Play Indicator 18 Rear panel Reference page 1. MP3/WMA Title Indicators 24 4. Tape Play Indicator 30 15. Disc Pause Indicator 19 19. CD-SW200 Controls and...

CD-SW200 Operation Manual
Page 10
.... Tape Play Button 30 21. Character Button 26 27. Tuner (Band) Button 28 10. MP3/WMA Navigation Mode Select Button 25 23. Game/Video Button 38 12. MP3/WMA Display Button 20 24. General Information CD-SW200 Controls and indicators (continued) 1 7 8 13 17 9 C D 2 14 18 10 15 19 11 20 3 16 21 22 23 24 4 5 25 26 27 28 6 12 Remote control Reference page 1. Remote Control Transmitter 14 2. Disc Number Select Buttons 18 3. Extra Bass (Surround) Button...
.... Tape Play Button 30 21. Character Button 26 27. Tuner (Band) Button 28 10. MP3/WMA Navigation Mode Select Button 25 23. Game/Video Button 38 12. MP3/WMA Display Button 20 24. General Information CD-SW200 Controls and indicators (continued) 1 7 8 13 17 9 C D 2 14 18 10 15 19 11 20 3 16 21 22 23 24 4 5 25 26 27 28 6 12 Remote control Reference page 1. Remote Control Transmitter 14 2. Disc Number Select Buttons 18 3. Extra Bass (Surround) Button...
CD-SW200 Operation Manual
Page 12
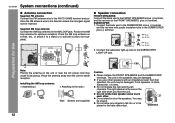
... AC power cord may be placed in the direction where the strongest signal can be received. SUBWOOFER: 1. Front speakers: 6 ohms, Subwoofer: 12 ohms. Do not mistake the right and the left channels. CD-SW200 System connections (continued) Antenna connection Supplied FM antenna: Connect the FM antenna wire to a stand or a wall with screws (not supplied). ANTENNA AM FM 75 OHMS GND LOOP Speaker connection FRONT SPEAKERS: Connect the black wire to the FRONT SPEAKERS minus (-) terminal, and the red wire...
... AC power cord may be placed in the direction where the strongest signal can be received. SUBWOOFER: 1. Front speakers: 6 ohms, Subwoofer: 12 ohms. Do not mistake the right and the left channels. CD-SW200 System connections (continued) Antenna connection Supplied FM antenna: Connect the FM antenna wire to a stand or a wall with screws (not supplied). ANTENNA AM FM 75 OHMS GND LOOP Speaker connection FRONT SPEAKERS: Connect the black wire to the FRONT SPEAKERS minus (-) terminal, and the red wire...

CD-SW200 Operation Manual
Page 13
... will enter the low power consumption mode and the subwoofer light up in to select the extra bass mode. Outdoor FM antenna 75 ohms coaxial cable Note: When an outdoor FM antenna is built with any obstacles, as this will start the tape initialization when plugged in flashing mode. If you require better reception. Cooling fan: The main unit is used to the AC outlet. CD-SW200 Preparation for a prolonged...
... will enter the low power consumption mode and the subwoofer light up in to select the extra bass mode. Outdoor FM antenna 75 ohms coaxial cable Note: When an outdoor FM antenna is built with any obstacles, as this will start the tape initialization when plugged in flashing mode. If you require better reception. Cooling fan: The main unit is used to the AC outlet. CD-SW200 Preparation for a prolonged...
CD-SW200 Operation Manual
Page 15
... last set level. When it will decrease. Equalizer When the power is first turned on , light illuminates around the display. When the EQUALIZER (EQUALIZER MODE) button is turned counterclockwise, the volume will be displayed. In CD/TUNER/TAPE mode In GAME/VIDEO mode FLAT No equalization. To cancel this mode, press the X-BASS (SURROUND)/ DEMO[X-BASS (SURROUND)] button again. CLASSIC For classical music. After use: Press the ON/STAND-BY button to volume input. ROCK For rock music. FLAT No equalization. Remote control operation: Press the VOLUME (+ or -) button to...
... last set level. When it will decrease. Equalizer When the power is first turned on , light illuminates around the display. When the EQUALIZER (EQUALIZER MODE) button is turned counterclockwise, the volume will be displayed. In CD/TUNER/TAPE mode In GAME/VIDEO mode FLAT No equalization. To cancel this mode, press the X-BASS (SURROUND)/ DEMO[X-BASS (SURROUND)] button again. CLASSIC For classical music. After use: Press the ON/STAND-BY button to volume input. ROCK For rock music. FLAT No equalization. Remote control operation: Press the VOLUME (+ or -) button to...

CD-SW200 Operation Manual
Page 16
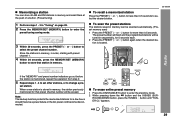
CD-SW200 Press the or button once to advance the time by 1 minute. Press the or button once to se- hour display and then press the MEMORY/SET button. PM 11:59) The 12-hour display will appear. (AM 12:00 - To change the time in step 3, step 4 (for selecting the 12-hour or 24-hour display) will be set for details.] 2 Perform "Setting the clock...
CD-SW200 Press the or button once to advance the time by 1 minute. Press the or button once to se- hour display and then press the MEMORY/SET button. PM 11:59) The 12-hour display will appear. (AM 12:00 - To change the time in step 3, step 4 (for selecting the 12-hour or 24-hour display) will be set for details.] 2 Perform "Setting the clock...
CD-SW200 Operation Manual
Page 17
... a CD or MP3/WMA disc CD-SW200 This system can play back a standard CD, CD-R/RW in sound quality. MP3 is a type of audio code which is processed by significant compression from its actual playback time. This system supports MPEG 1 Layer 3, MPEG 2 Layer 3, and VBR files. Auto power on function: When you press any of the following buttons, the unit turns on and the "CD" function is...
... a CD or MP3/WMA disc CD-SW200 This system can play back a standard CD, CD-R/RW in sound quality. MP3 is a type of audio code which is processed by significant compression from its actual playback time. This system supports MPEG 1 Layer 3, MPEG 2 Layer 3, and VBR files. Auto power on function: When you press any of the following buttons, the unit turns on and the "CD" function is...
CD-SW200 Operation Manual
Page 29
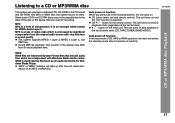
The preset number will flash and the programmed stations will be tuned in sequentially, for 5 seconds each. 2 Press the PRESET ( or ) button again when the desired station is stored in memory. To scan the preset stations The stations saved in "Tuning" on page 28. 2 Press the MEMORY/SET (MEMORY) button to enter the preset tuning saving mode. 3 Within 30 seconds, press the PRESET ( or ) button to change a pre- set other stations, or to select the preset channel number. Note...
The preset number will flash and the programmed stations will be tuned in sequentially, for 5 seconds each. 2 Press the PRESET ( or ) button again when the desired station is stored in memory. To scan the preset stations The stations saved in "Tuning" on page 28. 2 Press the MEMORY/SET (MEMORY) button to enter the preset tuning saving mode. 3 Within 30 seconds, press the PRESET ( or ) button to change a pre- set other stations, or to select the preset channel number. Note...
CD-SW200 Operation Manual
Page 30
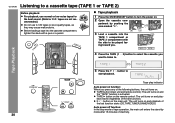
... Tape play indicator Auto power on function: When you press any of the last function starts (CD,TAPE,TUNER,GAME/VIDEO). TAPE button (main unit and remote control): The unit turns on . TAPE 1 TAPE 2 4 Press the TAPE (1 2) button to select the cassette you . CD-SW200 Tape playback 1 Press the ON/STAND-BY button to turn the power on and playback of the following buttons, the unit turns on and the "TAPE" function is activated. CD-SW200 Listening to . Auto power off function: In the stop mode...
... Tape play indicator Auto power on function: When you press any of the last function starts (CD,TAPE,TUNER,GAME/VIDEO). TAPE button (main unit and remote control): The unit turns on . TAPE 1 TAPE 2 4 Press the TAPE (1 2) button to select the cassette you . CD-SW200 Tape playback 1 Press the ON/STAND-BY button to turn the power on and playback of the following buttons, the unit turns on and the "TAPE" function is activated. CD-SW200 Listening to . Auto power off function: In the stop mode...

CD-SW200 Operation Manual
Page 35
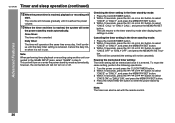
... MEMORY/SET button. by pressing the or button, and then press the MEMORY/SET button. button, and then To select the timer playback source: CD, TUNER, TAPE 1 or TAPE 2. CD-SW200 8 Set the time to select "PLAY" or "REC", and press the MEMORY/SET button. White Red The illustrations show the timer playback setting in steps 6 and 7 above. When you select the tuner, select a station by mode. Continued to adjust the hour and then press the MEMORY/SET button. 9 Switch input with...
... MEMORY/SET button. by pressing the or button, and then press the MEMORY/SET button. button, and then To select the timer playback source: CD, TUNER, TAPE 1 or TAPE 2. CD-SW200 8 Set the time to select "PLAY" or "REC", and press the MEMORY/SET button. White Red The illustrations show the timer playback setting in steps 6 and 7 above. When you select the tuner, select a station by mode. Continued to adjust the hour and then press the MEMORY/SET button. 9 Switch input with...
CD-SW200 Operation Manual
Page 36
... also be canceled). CD-SW200 Timer and sleep operation (continued) Advanced Features 12When the preset time is reached, playback or recording will continue until it reaches the preset volume. 13When the timer end time is reached, the system will not turn on or enter the power stand-by mode automatically, however, the connected unit will enter the power stand-by mode: 1 Press the CLOCK...
... also be canceled). CD-SW200 Timer and sleep operation (continued) Advanced Features 12When the preset time is reached, playback or recording will continue until it reaches the preset volume. 13When the timer end time is reached, the system will not turn on or enter the power stand-by mode automatically, however, the connected unit will enter the power stand-by mode: 1 Press the CLOCK...

CD-SW200 Operation Manual
Page 39
... plug and impedance between 16 and 50 ohms. The recommended impedance is 32 ohms. Plugging in the middle or is not set to the correct time. No sound is pressed, the unit does not respond. Is the disc distorted or scratched? Is the disc very dirty? Adjust the volume using the VOLUME control. Reset the clock. (Refer to page 16.) Set the unit to the power standby mode and then turn it...
... plug and impedance between 16 and 50 ohms. The recommended impedance is 32 ohms. Plugging in the middle or is not set to the correct time. No sound is pressed, the unit does not respond. Is the disc distorted or scratched? Is the disc very dirty? Adjust the volume using the VOLUME control. Reset the clock. (Refer to page 16.) Set the unit to the power standby mode and then turn it...
CD-SW200 Operation Manual
Page 41
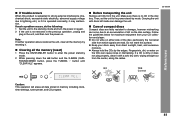
CD-SW200 If trouble occurs When this surface. Before transporting the unit Remove all data stored in memory including clock, timer settings, tuner preset, and CD program. 41 Do not write on either side of dirt on the disc surface. Always hold the CDs by mode and turn the power on again. 2 If the unit is operated incorrectly, it with discs left inside can damage the...
CD-SW200 If trouble occurs When this surface. Before transporting the unit Remove all data stored in memory including clock, timer settings, tuner preset, and CD program. 41 Do not write on either side of dirt on the disc surface. Always hold the CDs by mode and turn the power on again. 2 If the unit is operated incorrectly, it with discs left inside can damage the...

CD-SW200 Operation Manual
Page 42
..., paint thinner, etc.). Subwoofer: 220 watts RMS into 6 ohms from 100Hz to make design and specification changes for product improvement without prior notice. Input terminals Game/ Auxiliary (audio signal): 500 mV/ 47 k ohms Game/Video: 1Vp-p Caution: Do not use , the deck's heads and capstans may be performed periodically. Do not apply oil to ensure proper operation of the CD player, preventative maintenance (cleaning of...
..., paint thinner, etc.). Subwoofer: 220 watts RMS into 6 ohms from 100Hz to make design and specification changes for product improvement without prior notice. Input terminals Game/ Auxiliary (audio signal): 500 mV/ 47 k ohms Game/Video: 1Vp-p Caution: Do not use , the deck's heads and capstans may be performed periodically. Do not apply oil to ensure proper operation of the CD player, preventative maintenance (cleaning of...


