
CD-MPS99 | CD-MPS900 Operation Manual
Page 2
... the separation between the equipment and receiver. REFER SERVICING TO QUALIFIED SERVICE PERSONNEL. Model number Serial number Date of purchase Place of loss or theft, please record below the model number and serial number which can radiate radio frequency energy and, if not installed and used in full compliance with the limits for help. SPECIAL NOTES CD-MPS99 CD-MPS900 Important Instruction CAUTION: TO REDUCE THE RISK OF...
... the separation between the equipment and receiver. REFER SERVICING TO QUALIFIED SERVICE PERSONNEL. Model number Serial number Date of purchase Place of loss or theft, please record below the model number and serial number which can radiate radio frequency energy and, if not installed and used in full compliance with the limits for help. SPECIAL NOTES CD-MPS99 CD-MPS900 Important Instruction CAUTION: TO REDUCE THE RISK OF...
CD-MPS99 | CD-MPS900 Operation Manual
Page 3
... other ). This product may cause hazards. 7 Water and Moisture - Power-supply cords should be walked on the marking label. See Instruction Manual for venti- All the safety and operating instructions should be routed so that has the same overload protection as they may be sure the service technician has used a replacement plug specified by items placed upon or against them, paying...
... other ). This product may cause hazards. 7 Water and Moisture - Power-supply cords should be walked on the marking label. See Instruction Manual for venti- All the safety and operating instructions should be routed so that has the same overload protection as they may be sure the service technician has used a replacement plug specified by items placed upon or against them, paying...
CD-MPS99 | CD-MPS900 Operation Manual
Page 4
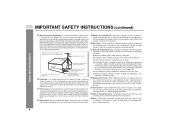
... require extensive work by following conditions: a) When the power-supply cord or plug is connected to this product from touching such power lines or circuits as per National Electrical Code, ANSI/NFPA 70 ANTENNA LEAD IN WIRE GROUND CLAMP ELECTRIC SERV ICE EQUIPMENT NEC - Unauthorized substitutions may result in fire, electric shock, or other controls may result in proper operating condition...
... require extensive work by following conditions: a) When the power-supply cord or plug is connected to this product from touching such power lines or circuits as per National Electrical Code, ANSI/NFPA 70 ANTENNA LEAD IN WIRE GROUND CLAMP ELECTRIC SERV ICE EQUIPMENT NEC - Unauthorized substitutions may result in fire, electric shock, or other controls may result in proper operating condition...
CD-MPS99 | CD-MPS900 Operation Manual
Page 5
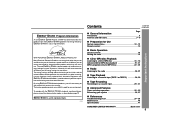
... CD-MPS99 CD-MPS900 Important Instruction Page ! Tape Recording Recording on page12. If every American family replaced their electronic equipment with the ENERGY STAR® standards mentioned above, please cancel the demonstration mode, as described on a cassette tape 29 - 31 ! registered mark. ergy "leakage" by home electronic products when they are not in energy savings for Use System connections 10 - 12 Remote control...
... CD-MPS99 CD-MPS900 Important Instruction Page ! Tape Recording Recording on page12. If every American family replaced their electronic equipment with the ENERGY STAR® standards mentioned above, please cancel the demonstration mode, as described on a cassette tape 29 - 31 ! registered mark. ergy "leakage" by home electronic products when they are not in energy savings for Use System connections 10 - 12 Remote control...
CD-MPS99 | CD-MPS900 Operation Manual
Page 6
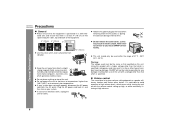
...) " Use the unit on a firm, level surface free from vibration. 4" (10 cm) General Information " Keep the unit away from the AC outlet. Precautions CD-MPS99 CD-MPS900 ! " Do not expose the unit to moisture, to your system does not work properly, disconnect the AC power cord from direct sunlight, strong magnetic fields, excessive dust, humidity and electronic/electrical equipment (home computers...
...) " Use the unit on a firm, level surface free from vibration. 4" (10 cm) General Information " Keep the unit away from the AC outlet. Precautions CD-MPS99 CD-MPS900 ! " Do not expose the unit to moisture, to your system does not work properly, disconnect the AC power cord from direct sunlight, strong magnetic fields, excessive dust, humidity and electronic/electrical equipment (home computers...
CD-MPS99 | CD-MPS900 Operation Manual
Page 7
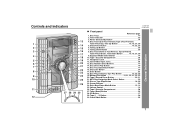
... 33 3. Equalizer Mode Select Button 14 10. Tape 1 Cassette Compartment 28 11. Enter Button 23 18. Memory/Set Button 15, 21, 25, 27, 32, 35 20. Cursor Buttons 23 24. Disc Trays 17 2. Headphone Jack 37 12. Disc Number Select Buttons 17 14. Disc Play or Repeat, Tape Play Button 17, 20, 28 19. Extra Bass/Demo Mode Button 12, 14 25. Tape (1 2) Button 28 30. Disc Track Up or Fast Forward, Tape 2 Fast Forward, Tuner Preset Up, Time Up Button 15...
... 33 3. Equalizer Mode Select Button 14 10. Tape 1 Cassette Compartment 28 11. Enter Button 23 18. Memory/Set Button 15, 21, 25, 27, 32, 35 20. Cursor Buttons 23 24. Disc Trays 17 2. Headphone Jack 37 12. Disc Number Select Buttons 17 14. Disc Play or Repeat, Tape Play Button 17, 20, 28 19. Extra Bass/Demo Mode Button 12, 14 25. Tape (1 2) Button 28 30. Disc Track Up or Fast Forward, Tape 2 Fast Forward, Tuner Preset Up, Time Up Button 15...

CD-MPS99 | CD-MPS900 Operation Manual
Page 8
.... Rear panel Reference page 1. AC Power Cord 12 3. Video Output Jack 36 7. Tweeter 1 2. Timer Play Indicator 33 7. Timer Recording Indicator 33 8. Display Reference page 1. FM Stereo Mode Indicator 26 11. Speaker Terminals 11 ! Passive Radiator 3. Tape Play Indicator 28 14. FM Antenna Ground Terminal 12 5. Disc Number Indicators 19 2. Tape 2 Record Indicator 30 9. AM Loop Aerial Jack 11 6. MP3 Folder Indicator 22 3. Woofer 2 4. FM 75 Ohms Antenna Terminal 11 4. Super Tweeters 5. Speaker Wire 3 4 5 CD-MPS99 CD-MPS900 Controls...
.... Rear panel Reference page 1. AC Power Cord 12 3. Video Output Jack 36 7. Tweeter 1 2. Timer Play Indicator 33 7. Timer Recording Indicator 33 8. Display Reference page 1. FM Stereo Mode Indicator 26 11. Speaker Terminals 11 ! Passive Radiator 3. Tape Play Indicator 28 14. FM Antenna Ground Terminal 12 5. Disc Number Indicators 19 2. Tape 2 Record Indicator 30 9. AM Loop Aerial Jack 11 6. MP3 Folder Indicator 22 3. Woofer 2 4. FM 75 Ohms Antenna Terminal 11 4. Super Tweeters 5. Speaker Wire 3 4 5 CD-MPS99 CD-MPS900 Controls...

CD-MPS99 | CD-MPS900 Operation Manual
Page 9
..., 4 Tuner Preset Down, Time Down Button 15, 18, 27, 29 10. CD Button 17 12. Game/Video Button 36 25. CD-MPS99 CD-MPS900 General Information ! Disc Number Select Buttons 17 3. Disc or Tape Stop Button 18, 29 16 11. Cursor Buttons 23 9 21 19. Disc Track Up or Fast Forward, Tape 2 Fast Forward, Tuner Preset Up, Time Up Button 15, 18, 27, 29 22. Remote Control Transmitter 13 2. Equalizer Mode Select Button 14 6 18 14. Character Input/Disc Direct Search Buttons 19, 24 5. Memory/Set Button...
..., 4 Tuner Preset Down, Time Down Button 15, 18, 27, 29 10. CD Button 17 12. Game/Video Button 36 25. CD-MPS99 CD-MPS900 General Information ! Disc Number Select Buttons 17 3. Disc or Tape Stop Button 18, 29 16 11. Cursor Buttons 23 9 21 19. Disc Track Up or Fast Forward, Tape 2 Fast Forward, Tuner Preset Up, Time Up Button 15, 18, 27, 29 22. Remote Control Transmitter 13 2. Equalizer Mode Select Button 14 6 18 14. Character Input/Disc Direct Search Buttons 19, 24 5. Memory/Set Button...

CD-MPS99 | CD-MPS900 Operation Manual
Page 12
... when plugged in the power stand-by mode, press the X-BASS/ DEMO button again. Consult your dealer. To cancel the demonstration mode: When the unit is on , the X-BASS/DEMO button can be in the power standby mode (demonstration mode), press the X-BASS/DEMO button. AC outlet (AC 120 V, 60 Hz) Notes: " The unit will enter the demonstration mode. Outdoor FM antenna 75 ohm coaxial cable Note: When an outdoor FM antenna is used...
... when plugged in the power stand-by mode, press the X-BASS/ DEMO button again. Consult your dealer. To cancel the demonstration mode: When the unit is on , the X-BASS/DEMO button can be in the power standby mode (demonstration mode), press the X-BASS/DEMO button. AC outlet (AC 120 V, 60 Hz) Notes: " The unit will enter the demonstration mode. Outdoor FM antenna 75 ohm coaxial cable Note: When an outdoor FM antenna is used...

CD-MPS99 | CD-MPS900 Operation Manual
Page 13
Change the lighting or the direction of time. This will not be used for battery use: " Replace all the connections (see pages 10 - 12). When inserting or removing the batteries, push them toward the battery terminals. 3 Close the cover. " Exposing the sensor on the unit. Test of the remote control Check the remote control after checking all old batteries with new ones at the...
Change the lighting or the direction of time. This will not be used for battery use: " Replace all the connections (see pages 10 - 12). When inserting or removing the batteries, push them toward the battery terminals. 3 Close the cover. " Exposing the sensor on the unit. Test of the remote control Check the remote control after checking all old batteries with new ones at the...

CD-MPS99 | CD-MPS900 Operation Manual
Page 14
...(midrange tones) are slightly emphasized. RACING Bass and treble are emphasized. CLASSIC Treble is pressed, the current mode setting will increase. Equalizer When the EQUALIZER (EQUALIZER MODE) button is cut a little. To turn the power on the remote control for 2 seconds or more . 14 After use: Press the ON/STAND-BY button to turn on/off the light, hold down the CLEAR/DIMMER button on During CD/TUNER/TAPE mode During GAME/VIDEO mode Press the...
...(midrange tones) are slightly emphasized. RACING Bass and treble are emphasized. CLASSIC Treble is pressed, the current mode setting will increase. Equalizer When the EQUALIZER (EQUALIZER MODE) button is cut a little. To turn the power on the remote control for 2 seconds or more . 14 After use: Press the ON/STAND-BY button to turn on/off the light, hold down the CLEAR/DIMMER button on During CD/TUNER/TAPE mode During GAME/VIDEO mode Press the...

CD-MPS99 | CD-MPS900 Operation Manual
Page 15
...) The 12-hour display will appear. (AM 12:00 - To change the time in the stand-by mode] Press the CLOCK/TIMER button. Setting the clock CD-MPS99 CD-MPS900 5 Press the or button to display the time. The time display will appear for about 10 seconds. [When the power is set with the remote control. 15 The time display will flash to confirm the time display when the AC power supply is in...
...) The 12-hour display will appear. (AM 12:00 - To change the time in the stand-by mode] Press the CLOCK/TIMER button. Setting the clock CD-MPS99 CD-MPS900 5 Press the or button to display the time. The time display will appear for about 10 seconds. [When the power is set with the remote control. 15 The time display will flash to confirm the time display when the AC power supply is in...

CD-MPS99 | CD-MPS900 Operation Manual
Page 16
... the display may not be playable due to a CD or MP3 disc This system can play audio CD, CD-R and CD-RW discs, but cannot record. " This system supports MPEG 1 Layer 3, MPEG 2 Layer 3, and VBR files. Some audio CD-R and CD-RW discs may differ from its actual playback time. Auto power on and playback of audio code which stands for recording. " / button (main unit and remote control): The unit turns on function: When...
... the display may not be playable due to a CD or MP3 disc This system can play audio CD, CD-R and CD-RW discs, but cannot record. " This system supports MPEG 1 Layer 3, MPEG 2 Layer 3, and VBR files. Some audio CD-R and CD-RW discs may differ from its actual playback time. Auto power on and playback of audio code which stands for recording. " / button (main unit and remote control): The unit turns on function: When...

CD-MPS99 | CD-MPS900 Operation Manual
Page 27
... the PRESET ( or ) button for a few hours should there be tuned in order, starting with preset channel 1. 4 Within 30 seconds, press the MEMORY/SET (MEMORY) button to select the preset channel number. set other stations, or to change a pre- Note: The backup function protects the memorized stations for more than 0.5 seconds to enter the stand-by mode. 2 While pressing down the button and the X-BASS/DEMO but- Radio If the "MEMORY" and preset number indicators...
... the PRESET ( or ) button for a few hours should there be tuned in order, starting with preset channel 1. 4 Within 30 seconds, press the MEMORY/SET (MEMORY) button to select the preset channel number. set other stations, or to change a pre- Note: The backup function protects the memorized stations for more than 0.5 seconds to enter the stand-by mode. 2 While pressing down the button and the X-BASS/DEMO but- Radio If the "MEMORY" and preset number indicators...

CD-MPS99 | CD-MPS900 Operation Manual
Page 32
... plays the desired source (CD, MP3 disc, tuner, tape) at least 1 minute between operations. 32 Set the clock to the correct time if "ONCE" or "DAILY" does not appear. Timer recording: The unit turns on and starts recording from the tuner at the preset time. Start Stop Start Stop Note: When the setting times for recording in combination: For example, use the once timer to record a radio program...
... plays the desired source (CD, MP3 disc, tuner, tape) at least 1 minute between operations. 32 Set the clock to the correct time if "ONCE" or "DAILY" does not appear. Timer recording: The unit turns on and starts recording from the tuner at the preset time. Start Stop Start Stop Note: When the setting times for recording in combination: For example, use the once timer to record a radio program...

CD-MPS99 | CD-MPS900 Operation Manual
Page 33
... been programmed, " NO PRESET" will be displayed and timer setting will be canceled. 10Adjust the volume using the VOLUME control, and then press the MEMORY/SET button. CD-MPS99 CD-MPS900 4 Within 10 seconds, press the or button to select "PLAY" or "REC", and press the MEMORY/SET button. The "TIMER" indicator lights up too high. 11Press the ON/STAND-BY button to adjust the hour and then press the MEMORY/SET button. 9 Switch input...
... been programmed, " NO PRESET" will be displayed and timer setting will be canceled. 10Adjust the volume using the VOLUME control, and then press the MEMORY/SET button. CD-MPS99 CD-MPS900 4 Within 10 seconds, press the or button to select "PLAY" or "REC", and press the MEMORY/SET button. The "TIMER" indicator lights up too high. 11Press the ON/STAND-BY button to adjust the hour and then press the MEMORY/SET button. 9 Switch input...

CD-MPS99 | CD-MPS900 Operation Manual
Page 34
... INPUT jacks, select "GAME" in order. The volume will start. Note: The timer can also be memorized once it is not in the timer stand-by mode. It will continue until the daily timer setting is reached, playback or recording will increase gradually until it is entered. CD-MPS99 CD-MPS900 Timer and sleep operation (continued) Advanced Features 12When the preset time...
... INPUT jacks, select "GAME" in order. The volume will start. Note: The timer can also be memorized once it is not in the timer stand-by mode. It will continue until the daily timer setting is reached, playback or recording will increase gradually until it is entered. CD-MPS99 CD-MPS900 Timer and sleep operation (continued) Advanced Features 12When the preset time...
CD-MPS99 | CD-MPS900 Operation Manual
Page 37
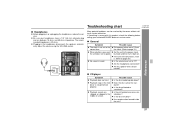
.... cally. Troubleshooting chart CD-MPS99 CD-MPS900 Many potential problems can be resolved by mode and then turn it . (Refer to page 39.) " No sound is not set to page 15.) " When a button is 32 ohms. " Plugging in the vibrations? General Symptom Possible cause " The clock is heard. nected? " Playback sounds are between 16 ohms and 50 ohms impedance. The recom- by the owner without calling a service technician...
.... cally. Troubleshooting chart CD-MPS99 CD-MPS900 Many potential problems can be resolved by mode and then turn it . (Refer to page 39.) " No sound is not set to page 15.) " When a button is 32 ohms. " Plugging in the vibrations? General Symptom Possible cause " The clock is heard. nected? " Playback sounds are between 16 ohms and 50 ohms impedance. The recom- by the owner without calling a service technician...
CD-MPS99 | CD-MPS900 Operation Manual
Page 39
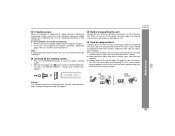
... Clearing all CDs from which signals are fairly resistant to damage, however mistracking can occur due to the power stand-by mode. Make sure there is dirty or does not play properly, clean...resetting it is not restored in the previous operation, unplug and plug in the unit, and then turn the power on the disc surface. " Keep your CD collection and player. If a CD is no CD in memory including clock, timer settings, tuner preset, and CD program. 39 ton, press the PRESET button until "CLEAR ALL" appears. Carrying the unit with a soft, dry cloth, wiping straight out from direct...
... Clearing all CDs from which signals are fairly resistant to damage, however mistracking can occur due to the power stand-by mode. Make sure there is dirty or does not play properly, clean...resetting it is not restored in the previous operation, unplug and plug in the unit, and then turn the power on the disc surface. " Keep your CD collection and player. If a CD is no CD in memory including clock, timer settings, tuner preset, and CD program. 39 ton, press the PRESET button until "CLEAR ALL" appears. Carrying the unit with a soft, dry cloth, wiping straight out from direct...
CD-MPS99 | CD-MPS900 Operation Manual
Page 41
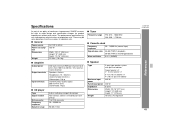
... harmonic distortion Speakers: 6 ohms Headphones: 16 - 50 ohms (recommended: 32 ohms) Video output: 1Vp-p Game/Auxiliary (audio signal): 500 mV/47 k ohms Game/Video: 1Vp-p ! There may be some deviations from 100 Hz to make design and specification changes for product improvement without prior notice. Tuner Frequency range FM: 87.5 - 108.0 MHz AM: 530 - 1,720 kHz ! Amplifier Output power Output terminals Input terminals 220 watts minimum RMS per channel into 6 ohms from these...
... harmonic distortion Speakers: 6 ohms Headphones: 16 - 50 ohms (recommended: 32 ohms) Video output: 1Vp-p Game/Auxiliary (audio signal): 500 mV/47 k ohms Game/Video: 1Vp-p ! There may be some deviations from 100 Hz to make design and specification changes for product improvement without prior notice. Tuner Frequency range FM: 87.5 - 108.0 MHz AM: 530 - 1,720 kHz ! Amplifier Output power Output terminals Input terminals 220 watts minimum RMS per channel into 6 ohms from these...


