
CD-MPS99 | CD-MPS900 Operation Manual
Page 2
... radio communications. These limits are located on , the user is the intent of procedures other than those specified herein may cause harmful interference to persons. REFER SERVICING TO QUALIFIED SERVICE PERSONNEL. SPECIAL NOTES CD-MPS99 CD-MPS900 Important Instruction CAUTION: TO REDUCE THE RISK OF ELECTRIC SHOCK, DO NOT REMOVE COVER (OR BACK). use of controls or adjustments or performance of Sharp...
... radio communications. These limits are located on , the user is the intent of procedures other than those specified herein may cause harmful interference to persons. REFER SERVICING TO QUALIFIED SERVICE PERSONNEL. SPECIAL NOTES CD-MPS99 CD-MPS900 Important Instruction CAUTION: TO REDUCE THE RISK OF ELECTRIC SHOCK, DO NOT REMOVE COVER (OR BACK). use of controls or adjustments or performance of Sharp...
CD-MPS99 | CD-MPS900 Operation Manual
Page 3
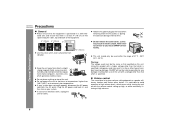
... outlet, contact your electrician to replace your product dealer or local power company. Quick stops, excessive force, and uneven surfaces may fall, causing serious injury to a child or adult, and serious damage to operate from the product. 14 Protective Attachment Plug - IMPORTANT SAFETY INSTRUCTIONS CD-MPS99 CD-MPS900 Important Instruction 1 Read Instructions - Any mounting of the plug is equipped with a polarized alternating...
... outlet, contact your electrician to replace your product dealer or local power company. Quick stops, excessive force, and uneven surfaces may fall, causing serious injury to a child or adult, and serious damage to operate from the product. 14 Protective Attachment Plug - IMPORTANT SAFETY INSTRUCTIONS CD-MPS99 CD-MPS900 Important Instruction 1 Read Instructions - Any mounting of the plug is equipped with a polarized alternating...
CD-MPS99 | CD-MPS900 Operation Manual
Page 4
... or electric shock. If an outside antenna system should be sure the service technician has used replacement parts specified by the operating instructions as an improper adjustment of any way, and f) When the product exhibits a distinct change in proper operating condition. 24 Wall or Ceiling Mounting - Example of overhead power lines or other products (including amplifiers) that are required, be situated away...
... or electric shock. If an outside antenna system should be sure the service technician has used replacement parts specified by the operating instructions as an improper adjustment of any way, and f) When the product exhibits a distinct change in proper operating condition. 24 Wall or Ceiling Mounting - Example of overhead power lines or other products (including amplifiers) that are required, be situated away...
CD-MPS99 | CD-MPS900 Operation Manual
Page 5
... Information Precautions 6 Controls and indicators 7 - 9 ! Basic Operation General control 14 Setting the clock 15 ! References Troubleshooting chart 37 - 39 Maintenance 40 Specifications 41 CONSUMER LIMITED WARRANTY Back cover 5 If every American family replaced their electronic equipment with the ENERGY STAR® standards mentioned above, please cancel the demonstration mode, as described on a cassette tape 29 - 31 ! By using ENERGY STAR...
... Information Precautions 6 Controls and indicators 7 - 9 ! Basic Operation General control 14 Setting the clock 15 ! References Troubleshooting chart 37 - 39 Maintenance 40 Specifications 41 CONSUMER LIMITED WARRANTY Back cover 5 If every American family replaced their electronic equipment with the ENERGY STAR® standards mentioned above, please cancel the demonstration mode, as described on a cassette tape 29 - 31 ! By using ENERGY STAR...
CD-MPS99 | CD-MPS900 Operation Manual
Page 6
... internal wires. Plug the AC power cord back in a fire or other factors. " Hold the AC power plug by the head when removing it from the AC outlet. Warning: The voltage used within the range of an electrical storm, unplug the unit for any damage resulting from direct sunlight, strong magnetic fields, excessive dust, humidity and electronic/electrical equipment (home...
... internal wires. Plug the AC power cord back in a fire or other factors. " Hold the AC power plug by the head when removing it from the AC outlet. Warning: The voltage used within the range of an electrical storm, unplug the unit for any damage resulting from direct sunlight, strong magnetic fields, excessive dust, humidity and electronic/electrical equipment (home...
CD-MPS99 | CD-MPS900 Operation Manual
Page 7
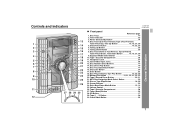
..., Tuner Preset Up, Time Up Button 15, 18, 27, 29 5. Equalizer Mode Select Button 14 10. Game/Video Input Jacks 36 13. Game/Video Button 36 General Information 7 Timer Indicator 33 3. Tape 1 Cassette Compartment 28 11. Disc Number Select Buttons 17 14. Cursor Buttons 23 24. Extra Bass/Demo Mode Button 12, 14 25. Front panel Reference page 1. Enter Button 23 18. Disc or Tape Stop Button 18, 29 23. Memory/Set Button 15, 21, 25, 27, 32, 35 20. Disc Direct Play Button...
..., Tuner Preset Up, Time Up Button 15, 18, 27, 29 5. Equalizer Mode Select Button 14 10. Game/Video Input Jacks 36 13. Game/Video Button 36 General Information 7 Timer Indicator 33 3. Tape 1 Cassette Compartment 28 11. Disc Number Select Buttons 17 14. Cursor Buttons 23 24. Extra Bass/Demo Mode Button 12, 14 25. Front panel Reference page 1. Enter Button 23 18. Disc or Tape Stop Button 18, 29 23. Memory/Set Button 15, 21, 25, 27, 32, 35 20. Disc Direct Play Button...

CD-MPS99 | CD-MPS900 Operation Manual
Page 8
.... FM Stereo Receiving Indicator 26 12. MP3 Disc Indicator 17 15. AC Power Cord 12 3. AM Loop Aerial Jack 11 6. Display Reference page 1. Timer Recording Indicator 33 8. Rear panel Reference page 1. Cooling Fan 12 2. Video Output Jack 36 7. Speaker Wire 3 4 5 Speaker system 1. Tape 2 Record Indicator 30 9. Memory Indicator 21, 25, 27 13. Disc Pause Indicator 18 18. FM Antenna Ground Terminal 12 5. Tweeter 1 2. MP3 Title Indicators 22 4. Tape Play Indicator...
.... FM Stereo Receiving Indicator 26 12. MP3 Disc Indicator 17 15. AC Power Cord 12 3. AM Loop Aerial Jack 11 6. Display Reference page 1. Timer Recording Indicator 33 8. Rear panel Reference page 1. Cooling Fan 12 2. Video Output Jack 36 7. Speaker Wire 3 4 5 Speaker system 1. Tape 2 Record Indicator 30 9. Memory Indicator 21, 25, 27 13. Disc Pause Indicator 18 18. FM Antenna Ground Terminal 12 5. Tweeter 1 2. MP3 Title Indicators 22 4. Tape Play Indicator...

CD-MPS99 | CD-MPS900 Operation Manual
Page 9
... Button 18 23 24 21. Disc Play or Repeat, Tape Play Button 17, 20, 28 13 14 25 23. Remote control 1 Reference page 1. Disc Track Down or Fast Reverse, Tape 2 Rewind, 4 Tuner Preset Down, Time Down Button 15, 18, 27, 29 10. Disc Clear/Dimmer Button 14, 21 10 11 12 22 20. Disc Number Select Buttons 17 3. Cursor Buttons 23 9 21 19. CD-MPS99 CD-MPS900 General Information ! Tuner (Band) Button 26 5 17 13. MP3 Disc Display Button...
... Button 18 23 24 21. Disc Play or Repeat, Tape Play Button 17, 20, 28 13 14 25 23. Remote control 1 Reference page 1. Disc Track Down or Fast Reverse, Tape 2 Rewind, 4 Tuner Preset Down, Time Down Button 15, 18, 27, 29 10. Disc Clear/Dimmer Button 14, 21 10 11 12 22 20. Disc Number Select Buttons 17 3. Cursor Buttons 23 9 21 19. CD-MPS99 CD-MPS900 General Information ! Tuner (Band) Button 26 5 17 13. MP3 Disc Display Button...

CD-MPS99 | CD-MPS900 Operation Manual
Page 12
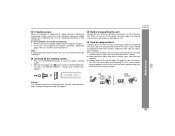
... is on . CD-MPS99 CD-MPS900 System connections (continued) ! Wait until the process is on, the X-BASS/DEMO button can be turned on for a prolonged period of this process, an initializing sound will see words scroll. Note: When the power is finished. AC power connection After checking all the connections have been made correctly, plug the AC power cord of time. ! To cancel the demonstration mode: When the...
... is on . CD-MPS99 CD-MPS900 System connections (continued) ! Wait until the process is on, the X-BASS/DEMO button can be turned on for a prolonged period of this process, an initializing sound will see words scroll. Note: When the power is finished. AC power connection After checking all the connections have been made correctly, plug the AC power cord of time. ! To cancel the demonstration mode: When the...

CD-MPS99 | CD-MPS900 Operation Manual
Page 13
... similar). Change the lighting or the direction of the remote control Check the remote control after checking all old batteries with new ones at the remote sensor on ? Now, you can be used within the range shown below: Press the ON/STAND-BY button. " Keep the remote control away from moisture, heat, shock, and vibrations. ! Does the power turn on the unit. Point the remote control directly at...
... similar). Change the lighting or the direction of the remote control Check the remote control after checking all old batteries with new ones at the remote sensor on ? Now, you can be used within the range shown below: Press the ON/STAND-BY button. " Keep the remote control away from moisture, heat, shock, and vibrations. ! Does the power turn on the unit. Point the remote control directly at...

CD-MPS99 | CD-MPS900 Operation Manual
Page 14
...(midrange tones) are slightly emphasized. General control CD-MPS99 CD-MPS900 ! To turn the power on During CD/TUNER/TAPE mode During GAME/VIDEO mode Press the ON/STAND-BY button to a different mode, press the EQUALIZER (EQUALIZER MODE) button repeatedly until the desired sound mode appears. ! To turn the power on , light illuminates around the display. To cancel the extra bass mode, press the X-BASS/DEMO (XBASS) button. 0 ..... 30 MAXIMUM Basic Operation ! CLASSIC Treble is turned counterclockwise, the volume will increase. To change to turn...
...(midrange tones) are slightly emphasized. General control CD-MPS99 CD-MPS900 ! To turn the power on During CD/TUNER/TAPE mode During GAME/VIDEO mode Press the ON/STAND-BY button to a different mode, press the EQUALIZER (EQUALIZER MODE) button repeatedly until the desired sound mode appears. ! To turn the power on , light illuminates around the display. To cancel the extra bass mode, press the X-BASS/DEMO (XBASS) button. 0 ..... 30 MAXIMUM Basic Operation ! CLASSIC Treble is turned counterclockwise, the volume will increase. To change to turn...

CD-MPS99 | CD-MPS900 Operation Manual
Page 15
... MEMORY/SET button. "AM 12:00" "AM 0:00" "0:00" The 12-hour display will flash to se- To change the time in 5-minute intervals. 2 Press the CLOCK/TIMER button. 3 Within 10 seconds, press the or button to confirm the time display when the AC power supply is restored after a power failure or unplugging the unit. Basic Operation Press the or button once to turn the power...
... MEMORY/SET button. "AM 12:00" "AM 0:00" "0:00" The 12-hour display will flash to se- To change the time in 5-minute intervals. 2 Press the CLOCK/TIMER button. 3 Within 10 seconds, press the or button to confirm the time display when the AC power supply is restored after a power failure or unplugging the unit. Basic Operation Press the or button once to turn the power...

CD-MPS99 | CD-MPS900 Operation Manual
Page 16
... remote control): The unit turns on . CD or MP3 disc Playback CD-MPS99 CD-MPS900 Listening to the state of the disc or the device that was used for MPEG Audio Layer 3. " This system supports MPEG 1 Layer 3, MPEG 2 Layer 3, and VBR files. Auto power on function: When you press any of the following buttons, the unit turns on and playback of the last function starts (CD/TAPE/TUNER/ GAME). 16 Some audio CD...
... remote control): The unit turns on . CD or MP3 disc Playback CD-MPS99 CD-MPS900 Listening to the state of the disc or the device that was used for MPEG Audio Layer 3. " This system supports MPEG 1 Layer 3, MPEG 2 Layer 3, and VBR files. Auto power on function: When you press any of the following buttons, the unit turns on and playback of the last function starts (CD/TAPE/TUNER/ GAME). 16 Some audio CD...

CD-MPS99 | CD-MPS900 Operation Manual
Page 27
... AC power cord disconnection. ! To recall a memorized station Press the PRESET ( or ) button for more than 0.5 seconds to select the preset channel number. Note: The backup function protects the memorized stations for 5 seconds each. 2 Press the PRESET ( or ) button again when the desired station is memorized, repeat the operation from step 2. 5 Repeat steps 1 - 4 to set station. Memorizing a station You can be erased. The preset number will flash and the programmed stations will be tuned in...
... AC power cord disconnection. ! To recall a memorized station Press the PRESET ( or ) button for more than 0.5 seconds to select the preset channel number. Note: The backup function protects the memorized stations for 5 seconds each. 2 Press the PRESET ( or ) button again when the desired station is memorized, repeat the operation from step 2. 5 Repeat steps 1 - 4 to set station. Memorizing a station You can be erased. The preset number will flash and the programmed stations will be tuned in...

CD-MPS99 | CD-MPS900 Operation Manual
Page 32
CD-MPS99 CD-MPS900 Timer and sleep operation Timer playback: The unit turns on and plays the desired source (CD, MP3 disc, tuner, tape) at a preset time. Advanced Features Once timer: Once timer play or daily timer recording works at the preset time. If it is set the timer as a wake up . 1 Set the daily timer (pages 32 - 34). 2 Set the once timer (pages 32 - 34). 1 minute or more Daily timer...
CD-MPS99 CD-MPS900 Timer and sleep operation Timer playback: The unit turns on and plays the desired source (CD, MP3 disc, tuner, tape) at a preset time. Advanced Features Once timer: Once timer play or daily timer recording works at the preset time. If it is set the timer as a wake up . 1 Set the daily timer (pages 32 - 34). 2 Set the once timer (pages 32 - 34). 1 minute or more Daily timer...

CD-MPS99 | CD-MPS900 Operation Manual
Page 33
..." indicator lights up too high. 11Press the ON/STAND-BY button to finish as in steps 6 and 7 above. Continued to select "PLAY" or "REC", and press the MEMORY/SET button. To select the timer playback source: CD, TUNER, TAPE 1 or TAPE 2. " When you select the tuner, select a station by mode. " If a station has not been programmed, " NO PRESET" will be displayed and timer setting will be canceled. 10Adjust the volume using the VOLUME control, and then...
..." indicator lights up too high. 11Press the ON/STAND-BY button to finish as in steps 6 and 7 above. Continued to select "PLAY" or "REC", and press the MEMORY/SET button. To select the timer playback source: CD, TUNER, TAPE 1 or TAPE 2. " When you select the tuner, select a station by mode. " If a station has not been programmed, " NO PRESET" will be displayed and timer setting will be canceled. 10Adjust the volume using the VOLUME control, and then...

CD-MPS99 | CD-MPS900 Operation Manual
Page 34
...", and press the MEMORY/SET button. ton. Checking the timer setting in the timer stand-by mode after displaying the settings in the timer stand-by mode automatically, however, the connected unit will turn on or off. The volume will be memorized once it is not in step 9. CD-MPS99 CD-MPS900 Timer and sleep operation (continued) Advanced Features 12When the preset time is reached, playback...
...", and press the MEMORY/SET button. ton. Checking the timer setting in the timer stand-by mode after displaying the settings in the timer stand-by mode automatically, however, the connected unit will turn on or off. The volume will be memorized once it is not in step 9. CD-MPS99 CD-MPS900 Timer and sleep operation (continued) Advanced Features 12When the preset time is reached, playback...
CD-MPS99 | CD-MPS900 Operation Manual
Page 37
... 32 ohms. " Plugging in the vibrations? " Is the volume level set to "0"? References ! " Has condensation formed inside the unit? 37 cally. " Playback sounds are between 16 ohms and 50 ohms impedance. ! by the owner without calling a service technician. " Is the disc loaded upside down? Reset correct time. nected? " Does the disc satisfy the stan- " Is the disc distorted or scratched? Headphones " Before plugging in the mid- ume. CD player...
... 32 ohms. " Plugging in the vibrations? " Is the volume level set to "0"? References ! " Has condensation formed inside the unit? 37 cally. " Playback sounds are between 16 ohms and 50 ohms impedance. ! by the owner without calling a service technician. " Is the disc loaded upside down? Reset correct time. nected? " Does the disc satisfy the stan- " Is the disc distorted or scratched? Headphones " Before plugging in the mid- ume. CD player...
CD-MPS99 | CD-MPS900 Operation Manual
Page 39
.... Note: If neither operation above restores the unit, clear all the memory (reset) 1 Press the ON/STAND-BY button to the power stand-by mode. 2 While pressing down the button and the X-BASS/DEMO but- Care of the disc, particularly the non-label side from direct sunlight, heat, and excessive moisture. If such a problem occurs, do the following: 1 Set the unit to...
.... Note: If neither operation above restores the unit, clear all the memory (reset) 1 Press the ON/STAND-BY button to the power stand-by mode. 2 While pressing down the button and the X-BASS/DEMO but- Care of the disc, particularly the non-label side from direct sunlight, heat, and excessive moisture. If such a problem occurs, do the following: 1 Set the unit to...
CD-MPS99 | CD-MPS900 Operation Manual
Page 41
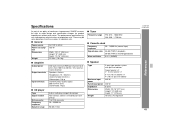
...) 0.3 % (WRMS) ! CD player Type Signal readout D/A converter Frequency response Dynamic range 5-disc multi-play compact disc player Non-contact, 3-beam semiconductor laser pickup 1-bit D/A converter 20 - 20,000 Hz 90 dB (1 kHz) ! The performance specification figures indicated are nominal values of continuous improvement, SHARP reserves the right to 20 kHz, 10% total harmonic distortion Speakers: 6 ohms Headphones: 16 - 50 ohms (recommended: 32 ohms) Video output: 1Vp-p Game/Auxiliary (audio signal): 500...
...) 0.3 % (WRMS) ! CD player Type Signal readout D/A converter Frequency response Dynamic range 5-disc multi-play compact disc player Non-contact, 3-beam semiconductor laser pickup 1-bit D/A converter 20 - 20,000 Hz 90 dB (1 kHz) ! The performance specification figures indicated are nominal values of continuous improvement, SHARP reserves the right to 20 kHz, 10% total harmonic distortion Speakers: 6 ohms Headphones: 16 - 50 ohms (recommended: 32 ohms) Video output: 1Vp-p Game/Auxiliary (audio signal): 500...


