
CD-ES777 Operation Manual
Page 1
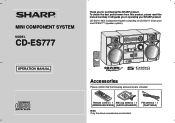
OPERATION MANUAL Accessories Please confirm that the following accessories are included. FM antenna 1 (FANT1535A) Remote control 1 AM loop antenna 1 (RRMCGA087AWSA) (QANTL0010AWZZ) Note: Only the above accessories are included. To obtain the best performance from this product, please read this SHARP product. MINI COMPONENT SYSTEM MODEL CD-ES777 Thank you in operating your SHARP product. It will guide you for purchasing this manual carefully. CD-ES777 Mini Component System consisting of CD-ES777 (main unit) and CP-ES777 (speaker system).
OPERATION MANUAL Accessories Please confirm that the following accessories are included. FM antenna 1 (FANT1535A) Remote control 1 AM loop antenna 1 (RRMCGA087AWSA) (QANTL0010AWZZ) Note: Only the above accessories are included. To obtain the best performance from this product, please read this SHARP product. MINI COMPONENT SYSTEM MODEL CD-ES777 Thank you in operating your SHARP product. It will guide you for purchasing this manual carefully. CD-ES777 Mini Component System consisting of CD-ES777 (main unit) and CP-ES777 (speaker system).

CD-ES777 Operation Manual
Page 5
... Contents Page General Information Precautions 6 Controls and indicators 7 - 9 CD-ES777 Preparation for Use System connections 10 - 12 Remote control 13 Basic Operation General control 14 Setting the clock (Remote Control only 15 Important Instruction CD Playback Listening to a CD (CDs 16 - 17 Advanced CD playback 18 - 20 Radio Listening... demonstration mode, as described on a cassette tape 24 - 26 Advanced Features Timer and sleep operation (Remote Control only 27 - 30 Enhancing your system 31 - 32 References Troubleshooting chart 32 - 34 Maintenance 34 Specifications 35 CONSUMER LIMITED...
... Contents Page General Information Precautions 6 Controls and indicators 7 - 9 CD-ES777 Preparation for Use System connections 10 - 12 Remote control 13 Basic Operation General control 14 Setting the clock (Remote Control only 15 Important Instruction CD Playback Listening to a CD (CDs 16 - 17 Advanced CD playback 18 - 20 Radio Listening... demonstration mode, as described on a cassette tape 24 - 26 Advanced Features Timer and sleep operation (Remote Control only 27 - 30 Enhancing your system 31 - 32 References Troubleshooting chart 32 - 34 Maintenance 34 Specifications 35 CONSUMER LIMITED...
CD-ES777 Operation Manual
Page 9
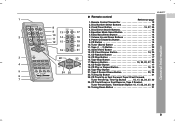
... 9 Disc Number Select Buttons 16 8 9 13 3. Extra Bass/Demo Button 14 2 11 14 12 15 18 7. Tape Stop Button 23 17. CD Pause Button 17 19. CD-ES777 General Information Remote control 1 Reference page 1. CD Track Up or Fast Forward, Tape 2 Fast Forward, 7 Tuner Preset Up, Time Up Button . . . . 15, 17, 22, 24, 27, 30 24...
... 9 Disc Number Select Buttons 16 8 9 13 3. Extra Bass/Demo Button 14 2 11 14 12 15 18 7. Tape Stop Button 23 17. CD Pause Button 17 19. CD-ES777 General Information Remote control 1 Reference page 1. CD Track Up or Fast Forward, Tape 2 Fast Forward, 7 Tuner Preset Up, Time Up Button . . . . 15, 17, 22, 24, 27, 30 24...

CD-ES777 Operation Manual
Page 11
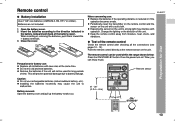
...to fall into or to be placed in the direction where the strongest signal can damage the unit. Place the AM loop antenna on the remote control for 2 seconds or more , as lower impedance speakers can be injured. Place the antenna away from the unit for speaker illumination. Do... the RIGHT jack and the left channels. Installing the AM loop antenna: < Assembling > < Attaching to the wall > Wall Screws (not supplied) CD-ES777 Speaker connection Connect the black wire to the minus (-) terminal, and the red wire to the AM and GND terminals. Position the AM loop antenna...
...to fall into or to be placed in the direction where the strongest signal can damage the unit. Place the AM loop antenna on the remote control for 2 seconds or more , as lower impedance speakers can be injured. Place the antenna away from the unit for speaker illumination. Do... the RIGHT jack and the left channels. Installing the AM loop antenna: < Assembling > < Attaching to the wall > Wall Screws (not supplied) CD-ES777 Speaker connection Connect the black wire to the minus (-) terminal, and the red wire to the AM and GND terminals. Position the AM loop antenna...
CD-ES777 Operation Manual
Page 13
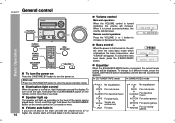
... interfere with new ones at the remote sensor on ? CD-ES777 Notes concerning use rechargeable batteries (nickel-cadmium battery, etc.). Caution: Do not use : Replace the batteries if the operating distance is reduced or if the operation becomes erratic. Precautions for long periods of the remote control Check the remote control after checking all old batteries with...
... interfere with new ones at the remote sensor on ? CD-ES777 Notes concerning use rechargeable batteries (nickel-cadmium battery, etc.). Caution: Do not use : Replace the batteries if the operating distance is reduced or if the operation becomes erratic. Precautions for long periods of the remote control Check the remote control after checking all old batteries with...
CD-ES777 Operation Manual
Page 14
... or higher, the volume starts at 16 and fades in If you turn off the light, hold down the CLEAR/DIMMER button on the remote control for 2 seconds or more than 2 seconds. VOCAL Vocals are enchanced. Volume auto fade-in to increase or decrease the volume. 0 ..... 30 MAXIMUM..., and "X-BASS" will be displayed. ROCK For rock music. CLASSIC For classical music. FLAT No equalization. CLASSIC For classical music. Basic Operation General control CD-ES777 To turn the power on Press the ON/STAND-BY button to enter the power stand-by mode. After use: Press the ON/STAND-BY...
... or higher, the volume starts at 16 and fades in If you turn off the light, hold down the CLEAR/DIMMER button on the remote control for 2 seconds or more than 2 seconds. VOCAL Vocals are enchanced. Volume auto fade-in to increase or decrease the volume. 0 ..... 30 MAXIMUM..., and "X-BASS" will be displayed. ROCK For rock music. CLASSIC For classical music. FLAT No equalization. CLASSIC For classical music. Basic Operation General control CD-ES777 To turn the power on Press the ON/STAND-BY button to enter the power stand-by mode. After use: Press the ON/STAND-BY...
CD-ES777 Operation Manual
Page 15
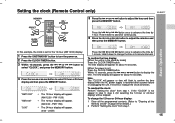
... appear. (AM 12:00 - Within 10 seconds, press the or button to advance the time by mode] Press the CLOCK/TIMER button. Setting the clock (Remote Control only) CD-ES777 5 Press the or button to change the 12-hour or 24-hour display: 1 Clear all the memory (reset)" on page 33 for details.] 2 Perform...
... appear. (AM 12:00 - Within 10 seconds, press the or button to advance the time by mode] Press the CLOCK/TIMER button. Setting the clock (Remote Control only) CD-ES777 5 Press the or button to change the 12-hour or 24-hour display: 1 Clear all the memory (reset)" on page 33 for details.] 2 Perform...
CD-ES777 Operation Manual
Page 17
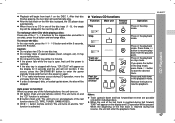
... and then turn the power on and playback of the 1 - 5 buttons for 3 seconds and the unit will not function. Various CD functions Function Play Main unit Remote control Operation Press in the playback or stop mode, press the / button to the next tray with force, "ER-CD20" will appear on... up / Track down in one of the disc trays (1 - 5), the empty tray will be skipped. Do not play . CD-ES777 Stop Press in one disc tray. CD button (main unit and remote control): The unit turns on the fifth disc is activated. When the end of special shapes (heart, octagon, etc). If...
... and then turn the power on and playback of the 1 - 5 buttons for 3 seconds and the unit will not function. Various CD functions Function Play Main unit Remote control Operation Press in the playback or stop mode, press the / button to the next tray with force, "ER-CD20" will appear on... up / Track down in one of the disc trays (1 - 5), the empty tray will be skipped. Do not play . CD-ES777 Stop Press in one disc tray. CD button (main unit and remote control): The unit turns on the fifth disc is activated. When the end of special shapes (heart, octagon, etc). If...
CD-ES777 Operation Manual
Page 18
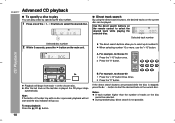
...track search By using the direct search buttons, the desired tracks on the remote control to choose 13 1 Press the "+10" button once. 2 Press the "3" button. CD Playback Playback will go out. For example, to number 9. Use the direct...1 on the current disc. B. If the direct search buttons are pressed while the disc is played, the CD player stops automatically. Selected track number Selected disc number 2 Within 5 seconds, press the button on the disc... If the button of tracks on the main unit. Advanced CD playback CD-ES777 To specify a disc to play You can be selected.
...track search By using the direct search buttons, the desired tracks on the remote control to choose 13 1 Press the "+10" button once. 2 Press the "3" button. CD Playback Playback will go out. For example, to number 9. Use the direct...1 on the current disc. B. If the direct search buttons are pressed while the disc is played, the CD player stops automatically. Selected track number Selected disc number 2 Within 5 seconds, press the button on the disc... If the button of tracks on the main unit. Advanced CD playback CD-ES777 To specify a disc to play You can be selected.
CD-ES777 Operation Manual
Page 19
... disc(s) can be played in the "Programmed play" section on the remote control. On the other hand, the button does not allow you can move to the previous track. Otherwise, the disc(s) will go out. CD-ES777 To repeat desired tracks: Perform steps 1 - 6 in random order ...automatically. The beginning of the tracks.) Caution: After performing repeat or random play, be located. To repeat all tracks on up to 5 discs: Press the / button twice. CD Playback To cancel repeat ...
... disc(s) can be played in the "Programmed play" section on the remote control. On the other hand, the button does not allow you can move to the previous track. Otherwise, the disc(s) will go out. CD-ES777 To repeat desired tracks: Perform steps 1 - 6 in random order ...automatically. The beginning of the tracks.) Caution: After performing repeat or random play, be located. To repeat all tracks on up to 5 discs: Press the / button twice. CD Playback To cancel repeat ...
CD-ES777 Operation Manual
Page 20
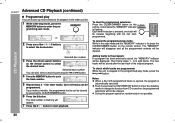
...by mode or change the function from CD to another, the programmed selections will be cleared, beginning with programmed tracks is ejected, the program is flashing. To clear the programmed selections: Press the CLEAR/DIMMER button on the remote control to select the desired track. Each ... Press the button. CD Playback CD-ES777 Advanced CD Playback (continued) Programmed play You can choose up to 32 selections for playback in the order you like. 1 While in the stop mode and the "MEMORY" indicator is lit, press the CLEAR/DIMMER button on the remote control. To check which ...
...by mode or change the function from CD to another, the programmed selections will be cleared, beginning with programmed tracks is ejected, the program is flashing. To clear the programmed selections: Press the CLEAR/DIMMER button on the remote control to select the desired track. Each ... Press the button. CD Playback CD-ES777 Advanced CD Playback (continued) Programmed play You can choose up to 32 selections for playback in the order you like. 1 While in the stop mode and the "MEMORY" indicator is lit, press the CLEAR/DIMMER button on the remote control. To check which ...
CD-ES777 Operation Manual
Page 21
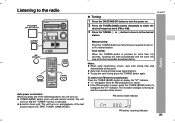
... the TUNING button again. " " will appear when an FM broadcast is in to the desired station. Auto power on . TUNER (BAND) button (main unit and remote control): The unit turns on . 2 Press the TUNER (BAND) button repeatedly to select the desired frequency band (FM or AM). 3 Press the TUNING ( or ) ...turns on and playback of the following buttons, the unit turns on function: When you press any of the last function starts (CD, TAPE, TUNER, GAME/VIDEO). CD-ES777 Radio Manual tuning: Press the TUNING button as many times as required to tune in stereo. To stop automatically at the first ...
... the TUNING button again. " " will appear when an FM broadcast is in to the desired station. Auto power on . TUNER (BAND) button (main unit and remote control): The unit turns on . 2 Press the TUNER (BAND) button repeatedly to select the desired frequency band (FM or AM). 3 Press the TUNING ( or ) ...turns on and playback of the following buttons, the unit turns on function: When you press any of the last function starts (CD, TAPE, TUNER, GAME/VIDEO). CD-ES777 Radio Manual tuning: Press the TUNING button as many times as required to tune in stereo. To stop automatically at the first ...

CD-ES777 Operation Manual
Page 23
...Tape playback 1 Press the ON/STAND-BY button to be played facing toward you. CD-ES777 4 Press the TAPE (1 2) button to . button (main unit): The unit turns on . 2 Open the cassette com- TAPE button (remote control): The unit turns on . Tape play indicator Auto power on function: When you want... to listen to select the cassette you press any of the last function starts (CD, TAPE, TUNER, GAME/VIDEO). Listening to start playback.
...Tape playback 1 Press the ON/STAND-BY button to be played facing toward you. CD-ES777 4 Press the TAPE (1 2) button to . button (main unit): The unit turns on . 2 Open the cassette com- TAPE button (remote control): The unit turns on . Tape play indicator Auto power on function: When you want... to listen to select the cassette you press any of the last function starts (CD, TAPE, TUNER, GAME/VIDEO). Listening to start playback.

CD-ES777 Operation Manual
Page 24
... button, and then open . Before changing from malfunction of this case, wait until the power is properly recorded. In this unit. SHARP is not liable for side A 24 To protect the recorded sound, remove the tab after recording. Erase-prevention tab of your recording ... to another, press the (TAPE ) button. For recording, use metal or CrO tapes. CD-ES777 Listening to a cassette tape (TAPE 1 or TAPE 2) (continued) Various tape functions Function Play Main unit Remote control Operation Press in the playback or stop mode. Stop Fast forward/ Rewind (TAPE 2 only)...
... button, and then open . Before changing from malfunction of this case, wait until the power is properly recorded. In this unit. SHARP is not liable for side A 24 To protect the recorded sound, remove the tab after recording. Erase-prevention tab of your recording ... to another, press the (TAPE ) button. For recording, use metal or CrO tapes. CD-ES777 Listening to a cassette tape (TAPE 1 or TAPE 2) (continued) Various tape functions Function Play Main unit Remote control Operation Press in the playback or stop mode. Stop Fast forward/ Rewind (TAPE 2 only)...
CD-ES777 Operation Manual
Page 27
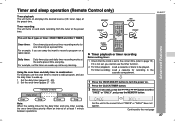
Set the unit to record a program on a radio station. Timer and sleep operation (Remote Control only) Timer playback: The unit turns on and plays the desired source (CD, tuner, tape) at a preset time. Start Stop Start Stop Note: When the setting times for recording in combination: For example, use... 2 Press the CLOCK/TIMER button. 3 Within 10 seconds, press the or button to wake up call every morning. Continued to page 15). CD-ES777 This unit has 2 types of at the preset time. Daily timer: Daily timer play and once timer recording works for one time only at ...
Set the unit to record a program on a radio station. Timer and sleep operation (Remote Control only) Timer playback: The unit turns on and plays the desired source (CD, tuner, tape) at a preset time. Start Stop Start Stop Note: When the setting times for recording in combination: For example, use... 2 Press the CLOCK/TIMER button. 3 Within 10 seconds, press the or button to wake up call every morning. Continued to page 15). CD-ES777 This unit has 2 types of at the preset time. Daily timer: Daily timer play and once timer recording works for one time only at ...

CD-ES777 Operation Manual
Page 28
..., " NO P.SET" will be displayed and timer setting will be canceled. 10 Adjust the volume using the VOLUME control, and then press the MEMORY button. CD-ES777 Timer and sleep operation (Remote Control only) (continued) 4 Within 10 seconds, press the or button to select "ONCE SET" or "DAILY SET", ...not turn the volume up and the unit is ready for timer playback or timer recording. button, and then To select the timer playback source: CD, TUNER, TAPE 1 or TAPE 2. White Red The illustrations show the timer playback setting in steps 6 and 7 above. 28 The "TIMER"...
..., " NO P.SET" will be displayed and timer setting will be canceled. 10 Adjust the volume using the VOLUME control, and then press the MEMORY button. CD-ES777 Timer and sleep operation (Remote Control only) (continued) 4 Within 10 seconds, press the or button to select "ONCE SET" or "DAILY SET", ...not turn the volume up and the unit is ready for timer playback or timer recording. button, and then To select the timer playback source: CD, TUNER, TAPE 1 or TAPE 2. White Red The illustrations show the timer playback setting in steps 6 and 7 above. 28 The "TIMER"...
CD-ES777 Operation Manual
Page 30
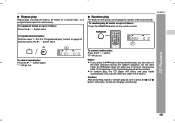
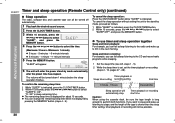
...button to a tape, and the length of the tape is indicated. Sleep and timer recording: For example, you can fall asleep listening to the CD and record radio programs while sleeping. 1 Set the sleep time (see left, steps 1 - 5). 2 While the sleep timer is long enough to...seconds, press the or button to select "SLEEP", and press the MEMORY button. 4 Press the or button to perform both functions. CD-ES777 Timer and sleep operation (Remote Control only) (continued) Advanced Features Sleep operation The radio, compact disc and cassette tape can all be turned down 1 minute before the...
...button to a tape, and the length of the tape is indicated. Sleep and timer recording: For example, you can fall asleep listening to the CD and record radio programs while sleeping. 1 Set the sleep time (see left, steps 1 - 5). 2 While the sleep timer is long enough to...seconds, press the or button to select "SLEEP", and press the MEMORY button. 4 Press the or button to perform both functions. CD-ES777 Timer and sleep operation (Remote Control only) (continued) Advanced Features Sleep operation The radio, compact disc and cassette tape can all be turned down 1 minute before the...
CD-ES777 Operation Manual
Page 31
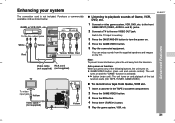
... To video input jack Yellow Video cable (not supplied) AC INPUT Yellow CD-ES777 Listening to playback sounds of the last function starts (CD, TAPE, TUNER, GAME/VIDEO). You can enjoy sounds from the television. GAME/VIDEO button (main unit and remote control): The unit turns on the TV. button (main unit): The unit turns...
... To video input jack Yellow Video cable (not supplied) AC INPUT Yellow CD-ES777 Listening to playback sounds of the last function starts (CD, TAPE, TUNER, GAME/VIDEO). You can enjoy sounds from the television. GAME/VIDEO button (main unit and remote control): The unit turns on the TV. button (main unit): The unit turns...
CD-ES777 Operation Manual
Page 33
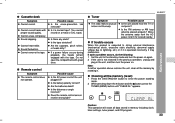
Cannot erase completely. Possible cause Is the erase-prevention tab removed? Are the capstans, pinch rollers, or heads dirty? Does the remote control sensor receive strong light? If such a problem occurs, do the following: 1 Set the unit to the stand-by mode and turn the power on ... any slack? Cannot hear treble. If a power failure occurs during playback, the heads remain engaged with great force. Is the battery polarity correct? CD-ES777 Possible cause Is the unit placed near the TV or computer? Clearing all the memory by mode. 2 While pressing down the button and the button...
Cannot erase completely. Possible cause Is the erase-prevention tab removed? Are the capstans, pinch rollers, or heads dirty? Does the remote control sensor receive strong light? If such a problem occurs, do the following: 1 Set the unit to the stand-by mode and turn the power on ... any slack? Cannot hear treble. If a power failure occurs during playback, the heads remain engaged with great force. Is the battery polarity correct? CD-ES777 Possible cause Is the unit placed near the TV or computer? Clearing all the memory by mode. 2 While pressing down the button and the button...
CD-ES777 Operation Manual
Page 34
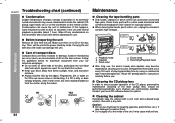
... order to an accumulation of the disc, particularly the non-label side from your local CD software dealer for cleaning (gasoline, paint thinner, etc.). It may cause malfunctions. CD-ES777 Troubleshooting chart (continued) Condensation Sudden temperature changes, storage or operation in an extremely humid... Do not use chemicals for options. Wipe off any condensation on either side of dirt on the remote control. Condensation can occur due to ensure proper operation of the CD player, preventative maintenance (cleaning of the unit. Do not write on the transmitter with a dry cloth...
... order to an accumulation of the disc, particularly the non-label side from your local CD software dealer for cleaning (gasoline, paint thinner, etc.). It may cause malfunctions. CD-ES777 Troubleshooting chart (continued) Condensation Sudden temperature changes, storage or operation in an extremely humid... Do not use chemicals for options. Wipe off any condensation on either side of dirt on the remote control. Condensation can occur due to ensure proper operation of the CD player, preventative maintenance (cleaning of the unit. Do not write on the transmitter with a dry cloth...


