
CD-ES777 Operation Manual
Page 2
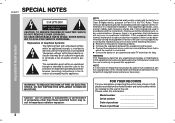
..., is intended to alert the user to the presence of uninsulated "dangerous voltage" within an equilateral triangle is the intent of Sharp that any unauthorized changes or modifications to the presence of loss or theft, please record below the model number and serial number which are designed to radio communications. Important Instruction SPECIAL NOTES CD-ES777 CAUTION: TO REDUCE THE...
..., is intended to alert the user to the presence of uninsulated "dangerous voltage" within an equilateral triangle is the intent of Sharp that any unauthorized changes or modifications to the presence of loss or theft, please record below the model number and serial number which are designed to radio communications. Important Instruction SPECIAL NOTES CD-ES777 CAUTION: TO REDUCE THE...
CD-ES777 Operation Manual
Page 3
...-current line plug (a plug having a third (grounding) pin. Do not use instructions should never be retained for replacement or resetting of power supply to . 4 Follow Instructions - Use only with a cart, stand, tripod, bracket, or table recommended by the manufacturer that they may be adhered to your home, consult your obsolete outlet. The openings should be sure the service technician has used a replacement plug specified...
...-current line plug (a plug having a third (grounding) pin. Do not use instructions should never be retained for replacement or resetting of power supply to . 4 Follow Instructions - Use only with a cart, stand, tripod, bracket, or table recommended by the manufacturer that they may be adhered to your home, consult your obsolete outlet. The openings should be sure the service technician has used a replacement plug specified...
CD-ES777 Operation Manual
Page 4
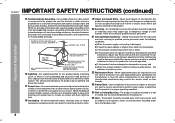
... Ceiling Mounting - When installing an outside antenna or cable system is connected to the product, be mounted to service this product during a lightning storm, or when it from heat sources such as this can fall into such power lines or circuits. Do not attempt to a wall or ceiling only as the original part. Adjust only those controls that could result...
... Ceiling Mounting - When installing an outside antenna or cable system is connected to the product, be mounted to service this product during a lightning storm, or when it from heat sources such as this can fall into such power lines or circuits. Do not attempt to a wall or ceiling only as the original part. Adjust only those controls that could result...

CD-ES777 Operation Manual
Page 5
... tape (TAPE 1 or TAPE 2 23 - 24 Tape Recording Recording on page 12. ENERGY STAR® is a U.S. Contents Page General Information Precautions 6 Controls and indicators 7 - 9 CD-ES777 Preparation for Use System connections 10 - 12 Remote control 13 Basic Operation General control 14 Setting the clock (Remote Control only 15 Important Instruction CD Playback Listening to a CD (CDs 16 - 17 Advanced CD playback 18 - 20 Radio Listening to the radio 21 - 22 Tape Playback Listening to protect...
... tape (TAPE 1 or TAPE 2 23 - 24 Tape Recording Recording on page 12. ENERGY STAR® is a U.S. Contents Page General Information Precautions 6 Controls and indicators 7 - 9 CD-ES777 Preparation for Use System connections 10 - 12 Remote control 13 Basic Operation General control 14 Setting the clock (Remote Control only 15 Important Instruction CD Playback Listening to a CD (CDs 16 - 17 Advanced CD playback 18 - 20 Radio Listening to the radio 21 - 22 Tape Playback Listening to protect...
CD-ES777 Operation Manual
Page 6
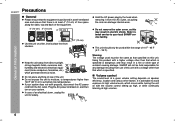
Plug the AC power cord back in, and then turn on speaker efficiency, location and various other factors. Do not remove the outer cover, as this unit. SHARP will not be the same as pulling the cord can damage internal wires. In case of the unit. Refer internal service to your...not work properly, disconnect the AC power cord from the AC outlet, as that specified on with a voltage other than 140˚F (60˚C) or to high volume levels, which generate electrical noise. This unit should only be used must be held responsible for safety. Precautions CD-ES777 General ...
Plug the AC power cord back in, and then turn on speaker efficiency, location and various other factors. Do not remove the outer cover, as this unit. SHARP will not be the same as pulling the cord can damage internal wires. In case of the unit. Refer internal service to your...not work properly, disconnect the AC power cord from the AC outlet, as that specified on with a voltage other than 140˚F (60˚C) or to high volume levels, which generate electrical noise. This unit should only be used must be held responsible for safety. Precautions CD-ES777 General ...
CD-ES777 Operation Manual
Page 7
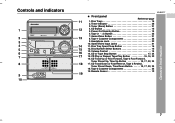
.... Disc Trays 16 2. Power On/Stand-by Button 14 6. Headphone Jack 32 10. Tape 1 Cassette Compartment 23 9. CD or Tape Stop Button 17, 24 15. CD Track Down or Fast Reverse, Tape 2 Rewind, Tuner Preset Down, Time Down Button . . . . . 15, 17, 22, 24 18. Timer Indicator 28 3. Controls and indicators CD-ES777 Front panel Reference page 1. Game/Video Button 31 8. Disc Tray Open/Close Button 16 12. Disc Number Select Buttons 16 13. CD Play or Repeat, Tape Play Button 16...
.... Disc Trays 16 2. Power On/Stand-by Button 14 6. Headphone Jack 32 10. Tape 1 Cassette Compartment 23 9. CD or Tape Stop Button 17, 24 15. CD Track Down or Fast Reverse, Tape 2 Rewind, Tuner Preset Down, Time Down Button . . . . . 15, 17, 22, 24 18. Timer Indicator 28 3. Controls and indicators CD-ES777 Front panel Reference page 1. Game/Video Button 31 8. Disc Tray Open/Close Button 16 12. Disc Number Select Buttons 16 13. CD Play or Repeat, Tape Play Button 16...
CD-ES777 Operation Manual
Page 8
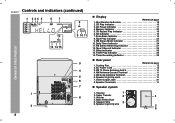
... 7. Tape Play Indicator 23 9. Daily Timer Indicator 28 11. AM Antenna Ground Terminal 11 5. Video Output Jack 31 8. Speaker Light-Up wire 5 6 Memory Indicator 20 5. AC Power Cord 12 3. Tweeter 1 2. Super Tweeter 3. Timer Recording Indicator 28 Rear panel Reference page 1. FM 75 Ohms Antenna Jack b 11 4. Speaker Light-Up Jack 11 7. Bass Reflex Duct 5. CD Pause Indicator 17 4. FM Stereo Receiving Indicator 21 12. Sleep Indicator 30 14. AM Loop Antenna Terminal 11 6. CD-ES777 Controls and...
... 7. Tape Play Indicator 23 9. Daily Timer Indicator 28 11. AM Antenna Ground Terminal 11 5. Video Output Jack 31 8. Speaker Light-Up wire 5 6 Memory Indicator 20 5. AC Power Cord 12 3. Tweeter 1 2. Super Tweeter 3. Timer Recording Indicator 28 Rear panel Reference page 1. FM 75 Ohms Antenna Jack b 11 4. Speaker Light-Up Jack 11 7. Bass Reflex Duct 5. CD Pause Indicator 17 4. FM Stereo Receiving Indicator 21 12. Sleep Indicator 30 14. AM Loop Antenna Terminal 11 6. CD-ES777 Controls and...
CD-ES777 Operation Manual
Page 9
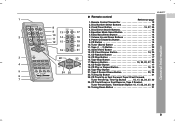
... Buttons 14 19 8. Tape Stop Button 23 17. Tape Play Button 23 5 24 25 21. Tuning Up Button 21 23. Disc Direct Search Buttons 18 17 5. CD Stop Button 17 16. CD-ES777 General Information Remote control 1 Reference page 1. Disc Number Select Buttons 16 8 9 13 3. Equalizer Mode Select Button 14 10 6. Power On/Stand-by Button 14 9. Tape (1 2) Button 23 16 21 12. CD Pause Button 17 19. CD Play or Repeat Button 16, 19 20. CD Track Up or Fast Forward, Tape 2 Fast Forward, 7 Tuner Preset Up, Time...
... Buttons 14 19 8. Tape Stop Button 23 17. Tape Play Button 23 5 24 25 21. Tuning Up Button 21 23. Disc Direct Search Buttons 18 17 5. CD Stop Button 17 16. CD-ES777 General Information Remote control 1 Reference page 1. Disc Number Select Buttons 16 8 9 13 3. Equalizer Mode Select Button 14 10 6. Power On/Stand-by Button 14 9. Tape (1 2) Button 23 16 21 12. CD Pause Button 17 19. CD Play or Repeat Button 16, 19 20. CD Track Up or Fast Forward, Tape 2 Fast Forward, 7 Tuner Preset Up, Time...

CD-ES777 Operation Manual
Page 11
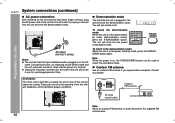
... left speaker light-up feature, press the CLEAR/DIMMER button on the remote control for better reception. Do not stand or sit on the right side when you face the unit. SPEAKERS LIGHT-UP RIGHT LEFT Preparation for Use Antenna connection Supplied FM antenna: Connect the FM antenna wire to be placed in the direction where the strongest signal can damage the unit. Red AC INPUT Black Caution: Use speakers...
... left speaker light-up feature, press the CLEAR/DIMMER button on the remote control for better reception. Do not stand or sit on the right side when you face the unit. SPEAKERS LIGHT-UP RIGHT LEFT Preparation for Use Antenna connection Supplied FM antenna: Connect the FM antenna wire to be placed in the direction where the strongest signal can damage the unit. Red AC INPUT Black Caution: Use speakers...
CD-ES777 Operation Manual
Page 12
... rear of time. If you require better reception. AC INPUT AC outlet (AC 120 V, 60 Hz) Notes: The unit will start the tape initialization when plugged in to select the extra bass mode. Unplug the AC power cord from the AC outlet if the unit will not be turned on , the X-BASS/DEMO button can be used , disconnect the supplied FM antenna wire. To cancel the demonstration mode...
... rear of time. If you require better reception. AC INPUT AC outlet (AC 120 V, 60 Hz) Notes: The unit will start the tape initialization when plugged in to select the extra bass mode. Unplug the AC power cord from the AC outlet if the unit will not be turned on , the X-BASS/DEMO button can be used , disconnect the supplied FM antenna wire. To cancel the demonstration mode...
CD-ES777 Operation Manual
Page 14
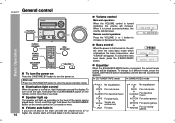
... volume set level. 14 Volume control Main unit operation: When the VOLUME control is first turned on the remote control for 2 seconds or more than 2 seconds. Volume auto fade-in to the last set to 27 or higher, the volume starts at 16 and fades in If you turn off and on , light illuminates around the display. To cancel the extra bass mode, press the X-BASS/DEMO button. In CD/TUNER/TAPE mode In GAME/VIDEO mode FLAT No equalization...
... volume set level. 14 Volume control Main unit operation: When the VOLUME control is first turned on the remote control for 2 seconds or more than 2 seconds. Volume auto fade-in to the last set to 27 or higher, the volume starts at 16 and fades in If you turn off and on , light illuminates around the display. To cancel the extra bass mode, press the X-BASS/DEMO button. In CD/TUNER/TAPE mode In GAME/VIDEO mode FLAT No equalization...
CD-ES777 Operation Manual
Page 15
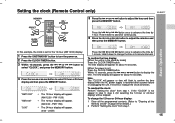
Hold it down to change the 12-hour or 24-hour display: 1 Clear all the programmed contents. [Refer to "Clearing all the memory (reset)" on page 33 for the 12-hour (AM 12:00) display. 1 Press the ON/STAND-BY button to turn the power on ] Press the CLOCK/TIMER button. The time display will appear for selecting the 12-hour or 24...
Hold it down to change the 12-hour or 24-hour display: 1 Clear all the programmed contents. [Refer to "Clearing all the memory (reset)" on page 33 for the 12-hour (AM 12:00) display. 1 Press the ON/STAND-BY button to turn the power on ] Press the CLOCK/TIMER button. The time display will appear for selecting the 12-hour or 24...
CD-ES777 Operation Manual
Page 22
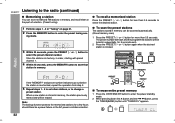
... will be erased. Radio CD-ES777 Listening to the radio (continued) Memorizing a station You can be scanned automatically. (Preset memory scan) 1 Press the PRESET ( or ) button for a few hours should there be a power failure or the AC power cord disconnection. The preset number will flash and the programmed stations will be tuned in memory. ing mode. 3 Within 30 seconds, press the PRESET ( or ) button to store that station in sequentially, for...
... will be erased. Radio CD-ES777 Listening to the radio (continued) Memorizing a station You can be scanned automatically. (Preset memory scan) 1 Press the PRESET ( or ) button for a few hours should there be a power failure or the AC power cord disconnection. The preset number will flash and the programmed stations will be tuned in memory. ing mode. 3 Within 30 seconds, press the PRESET ( or ) button to store that station in sequentially, for...
CD-ES777 Operation Manual
Page 27
...-BY button to turn the power on and plays the desired source (CD, tuner, tape) at the preset time. Set the unit to record a program on and starts recording from the tuner at a preset time. Timer recording: The unit turns on a radio station. Advanced Features Once timer: Once timer play and daily timer recording works at least 1 minute between operations. Daily timer: Daily timer play and once timer recording works for one time only...
...-BY button to turn the power on and plays the desired source (CD, tuner, tape) at the preset time. Set the unit to record a program on and starts recording from the tuner at a preset time. Timer recording: The unit turns on a radio station. Advanced Features Once timer: Once timer play and daily timer recording works at least 1 minute between operations. Daily timer: Daily timer play and once timer recording works for one time only...

CD-ES777 Operation Manual
Page 28
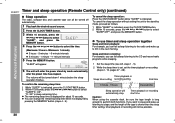
... power stand- button, and then To select the timer playback source: CD, TUNER, TAPE 1 or TAPE 2. When you select the tuner, select a station by mode. The "TIMER" indicator lights up too high. 11 Press the ON/STAND-BY button to finish as in steps 6 and 7 above. 28 To select the timer recording source: TUNER. If a station has not been programmed, " NO P.SET" will be displayed and timer setting will be canceled. 10 Adjust the volume using...
... power stand- button, and then To select the timer playback source: CD, TUNER, TAPE 1 or TAPE 2. When you select the tuner, select a station by mode. The "TIMER" indicator lights up too high. 11 Press the ON/STAND-BY button to finish as in steps 6 and 7 above. 28 To select the timer recording source: TUNER. If a station has not been programmed, " NO P.SET" will be displayed and timer setting will be canceled. 10 Adjust the volume using...
CD-ES777 Operation Manual
Page 29
... mode after displaying the settings in step 9. The unit returns to select "ONCE CAL" or "DAILY CAL", and press the MEMORY button. 12 When the preset time is reached, the system will enter the power stand-by mode automatically. Cancel the daily timer when it is canceled. This unit will turn on or enter the power stand-by mode automatically, however, the connected...
... mode after displaying the settings in step 9. The unit returns to select "ONCE CAL" or "DAILY CAL", and press the MEMORY button. 12 When the preset time is reached, the system will enter the power stand-by mode automatically. Cancel the daily timer when it is canceled. This unit will turn on or enter the power stand-by mode automatically, however, the connected...
CD-ES777 Operation Manual
Page 30
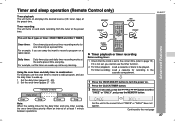
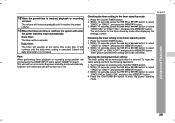
... stop. To use timer and sleep operation together Sleep and timer playback: For example, you want to sleep and wake up to the stand-by mode automatically after the preset time has elapsed. If you can fall asleep listening to select "SLEEP X : XX". CD-ES777 Timer and sleep operation (Remote Control only) (continued) Advanced Features Sleep operation The radio, compact disc and cassette tape can all...
... stop. To use timer and sleep operation together Sleep and timer playback: For example, you want to sleep and wake up to the stand-by mode automatically after the preset time has elapsed. If you can fall asleep listening to select "SLEEP X : XX". CD-ES777 Timer and sleep operation (Remote Control only) (continued) Advanced Features Sleep operation The radio, compact disc and cassette tape can all...
CD-ES777 Operation Manual
Page 32
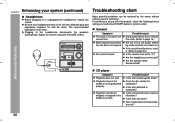
... near excessive vibrations? Advanced Features CD player Symptom Playback does not start. When a button is heard. CD-ES777 Enhancing your authorized SHARP dealer or service center. Possible cause Is the disc loaded upside down? Is the disc very dirty? Are the speaker wires disconnected? No sound is pressed, the unit does not respond. Adjust the volume using the VOLUME control. Troubleshooting chart Many potential problems can be resolved by the...
... near excessive vibrations? Advanced Features CD player Symptom Playback does not start. When a button is heard. CD-ES777 Enhancing your authorized SHARP dealer or service center. Possible cause Is the disc loaded upside down? Is the disc very dirty? Are the speaker wires disconnected? No sound is pressed, the unit does not respond. Adjust the volume using the VOLUME control. Troubleshooting chart Many potential problems can be resolved by the...
CD-ES777 Operation Manual
Page 33
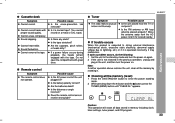
... button to lightning, etc.) or if it 's located nearby. Cannot erase completely. Does the remote control sensor receive strong light? Cassette deck Symptom Cannot record. If such a problem occurs, do the following: 1 Set the unit to the stand-by resetting it may malfunction. Cannot remove the tape. Is the distance or angle incorrect? Clearing all the memory by mode and turn the power...
... button to lightning, etc.) or if it 's located nearby. Cannot erase completely. Does the remote control sensor receive strong light? Cassette deck Symptom Cannot record. If such a problem occurs, do the following: 1 Set the unit to the stand-by resetting it may malfunction. Cannot remove the tape. Is the distance or angle incorrect? Clearing all the memory by mode and turn the power...
CD-ES777 Operation Manual
Page 35
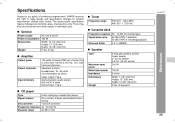
... distortion Speakers: 6 ohms Headphones: 16 - 50 ohms (recommended: 32 ohms) Video output: 1Vp-p Game/Auxiliary (audio signal): 500 mV/47 k ohms Game/Video: 1Vp-p CD player Type 5-disc multi-play compact disc player Signal readout Non-contact, 3-beam semiconductor laser pickup D/A converter 1-bit D/A converter Frequency response 20 - 20,000 Hz Dynamic range 90 dB (1 kHz) Tuner Frequency range FM: 87.5 - 108.0 MHz AM: 530 - 1,720 kHz Cassette deck Frequency response 50 - 14,000 Hz (normal tape) Signal/noise...
... distortion Speakers: 6 ohms Headphones: 16 - 50 ohms (recommended: 32 ohms) Video output: 1Vp-p Game/Auxiliary (audio signal): 500 mV/47 k ohms Game/Video: 1Vp-p CD player Type 5-disc multi-play compact disc player Signal readout Non-contact, 3-beam semiconductor laser pickup D/A converter 1-bit D/A converter Frequency response 20 - 20,000 Hz Dynamic range 90 dB (1 kHz) Tuner Frequency range FM: 87.5 - 108.0 MHz AM: 530 - 1,720 kHz Cassette deck Frequency response 50 - 14,000 Hz (normal tape) Signal/noise...


