
CD-ES777 Operation Manual
Page 1
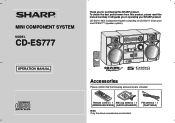
MINI COMPONENT SYSTEM MODEL CD-ES777 Thank you in operating your SHARP product. Remote control 1 AM loop antenna 1 (RRMCGA087AWSA) (QANTL0010AWZZ) Note: Only the above accessories are included. CD-ES777 Mini Component System consisting of CD-ES777 (main unit) and CP-ES777 (speaker system). It will guide you for purchasing this manual carefully. FM antenna 1 (FANT1535A) OPERATION MANUAL Accessories Please confirm that the following accessories are included. To obtain the best performance from this product, please read this SHARP product.
MINI COMPONENT SYSTEM MODEL CD-ES777 Thank you in operating your SHARP product. Remote control 1 AM loop antenna 1 (RRMCGA087AWSA) (QANTL0010AWZZ) Note: Only the above accessories are included. CD-ES777 Mini Component System consisting of CD-ES777 (main unit) and CP-ES777 (speaker system). It will guide you for purchasing this manual carefully. FM antenna 1 (FANT1535A) OPERATION MANUAL Accessories Please confirm that the following accessories are included. To obtain the best performance from this product, please read this SHARP product.

CD-ES777 Operation Manual
Page 5
...Precautions 6 Controls and indicators 7 - 9 CD-ES777 Preparation for Use System connections 10 - 12 Remote control 13 Basic Operation General control 14 Setting the clock (Remote Control only 15 Important Instruction CD Playback Listening to a CD (CDs 16 - 17 Advanced CD playback 18 - 20 Radio Listening to the... cancel the demonstration mode, as described on a cassette tape 24 - 26 Advanced Features Timer and sleep operation (Remote Control only 27 - 30 Enhancing your system 31 - 32 References Troubleshooting chart 32 - 34 Maintenance 34 Specifications 35 CONSUMER LIMITED...
...Precautions 6 Controls and indicators 7 - 9 CD-ES777 Preparation for Use System connections 10 - 12 Remote control 13 Basic Operation General control 14 Setting the clock (Remote Control only 15 Important Instruction CD Playback Listening to a CD (CDs 16 - 17 Advanced CD playback 18 - 20 Radio Listening to the... cancel the demonstration mode, as described on a cassette tape 24 - 26 Advanced Features Timer and sleep operation (Remote Control only 27 - 30 Enhancing your system 31 - 32 References Troubleshooting chart 32 - 34 Maintenance 34 Specifications 35 CONSUMER LIMITED...
CD-ES777 Operation Manual
Page 7
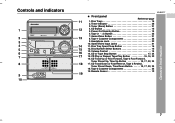
Power On/Stand-by Button 14 6. Headphone Jack 32 10. Volume Control 14 14. CD or Tape Stop Button 17, 24 15. CD Play or Repeat, Tape Play Button 16, 19, 23 16. CD Track Up or Fast Forward, Tape 2 Fast Forward, Tuner Preset Up, Time Up Button 15, ...Down, Time Down Button . . . . . 15, 17, 22, 24 18. Remote Sensor 13 General Information 7 Tuner (Band) Button 21 4. Disc Tray Open/Close Button 16 12. Timer Indicator 28 3. Disc Trays 16 2. CD Button 16 5. Controls and indicators CD-ES777 Front panel Reference page 1. Tape (1 2) Button 23 7. Game/Video Button 31 8....
Power On/Stand-by Button 14 6. Headphone Jack 32 10. Volume Control 14 14. CD or Tape Stop Button 17, 24 15. CD Play or Repeat, Tape Play Button 16, 19, 23 16. CD Track Up or Fast Forward, Tape 2 Fast Forward, Tuner Preset Up, Time Up Button 15, ...Down, Time Down Button . . . . . 15, 17, 22, 24 18. Remote Sensor 13 General Information 7 Tuner (Band) Button 21 4. Disc Tray Open/Close Button 16 12. Timer Indicator 28 3. Disc Trays 16 2. CD Button 16 5. Controls and indicators CD-ES777 Front panel Reference page 1. Tape (1 2) Button 23 7. Game/Video Button 31 8....
CD-ES777 Operation Manual
Page 9
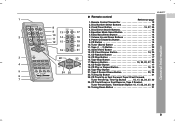
... Pause Button 25, 26 6 22. CD Track Down or Fast Reverse, Tape 2 Rewind, Tuner Preset Down, Time Down Button 15, 17, 22, 24, 27, 30 25. Game/Video Button 31 13. Tuning Down Button 21 9 Memory Button 15, 20, 22, 27, 30 4 18. CD-ES777 General Information Remote control 1 Reference page 1. Disc Number... Select Buttons 16 8 9 13 3. CD Random Button 19 3 22 23 15.
... Pause Button 25, 26 6 22. CD Track Down or Fast Reverse, Tape 2 Rewind, Tuner Preset Down, Time Down Button 15, 17, 22, 24, 27, 30 25. Game/Video Button 31 13. Tuning Down Button 21 9 Memory Button 15, 20, 22, 27, 30 4 18. CD-ES777 General Information Remote control 1 Reference page 1. Disc Number... Select Buttons 16 8 9 13 3. CD Random Button 19 3 22 23 15.

CD-ES777 Operation Manual
Page 11
... when you face the unit. Incorrect Speaker Light-Up Connection Connect the speaker light-up feature, press the CLEAR/DIMMER button on the remote control for 2 seconds or more , as lower impedance speakers can be injured. FM antenna AM loop antenna Supplied AM loop antenna: ...Caution: Use speakers with screws (not supplied). Installing the AM loop antenna: < Assembling > < Attaching to the wall > Wall Screws (not supplied) CD-ES777 Speaker connection Connect the black wire to the minus (-) terminal, and the red wire to the AM and GND terminals. LEFT SPEAKER RIGHT SPEAKER AC...
... when you face the unit. Incorrect Speaker Light-Up Connection Connect the speaker light-up feature, press the CLEAR/DIMMER button on the remote control for 2 seconds or more , as lower impedance speakers can be injured. FM antenna AM loop antenna Supplied AM loop antenna: ...Caution: Use speakers with screws (not supplied). Installing the AM loop antenna: < Assembling > < Attaching to the wall > Wall Screws (not supplied) CD-ES777 Speaker connection Connect the black wire to the minus (-) terminal, and the red wire to the AM and GND terminals. LEFT SPEAKER RIGHT SPEAKER AC...
CD-ES777 Operation Manual
Page 13
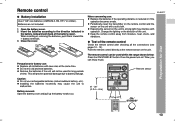
... a soft cloth. Test of time. The remote control can enjoy music. CD-ES777 Notes concerning use rechargeable batteries (nickel-cadmium battery, etc.). Point the remote control directly at the same time. Periodically clean the transmitter on the remote control and the sensor on the unit to ... up the battery to malfunction. Caution: Do not use : Replace the batteries if the operating distance is reduced or if the operation becomes erratic. Remote sensor 8" - 20" (0.2 m - 6 m) Preparation for battery use: Replace all the connections (see pages 10 - 12). Remove the batteries...
... a soft cloth. Test of time. The remote control can enjoy music. CD-ES777 Notes concerning use rechargeable batteries (nickel-cadmium battery, etc.). Point the remote control directly at the same time. Periodically clean the transmitter on the remote control and the sensor on the unit to ... up the battery to malfunction. Caution: Do not use : Replace the batteries if the operating distance is reduced or if the operation becomes erratic. Remote sensor 8" - 20" (0.2 m - 6 m) Preparation for battery use: Replace all the connections (see pages 10 - 12). Remove the batteries...
CD-ES777 Operation Manual
Page 14
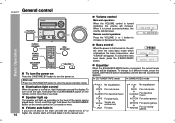
... When the power is turned on , the unit will enter the extra bass mode which emphasizes the bass frequencies, and "X-BASS" will appear. Remote control operation: Press the VOLUME (+ or -) button to increase or decrease the volume. 0 ..... 30 MAXIMUM Bass control When the power is turned... enchanced. Equalizer When the EQUALIZER MODE button is turned counterclockwise, the volume will increase. CLASSIC For classical music. Basic Operation General control CD-ES777 To turn the power on Press the ON/STAND-BY button to turn the power on the main unit with the volume set level...
... When the power is turned on , the unit will enter the extra bass mode which emphasizes the bass frequencies, and "X-BASS" will appear. Remote control operation: Press the VOLUME (+ or -) button to increase or decrease the volume. 0 ..... 30 MAXIMUM Bass control When the power is turned... enchanced. Equalizer When the EQUALIZER MODE button is turned counterclockwise, the volume will increase. CLASSIC For classical music. Basic Operation General control CD-ES777 To turn the power on Press the ON/STAND-BY button to turn the power on the main unit with the volume set level...
CD-ES777 Operation Manual
Page 15
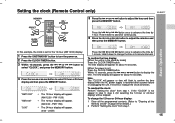
... 12-hour or 24-hour display: 1 Clear all the programmed contents. [Refer to adjust the minutes and then press the MEMORY button. Setting the clock (Remote Control only) CD-ES777 5 Press the or button to display the time.
... 12-hour or 24-hour display: 1 Clear all the programmed contents. [Refer to adjust the minutes and then press the MEMORY button. Setting the clock (Remote Control only) CD-ES777 5 Press the or button to display the time.
CD-ES777 Operation Manual
Page 17
Playback will enter the playback mode. 17 To remove the CDs: In the stop mode. It may cause malfunctions. CD-ES777 Stop Press in the playback mode. Release the button to enter the power stand-by mode and then turn the power on and playback of ... activated. If TV or radio interference occurs during fast forward, "END" will appear on . Various CD functions Function Play Main unit Remote control Operation Press in one of the following buttons, the unit turns on the display and CD operation will be paused. If you press any of the 1 - 5 buttons for 3 seconds and...
Playback will enter the playback mode. 17 To remove the CDs: In the stop mode. It may cause malfunctions. CD-ES777 Stop Press in the playback mode. Release the button to enter the power stand-by mode and then turn the power on and playback of ... activated. If TV or radio interference occurs during fast forward, "END" will appear on . Various CD functions Function Play Main unit Remote control Operation Press in one of the following buttons, the unit turns on the display and CD operation will be paused. If you press any of the 1 - 5 buttons for 3 seconds and...
CD-ES777 Operation Manual
Page 18
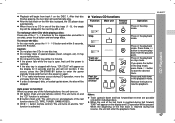
...be played. The direct search buttons allow you to select up to choose 13 1 Press the "+10" button once. 2 Press the "3" button. A. CD Playback Playback will not start the desired track on the current disc. B. During random play a disc by specifying the disc number. 1 Press one of... last track on the main unit. To stop playback: Press the (CD ) button. Advanced CD playback CD-ES777 To specify a disc to play You can be selected. Direct track search By using the direct search buttons, the desired tracks on the remote control to choose 30 1 Press the "+10" button three times....
...be played. The direct search buttons allow you to select up to choose 13 1 Press the "+10" button once. 2 Press the "3" button. A. CD Playback Playback will not start the desired track on the current disc. B. During random play a disc by specifying the disc number. 1 Press one of... last track on the main unit. To stop playback: Press the (CD ) button. Advanced CD playback CD-ES777 To specify a disc to play You can be selected. Direct track search By using the direct search buttons, the desired tracks on the remote control to choose 30 1 Press the "+10" button three times....
CD-ES777 Operation Manual
Page 19
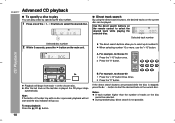
... selected next by the random operation. CD Playback To cancel repeat play , be sure to press the (CD ) button. In random play, the CD player will select and play tracks automatically. (You cannot select the order of the track being played will go out. CD-ES777 To repeat desired tracks: Perform steps ...1 - 6 in random order automatically. On the other hand, the button does not allow you can play all 5 discs, all tracks on the remote control. Repeat play Repeat play can move to ...
... selected next by the random operation. CD Playback To cancel repeat play , be sure to press the (CD ) button. In random play, the CD player will select and play tracks automatically. (You cannot select the order of the track being played will go out. CD-ES777 To repeat desired tracks: Perform steps ...1 - 6 in random order automatically. On the other hand, the button does not allow you can play all 5 discs, all tracks on the remote control. Repeat play Repeat play can move to ...
CD-ES777 Operation Manual
Page 20
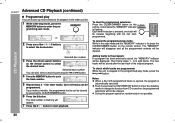
... will be cleared. Even if you press the ON/STAND-BY button to enter the stand-by mode or change the function from CD to add tracks. CD Playback CD-ES777 Advanced CD Playback (continued) Programmed play You can choose up to 32 selections for playback in the order you like. 1 While in the ... programmed tracks is ejected, the program is stopped in the stop mode and the "MEMORY" indicator is lit, press the CLEAR/DIMMER button on the remote control while the "MEMORY" indicator is flashing. During the program operation, random play mode, press the or button. Each time the button is not ...
... will be cleared. Even if you press the ON/STAND-BY button to enter the stand-by mode or change the function from CD to add tracks. CD Playback CD-ES777 Advanced CD Playback (continued) Programmed play You can choose up to 32 selections for playback in the order you like. 1 While in the ... programmed tracks is ejected, the program is stopped in the stop mode and the "MEMORY" indicator is lit, press the CLEAR/DIMMER button on the remote control while the "MEMORY" indicator is flashing. During the program operation, random play mode, press the or button. Each time the button is not ...
CD-ES777 Operation Manual
Page 21
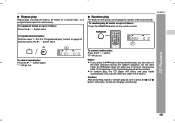
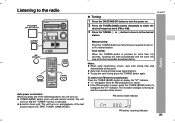
... the sound becomes clearer. Auto power on function: When you press any of the last function starts (CD, TAPE, TUNER, GAME/VIDEO). " " will skip weak signal stations. CD-ES777 Radio Manual tuning: Press the TUNING button as many times as required to tune in to the desired ...station. To stop automatically at the first receivable broadcast station. If the FM reception is activated. TUNER (BAND) button (main unit and remote control): The unit ...
... the sound becomes clearer. Auto power on function: When you press any of the last function starts (CD, TAPE, TUNER, GAME/VIDEO). " " will skip weak signal stations. CD-ES777 Radio Manual tuning: Press the TUNING button as many times as required to tune in to the desired ...station. To stop automatically at the first receivable broadcast station. If the FM reception is activated. TUNER (BAND) button (main unit and remote control): The unit ...

CD-ES777 Operation Manual
Page 23
... not recommended.) Do not use C-120 tapes or poor-quality tapes, as they may cause malfunctions. CD-ES777 4 Press the TAPE (1 2) button to select the cassette you press any of the last function starts (CD, TAPE, TUNER, GAME/VIDEO). button (main unit): The unit turns on . 2 Open the cassette... com- Tape play indicator Auto power on function: When you want to listen to start playback. TAPE button (remote control): The unit turns on . Tape ...
... not recommended.) Do not use C-120 tapes or poor-quality tapes, as they may cause malfunctions. CD-ES777 4 Press the TAPE (1 2) button to select the cassette you press any of the last function starts (CD, TAPE, TUNER, GAME/VIDEO). button (main unit): The unit turns on . 2 Open the cassette... com- Tape play indicator Auto power on function: When you want to listen to start playback. TAPE button (remote control): The unit turns on . Tape ...

CD-ES777 Operation Manual
Page 24
... loss of this case, wait until the power is not liable for side A 24 CD-ES777 Listening to a cassette tape (TAPE 1 or TAPE 2) (continued) Various tape functions Function Play Main unit Remote control Operation Press in the stop mode. Cassettes have removable tabs that the eraseprevention tabs ...the tape head will not open the compartment. Cover the tab hole with adhesive tape to record on the recorded signal (Variable Sound Monitor). SHARP is restored. Stop Fast forward/ Rewind (TAPE 2 only) Press in the playback or stop mode. Press in the playback, fast forward or...
... loss of this case, wait until the power is not liable for side A 24 CD-ES777 Listening to a cassette tape (TAPE 1 or TAPE 2) (continued) Various tape functions Function Play Main unit Remote control Operation Press in the stop mode. Cassettes have removable tabs that the eraseprevention tabs ...the tape head will not open the compartment. Cover the tab hole with adhesive tape to record on the recorded signal (Variable Sound Monitor). SHARP is restored. Stop Fast forward/ Rewind (TAPE 2 only) Press in the playback or stop mode. Press in the playback, fast forward or...
CD-ES777 Operation Manual
Page 27
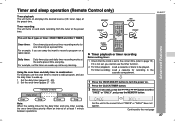
...or "DAILY", and press the MEMORY button. Timer recording: The unit turns on and starts recording from the tuner at the same preset time everyday. CD-ES777 This unit has 2 types of at the preset time. Allow an interval of timer: ONCE TIMER and DAILY TIMER. Start Stop Start Stop Note: ...When the setting times for one time only at a preset time. Timer and sleep operation (Remote Control only) Timer playback: The unit turns on and plays the desired source (CD, tuner, tape) at least 1 minute between operations. Using the once timer and daily timer in the cassette ...
...or "DAILY", and press the MEMORY button. Timer recording: The unit turns on and starts recording from the tuner at the same preset time everyday. CD-ES777 This unit has 2 types of at the preset time. Allow an interval of timer: ONCE TIMER and DAILY TIMER. Start Stop Start Stop Note: ...When the setting times for one time only at a preset time. Timer and sleep operation (Remote Control only) Timer playback: The unit turns on and plays the desired source (CD, tuner, tape) at least 1 minute between operations. Using the once timer and daily timer in the cassette ...

CD-ES777 Operation Manual
Page 28
... press the MEMORY button. 8 Set the time to enter the power stand- by pressing the or button, and then press the MEMORY button. CD-ES777 Timer and sleep operation (Remote Control only) (continued) 4 Within 10 seconds, press the or button to select "ONCE SET" or "DAILY SET", and press the MEMORY button. 5 Press... timer setting. 6 Press the or button to select "PLAY" or "REC", and press the MEMORY button. button, and then To select the timer playback source: CD, TUNER, TAPE 1 or TAPE 2. Do not turn the volume up and the unit is ready for timer playback or timer recording.
... press the MEMORY button. 8 Set the time to enter the power stand- by pressing the or button, and then press the MEMORY button. CD-ES777 Timer and sleep operation (Remote Control only) (continued) 4 Within 10 seconds, press the or button to select "ONCE SET" or "DAILY SET", and press the MEMORY button. 5 Press... timer setting. 6 Press the or button to select "PLAY" or "REC", and press the MEMORY button. button, and then To select the timer playback source: CD, TUNER, TAPE 1 or TAPE 2. Do not turn the volume up and the unit is ready for timer playback or timer recording.
CD-ES777 Operation Manual
Page 30
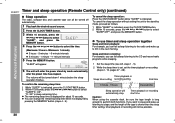
... button. Timer playback or recording start time Caution: When using the cassette deck, be sure the tape length is long enough to the CD and record radio programs while sleeping. 1 Set the sleep time (see left, steps 1 - 5). 2 While the sleep timer is...is indicated. Minimum: 1 minute) 3 hours - 5 minutes 5-minute intervals 5 minutes - 1 minute 1-minute intervals 5 Press the MEMORY button. CD-ES777 Timer and sleep operation (Remote Control only) (continued) Advanced Features Sleep operation The radio, compact disc and cassette tape can all be turned off automatically. 1 Play back the...
... button. Timer playback or recording start time Caution: When using the cassette deck, be sure the tape length is long enough to the CD and record radio programs while sleeping. 1 Set the sleep time (see left, steps 1 - 5). 2 While the sleep timer is...is indicated. Minimum: 1 minute) 3 hours - 5 minutes 5-minute intervals 5 minutes - 1 minute 1-minute intervals 5 Press the MEMORY button. CD-ES777 Timer and sleep operation (Remote Control only) (continued) Advanced Features Sleep operation The radio, compact disc and cassette tape can all be turned off automatically. 1 Play back the...
CD-ES777 Operation Manual
Page 31
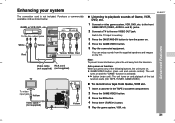
... Yellow White Red Video cable RCA cord (not supplied) (not supplied) TV To video input jack Yellow Video cable (not supplied) AC INPUT Yellow CD-ES777 Listening to the rear VIDEO OUT jack. Switch the TV input to auxiliary. 3 Press the ON/STAND-BY button to turn the power on a .... 5 Play the game system, VCR, etc. To record on . 4 Press the GAME/VIDEO button. 5 Play the connected equipment. GAME/VIDEO button (main unit and remote control): The unit turns on the TV. Purchase a commercially available cord as shown below. Auto power on . GAME or VCR, DVD, etc. button (main unit...
... Yellow White Red Video cable RCA cord (not supplied) (not supplied) TV To video input jack Yellow Video cable (not supplied) AC INPUT Yellow CD-ES777 Listening to the rear VIDEO OUT jack. Switch the TV input to auxiliary. 3 Press the ON/STAND-BY button to turn the power on a .... 5 Play the game system, VCR, etc. To record on . 4 Press the GAME/VIDEO button. 5 Play the connected equipment. GAME/VIDEO button (main unit and remote control): The unit turns on the TV. Purchase a commercially available cord as shown below. Auto power on . GAME or VCR, DVD, etc. button (main unit...
CD-ES777 Operation Manual
Page 33
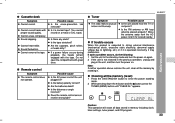
.... Is it a normal tape? (You cannot record on . Are the capstans, pinch rollers, or heads dirty? Are the batteries dead? CD-ES777 Possible cause Is the unit placed near the TV or computer? Cannot hear treble. Is the tape stretched? Possible cause Is the AC power cord... the TUNER (BAND) button until "CLEAR AL" appears. TUNER (BAND) Caution: This operation will erase all data stored in ? Remote control Symptom The remote control does not operate. Is the distance or angle incorrect? Is the battery polarity correct? Possible cause Is the erase-prevention tab removed...
.... Is it a normal tape? (You cannot record on . Are the capstans, pinch rollers, or heads dirty? Are the batteries dead? CD-ES777 Possible cause Is the unit placed near the TV or computer? Cannot hear treble. Is the tape stretched? Possible cause Is the AC power cord... the TUNER (BAND) button until "CLEAR AL" appears. TUNER (BAND) Caution: This operation will erase all data stored in ? Remote control Symptom The remote control does not operate. Is the distance or angle incorrect? Is the battery polarity correct? Possible cause Is the erase-prevention tab removed...


