
AR-M160 | AR-M205 Interactive Operation Manual
Page 2
... versions of Windows, some screen images may be different from the operation panel of the machine • Resolving printer and scanner problems • Specifications ● Where "AR-XXXX" appears in the U.S.A. CONTENTS INDEX 2 Note • Basic machine procedures (adding paper and toner, removing misfeeds, using peripheral devices) • Copier functions • Scanning from those in this manual, please substitute the name of your model, see "DIFFERENCES BETWEEN MODELS" in the Operation Manual. ● This manual refers...
... versions of Windows, some screen images may be different from the operation panel of the machine • Resolving printer and scanner problems • Specifications ● Where "AR-XXXX" appears in the U.S.A. CONTENTS INDEX 2 Note • Basic machine procedures (adding paper and toner, removing misfeeds, using peripheral devices) • Copier functions • Scanning from those in this manual, please substitute the name of your model, see "DIFFERENCES BETWEEN MODELS" in the Operation Manual. ● This manual refers...
AR-M160 | AR-M205 Interactive Operation Manual
Page 5
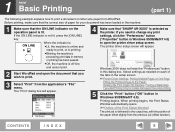
... machine is processing print data in the machine. 1 Make sure that you wish to the output tray, with the position of the Print Status Window) The print job is not lit, press the [ON LINE] key. Before printing, make sure that the correct size of the tabs in this dialog box. CONTENTS INDEX 5 Windows 2000 does not have the "Preferences" button in the setup screen. ☞Printer Driver Settings, Printing Multiple Pages on letter size paper from the application's "File" menu...
... machine is processing print data in the machine. 1 Make sure that you wish to the output tray, with the position of the Print Status Window) The print job is not lit, press the [ON LINE] key. Before printing, make sure that the correct size of the tabs in this dialog box. CONTENTS INDEX 5 Windows 2000 does not have the "Preferences" button in the setup screen. ☞Printer Driver Settings, Printing Multiple Pages on letter size paper from the application's "File" menu...
AR-M160 | AR-M205 Interactive Operation Manual
Page 6
... [CLEAR] key ( ) or the [CLEAR ALL] key ( ). ● To resume printing, press the [ON LINE] key to switch the machine online. When "Use close paper size" is disabled The PAPER SIZE indicator on the "Use Close Paper Size" setting in the user programs (see "USER PROGRAMS" in the machine, the printing procedure will vary depending on the operation panel will be sure to set to "Auto Select" in the "Paper" tab of the printer driver setup screen and the correct size of paper for USB 2.0 (Hi-Speed mode)" in the Operation Manual. (part...
... [CLEAR] key ( ) or the [CLEAR ALL] key ( ). ● To resume printing, press the [ON LINE] key to switch the machine online. When "Use close paper size" is disabled The PAPER SIZE indicator on the "Use Close Paper Size" setting in the user programs (see "USER PROGRAMS" in the machine, the printing procedure will vary depending on the operation panel will be sure to set to "Auto Select" in the "Paper" tab of the printer driver setup screen and the correct size of paper for USB 2.0 (Hi-Speed mode)" in the Operation Manual. (part...
AR-M160 | AR-M205 Interactive Operation Manual
Page 7
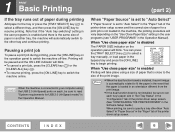
... then click "Printers and Faxes". In Windows 2000, click "Printers". 1 Click the "Start" button, select "Settings" and then click "Printers". 2 Click the "SHARP AR-XXXX" printer driver icon and select "Properties" from the "File" menu. 3 Click the "SHARP AR-XXXX" printer driver icon and select "Properties" from the Windows "start " button, and then click "Control Panel". The printer driver setup screen will appear. ☞Printer Driver Settings 3 In Windows 95/98/Me, click the "Setup" tab. The printer driver setup screen will appear. ☞Printer Driver Settings CONTENTS INDEX...
... then click "Printers and Faxes". In Windows 2000, click "Printers". 1 Click the "Start" button, select "Settings" and then click "Printers". 2 Click the "SHARP AR-XXXX" printer driver icon and select "Properties" from the "File" menu. 3 Click the "SHARP AR-XXXX" printer driver icon and select "Properties" from the Windows "start " button, and then click "Control Panel". The printer driver setup screen will appear. ☞Printer Driver Settings 3 In Windows 95/98/Me, click the "Setup" tab. The printer driver setup screen will appear. ☞Printer Driver Settings CONTENTS INDEX...
AR-M160 | AR-M205 Interactive Operation Manual
Page 14
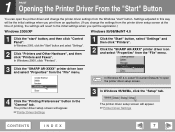
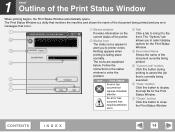
... the Print Status Window When printing begins, the Print Status Window automatically opens. below. options for the Print attention. CONTENTS INDEX 14 document currently being printed and any error messages that requires attention soon. that is a utility that monitors the machine and shows the name of the printer. Status Window. The Print Status Window is currently being 5 Icon Print Status executed. 6 An error has 6 "Help" button occurred that Click this button to printer errors. Click this button during printing to cancel the job problem. 1 PRINT...
... the Print Status Window When printing begins, the Print Status Window automatically opens. below. options for the Print attention. CONTENTS INDEX 14 document currently being printed and any error messages that requires attention soon. that is a utility that monitors the machine and shows the name of the printer. Status Window. The Print Status Window is currently being 5 Icon Print Status executed. 6 An error has 6 "Help" button occurred that Click this button to printer errors. Click this button during printing to cancel the job problem. 1 PRINT...
AR-M160 | AR-M205 Interactive Operation Manual
Page 19
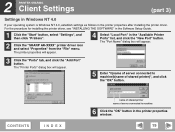
... "Add Port" button. The "Port Name" dialog box will appear. 4 Select "Local Port" in the printer properties window. 19 2 PRINTER SHARING Client Settings (part 3) Settings in Windows NT 4.0 If your operating system is Windows NT 4.0, establish settings as follows in the Software Setup Guide. 1 Click the "Start" button, select "Settings", and then click "Printers". 2 Click the "SHARP AR-XXXX" printer driver icon and select "Properties" from the "File" menu. For the procedure for installing the printer driver, see "INSTALLING THE SOFTWARE" in the printer...
... "Add Port" button. The "Port Name" dialog box will appear. 4 Select "Local Port" in the printer properties window. 19 2 PRINTER SHARING Client Settings (part 3) Settings in Windows NT 4.0 If your operating system is Windows NT 4.0, establish settings as follows in the Software Setup Guide. 1 Click the "Start" button, select "Settings", and then click "Printers". 2 Click the "SHARP AR-XXXX" printer driver icon and select "Properties" from the "File" menu. For the procedure for installing the printer driver, see "INSTALLING THE SOFTWARE" in the printer...
AR-M160 | AR-M205 Interactive Operation Manual
Page 31
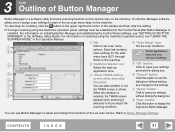
... Control Panel settings, see "USING THE SCANNER MODE" in the Operation Manual. 1 Tab 4 "Scan Setup" area 1 2 Click to set scan menu options. and exit the dialog box. 4 3 "Show TWAIN setting 6 "Cancel" button 5 screen when scanning" Checkbox Click this button to save your settings application here. CONTENTS INDEX 31 For information on the machine. 3 2 "Application Selection" area Select the start-up 5 "OK" button Click to display the scanning conditions. help file for Button Manager. The Button Manager software allows you adjust the Click this button...
... Control Panel settings, see "USING THE SCANNER MODE" in the Operation Manual. 1 Tab 4 "Scan Setup" area 1 2 Click to set scan menu options. and exit the dialog box. 4 3 "Show TWAIN setting 6 "Cancel" button 5 screen when scanning" Checkbox Click this button to save your settings application here. CONTENTS INDEX 31 For information on the machine. 3 2 "Application Selection" area Select the start-up 5 "OK" button Click to display the scanning conditions. help file for Button Manager. The Button Manager software allows you adjust the Click this button...
AR-M160 | AR-M205 Operation Manual
Page 9
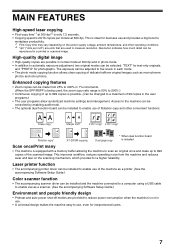
... the machine connected to a computer using a USB cable to enable use as monochrome photos and color photos. Laser printer function • The accompanying printer driver can be installed to enable use of the scanned image. The exposure can be adjusted to workplace productivity. *1 First-Copy time may vary depending on the scanning mechanism, which provides for business use of delicate halftone original images such as a scanner. (See the accompanying Software Setup Guide.) Environment and people friendly design • Preheat and auto power...
... the machine connected to a computer using a USB cable to enable use as monochrome photos and color photos. Laser printer function • The accompanying printer driver can be installed to enable use of the scanned image. The exposure can be adjusted to workplace productivity. *1 First-Copy time may vary depending on the scanning mechanism, which provides for business use of delicate halftone original images such as a scanner. (See the accompanying Software Setup Guide.) Environment and people friendly design • Preheat and auto power...

AR-M160 | AR-M205 Operation Manual
Page 11
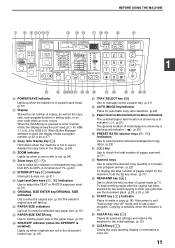
... replace the toner cartridge, pull out the toner cartridge while pushing on these levers and remove the paper. (p.66) The fusing unit is hot. BEFORE USING THE MACHINE 18 19 20 21 22 23 1 24 26 27 25 28 29 16 Parallel port Connect to your computer to use the printer function. (Software Setup Guide) 17 USB 2.0 port (when the dual function board is installed) Connect to your computer to use the printer and scanner functions. (Software Setup Guide) 18 Document feeder tray...
... replace the toner cartridge, pull out the toner cartridge while pushing on these levers and remove the paper. (p.66) The fusing unit is hot. BEFORE USING THE MACHINE 18 19 20 21 22 23 1 24 26 27 25 28 29 16 Parallel port Connect to your computer to use the printer function. (Software Setup Guide) 17 USB 2.0 port (when the dual function board is installed) Connect to your computer to use the printer and scanner functions. (Software Setup Guide) 18 Document feeder tray...
AR-M160 | AR-M205 Operation Manual
Page 13
... copy paper size. (p.16) 25 PAPER SIZE ENTER key Use to set the paper size in the paper trays. (p.16) 26 SPR/RSPF indicator (when the SPF/RSPF is installed) Lights up when the machine is set. (p.24) 20 Zoom keys ( , ) Use to select any reduction or enlargement copy ratio from 25% to 400% in use the document glass. (p.28, p.33, p.34) 34 START key ( ) /indicator Press to make user program entries. (p.22) To display the total number of pages output...
... copy paper size. (p.16) 25 PAPER SIZE ENTER key Use to set the paper size in the paper trays. (p.16) 26 SPR/RSPF indicator (when the SPF/RSPF is installed) Lights up when the machine is set. (p.24) 20 Zoom keys ( , ) Use to select any reduction or enlargement copy ratio from 25% to 400% in use the document glass. (p.28, p.33, p.34) 34 START key ( ) /indicator Press to make user program entries. (p.22) To display the total number of pages output...

AR-M160 | AR-M205 Operation Manual
Page 14
... "Default tray setting" in any mode. Note The preheat activation time and the "Auto power shut-off " mode) Note • "Auto clear" is on the operation panel can be changed in the user programs. (p.44) • The machine is made in the user programs.(p.46) 12 The POWER SAVE indicator lights up, however, the keys on . Normal operation automatically resumes when a key on the operation panel is pressed, an original is placed, a print job is received, or scanning is located on...
... "Default tray setting" in any mode. Note The preheat activation time and the "Auto power shut-off " mode) Note • "Auto clear" is on the operation panel can be changed in the user programs. (p.44) • The machine is made in the user programs.(p.46) 12 The POWER SAVE indicator lights up, however, the keys on . Normal operation automatically resumes when a key on the operation panel is pressed, an original is placed, a print job is received, or scanning is located on...

AR-M160 | AR-M205 Operation Manual
Page 35
... the paper output tray. • To cancel the Sort/Group copy job, press Note the [CLEAR] key ( ). 3 • To cancel Sort or Group mode, press the [SORT/GROUP] key repeatedly until all originals have been scanned into memory. 6 When all originals have been scanned up to that point, press the [START] key ( ). • To clear the data that can be changed in the paper output tray for easy separation. CONVENIENT COPY FUNCTIONS Using the document glass...
... the paper output tray. • To cancel the Sort/Group copy job, press Note the [CLEAR] key ( ). 3 • To cancel Sort or Group mode, press the [SORT/GROUP] key repeatedly until all originals have been scanned into memory. 6 When all originals have been scanned up to that point, press the [START] key ( ). • To clear the data that can be changed in the paper output tray for easy separation. CONVENIENT COPY FUNCTIONS Using the document glass...

AR-M160 | AR-M205 Operation Manual
Page 36
... settings, and then press the [START] key ( ). Certain combinations of original size, paper size, and number of images may result in the user programs, the original images may be rotated if necessary depending on the document glass. Note • To cancel 2 IN 1 / 4 IN 1 copying, press the [CLEAR] key ( ). • To cancel 2 IN 1 / 4 IN 1 copy mode, press the [2 IN 1 / 4 IN 1] key repeatedly until all originals have been scanned into memory. 5 When the start indicator lights, replace...
... settings, and then press the [START] key ( ). Certain combinations of original size, paper size, and number of images may result in the user programs, the original images may be rotated if necessary depending on the document glass. Note • To cancel 2 IN 1 / 4 IN 1 copying, press the [CLEAR] key ( ). • To cancel 2 IN 1 / 4 IN 1 copy mode, press the [2 IN 1 / 4 IN 1] key repeatedly until all originals have been scanned into memory. 5 When the start indicator lights, replace...
AR-M160 | AR-M205 Operation Manual
Page 37
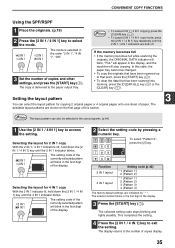
... display, and the machine will blink in the user programs. (p.44) 1 Use the [2 IN 1 / 4 IN 1] key to the paper output tray. Selecting the layout for 4 IN 1 copy With the 2 IN 1 indicator lit, hold down the [2 IN 1 / 4 IN 1] key until the 4 IN 1 indicator blinks. 2 IN 1 4 IN 1 The setting code of copies display. 35 Selecting the layout for copying 2 original pages or 4 original pages onto one sheet of this state, the paper tray...
... display, and the machine will blink in the user programs. (p.44) 1 Use the [2 IN 1 / 4 IN 1] key to the paper output tray. Selecting the layout for 4 IN 1 copy With the 2 IN 1 indicator lit, hold down the [2 IN 1 / 4 IN 1] key until the 4 IN 1 indicator blinks. 2 IN 1 4 IN 1 The setting code of copies display. 35 Selecting the layout for copying 2 original pages or 4 original pages onto one sheet of this state, the paper tray...
AR-M160 | AR-M205 Operation Manual
Page 40
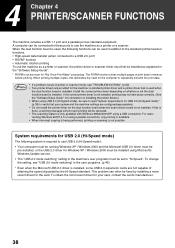
... USB 2.0 (Hi-Speed mode) The following functions can be connected to these ports to use USB 2.0 (Hi-Speed mode): • Your computer must be running Windows 95/NT 4.0 or using Microsoft's Windows Update service. • The "USB 2.0 mode switching" setting in the machine's user programs must first be installed as a printer or a scanner. When printing multiple copies, this is done, a warning message will print and printing will be canceled. • The scanning feature is installed, some USB 2.0 expansion cards are provided for the machine: a standard printer driver and a printer...
... USB 2.0 (Hi-Speed mode) The following functions can be connected to these ports to use USB 2.0 (Hi-Speed mode): • Your computer must be running Windows 95/NT 4.0 or using Microsoft's Windows Update service. • The "USB 2.0 mode switching" setting in the machine's user programs must first be installed as a printer or a scanner. When printing multiple copies, this is done, a warning message will print and printing will be canceled. • The scanning feature is installed, some USB 2.0 expansion cards are provided for the machine: a standard printer driver and a printer...
AR-M160 | AR-M205 Operation Manual
Page 41
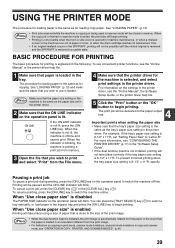
... the File menu. 4 Make sure that the paper is explained in copy and scanner mode, see the "Online Manual", the Software Setup Guide, or the printer driver help file. 1 Make sure that you wish to use convenient printer functions, see "CONFIGURING THE PRINTER DRIVER" (p.11) in the printer driver. See "LOADING PAPER" (p.13) and make sure the paper that the tray's paper size setting is 8-1/2" x 11"R. ON LINE If the ON LINE indicator is loaded. When "Use close to the size of paper that the ON LINE indicator on copying in print mode, scanner mode...
... the File menu. 4 Make sure that the paper is explained in copy and scanner mode, see the "Online Manual", the Software Setup Guide, or the printer driver help file. 1 Make sure that you wish to use convenient printer functions, see "CONFIGURING THE PRINTER DRIVER" (p.11) in the printer driver. See "LOADING PAPER" (p.13) and make sure the paper that the tray's paper size setting is 8-1/2" x 11"R. ON LINE If the ON LINE indicator is loaded. When "Use close to the size of paper that the ON LINE indicator on copying in print mode, scanner mode...
AR-M160 | AR-M205 Operation Manual
Page 54
... using the machine, check the following troubleshooting guide before it is finished...55 The POWER SAVE indicator is lit...55 Any of the alarm indicator is skewed or it runs off the paper 57 Lines in places 53 Paper misfeed...54 Original size not selected automatically...54 Copies are unable to scan the image...60 Notice page printed ...61 Removing the software ...61 INDICATORS AND DISPLAY MESSAGES 62 MISFEED REMOVAL 63 REPLACING THE TONER CARTRIDGE...
... using the machine, check the following troubleshooting guide before it is finished...55 The POWER SAVE indicator is lit...55 Any of the alarm indicator is skewed or it runs off the paper 57 Lines in places 53 Paper misfeed...54 Original size not selected automatically...54 Copies are unable to scan the image...60 Notice page printed ...61 Removing the software ...61 INDICATORS AND DISPLAY MESSAGES 62 MISFEED REMOVAL 63 REPLACING THE TONER CARTRIDGE...
AR-M160 | AR-M205 Operation Manual
Page 56
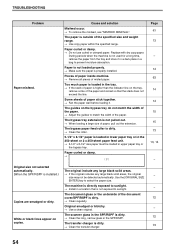
... a location that the stack does not exceed the line. Paper is not loaded properly. → Make sure the paper is installed.) Copies are smudged or dirty. The guides on copies. Replace with dry copy paper. During periods when the machine is not used for a long time, remove the paper from the tray and store it . Some sheets of the paper. Paper curled or damp. → Do not use curled or crimped paper. Use the [ORIGINAL SIZE ENTER] key...
... a location that the stack does not exceed the line. Paper is not loaded properly. → Make sure the paper is installed.) Copies are smudged or dirty. The guides on copies. Replace with dry copy paper. During periods when the machine is not used for a long time, remove the paper from the tray and store it . Some sheets of the paper. Paper curled or damp. → Do not use curled or crimped paper. Use the [ORIGINAL SIZE ENTER] key...
AR-M160 | AR-M205 Operation Manual
Page 58
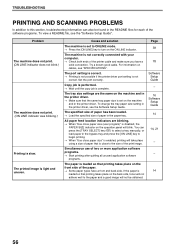
... printer driver. → Make sure that the same tray paper size is set to ONLINE mode. → Press the [ON LINE] key to turn on the back side, toner will not adhere well to the paper and a good image will not be found in the README files for each of the software programs. To view a README file, see the "Software Setup Guide". The printed image is not correct. For information on the operation panel will blink. The port setting...
... printer driver. → Make sure that the same tray paper size is set to ONLINE mode. → Press the [ON LINE] key to turn on the back side, toner will not adhere well to the paper and a good image will not be found in the README files for each of the software programs. To view a README file, see the "Software Setup Guide". The printed image is not correct. For information on the operation panel will blink. The port setting...
AR-M160 | AR-M205 Operation Manual
Page 63
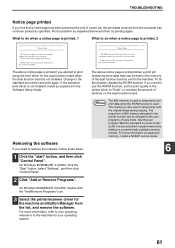
... "Start" button, select "Settings", and then click "Control Panel". 2 Click "Add or Remove Programs". For more information on a commercially available memory module. If you need to use the ROPM function, set the print quality in the Software Setup Guide. Note The IMC memory is used. This memory is also possible to temporarily hold print data when the ROPM function is used to expand memory by adding on expansion memory, contact a SHARP service center. 6 61 See the user program "Memory allocated to printer mode...
... "Start" button, select "Settings", and then click "Control Panel". 2 Click "Add or Remove Programs". For more information on a commercially available memory module. If you need to use the ROPM function, set the print quality in the Software Setup Guide. Note The IMC memory is used. This memory is also possible to temporarily hold print data when the ROPM function is used to expand memory by adding on expansion memory, contact a SHARP service center. 6 61 See the user program "Memory allocated to printer mode...


