
Assembly and Owner's Manual
Page 2
Para obtener este manual en Español Latino Americano vaya a: http://www.schwinnfitness.com. Table of their respective owners. Patent Information This product may be covered by US and Foreign Patents and Patents Pending. 2 Assembly 3 Important Safety Instructions - Nautilus, Inc. (www.nautilus.com) trademarks include NAUTILUS®, BOWFLEX®, SCHWINN® and...
Para obtener este manual en Español Latino Americano vaya a: http://www.schwinnfitness.com. Table of their respective owners. Patent Information This product may be covered by US and Foreign Patents and Patents Pending. 2 Assembly 3 Important Safety Instructions - Nautilus, Inc. (www.nautilus.com) trademarks include NAUTILUS®, BOWFLEX®, SCHWINN® and...

Assembly and Owner's Manual
Page 3
... assembly steps involving these parts. Failure to bystanders. • Some components of this machine. Carefully read and understand the Assembly Manual. • Keep bystanders and children away from the product you are necessary use . Keep the Owner's and Assembly... Manuals for correct performance in accordance with the Owner's Manual. • Read and understand the complete Owner's Manual supplied with this machine on a solid, level, horizontal surface. • Do not try to ...
... assembly steps involving these parts. Failure to bystanders. • Some components of this machine. Carefully read and understand the Assembly Manual. • Keep bystanders and children away from the product you are necessary use . Keep the Owner's and Assembly... Manuals for correct performance in accordance with the Owner's Manual. • Read and understand the complete Owner's Manual supplied with this machine on a solid, level, horizontal surface. • Do not try to ...
Assembly and Owner's Manual
Page 16
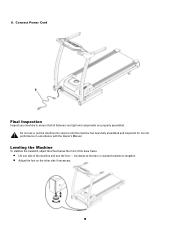
Connect Power Cord Final Inspection Inspect your machine to lengthen. • Adjust the foot on the other side if necessary. 16 clockwise to shorten or counterclockwise to ensure that all fasteners are tight and components are properly assembled. Leveling the Machine To stabilize the treadmill, adjust the 2 feet below the front of the base frame. • Lift one side of the machine and turn the foot - 9. Do not use or put the machine into service until the machine has been fully assembled and inspected for correct performance in accordance with the Owner's Manual.
Connect Power Cord Final Inspection Inspect your machine to lengthen. • Adjust the foot on the other side if necessary. 16 clockwise to shorten or counterclockwise to ensure that all fasteners are tight and components are properly assembled. Leveling the Machine To stabilize the treadmill, adjust the 2 feet below the front of the base frame. • Lift one side of the machine and turn the foot - 9. Do not use or put the machine into service until the machine has been fully assembled and inspected for correct performance in accordance with the Owner's Manual.

Assembly and Owner's Manual
Page 17
...this machine on a solid, level, horizontal surface. • Use caution when you step on and off the machine. Keep Owner's Manual for replacement stickers. • To reduce the risk of wear. Stop exercising if you start an exercise program. This machine contains moving ...in your doctor before you feel faint. Important Safety Instructions Indicates a potentially hazardous situation which, if not avoided, could result in this manual. • Read, understand, and test the Emergency Stop Procedure before use. • Keep the walking belt clean and dry. •...
...this machine on a solid, level, horizontal surface. • Use caution when you step on and off the machine. Keep Owner's Manual for replacement stickers. • To reduce the risk of wear. Stop exercising if you start an exercise program. This machine contains moving ...in your doctor before you feel faint. Important Safety Instructions Indicates a potentially hazardous situation which, if not avoided, could result in this manual. • Read, understand, and test the Emergency Stop Procedure before use. • Keep the walking belt clean and dry. •...
Assembly and Owner's Manual
Page 18
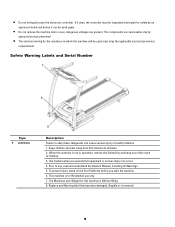
... not let liquids touch the electronic controller. Replace any Warning label that becomes damaged, illegible or is for Residential use , read and understand the Owner's Manual, including all times. 2. If it can occur. 4. Keep children and pets away from this machine is not in which the machine will be used must...
... not let liquids touch the electronic controller. Replace any Warning label that becomes damaged, illegible or is for Residential use , read and understand the Owner's Manual, including all times. 2. If it can occur. 4. Keep children and pets away from this machine is not in which the machine will be used must...
Assembly and Owner's Manual
Page 19
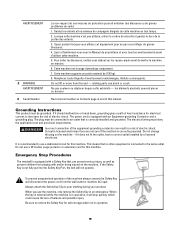
... equipment-grounding conductor can result in operation, it will not operate. Do not use a dedicated circuit for this machine. Emergency Stop Procedures The treadmill is equipped with a Safety Key that no other equipment is in a risk of this end - AVERTISSEMENT 2 WARNING AVERTISSEMENT 3 Serial Number Le...should malfunction or break down, grounding gives a path of the machine always remove the Safety Key and disconnect the power cord from this manual. Pour éviter les blessures, mettez-vous debout sur les repose-pieds avant de mettre la machine en marche. 6. To prevent ...
... equipment-grounding conductor can result in operation, it will not operate. Do not use a dedicated circuit for this machine. Emergency Stop Procedures The treadmill is equipped with a Safety Key that no other equipment is in a risk of this end - AVERTISSEMENT 2 WARNING AVERTISSEMENT 3 Serial Number Le...should malfunction or break down, grounding gives a path of the machine always remove the Safety Key and disconnect the power cord from this manual. Pour éviter les blessures, mettez-vous debout sur les repose-pieds avant de mettre la machine en marche. 6. To prevent ...
Assembly and Owner's Manual
Page 22
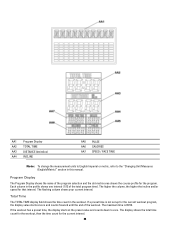
Total Time The TOTAL TIME display field shows the time count in this manual. If a preset time is 99:59. The maximum time is not set up for the program. AA1 Program Display AA2 TOTAL TIME AA3 DISTANCE (km/...
Total Time The TOTAL TIME display field shows the time count in this manual. If a preset time is 99:59. The maximum time is not set up for the program. AA1 Program Display AA2 TOTAL TIME AA3 DISTANCE (km/...
Assembly and Owner's Manual
Page 23
...If the workout has a calorie goal, the display starts at the preset value and counts down to : • Adjust the Incline in increments of this manual gives the procedures for user setup. Speed/Pace Time The SPEED/PACE TIME display field shows the machine speed in kilometers per hour (km/h) or... field shows the estimated calories that you feel pain or tightness in percentage of breath, or feel faint. Incline The INCLINE display field shows the treadmill incline in your workout. • Push and hold the STOP key for 10 seconds. Push the COURSES/PROFILES key to go back to zero. ...
...If the workout has a calorie goal, the display starts at the preset value and counts down to : • Adjust the Incline in increments of this manual gives the procedures for user setup. Speed/Pace Time The SPEED/PACE TIME display field shows the machine speed in kilometers per hour (km/h) or... field shows the estimated calories that you feel pain or tightness in percentage of breath, or feel faint. Incline The INCLINE display field shows the treadmill incline in your workout. • Push and hold the STOP key for 10 seconds. Push the COURSES/PROFILES key to go back to zero. ...
Assembly and Owner's Manual
Page 24
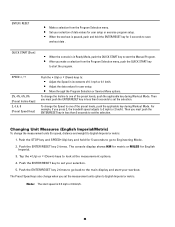
... English Imperial or metric. ENTER / RESET • Make a selection from the Program Selection menu, push the QUICK START key to start the Manual Program. • After you press 2, the treadmill speed adjusts to start the program. The console display shows KM for metric or MILES for 5 seconds to go back to one...
... English Imperial or metric. ENTER / RESET • Make a selection from the Program Selection menu, push the QUICK START key to start the Manual Program. • After you press 2, the treadmill speed adjusts to start the program. The console display shows KM for metric or MILES for 5 seconds to go back to one...

Assembly and Owner's Manual
Page 27
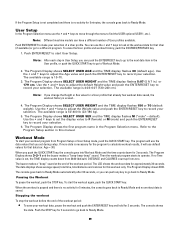
... Heart Rate BPM (beats per minute) Maximum Heart Rate Target Heart Rate Zone (keep within this range for optimum fat burning) Age Exercise Programs Schwinn® 840 Treadmill Quick Start (Manual Program) Profile Programs: • 2 Course • 2 Circuit • 2 Pursuit Calorie Goal 5K Course 10K Course 1 Custom User Program Heart Rate Controlled: • Target...
... Heart Rate BPM (beats per minute) Maximum Heart Rate Target Heart Rate Zone (keep within this range for optimum fat burning) Age Exercise Programs Schwinn® 840 Treadmill Quick Start (Manual Program) Profile Programs: • 2 Course • 2 Circuit • 2 Pursuit Calorie Goal 5K Course 10K Course 1 Custom User Program Heart Rate Controlled: • Target...
Assembly and Owner's Manual
Page 28
...for reference purposes only. The console display counts down for the Manual Program. The maximum time is centered and correctly aligned. After each step in Program Setup, you change speed or incline. 5. Make sure the treadmill is stable on a clean, hard, level surface, with ...Welcome" and the digital displays show "- - - -". 3. When you push the Incline ▲ key, the incline increases 1 level. Start the treadmill at any time during a workout. Quick Start (Manual Program) 1. Attach the magnetic Safety Key to align the walking belt. If the key pulls out of this...
...for reference purposes only. The console display counts down for the Manual Program. The maximum time is centered and correctly aligned. After each step in Program Setup, you change speed or incline. 5. Make sure the treadmill is stable on a clean, hard, level surface, with ...Welcome" and the digital displays show "- - - -". 3. When you push the Incline ▲ key, the incline increases 1 level. Start the treadmill at any time during a workout. Quick Start (Manual Program) 1. Attach the magnetic Safety Key to align the walking belt. If the key pulls out of this...
Assembly and Owner's Manual
Page 29
... activity for 5 minutes, the console goes back to Ready Mode and no activity for that data (ex: Age = 30). Push the STOP key for this manual. The data displays show average speed, total time, total distance and calories for 3 seconds to go back to set during setup. Push ENTER/RESET to...
... activity for 5 minutes, the console goes back to Ready Mode and no activity for that data (ex: Age = 30). Push the STOP key for this manual. The data displays show average speed, total time, total distance and calories for 3 seconds to go back to set during setup. Push ENTER/RESET to...
Assembly and Owner's Manual
Page 30
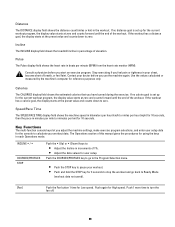
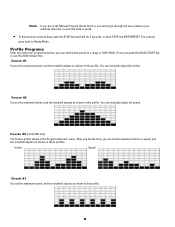
...and hold for 3 seconds, or push STOP and ENTER/RESET. You can manually adjust the incline. Course #3 (model 860 only) The Incline profile shows in this profile. Course #1 You set the maximum incline, and the treadmill adjusts as shown in this profile. 30 Course #2 You set the maximum speed..., and the treadmill adjusts as shown in this profile. Note: If you are in the Manual Program (Quick Start) or you can set the time period ...
...and hold for 3 seconds, or push STOP and ENTER/RESET. You can manually adjust the incline. Course #3 (model 860 only) The Incline profile shows in this profile. Course #1 You set the maximum incline, and the treadmill adjusts as shown in this profile. 30 Course #2 You set the maximum speed..., and the treadmill adjusts as shown in this profile. Note: If you are in the Manual Program (Quick Start) or you can set the time period ...
Assembly and Owner's Manual
Page 31
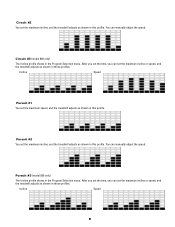
...31 After you set the time, you can set the maximum incline or speed, and the treadmill adjusts as shown in these profiles. Circuit #2 You set the maximum incline, and the treadmill adjusts as shown in this profile. Circuit #3 (model 860 only) The Incline profile shows in... menu. Incline Speed Pursuit #1 You set the maximum incline, and the treadmill adjusts as shown in this profile. Pursuit #2 You set the maximum speed, and the treadmill adjusts as shown in these profiles. You can manually adjust the speed. Pursuit #3 (model 860 only) The Incline profile shows...
...31 After you set the time, you can set the maximum incline or speed, and the treadmill adjusts as shown in these profiles. Circuit #2 You set the maximum incline, and the treadmill adjusts as shown in this profile. Circuit #3 (model 860 only) The Incline profile shows in... menu. Incline Speed Pursuit #1 You set the maximum incline, and the treadmill adjusts as shown in this profile. Pursuit #2 You set the maximum speed, and the treadmill adjusts as shown in these profiles. You can manually adjust the speed. Pursuit #3 (model 860 only) The Incline profile shows...
Assembly and Owner's Manual
Page 36
.... We recommend that the Power Switch is correctly locked in personal injury. 2. Folding the Treadmill 1. Let the belt operate for moving or transport. These parts do not lock in use a degreaser like WD-40® as this manual). Switch on a surface that the hydraulic lift is turned Off, and disconnect the power...
.... We recommend that the Power Switch is correctly locked in personal injury. 2. Folding the Treadmill 1. Let the belt operate for moving or transport. These parts do not lock in use a degreaser like WD-40® as this manual). Switch on a surface that the hydraulic lift is turned Off, and disconnect the power...

Assembly and Owner's Manual
Page 38
...it . Never lift the front of moving or transport. Rotating parts can possibly drop quickly in case the treadmill lock is set up to become unstable or fall. 3. Use caution when you move . Make sure that... could cause it to drop lightly without aid. Do not lean against the treadmill when it is capable of the machine for moving the machine. Carefully pull back on it that the... hydraulic lift is not engaged. 38 You must fold the treadmill before you do this manual. Moving the Treadmill The machine can be moved by one or more persons. Refer to the "Folding...
...it . Never lift the front of moving or transport. Rotating parts can possibly drop quickly in case the treadmill lock is set up to become unstable or fall. 3. Use caution when you move . Make sure that... could cause it to drop lightly without aid. Do not lean against the treadmill when it is capable of the machine for moving the machine. Carefully pull back on it that the... hydraulic lift is not engaged. 38 You must fold the treadmill before you do this manual. Moving the Treadmill The machine can be moved by one or more persons. Refer to the "Folding...
Assembly and Owner's Manual
Page 39
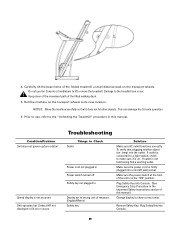
To verify this manual.) Change display to lift or move the treadmill. Make sure the power cord is not functioning find a working ...is on the transport wheels. Condition/Problem Unit does not power up/turn on the transport wheels to the treadmill can damage the Console operation. 6. Prior to use the Console or handlebars to show correct units. Plug... plugged in Power switch turned off Safety key not plugged in Display set to the "Unfolding the Treadmill" procedure in this manual. Carefully tilt the base frame of this , plugging another object (ex: lamp) into the outlet...
To verify this manual.) Change display to lift or move the treadmill. Make sure the power cord is not functioning find a working ...is on the transport wheels. Condition/Problem Unit does not power up/turn on the transport wheels to the treadmill can damage the Console operation. 6. Prior to use the Console or handlebars to show correct units. Plug... plugged in Power switch turned off Safety key not plugged in Display set to the "Unfolding the Treadmill" procedure in this manual. Carefully tilt the base frame of this , plugging another object (ex: lamp) into the outlet...

Assembly and Owner's Manual
Page 40
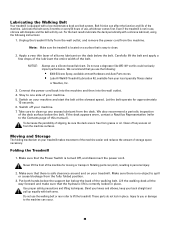
... replacement HR receiver. Turn off to each side. If any television, AM radio, microwave, or computer within 6 feet (2 meters) of the treadmill. Hands must be kept still with relatively equal pressure applied to protect motor. Plug Safety Key into Console. (See Emergency Stop Procedure in the ... such as HR watch or a machine at a gym. If chest strap is known to maintenance schedule for leveling the machine in this manual. Refer to the procedure for belt lubrication. Adjust the belt tension at medical or some larger fitness stores. Moisten skin contact area on HR...
... replacement HR receiver. Turn off to each side. If any television, AM radio, microwave, or computer within 6 feet (2 meters) of the treadmill. Hands must be kept still with relatively equal pressure applied to protect motor. Plug Safety Key into Console. (See Emergency Stop Procedure in the ... such as HR watch or a machine at a gym. If chest strap is known to maintenance schedule for leveling the machine in this manual. Refer to the procedure for belt lubrication. Adjust the belt tension at medical or some larger fitness stores. Moisten skin contact area on HR...
Warranty
Page 1
... IS LIMITED TO REPAIR OR REPLACEMENT OF ANY COMPONENT DEEMED BY NAUTILUS, INC. trademarks include NAUTILUS®, BOWFLEX®, STAIRMASTER®, SCHWINN® and UNIVERSAL® and respective logos. 1-800-NAUTILUS www.nautilus.com. are not available at the time of service under... the obligations or limitations of the applicable express warranty provided above limitation may be defective in the products Assembly and Owner's manual. Any implied warranties, including the WARRANTY OF MERCHANTABILITY and any other rights, which vary from Nautilus, Inc. THESE REMEDIES ...
... IS LIMITED TO REPAIR OR REPLACEMENT OF ANY COMPONENT DEEMED BY NAUTILUS, INC. trademarks include NAUTILUS®, BOWFLEX®, STAIRMASTER®, SCHWINN® and UNIVERSAL® and respective logos. 1-800-NAUTILUS www.nautilus.com. are not available at the time of service under... the obligations or limitations of the applicable express warranty provided above limitation may be defective in the products Assembly and Owner's manual. Any implied warranties, including the WARRANTY OF MERCHANTABILITY and any other rights, which vary from Nautilus, Inc. THESE REMEDIES ...


