Assembly and Owner's Manual
Page 2
... respective owners. Assembly 3 Important Safety Instructions - Operation 17 Specifications 4 Features 20 Before Assembly 5 Operations 28 Tools 6 Maintenance 34 Hardware 6 Troubleshooting 39 Parts 7 Contacts 41 Assembly 8 Guide de Montage et du Propriétaire 43 Leveling the Machine 16 ...Instructions - Nautilus, Inc. (www.nautilus.com) trademarks include NAUTILUS®, BOWFLEX®, SCHWINN® and UNIVERSAL® and respective logos. Patent Information This product may be covered by US and Foreign Patents and Patents Pending. 2 Para obtener este manual...
... respective owners. Assembly 3 Important Safety Instructions - Operation 17 Specifications 4 Features 20 Before Assembly 5 Operations 28 Tools 6 Maintenance 34 Hardware 6 Troubleshooting 39 Parts 7 Contacts 41 Assembly 8 Guide de Montage et du Propriétaire 43 Leveling the Machine 16 ...Instructions - Nautilus, Inc. (www.nautilus.com) trademarks include NAUTILUS®, BOWFLEX®, SCHWINN® and UNIVERSAL® and respective logos. Patent Information This product may be covered by US and Foreign Patents and Patents Pending. 2 Para obtener este manual...

Assembly and Owner's Manual
Page 3
... assembly steps involving these parts. Failure to use genuine replacement parts can be heavy or awkward. Keep the Owner's and Assembly Manuals for correct performance in accordance with the Owner's Manual. • Read and understand the complete Owner's Manual supplied with this machine. This could result in an appropriate work space away from operating correctly or void the warranty. • Do not use or put the machine into service until instructed...
... assembly steps involving these parts. Failure to use genuine replacement parts can be heavy or awkward. Keep the Owner's and Assembly Manuals for correct performance in accordance with the Owner's Manual. • Read and understand the complete Owner's Manual supplied with this machine. This could result in an appropriate work space away from operating correctly or void the warranty. • Do not use or put the machine into service until instructed...
Assembly and Owner's Manual
Page 4
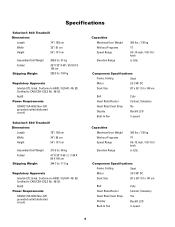
..." / 51 x 140 cm Belt Heart Rate Monitor Heart Rate Chest Strap Display Built-In Fan 2 ply Contact, Telemetry No Backlit LCD 3-speed Capacities Maximum User Weight Workout Programs Speed Range Elevation Range 300 lbs. / 136 kg 19 0.5-12 mph / 0.8-19.3 km/h 0-12% Component Specifications Frame, Folding Steel Motor 3.0 CHP DC Deck Size 20" x 58" / 51 x 147 cm Belt Heart Rate Monitor Heart Rate Chest Strap Display Built-In Fan 2 ply Contact, Telemetry Yes Backlit LCD 3-speed 4 Specifications Schwinn® 840 Treadmill Dimensions Length 74" / 188...
..." / 51 x 140 cm Belt Heart Rate Monitor Heart Rate Chest Strap Display Built-In Fan 2 ply Contact, Telemetry No Backlit LCD 3-speed Capacities Maximum User Weight Workout Programs Speed Range Elevation Range 300 lbs. / 136 kg 19 0.5-12 mph / 0.8-19.3 km/h 0-12% Component Specifications Frame, Folding Steel Motor 3.0 CHP DC Deck Size 20" x 58" / 51 x 147 cm Belt Heart Rate Monitor Heart Rate Chest Strap Display Built-In Fan 2 ply Contact, Telemetry Yes Backlit LCD 3-speed 4 Specifications Schwinn® 840 Treadmill Dimensions Length 74" / 188...

Assembly and Owner's Manual
Page 5
... the holes. 5. When attaching 2 pieces, lightly lift and look for each assembly step. 3. If they have the test and reset button, it is designed to loosen, unless instructed otherwise. 4. Allow a workout area of minimum 201" x 71" (5.1m x 1.8m). To determine if your machine. Using the recommended wrenches, turn the bolts and nuts to the right (clockwise) to tighten, and the left (counterclockwise...
... the holes. 5. When attaching 2 pieces, lightly lift and look for each assembly step. 3. If they have the test and reset button, it is designed to loosen, unless instructed otherwise. 4. Allow a workout area of minimum 201" x 71" (5.1m x 1.8m). To determine if your machine. Using the recommended wrenches, turn the bolts and nuts to the right (clockwise) to tighten, and the left (counterclockwise...

Assembly and Owner's Manual
Page 17
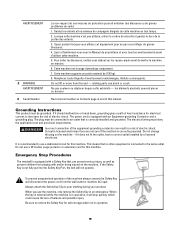
... machine motor cover or front trim cover • Keep power cord away from the machine. Stop exercising if you use , examine this machine on and off the machine. Contact Nautilus® Customer Service for reference purposes only. • Before each side of electrical shock, always unplug the power cord and wait 5 minutes before cleaning, maintaining or repairing this machine outdoors or in your doctor before you step on...
... machine motor cover or front trim cover • Keep power cord away from the machine. Stop exercising if you use , examine this machine on and off the machine. Contact Nautilus® Customer Service for reference purposes only. • Before each side of electrical shock, always unplug the power cord and wait 5 minutes before cleaning, maintaining or repairing this machine outdoors or in your doctor before you step on...
Assembly and Owner's Manual
Page 18
... be used again. • Do not remove the machine motor cover, dangerous voltages are serviceable only by approved service personnel. • The electrical wiring for the residence in operation, remove the Safety Key and keep out of the reach of children. 3. The Maximum user Weight for Residential use , read and understand the Owner's Manual, including all times. 2. • Do not let liquids touch the electronic controller.
... be used again. • Do not remove the machine motor cover, dangerous voltages are serviceable only by approved service personnel. • The electrical wiring for the residence in operation, remove the Safety Key and keep out of the reach of children. 3. The Maximum user Weight for Residential use , read and understand the Owner's Manual, including all times. 2. • Do not let liquids touch the electronic controller.
Assembly and Owner's Manual
Page 19
... extension cord for safe storage when not in a risk of electric shock. if it will not operate. It is not fully put into the Safety Key Port, the belt will stop quickly, which could cause the loss of electric shock. Always attach the Safety Key Clip to remove the Safety Key for this machine. Grounding Instructions This product must be connected to...
... extension cord for safe storage when not in a risk of electric shock. if it will not operate. It is not fully put into the Safety Key Port, the belt will stop quickly, which could cause the loss of electric shock. Always attach the Safety Key Clip to remove the Safety Key for this machine. Grounding Instructions This product must be connected to...
Assembly and Owner's Manual
Page 23
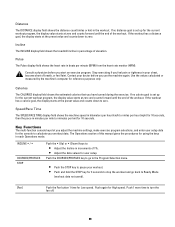
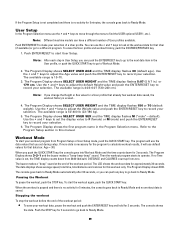
...-function console keys let you adjust the machine settings, make exercise program selections, and enter user setup data for the console to : • Adjust the Incline in beats per minute (BPM) from the heart rate monitor (HRM). INCLINE ▲ / ▼ COURSES/PROFILES STOP Push the ▲ (Up) or ▼ (Down) keys to calculate your workout. • Push and hold the STOP key for 10 seconds. Speed/Pace Time The SPEED/PACE TIME display field...
...-function console keys let you adjust the machine settings, make exercise program selections, and enter user setup data for the console to : • Adjust the Incline in beats per minute (BPM) from the heart rate monitor (HRM). INCLINE ▲ / ▼ COURSES/PROFILES STOP Push the ▲ (Up) or ▼ (Down) keys to calculate your workout. • Push and hold the STOP key for 10 seconds. Speed/Pace Time The SPEED/PACE TIME display field...
Assembly and Owner's Manual
Page 24
... Workout Mode. For example, if you press 2, the treadmill speed adjusts to look at the measurement options. 4. Push the ENTER/RESET key to set the selection. ENTER / RESET • Make a selection from the Program Selection menu. • Set your selection of data values for user setup or exercise program setup. • When the workout is paused, push and hold for 5 seconds to go back to the main display and start speed...
... Workout Mode. For example, if you press 2, the treadmill speed adjusts to look at the measurement options. 4. Push the ENTER/RESET key to set the selection. ENTER / RESET • Make a selection from the Program Selection menu. • Set your selection of data values for user setup or exercise program setup. • When the workout is paused, push and hold for 5 seconds to go back to the main display and start speed...

Assembly and Owner's Manual
Page 25
... attached to a chest strap to the Console. Contact Heart Rate (CHR) sensors are installed to send your heart rate signals to keep your hands free during your workout. Remote Heart Rate Monitor Monitoring your Heart Rate is one of your workout. Chest Strap Using the heart rate transmitter chest strap lets you have a pacemaker or other implanted electronic device, consult your doctor before using a wireless chest strap or other telemetric heart rate monitor. Secure the strap around your Heart Rate in Beats Per Minute (BPM). Adjust...
... attached to a chest strap to the Console. Contact Heart Rate (CHR) sensors are installed to send your heart rate signals to keep your hands free during your workout. Remote Heart Rate Monitor Monitoring your Heart Rate is one of your workout. Chest Strap Using the heart rate transmitter chest strap lets you have a pacemaker or other implanted electronic device, consult your doctor before using a wireless chest strap or other telemetric heart rate monitor. Secure the strap around your Heart Rate in Beats Per Minute (BPM). Adjust...

Assembly and Owner's Manual
Page 26
... the Console displays a heart rate value of the same age could be higher or lower. It is not sending a signal. Always remove the transmitter before you clean the chest strap, as highly trained runners may need further assistance, call your Beats Per Minute (BPM). Continue at rest heart rate of 40 BPM or lower. The longer you need to the machine's receiver and display your Nautilus...
... the Console displays a heart rate value of the same age could be higher or lower. It is not sending a signal. Always remove the transmitter before you clean the chest strap, as highly trained runners may need further assistance, call your Beats Per Minute (BPM). Continue at rest heart rate of 40 BPM or lower. The longer you need to the machine's receiver and display your Nautilus...

Assembly and Owner's Manual
Page 27
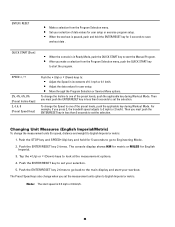
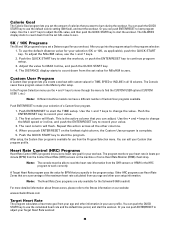
... Heart Rate Target Heart Rate Zone (keep within this range for optimum fat burning) Age Exercise Programs Schwinn® 840 Treadmill Quick Start (Manual Program) Profile Programs: • 2 Course • 2 Circuit • 2 Pursuit Calorie Goal 5K Course 10K Course 1 Custom User Program Heart Rate Controlled: • Target HR Schwinn® 860 Treadmill Quick Start (Manual Program) Profile Programs: • 3 Course • 3 Circuit • 3 Pursuit Calorie Goal 5K Course 10K Course 2 Custom User Programs Heart Rate Controlled: • Target HR • 65% Max...
... Heart Rate Target Heart Rate Zone (keep within this range for optimum fat burning) Age Exercise Programs Schwinn® 840 Treadmill Quick Start (Manual Program) Profile Programs: • 2 Course • 2 Circuit • 2 Pursuit Calorie Goal 5K Course 10K Course 1 Custom User Program Heart Rate Controlled: • Target HR Schwinn® 860 Treadmill Quick Start (Manual Program) Profile Programs: • 3 Course • 3 Circuit • 3 Pursuit Calorie Goal 5K Course 10K Course 2 Custom User Programs Heart Rate Controlled: • Target HR • 65% Max...
Assembly and Owner's Manual
Page 28
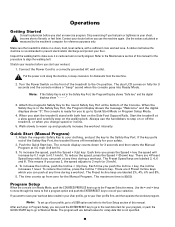
... you use the machine again. Connect the Power Cord to warm up from the machine. 2. Note: If the Safety Key is recommended to the User Setup section of the Console. When you start an exercise program. Quick Start (Manual Program) 1. The time counts up and gradually increase the workout intensity. Make sure the treadmill is stable on the Side Foot Support Rails. Attach the magnetic Safety Key to Quick Start Mode or Program Setup Mode. 4. Walk slowly...
... you use the machine again. Connect the Power Cord to warm up from the machine. 2. Note: If the Safety Key is recommended to the User Setup section of the Console. When you start an exercise program. Quick Start (Manual Program) 1. The time counts up and gradually increase the workout intensity. Make sure the treadmill is stable on the Side Foot Support Rails. Attach the magnetic Safety Key to Quick Start Mode or Program Setup Mode. 4. Walk slowly...
Assembly and Owner's Manual
Page 29
... speed, total time, total distance and calories for 5 minutes, the console goes back to record your selection. 6. To start User Setup. The Program Display shows END. Push the STOP key for that you push the QUICK START key, the console goes into Workout Mode and the time counts down from 24:00 (default). Use the ▲ and ▼ keys to adjust the Age value and push the ENTER/RESET key...
... speed, total time, total distance and calories for 5 minutes, the console goes back to record your selection. 6. To start User Setup. The Program Display shows END. Push the STOP key for that you push the QUICK START key, the console goes into Workout Mode and the time counts down from 24:00 (default). Use the ▲ and ▼ keys to adjust the Age value and push the ENTER/RESET key...
Assembly and Owner's Manual
Page 32
... and other user setup information. Use the ▲ and ▼ keys to adjust the CAL value, and then push the QUICK START key to start the program. Push the QUICK START key to start the workout, or push the ENTER/RESET key to record your workout. The DISTANCE display starts to count down from a Heart Rate Monitor (HRM) chest strap. Push the ENTER/RESET key to continue program setup. 3. Use the ▲ and ▼ keys to change the value. A Target Heart Rate program uses the value...
... and other user setup information. Use the ▲ and ▼ keys to adjust the CAL value, and then push the QUICK START key to start the program. Push the QUICK START key to start the workout, or push the ENTER/RESET key to record your workout. The DISTANCE display starts to count down from a Heart Rate Monitor (HRM) chest strap. Push the ENTER/RESET key to continue program setup. 3. Use the ▲ and ▼ keys to change the value. A Target Heart Rate program uses the value...
Assembly and Owner's Manual
Page 34
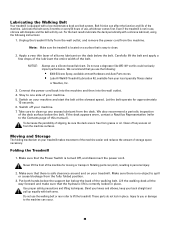
... tension bolts 1/2 turn the treadmill on the Console. To clean the walking belt, carefully turn , first one bolt and then the other bolt until the repair is provided in accordance with a petroleum based solvent when you clean. Use a 6 mm hex key to wipe the inner side of electrical shock, always unplug the power cord and wait 5 minutes before cleaning, maintaining or repairing this machine. The owner is...
... tension bolts 1/2 turn the treadmill on the Console. To clean the walking belt, carefully turn , first one bolt and then the other bolt until the repair is provided in accordance with a petroleum based solvent when you clean. Use a 6 mm hex key to wipe the inner side of electrical shock, always unplug the power cord and wait 5 minutes before cleaning, maintaining or repairing this machine. The owner is...
Assembly and Owner's Manual
Page 36
... outlet, and remove the power cord from the machine surfaces. Stay to lift the treadmill. Switch on your treadmill makes movement of the machine easier and reduces the amount of use a degreaser like WD-40® as this manual). Clean off your machine and start the belt at most Hardware and Auto Parts stores. • Lube-N-Walk® Treadmill Lubrication Kit, available from the fully folded position. 3. Never...
... outlet, and remove the power cord from the machine surfaces. Stay to lift the treadmill. Switch on your treadmill makes movement of the machine easier and reduces the amount of use a degreaser like WD-40® as this manual). Clean off your machine and start the belt at most Hardware and Auto Parts stores. • Lube-N-Walk® Treadmill Lubrication Kit, available from the fully folded position. 3. Never...
Assembly and Owner's Manual
Page 39
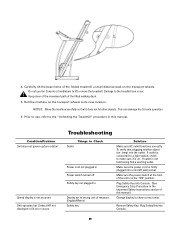
... /start Speed display is connected to a light switch, check to its new location. Do not use , refer to the treadmill can damage the Console operation. 6. 4. Roll the machine on the transport wheels. If outlet is not accurate Unit operates but Contact HR not displayed or E4 error occurs Troubleshooting Things to Check Outlet Power cord not plugged in Power switch turned off Safety key not plugged in the Important Safety Instructions section...
... /start Speed display is connected to a light switch, check to its new location. Do not use , refer to the treadmill can damage the Console operation. 6. 4. Roll the machine on the transport wheels. If outlet is not accurate Unit operates but Contact HR not displayed or E4 error occurs Troubleshooting Things to Check Outlet Power cord not plugged in Power switch turned off Safety key not plugged in the Important Safety Instructions section...

Assembly and Owner's Manual
Page 40
... turn off any are available on walking belt Hesitation or walking belt slips when in Belt tension use Belt stops moving while in use Safety key Motor overload 40 Insure cable is correct. If transmitter has good skin contact and still does not send a HR signal, replace chest strap transmitter. Refer to Console. Plug Safety Key into Console. (See Emergency Stop Procedure in this manual. HR cable connection at Console Sensor grip Dry or calloused hands No Heart Rate display while using chest strap...
... turn off any are available on walking belt Hesitation or walking belt slips when in Belt tension use Belt stops moving while in use Safety key Motor overload 40 Insure cable is correct. If transmitter has good skin contact and still does not send a HR signal, replace chest strap transmitter. Refer to Console. Plug Safety Key into Console. (See Emergency Stop Procedure in this manual. HR cable connection at Console Sensor grip Dry or calloused hands No Heart Rate display while using chest strap...
Warranty
Page 1
... THE USE OF THE FITNESS MACHINE EVEN IF NAUTILUS, INC. contact the Nautilus office listed on post-warranty parts and services. State Laws This warranty gives you . may either replace the machine or refund a portion of the product under this warranty. Contact a Nautilus® office for the purpose intended, under normal conditions, and provided it receives proper care and maintenance as set forth...
... THE USE OF THE FITNESS MACHINE EVEN IF NAUTILUS, INC. contact the Nautilus office listed on post-warranty parts and services. State Laws This warranty gives you . may either replace the machine or refund a portion of the product under this warranty. Contact a Nautilus® office for the purpose intended, under normal conditions, and provided it receives proper care and maintenance as set forth...


