Assembly and Owner's Manual
Page 2
Nautilus, Inc. (www.nautilus.com) trademarks include NAUTILUS®, BOWFLEX®, SCHWINN® and UNIVERSAL® and respective logos. Patent Information This product may be covered by US and Foreign Patents and Patents Pending. 2 Other trademarks are ...étaire 43 Leveling the Machine 16 © 2010 Nautilus, Inc., All rights reserved ™ and ® indicate a trademark or registered trademark. Para obtener este manual en Español Latino Americano vaya a: http://www.schwinnfitness.com.
Nautilus, Inc. (www.nautilus.com) trademarks include NAUTILUS®, BOWFLEX®, SCHWINN® and UNIVERSAL® and respective logos. Patent Information This product may be covered by US and Foreign Patents and Patents Pending. 2 Other trademarks are ...étaire 43 Leveling the Machine 16 © 2010 Nautilus, Inc., All rights reserved ™ and ® indicate a trademark or registered trademark. Para obtener este manual en Español Latino Americano vaya a: http://www.schwinnfitness.com.

Assembly and Owner's Manual
Page 3
...put the machine into service until instructed to bystanders. • Some components of this machine. Carefully read and understand the Assembly Manual. • Keep bystanders and children away from the product you are necessary use only genuine Nautilus® replacement parts and hardware... person when doing the assembly steps involving these parts. Keep the Owner's and Assembly Manuals for correct performance in accordance with the Owner's Manual. • Read and understand the complete Owner's Manual supplied with this machine outdoors or in a wet or moist location. • Make...
...put the machine into service until instructed to bystanders. • Some components of this machine. Carefully read and understand the Assembly Manual. • Keep bystanders and children away from the product you are necessary use only genuine Nautilus® replacement parts and hardware... person when doing the assembly steps involving these parts. Keep the Owner's and Assembly Manuals for correct performance in accordance with the Owner's Manual. • Read and understand the complete Owner's Manual supplied with this machine outdoors or in a wet or moist location. • Make...
Assembly and Owner's Manual
Page 16
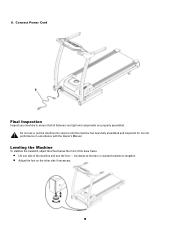
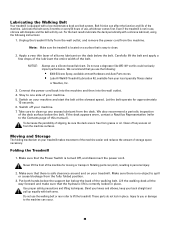
9. clockwise to shorten or counterclockwise to ensure that all fasteners are tight and components are properly assembled. Leveling the Machine To stabilize the treadmill, adjust the 2 feet below the front of the base frame. • Lift one side of the machine and turn the foot - Connect Power Cord Final Inspection Inspect your machine to lengthen. • Adjust the foot on the other side if necessary. 16 Do not use or put the machine into service until the machine has been fully assembled and inspected for correct performance in accordance with the Owner's Manual.
9. clockwise to shorten or counterclockwise to ensure that all fasteners are tight and components are properly assembled. Leveling the Machine To stabilize the treadmill, adjust the 2 feet below the front of the base frame. • Lift one side of the machine and turn the foot - Connect Power Cord Final Inspection Inspect your machine to lengthen. • Adjust the foot on the other side if necessary. 16 Do not use or put the machine into service until the machine has been fully assembled and inspected for correct performance in accordance with the Owner's Manual.

Assembly and Owner's Manual
Page 17
...the power cord and wait 5 minutes before walking on the moving parts. Keep third parties out of breath, or feel pain or tightness in this manual. • Read, understand, and test the Emergency Stop Procedure before you are being used. 17 Stop exercising if you feel faint. Do not .... • Set up and operate this machine on a solid, level, horizontal surface. • Use caution when you use the machine again. Keep Owner's Manual for reference purposes only. • Before each side of burns, electric shock, or injury to persons, read and understand the complete Owner...
...the power cord and wait 5 minutes before walking on the moving parts. Keep third parties out of breath, or feel pain or tightness in this manual. • Read, understand, and test the Emergency Stop Procedure before you are being used. 17 Stop exercising if you feel faint. Do not .... • Set up and operate this machine on a solid, level, horizontal surface. • Use caution when you use the machine again. Keep Owner's Manual for reference purposes only. • Before each side of burns, electric shock, or injury to persons, read and understand the complete Owner...
Assembly and Owner's Manual
Page 18
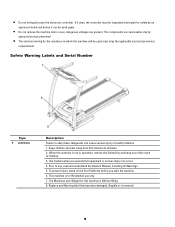
... not in which the machine will be used must be inspected and tested for this machine is for Residential use , read and understand the Owner's Manual, including all times. 2. Safety Warning Labels and Serial Number Type 1 WARNING Description Failure to use only. 7. Use Caution when you start the machine. 6. When this...
... not in which the machine will be used must be inspected and tested for this machine is for Residential use , read and understand the Owner's Manual, including all times. 2. Safety Warning Labels and Serial Number Type 1 WARNING Description Failure to use only. 7. Use Caution when you start the machine. 6. When this...
Assembly and Owner's Manual
Page 19
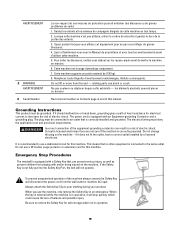
.... Consult a licensed electrician if you use the machine, only remove the Safety Key in a risk of electric shock. Emergency Stop Procedures The treadmill is connected to the same outlet. Soyez prudent lorsque vous utilisez cet équipement pour ne pas vous infliger de graves blessures. 4. Grounding .... It is in operation. 19 Always attach the Safety Key Clip to use a GFI outlet, surge protector or extension cord for this manual. When the key is removed while the machine is recommended to your clothing during your workout. If it should malfunction or break down, ...
.... Consult a licensed electrician if you use the machine, only remove the Safety Key in a risk of electric shock. Emergency Stop Procedures The treadmill is connected to the same outlet. Soyez prudent lorsque vous utilisez cet équipement pour ne pas vous infliger de graves blessures. 4. Grounding .... It is in operation. 19 Always attach the Safety Key Clip to use a GFI outlet, surge protector or extension cord for this manual. When the key is removed while the machine is recommended to your clothing during your workout. If it should malfunction or break down, ...
Assembly and Owner's Manual
Page 22
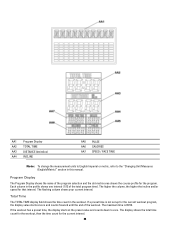
Total Time The TOTAL TIME display field shows the time count in this manual. The maximum time is not set up for the current interval. 22 Program Display The Program Display shows the name of the total program time). ...
Total Time The TOTAL TIME display field shows the time count in this manual. The maximum time is not set up for the current interval. 22 Program Display The Program Display shows the name of the total program time). ...
Assembly and Owner's Manual
Page 23
...monitor (HRM). Consult a physician before you start an exercise program. The Operations section of the workout. Incline The INCLINE display field shows the treadmill incline in beats per km) for using the keys in the workout. Key Functions The multi-function console keys let you adjust the machine settings..., and enter user setup data for the current workout program, the display value starts at zero and counts forward until the end of this manual gives the procedures for 10 seconds. If the workout has a calorie goal, the display starts at the preset value and counts down to...
...monitor (HRM). Consult a physician before you start an exercise program. The Operations section of the workout. Incline The INCLINE display field shows the treadmill incline in beats per km) for using the keys in the workout. Key Functions The multi-function console keys let you adjust the machine settings..., and enter user setup data for the current workout program, the display value starts at zero and counts forward until the end of this manual gives the procedures for 10 seconds. If the workout has a calorie goal, the display starts at the preset value and counts down to...
Assembly and Owner's Manual
Page 24
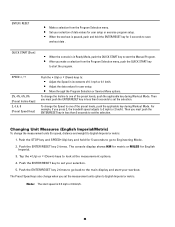
... ▲ (Up) or ▼ (Down) keys to: • Adjust the Speed in Ready Mode, push the QUICK START key to start the Manual Program. • After you press 2, the treadmill speed adjusts to English Imperial or metric. To change the Speed to one of the preset levels, push the applicable key during...
... ▲ (Up) or ▼ (Down) keys to: • Adjust the Speed in Ready Mode, push the QUICK START key to start the Manual Program. • After you press 2, the treadmill speed adjusts to English Imperial or metric. To change the Speed to one of the preset levels, push the applicable key during...

Assembly and Owner's Manual
Page 27
... Heart Rate BPM (beats per minute) Maximum Heart Rate Target Heart Rate Zone (keep within this range for optimum fat burning) Age Exercise Programs Schwinn® 840 Treadmill Quick Start (Manual Program) Profile Programs: • 2 Course • 2 Circuit • 2 Pursuit Calorie Goal 5K Course 10K Course 1 Custom User Program Heart Rate Controlled: • Target...
... Heart Rate BPM (beats per minute) Maximum Heart Rate Target Heart Rate Zone (keep within this range for optimum fat burning) Age Exercise Programs Schwinn® 840 Treadmill Quick Start (Manual Program) Profile Programs: • 2 Course • 2 Circuit • 2 Pursuit Calorie Goal 5K Course 10K Course 1 Custom User Program Heart Rate Controlled: • Target...
Assembly and Owner's Manual
Page 28
... up from the machine. 2. The dual LCD comes on the Side Foot Support Rails. The console is not specified. 28 Quick Start (Manual Program) 1. Make sure the treadmill is in Ready Mode, push the COURSES/PROFILES key to go to the Program Selection menu. When the Safety Key is stable on... go to the On position. Contact your doctor before you use default values for the Manual Program. A rubber mat below the machine is centered and correctly aligned. Start the treadmill at the bottom of this manual for your program, or push the QUICK START key to go to the next data ...
... up from the machine. 2. The dual LCD comes on the Side Foot Support Rails. The console is not specified. 28 Quick Start (Manual Program) 1. Make sure the treadmill is in Ready Mode, push the COURSES/PROFILES key to go to the Program Selection menu. When the Safety Key is stable on... go to the On position. Contact your doctor before you use default values for the Manual Program. A rubber mat below the machine is centered and correctly aligned. Start the treadmill at the bottom of this manual for your program, or push the QUICK START key to go to the next data ...
Assembly and Owner's Manual
Page 29
... flashes 30 (default age). To erase the User profile and workout history, push the COURSES/PROFILES key. 1. The LCD shows the workout data for this manual. DISTANCE and CALORIES count up from Program Setup or User Setup mode, push the QUICK START key. Refer to the Program Setup section in the...
... flashes 30 (default age). To erase the User profile and workout history, push the COURSES/PROFILES key. 1. The LCD shows the workout data for this manual. DISTANCE and CALORIES count up from Program Setup or User Setup mode, push the QUICK START key. Refer to the Program Setup section in the...
Assembly and Owner's Manual
Page 30
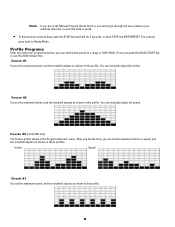
...to use the 24:00 default time. Course #1 You set the maximum speed, and the treadmill adjusts as shown in the Manual Program (Quick Start) or you can set the maximum incline, and the treadmill adjusts as shown in this profile. Course #2 You set the time period in the Program ...Selection menu. Incline Speed Circuit #1 You set the maximum incline or speed, and the treadmill adjusts as shown...
...to use the 24:00 default time. Course #1 You set the maximum speed, and the treadmill adjusts as shown in the Manual Program (Quick Start) or you can set the maximum incline, and the treadmill adjusts as shown in this profile. Course #2 You set the time period in the Program ...Selection menu. Incline Speed Circuit #1 You set the maximum incline or speed, and the treadmill adjusts as shown...
Assembly and Owner's Manual
Page 31
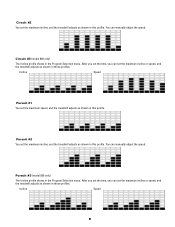
... can set the maximum incline or speed, and the treadmill adjusts as shown in this profile. After you set the time, you can set the maximum incline or speed, and the treadmill adjusts as shown in this profile. Incline Speed 31 You can manually adjust the speed. Circuit #2 You set the maximum incline...
... can set the maximum incline or speed, and the treadmill adjusts as shown in this profile. After you set the time, you can set the maximum incline or speed, and the treadmill adjusts as shown in this profile. Incline Speed 31 You can manually adjust the speed. Circuit #2 You set the maximum incline...
Assembly and Owner's Manual
Page 36
...and then into the wall outlet. 4. Switch on a surface that you or damage to you use a degreaser like WD-40® as this manual). Switch off any excess lubricant from the fully folded position. 3. If the deck appears worn, contact a Nautilus Representative (refer to clean. 2....seriously impact performance. Clean off your machine and start the belt at most Hardware and Auto Parts stores. • Lube-N-Walk® Treadmill Lubrication Kit, available from the machine surfaces. Rotating parts can occur. 36 Make sure there is free from the machine. Put both ...
...and then into the wall outlet. 4. Switch on a surface that you or damage to you use a degreaser like WD-40® as this manual). Switch off any excess lubricant from the fully folded position. 3. If the deck appears worn, contact a Nautilus Representative (refer to clean. 2....seriously impact performance. Clean off your machine and start the belt at most Hardware and Auto Parts stores. • Lube-N-Walk® Treadmill Lubrication Kit, available from the machine surfaces. Rotating parts can occur. 36 Make sure there is free from the machine. Put both ...

Assembly and Owner's Manual
Page 38
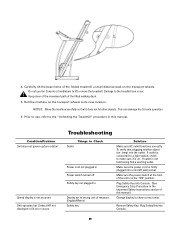
... deck until approximately 2/3 of the machine for moving the machine. Refer to become unstable or fall. 3. Do not lean against the treadmill when it . Use caution when you use proper lifting technique; Rotating parts can possibly drop quickly in personal injury. 2. The hydraulic ...lift is not engaged. 38 4. You must fold the treadmill before you do this manual. When you move the machine. However, we recommend that your back straight. Never lift the front of the movement down.
... deck until approximately 2/3 of the machine for moving the machine. Refer to become unstable or fall. 3. Do not lean against the treadmill when it . Use caution when you use proper lifting technique; Rotating parts can possibly drop quickly in personal injury. 2. The hydraulic ...lift is not engaged. 38 4. You must fold the treadmill before you do this manual. When you move the machine. However, we recommend that your back straight. Never lift the front of the movement down.
Assembly and Owner's Manual
Page 39
... the lifted walking deck. 5. Roll the machine on . Condition/Problem Unit does not power up/turn on the transport wheels. To verify this manual. Remove Safety Key. If outlet is connected to a light switch, check to show correct units. Make sure the power switch at the front ... this , plugging another object (ex: lamp) into the outlet. 4. Damage to its new location. Keep clear of the movement path of the folded treadmill a small distance back on /start Speed display is not functioning find a working outlet. Make sure the power cord is firmly plugged into Console. 39...
... the lifted walking deck. 5. Roll the machine on . Condition/Problem Unit does not power up/turn on the transport wheels. To verify this manual. Remove Safety Key. If outlet is connected to a light switch, check to show correct units. Make sure the power switch at the front ... this , plugging another object (ex: lamp) into the outlet. 4. Damage to its new location. Keep clear of the movement path of the folded treadmill a small distance back on /start Speed display is not functioning find a working outlet. Make sure the power cord is firmly plugged into Console. 39...

Assembly and Owner's Manual
Page 40
... to maintenance schedule for leveling the machine in this manual. Refer to the procedure for adjusting tension and aligning the belt in this manual. If chest strap is known to each side. Adjust the belt tension at the rear of the treadmill. Plug Safety Key into Console. (See Emergency Stop... slips when in Belt tension use Belt stops moving while in use Safety key Motor overload 40 Insure cable is correct. All wires in this manual. If any television, AM radio, microwave, or computer within 6 feet (2 meters) of the machine. Insure hands are present, or console is ...
... to maintenance schedule for leveling the machine in this manual. Refer to the procedure for adjusting tension and aligning the belt in this manual. If chest strap is known to each side. Adjust the belt tension at the rear of the treadmill. Plug Safety Key into Console. (See Emergency Stop... slips when in Belt tension use Belt stops moving while in use Safety key Motor overload 40 Insure cable is correct. All wires in this manual. If any television, AM radio, microwave, or computer within 6 feet (2 meters) of the machine. Insure hands are present, or console is ...
Warranty
Page 1
... has expired, Nautilus, Inc. Contact a Nautilus® office for warranty support. trademarks include NAUTILUS®, BOWFLEX®, STAIRMASTER®, SCHWINN® and UNIVERSAL® and respective logos. 1-800-NAUTILUS www.nautilus.com. warrants to you. Additionally, this warranty will not cover...of their products directly from a Retail Establishment Throughout the terms of God (such as defined in the products Assembly and Owner's manual. BE LIABLE FOR ANY SPECIAL, CONSEQUENTIAL, INCIDENTAL, INDIRECT OR ECONOMIC DAMAGES, REGARDLESS OF THE THEORY OF LIABILITY (INCLUDING, WITHOUT ...
... has expired, Nautilus, Inc. Contact a Nautilus® office for warranty support. trademarks include NAUTILUS®, BOWFLEX®, STAIRMASTER®, SCHWINN® and UNIVERSAL® and respective logos. 1-800-NAUTILUS www.nautilus.com. warrants to you. Additionally, this warranty will not cover...of their products directly from a Retail Establishment Throughout the terms of God (such as defined in the products Assembly and Owner's manual. BE LIABLE FOR ANY SPECIAL, CONSEQUENTIAL, INCIDENTAL, INDIRECT OR ECONOMIC DAMAGES, REGARDLESS OF THE THEORY OF LIABILITY (INCLUDING, WITHOUT ...


