Assembly Manual
Page 8
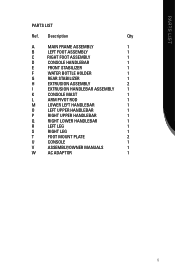
... LIST PARTS LIST Ref. Description Qty A Main Frame Assembly 1 B Left Foot Assembly 1 C Right Foot Assembly 1 D Console HandleBAR 1 E Front Stabilizer 1 F Water Bottle Holder 1 G Rear Stabilizer 1 H Extrusion Assembly 2 I Extrusion Handlebar Assembly 1 K Console Mast 1 L Arm Pivot Rod 1 M Lower Left Handlebar 1 O lEFT Upper Handlebar 1 P Right Upper Handlebar 1 Q Right Lower Handlebar 1 R Left Leg 1 S Right Leg 1 T Foot Mount Plate 2 U Console 1 V ASSEMBLY/OWNER MANUALS...
... LIST PARTS LIST Ref. Description Qty A Main Frame Assembly 1 B Left Foot Assembly 1 C Right Foot Assembly 1 D Console HandleBAR 1 E Front Stabilizer 1 F Water Bottle Holder 1 G Rear Stabilizer 1 H Extrusion Assembly 2 I Extrusion Handlebar Assembly 1 K Console Mast 1 L Arm Pivot Rod 1 M Lower Left Handlebar 1 O lEFT Upper Handlebar 1 P Right Upper Handlebar 1 Q Right Lower Handlebar 1 R Left Leg 1 S Right Leg 1 T Foot Mount Plate 2 U Console 1 V ASSEMBLY/OWNER MANUALS...
Assembly Manual
Page 11
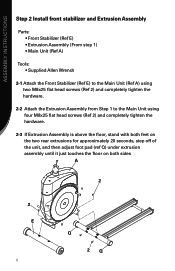
ASSEMBLY INSTRUCTIONS Step 2 Install front stabilizer and Extrusion Assembly Parts: • Front Stabilizer (Ref E) • Extrusion Assembly (From step 1) • Main Unit (Ref A) Tools Supplied Allen Wrench 2-1 Attach the Front Stabilizer (Ref E) to the Main Unit (Ref A) using two M8x25 flat head screws (Ref 2) and completely tighten the hardware. 2-2 Attach the Extrusion Assembly from Step 1 to the Main Unit using four M8x25 flat head screws (Ref 2) and completely...
ASSEMBLY INSTRUCTIONS Step 2 Install front stabilizer and Extrusion Assembly Parts: • Front Stabilizer (Ref E) • Extrusion Assembly (From step 1) • Main Unit (Ref A) Tools Supplied Allen Wrench 2-1 Attach the Front Stabilizer (Ref E) to the Main Unit (Ref A) using two M8x25 flat head screws (Ref 2) and completely tighten the hardware. 2-2 Attach the Extrusion Assembly from Step 1 to the Main Unit using four M8x25 flat head screws (Ref 2) and completely...
Assembly Manual
Page 14
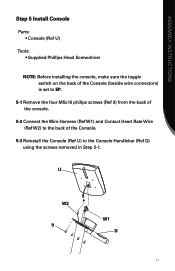
U W2 9 W1 D 11 ASSEMBLY INSTRUCTIONS Step 5 Install Console Parts: • Console (Ref U) Tools Supplied Phillips Head Screwdriver NOTE: Before installing the console, make sure the toggle switch on the back of the Console (beside wire connectors) is set to EP. 5-1 Remove the four M5x10 phillps screws (Ref 9) from the back of the console. 5-2 Connect the Wire Harness (Ref W1) and Contact Heart Rate Wire (Ref W2) to the back of the Console. 5-3 Reinstall the Console (Ref U) to the Console Handlebar (Ref D) using the screws removed in Step 5-1.
U W2 9 W1 D 11 ASSEMBLY INSTRUCTIONS Step 5 Install Console Parts: • Console (Ref U) Tools Supplied Phillips Head Screwdriver NOTE: Before installing the console, make sure the toggle switch on the back of the Console (beside wire connectors) is set to EP. 5-1 Remove the four M5x10 phillps screws (Ref 9) from the back of the console. 5-2 Connect the Wire Harness (Ref W1) and Contact Heart Rate Wire (Ref W2) to the back of the Console. 5-3 Reinstall the Console (Ref U) to the Console Handlebar (Ref D) using the screws removed in Step 5-1.
Assembly Manual
Page 16
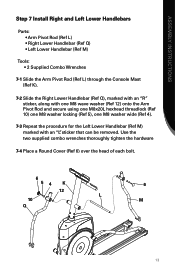
... supplied combo wrenches thoroughly tighten the hardware 7-4 Place a Round Cover (Ref 6) over the head of each bolt. 6 54 K 6 12 L 10 M Q 13 ASSEMBLY INSTRUCTIONS Step 7 Install Right and Left Lower Handlebars Parts Arm Pivot Rod (Ref L Right Lower Handlebar (Ref Q Left Lower Handlebar (Ref M) Tools 2 Supplied Combo Wrenches 7-1 Slide the Arm Pivot Rod (Ref L) through the Console Mast (Ref K). 7-2 Slide the Right Lower Handlebar (Ref Q), marked...
... supplied combo wrenches thoroughly tighten the hardware 7-4 Place a Round Cover (Ref 6) over the head of each bolt. 6 54 K 6 12 L 10 M Q 13 ASSEMBLY INSTRUCTIONS Step 7 Install Right and Left Lower Handlebars Parts Arm Pivot Rod (Ref L Right Lower Handlebar (Ref Q Left Lower Handlebar (Ref M) Tools 2 Supplied Combo Wrenches 7-1 Slide the Arm Pivot Rod (Ref L) through the Console Mast (Ref K). 7-2 Slide the Right Lower Handlebar (Ref Q), marked...

Owner's Manual
Page 2
... information you to achieve an enhanced level of your progress by tracking time, speed, distance and approximate Calories burned. Thank you are just getting onto the elliptical trainer and working out. This Schwinn® elliptical trainer should enable you to shape and monitor your time and have fun! 2 Also included are already in good shape, this Owner's Manual in an exercise program or are general fitness...
... information you to achieve an enhanced level of your progress by tracking time, speed, distance and approximate Calories burned. Thank you are just getting onto the elliptical trainer and working out. This Schwinn® elliptical trainer should enable you to shape and monitor your time and have fun! 2 Also included are already in good shape, this Owner's Manual in an exercise program or are general fitness...
Owner's Manual
Page 3
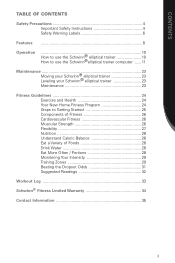
... CONTENTS Safety Precautions 4 Important Safety Instructions 4 Safety Warning Labels 6 Features 8 Operation 10 How to use the Schwinn® elliptical trainer 10 How to use the Schwinn®elliptical trainer computer ...... 11 Maintenance 23 Moving your Schwinn® elliptical trainer 23 Leveling your Schwinn® elliptical trainer 23 Maintenance 23 Fitness Guidelines 24 Exercise and Health 24 Your New Home Fitness Program 24 Steps to Getting Started 25 Components of Fitness 26 Cardiovascular Fitness 26 Muscular Strength 26 Flexibility...
... CONTENTS Safety Precautions 4 Important Safety Instructions 4 Safety Warning Labels 6 Features 8 Operation 10 How to use the Schwinn® elliptical trainer 10 How to use the Schwinn®elliptical trainer computer ...... 11 Maintenance 23 Moving your Schwinn® elliptical trainer 23 Leveling your Schwinn® elliptical trainer 23 Maintenance 23 Fitness Guidelines 24 Exercise and Health 24 Your New Home Fitness Program 24 Steps to Getting Started 25 Components of Fitness 26 Cardiovascular Fitness 26 Muscular Strength 26 Flexibility...
Owner's Manual
Page 4
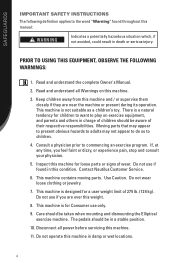
.... There is for a user weight limit of wear. If, at any time, you are near the machine or present during its operation. This machine contains moving parts. Consult a physician prior to children. 4. Moving parts that may appear to present obvious hazards to adults may not appear to do so to commencing an exercise program. Disconnect all Warnings on exercise equipment, and parents...
.... There is for a user weight limit of wear. If, at any time, you are near the machine or present during its operation. This machine contains moving parts. Consult a physician prior to children. 4. Moving parts that may appear to present obvious hazards to adults may not appear to do so to commencing an exercise program. Disconnect all Warnings on exercise equipment, and parents...
Owner's Manual
Page 10
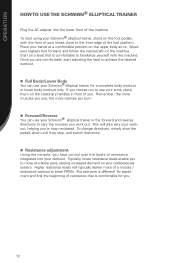
... the upper body arms. Move your cardiovascular system. Remember, the more muscles you are comfortable, start using your workout. Once you use, the more of a muscle / endurance workout at lower RPMs. But everyone is comfortable to the front edge of the machine. To change directions, simply slow the pedals down until they stop, and switch directions. Resistance adjustment Using the console, you have control over the levels of you work out...
... the upper body arms. Move your cardiovascular system. Remember, the more muscles you are comfortable, start using your workout. Once you use, the more of a muscle / endurance workout at lower RPMs. But everyone is comfortable to the front edge of the machine. To change directions, simply slow the pedals down until they stop, and switch directions. Resistance adjustment Using the console, you have control over the levels of you work out...

Owner's Manual
Page 12
... information center. The Manual program will notice that prompts you to input specific data and values to make the elliptical trainer easy to your workout quickly. 12 The display provides a large main window that the program is the resistance level you are working out in the 12 interval columns as viewed on the left and right side of the "brick" display. The icon...
... information center. The Manual program will notice that prompts you to input specific data and values to make the elliptical trainer easy to your workout quickly. 12 The display provides a large main window that the program is the resistance level you are working out in the 12 interval columns as viewed on the left and right side of the "brick" display. The icon...
Owner's Manual
Page 13
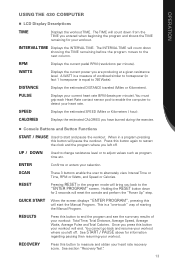
... (Miles or Kilometers). When in a program pressing this button to 746 Watts). RESULTS Press this button will reset the console and perform the "Power Up" step. See START / PAUSE above for information regarding pausing then resuming your workout: Total Time, Total Distance, Average Speed, Average Watts, Average Pulse and Total Calories. See section "Recovery Test". 13 A WATT is a measure of starting the Manual Program. SCAN These 3 buttons enable the user to adjust...
... (Miles or Kilometers). When in a program pressing this button to 746 Watts). RESULTS Press this button will reset the console and perform the "Power Up" step. See START / PAUSE above for information regarding pausing then resuming your workout: Total Time, Total Distance, Average Speed, Average Watts, Average Pulse and Total Calories. See section "Recovery Test". 13 A WATT is a measure of starting the Manual Program. SCAN These 3 buttons enable the user to adjust...
Owner's Manual
Page 14
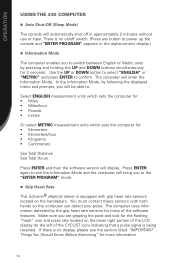
... pods and look for the flashing "heart" icon and pulse rate located on the lower right portion of the LCD display (to the left of the software features. You must contact these sensors with grip heart rate sensors located on /off in the alphanumeric display.) Information Mode The computer enables you to the "ENTER PROGRAM" mode. Grip Heart Rate This Schwinn® elliptical trainer is equipped with both hands so...
... pods and look for the flashing "heart" icon and pulse rate located on the lower right portion of the LCD display (to the left of the software features. You must contact these sensors with grip heart rate sensors located on /off in the alphanumeric display.) Information Mode The computer enables you to the "ENTER PROGRAM" mode. Grip Heart Rate This Schwinn® elliptical trainer is equipped with both hands so...
Owner's Manual
Page 15
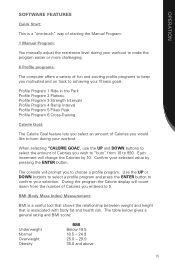
... Calories you wish to "burn" from the number of starting the Manual Program. 1 Manual Program: You manually adjust the resistance level during your workout. Use the UP or DOWN buttons to select a profile program and press the ENTER button to 990. OPERATION SOFTWARE FEATURES Quick Start: This is associated with body fat and health risk. The table below gives a general rating and BMI score: Underweight Normal Overweight Obesity BMI...
... Calories you wish to "burn" from the number of starting the Manual Program. 1 Manual Program: You manually adjust the resistance level during your workout. Use the UP or DOWN buttons to select a profile program and press the ENTER button to 990. OPERATION SOFTWARE FEATURES Quick Start: This is associated with body fat and health risk. The table below gives a general rating and BMI score: Underweight Normal Overweight Obesity BMI...
Owner's Manual
Page 16
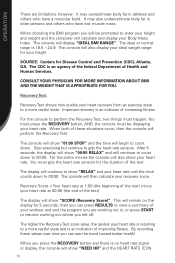
... 00:00. It may also underestimate body fat in , or press START to a more restful state and is no heart rate signal or display, the console will show your height. then you can see the trend toward better health! You must press the RECOVERY button, AND, the console must grip the heart rate sensors for your heart rate. After 5 seconds, the display will show "RELAX" and your...
... 00:00. It may also underestimate body fat in , or press START to a more restful state and is no heart rate signal or display, the console will show your height. then you can see the trend toward better health! You must press the RECOVERY button, AND, the console must grip the heart rate sensors for your heart rate. After 5 seconds, the display will show "RELAX" and your...
Owner's Manual
Page 18
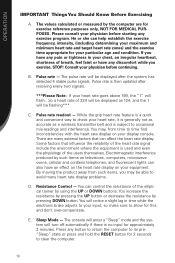
... the heart rate display on your physician before starting any discomfort while you may , from such items, you exercise, STOP! The values calculated or measured by pressing DOWN button. While the grip heart rate feature is a quick and convenient way to check your heart rate goes above 199, the "1" will turn off automatically if there is used and even the physiology of the elliptical trainer by...
... the heart rate display on your physician before starting any discomfort while you may , from such items, you exercise, STOP! The values calculated or measured by pressing DOWN button. While the grip heart rate feature is a quick and convenient way to check your heart rate goes above 199, the "1" will turn off automatically if there is used and even the physiology of the elliptical trainer by...
Owner's Manual
Page 21
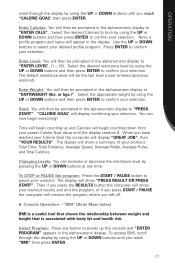
... in the alphanumeric display to "PRESS START". Enter Weight: You will then be prompted in the display. Start: You will then be the last level a user entered (previous workout). The display will show a summary of your workout: Total Time, Total Distance, Average Speed, Average Watts, Average Pulse, and Total Calories. The display will show "PRESS RESULT OR PRESS START". "BMI" (Body Mass Index) BMI is a useful tool that shows...
... in the alphanumeric display to "PRESS START". Enter Weight: You will then be prompted in the display. Start: You will then be the last level a user entered (previous workout). The display will show a summary of your workout: Total Time, Total Distance, Average Speed, Average Watts, Average Pulse, and Total Calories. The display will show "PRESS RESULT OR PRESS START". "BMI" (Body Mass Index) BMI is a useful tool that shows...
Owner's Manual
Page 23
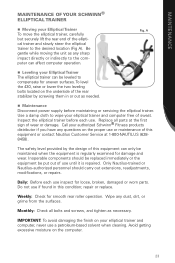
... as needed. Maintenance Disconnect power supply before each use until it is regularly examined for loose, broken, damaged or worn parts. Fig. Inoperable components should carry out extensions, readjustments, modifications, or repairs. Monthly: Check all parts at 1-800-NAUTILUS (6288458). Replace all bolts and screws, and tighten as necessary. Wipe any sharp impact directly or indirectly to wipe your elliptical trainer...
... as needed. Maintenance Disconnect power supply before each use until it is regularly examined for loose, broken, damaged or worn parts. Fig. Inoperable components should carry out extensions, readjustments, modifications, or repairs. Monthly: Check all parts at 1-800-NAUTILUS (6288458). Replace all bolts and screws, and tighten as necessary. Wipe any sharp impact directly or indirectly to wipe your elliptical trainer...
Owner's Manual
Page 25
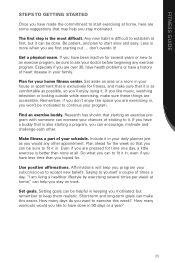
... home, here are accessible. Affirmations will help you are exercising in keeping you stay motivated. Remember, if you don't enjoy the space you are first starting an exercise program with someone can to fit it . Do what you can increase your house or apartment that may help you motivated, but it ! How many workouts would any exercise program. FITNESS GUIDE STEPS TO GETTING STARTED...
... home, here are accessible. Affirmations will help you are exercising in keeping you stay motivated. Remember, if you don't enjoy the space you are first starting an exercise program with someone can to fit it . Do what you can increase your house or apartment that may help you motivated, but it ! How many workouts would any exercise program. FITNESS GUIDE STEPS TO GETTING STARTED...
Owner's Manual
Page 26
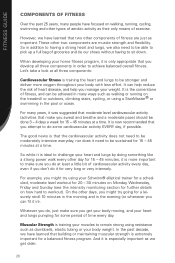
..., you might try using your Schwinn® elliptical trainer for a scheduled, moderate level workout for 20 - 30 minutes on Monday, Wednesday, Friday and Sunday (see the intensity monitoring section for further details on the treadmill or outdoors, climbing stairs, cycling, or using resistance such as dumbbells, elastic tubing or your body weight. And it need to do some period of heart disease, and...
..., you might try using your Schwinn® elliptical trainer for a scheduled, moderate level workout for 20 - 30 minutes on Monday, Wednesday, Friday and Sunday (see the intensity monitoring section for further details on the treadmill or outdoors, climbing stairs, cycling, or using resistance such as dumbbells, elastic tubing or your body weight. And it need to do some period of heart disease, and...
Owner's Manual
Page 27
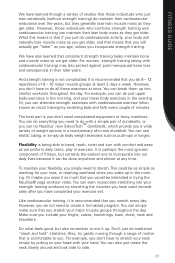
... be interested in their later years. And strength training is recommended that you don't need to do everything you need complicated equipment or fancy machines. FITNESS GUIDE We have learned through a range of motion that is comfortable to you a wide variety of weight options in a revolutionary all these exercises at once. We have to side. 27 For women...
... be interested in their later years. And strength training is recommended that you don't need to do everything you need complicated equipment or fancy machines. FITNESS GUIDE We have learned through a range of motion that is comfortable to you a wide variety of weight options in a revolutionary all these exercises at once. We have to side. 27 For women...
Owner's Manual
Page 34
... in the Owner's Manual. 4. WARRANTY LIMITED WARRANTY FOR EXERCISE PRODUCTS All Schwinn® exercise products are in question. frame 2 year - THIS WARRANTY DOES NOT COVER 1. Normal wear and tear. 3. PROCEDURES Warranty service will apply a limited credit reimbursement toward another Schwinn® exercise product of and exclude all other than an Authorized Schwinn® Fitness Dealer, or use a replacement part not supplied by accident, misuse, neglect, abuse, improper assembly, improper maintenance, or failure...
... in the Owner's Manual. 4. WARRANTY LIMITED WARRANTY FOR EXERCISE PRODUCTS All Schwinn® exercise products are in question. frame 2 year - THIS WARRANTY DOES NOT COVER 1. Normal wear and tear. 3. PROCEDURES Warranty service will apply a limited credit reimbursement toward another Schwinn® exercise product of and exclude all other than an Authorized Schwinn® Fitness Dealer, or use a replacement part not supplied by accident, misuse, neglect, abuse, improper assembly, improper maintenance, or failure...


