
Owner's Manual
Page 4
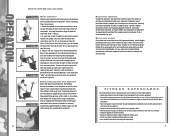
... when mounting and dismounting 7 As you will "pop" up into moving parts of resistance levels available via the console. Release the seat knob, engaging the locking pin. To adjust the 201 seat, pull the seat knob up on the 101 or backward on the hand grips. A child's curiosity may...move the seat up with your sides and with the range of the exercise equipment. • Keep children and pets away from the 101/201 bike while machine is comfortable for you. ■ Lower body workout Once you will typically deliver more comfortable, experiment with your hands resting on ...
... when mounting and dismounting 7 As you will "pop" up into moving parts of resistance levels available via the console. Release the seat knob, engaging the locking pin. To adjust the 201 seat, pull the seat knob up on the 101 or backward on the hand grips. A child's curiosity may...move the seat up with your sides and with the range of the exercise equipment. • Keep children and pets away from the 101/201 bike while machine is comfortable for you. ■ Lower body workout Once you will typically deliver more comfortable, experiment with your hands resting on ...
Owner's Manual
Page 5
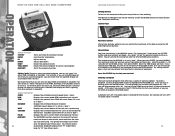
...MANUAL mode. If you wish to 0. This will notice that Heart Rate is to select desired one goal (TIME or DISTANCE or CALORIES,) for Console Getting Started: To turn on the computer either TIME, DISTANCE, or CALORIES. During you a variety of that the user is producting CALORIES Displays ... count up Adjusts data down Resets the workout results Resets the entire computer to highlight the PROGRAM icon. HOW TO USE THE 101/201 BIKE COMPUTER Button Functions ST/STOP ENTER UP DOWN RESET TOTAL RESET RECOVERY Starts and Stops the workout session Used to enter information Adjusts data...
...MANUAL mode. If you wish to 0. This will notice that Heart Rate is to select desired one goal (TIME or DISTANCE or CALORIES,) for Console Getting Started: To turn on the computer either TIME, DISTANCE, or CALORIES. During you a variety of that the user is producting CALORIES Displays ... count up Adjusts data down Resets the workout results Resets the entire computer to highlight the PROGRAM icon. HOW TO USE THE 101/201 BIKE COMPUTER Button Functions ST/STOP ENTER UP DOWN RESET TOTAL RESET RECOVERY Starts and Stops the workout session Used to enter information Adjusts data...
Assembly Manual
Page 4
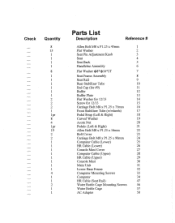
... 22 Bolt Cover 23 Carriage Bolt M8 x P1.25 x 90mm 24 Computer Cable (Lower) 25 HR Cable (Lower) 26 Console Mast Cover 27 Computer Cable (Upper) 28 HR Cable (Upper) 29 Console Mast 30 Main Unit 31 Lower Base Frame 32 Computer Mounting Screws 33 Computer 34 HR Cable (Seat Rail) 47...
... 22 Bolt Cover 23 Carriage Bolt M8 x P1.25 x 90mm 24 Computer Cable (Lower) 25 HR Cable (Lower) 26 Console Mast Cover 27 Computer Cable (Upper) 28 HR Cable (Upper) 29 Console Mast 30 Main Unit 31 Lower Base Frame 32 Computer Mounting Screws 33 Computer 34 HR Cable (Seat Rail) 47...
Assembly Manual
Page 7
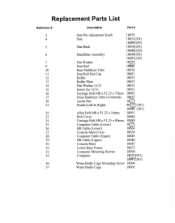
...18053 16 Carriage Bolt M8 x P1.25 x 75mm 18002 17 Front Stabilizer Tube (w/wheels) 18057 20 Acorn Nut 18004 21 Pedals (Left & Right) 98148 (201) 18048 (203) 22 Allen Bolt M8 x P1.25 x 16mm 18001 23 Bolt Cover 18084 24 Carriage Bolt M8 x P1.25 x 90mm 18089 25 ...Cable (Lower) 18063 26 HR Cable (Lower) 18064 27 Console Mast Cover 18058 28 Computer Cable (Upper) 18085 29 HR Cable (Upper) 18086 30 Console Mast 18087 32 Lower Base Frame 18075 33 Computer Mounting Screws 18096 34 Computer 18033(201) 18047(203) 56 Water Bottle Cage Mounting Screw 18094 57...
...18053 16 Carriage Bolt M8 x P1.25 x 75mm 18002 17 Front Stabilizer Tube (w/wheels) 18057 20 Acorn Nut 18004 21 Pedals (Left & Right) 98148 (201) 18048 (203) 22 Allen Bolt M8 x P1.25 x 16mm 18001 23 Bolt Cover 18084 24 Carriage Bolt M8 x P1.25 x 90mm 18089 25 ...Cable (Lower) 18063 26 HR Cable (Lower) 18064 27 Console Mast Cover 18058 28 Computer Cable (Upper) 18085 29 HR Cable (Upper) 18086 30 Console Mast 18087 32 Lower Base Frame 18075 33 Computer Mounting Screws 18096 34 Computer 18033(201) 18047(203) 56 Water Bottle Cage Mounting Screw 18094 57...

Assembly Manual
Page 14
... #22) (4) Curved Washers (item #19) (4) Computer Screws (item #33) (2) Water Bottle Cage Screws M5*12 mm (item #56) Step 13: Run CONSOLE MAST (#30) through the CONSOLE MAST COVER (#27) and onto the MAIN UNIT (#31). Step 14: Attach WATER BOTTLE CAGE (#57) to under side of the COMPUTER. Before... (#29 & #26) as well as the COMPUTER CABLE (#28 & #25). Step 15: Attach UPPER COMPUTER CABLE (#28) and HR CABLE (#29) to CONSOLE MAST (#30) with 4 BOLTS (#22) and 4 CURVED WASHERS (#19). Fasten with SCREWS (#56). Tighten with Phillips head screwdriver. Place COMPUTER (#34) on top of...
... #22) (4) Curved Washers (item #19) (4) Computer Screws (item #33) (2) Water Bottle Cage Screws M5*12 mm (item #56) Step 13: Run CONSOLE MAST (#30) through the CONSOLE MAST COVER (#27) and onto the MAIN UNIT (#31). Step 14: Attach WATER BOTTLE CAGE (#57) to under side of the COMPUTER. Before... (#29 & #26) as well as the COMPUTER CABLE (#28 & #25). Step 15: Attach UPPER COMPUTER CABLE (#28) and HR CABLE (#29) to CONSOLE MAST (#30) with 4 BOLTS (#22) and 4 CURVED WASHERS (#19). Fasten with SCREWS (#56). Tighten with Phillips head screwdriver. Place COMPUTER (#34) on top of...
Assembly Manual
Page 15
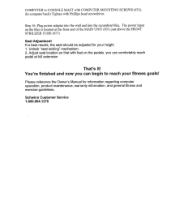
...Please reference the Owner's Manual for your fitness goals! Schwinn Customer Service 1.800.864.1270 Adjust seat location so that with Phillips head screwdriver. That's it! Step 16: Plug power adapter into the wall and into the recumbent bike. The power input on the pedals, you can ...maintenance, warranty information, and general fitness and exercise guidelines. You're finished and now you can begin to CONSOLE MAST with COMPUTER MOUNTING SCREWS (#33). (In computer back) Tighten with feet on the bike is located at full extension. COMPUTER to reach your height. 1.
...Please reference the Owner's Manual for your fitness goals! Schwinn Customer Service 1.800.864.1270 Adjust seat location so that with Phillips head screwdriver. That's it! Step 16: Plug power adapter into the wall and into the recumbent bike. The power input on the pedals, you can ...maintenance, warranty information, and general fitness and exercise guidelines. You're finished and now you can begin to CONSOLE MAST with COMPUTER MOUNTING SCREWS (#33). (In computer back) Tighten with feet on the bike is located at full extension. COMPUTER to reach your height. 1.

