
Owner's Manual
Page 3
... 101/201 bike. Limited Warranty 21 FITNESS SAFEGUARDS Before starting any discomfort while you exercise, STOP! Consult your 101/201 bike 10 Daily maintenance 10 Guidelines - CONGRATULATIONS! Please read this Owner's Manual in your time and have any exercise program, consult with your fitness program .......18 Summary of breath, feel faint or have fun! TABLE OF CONTENTS Operation ...7 How to use the 101/201 bike 7 How to rely on Schwinn craftsmanship...
... 101/201 bike. Limited Warranty 21 FITNESS SAFEGUARDS Before starting any discomfort while you exercise, STOP! Consult your 101/201 bike 10 Daily maintenance 10 Guidelines - CONGRATULATIONS! Please read this Owner's Manual in your time and have any exercise program, consult with your fitness program .......18 Summary of breath, feel faint or have fun! TABLE OF CONTENTS Operation ...7 How to use the 101/201 bike 7 How to rely on Schwinn craftsmanship...
Owner's Manual
Page 4
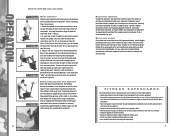
... the seat knob, engaging the locking pin. FITNESS SAFEGUARDS Failure to move the seat down on the 101 or forward on the 201 bike. Do not allow anyone to release the seat. turn pedal crank arms by slipping the nub at your sides and with the range of injury. 1. Then, reach down the strap until the pedals are designed and intended for subsequent workouts. 6 ■ Resistance adjustment Using the console, you...
... the seat knob, engaging the locking pin. FITNESS SAFEGUARDS Failure to move the seat down on the 101 or forward on the 201 bike. Do not allow anyone to release the seat. turn pedal crank arms by slipping the nub at your sides and with the range of injury. 1. Then, reach down the strap until the pedals are designed and intended for subsequent workouts. 6 ■ Resistance adjustment Using the console, you...
Owner's Manual
Page 5
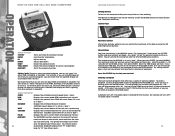
... programs that the CALORIE display will begin. Next, the TIME display will turn off : If no pedal signal is set only one minute, measured from the time you can press the ST/STOP button to start pedaling. P6). Automatic turn on the computer either TIME, DISTANCE, or CALORIES. Control Panel Resistance Control At any button or start your workout or you can set LEVEL or a goal as a "goal".) PULSE Displays the user's current heart rate...
... programs that the CALORIE display will begin. Next, the TIME display will turn off : If no pedal signal is set only one minute, measured from the time you can press the ST/STOP button to start pedaling. P6). Automatic turn on the computer either TIME, DISTANCE, or CALORIES. Control Panel Resistance Control At any button or start your workout or you can set LEVEL or a goal as a "goal".) PULSE Displays the user's current heart rate...
Owner's Manual
Page 6
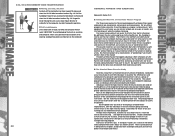
... benefit from exercising at home. ■ The Stanford Home Exercise Study Recently, researchers at home turns out to be true. The subject population included middle aged men and women and included fit individuals as well as if you . MAINTENANCE 101/201 RECUMBENT BIKE MAINTENANCE FIG.19 ■ Moving your 101/201 bike Carefully lift the horizontal rear floor support to move and steer the 101 bike to use a petroleum-based...
... benefit from exercising at home. ■ The Stanford Home Exercise Study Recently, researchers at home turns out to be true. The subject population included middle aged men and women and included fit individuals as well as if you . MAINTENANCE 101/201 RECUMBENT BIKE MAINTENANCE FIG.19 ■ Moving your 101/201 bike Carefully lift the horizontal rear floor support to move and steer the 101 bike to use a petroleum-based...
Owner's Manual
Page 7
...spouse or children to exercise with its recommendations on cardiovascular fitness and body composition, and now recommends that you add resistance training. 12 STEPS TO GETTING STARTED Once you have made the commitment to get started in a home fitness program, here are some ...weights until they are over 35, have health problems or have a history of heart disease in your family. • Begin planning for your house or apartment that is as comfortable as possible so you'll enjoy using it in your daily planner just as important. Set aside a portion or a room in your home fitness...
...spouse or children to exercise with its recommendations on cardiovascular fitness and body composition, and now recommends that you add resistance training. 12 STEPS TO GETTING STARTED Once you have made the commitment to get started in a home fitness program, here are some ...weights until they are over 35, have health problems or have a history of heart disease in your family. • Begin planning for your house or apartment that is as comfortable as possible so you'll enjoy using it in your daily planner just as important. Set aside a portion or a room in your home fitness...
Owner's Manual
Page 8
... ACSM recognizes the increasing importance of your maximum heart rate (max HR = 220 - The guidelines also show where consistent resistance training helps maintain bone and muscle mass as walking, cycling, cross-county skiing, etc. The guidelines state that you will result in a gradual weight loss, without a loss of water and lean body tissue, such as we get older. It...
... ACSM recognizes the increasing importance of your maximum heart rate (max HR = 220 - The guidelines also show where consistent resistance training helps maintain bone and muscle mass as walking, cycling, cross-county skiing, etc. The guidelines state that you will result in a gradual weight loss, without a loss of water and lean body tissue, such as we get older. It...
Owner's Manual
Page 9
... heart rate into your workout program. Stretching before you get on a formula which oxygen can help you to 120 beats per week. This is best accomplished with a heart rate monitor allows you to constantly receive visible feedback (and on some models audible feedback) as to what 's to stretch your legs, shoulders and lower back before and after exercise also serves many charts...
... heart rate into your workout program. Stretching before you get on a formula which oxygen can help you to 120 beats per week. This is best accomplished with a heart rate monitor allows you to constantly receive visible feedback (and on some models audible feedback) as to what 's to stretch your legs, shoulders and lower back before and after exercise also serves many charts...

Owner's Manual
Page 10
... workout. "Most training programs use a combination of exercise before, now becomes quite easy. Don't look at a lower heart rate. As you run, walk or lift weights, concentrate on the horse just as fast as we will show , you'll reduce your regular workout routine. Whereas cycling or running at a certain pace or speed may have reached a certain weight loss goal, or buy yourself a new workout...
... workout. "Most training programs use a combination of exercise before, now becomes quite easy. Don't look at a lower heart rate. As you run, walk or lift weights, concentrate on the horse just as fast as we will show , you'll reduce your regular workout routine. Whereas cycling or running at a certain pace or speed may have reached a certain weight loss goal, or buy yourself a new workout...

Owner's Manual
Page 11
... require warranty service. 2. THIS WARRANTY DOES NOT COVER 1. LIMITATIONS The foregoing warranties are a competitive cyclist or triathlete, an executive or someone other warranties not expressly set -up a home gym, purchase equipment and gives workout programs for 6 months from defects in connection with it by Schwinn Fitness warranty policies and procedures. Service calls and/or transportation to normal wear and tear. In the event a product cannot be repaired, Schwinn will...
... require warranty service. 2. THIS WARRANTY DOES NOT COVER 1. LIMITATIONS The foregoing warranties are a competitive cyclist or triathlete, an executive or someone other warranties not expressly set -up a home gym, purchase equipment and gives workout programs for 6 months from defects in connection with it by Schwinn Fitness warranty policies and procedures. Service calls and/or transportation to normal wear and tear. In the event a product cannot be repaired, Schwinn will...
Assembly Manual
Page 1
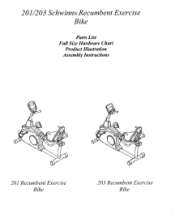
201/203 Schwinn® Recumbent Exercise Bike Parts List Full Size Hardware Chart Product Illustration Assembly Instructions 201 Recumbent Exercise Bike 203 Recumbent Exercise Bike
201/203 Schwinn® Recumbent Exercise Bike Parts List Full Size Hardware Chart Product Illustration Assembly Instructions 201 Recumbent Exercise Bike 203 Recumbent Exercise Bike
Assembly Manual
Page 2
... while exercising, stop immediately and consult your physician. This Schwinn 201/203 is especially important for home use of 35 or persons with pre-existing health problems. Read all times. 7. This is intended for persons over the age of this equipment only on the exercise bicycle. 10. Use this product. Care should be taken when mounting or dismounting the exercise bicycle. 9. User weight limit...
... while exercising, stop immediately and consult your physician. This Schwinn 201/203 is especially important for home use of 35 or persons with pre-existing health problems. Read all times. 7. This is intended for persons over the age of this equipment only on the exercise bicycle. 10. Use this product. Care should be taken when mounting or dismounting the exercise bicycle. 9. User weight limit...
Assembly Manual
Page 3
... of the 201/203 Recumbent Bike is divided into 5 easy stages; Included is suggested to assemble and properly use the 201/203 exercise bike. • You will need the following tools to complete the assembly: 5mm Allen wrench (supplied) Open wrench 13mm, 14mm, 15mm (supplied) Phillips screwdriver (supplied) Also, to each comprised of the enclosed assembly hardware. 201/203 Schwinn Recumbent Bike Parts List, Hardware Chart, and Assembly Instructions Assembly of the...
... of the 201/203 Recumbent Bike is divided into 5 easy stages; Included is suggested to assemble and properly use the 201/203 exercise bike. • You will need the following tools to complete the assembly: 5mm Allen wrench (supplied) Open wrench 13mm, 14mm, 15mm (supplied) Phillips screwdriver (supplied) Also, to each comprised of the enclosed assembly hardware. 201/203 Schwinn Recumbent Bike Parts List, Hardware Chart, and Assembly Instructions Assembly of the...
Assembly Manual
Page 4
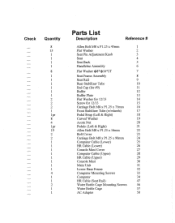
....25 x 45mm 1 Flat Washer 2 Seat Pin Adjustment Knob 3 Seat 4 Seat Back 5 Handlebar Assembly 6 Flat Washer i1)8*c016*2T 7 Seat Frame Assembly 8 Seat Rail 9 Rear Stabilizer Tube 10 End Cap (for #9) 11 Buffer 12 Buffer Plate 13 Flat Washer for 12/13 14 Screw for 12/13 15 Carriage Bolt M8 x P1.25 x 75mm 16 Front Stabilizer Tube (w/wheels) 17 Pedal Strap (Left & Right) 18 Curved...
....25 x 45mm 1 Flat Washer 2 Seat Pin Adjustment Knob 3 Seat 4 Seat Back 5 Handlebar Assembly 6 Flat Washer i1)8*c016*2T 7 Seat Frame Assembly 8 Seat Rail 9 Rear Stabilizer Tube 10 End Cap (for #9) 11 Buffer 12 Buffer Plate 13 Flat Washer for 12/13 14 Screw for 12/13 15 Carriage Bolt M8 x P1.25 x 75mm 16 Front Stabilizer Tube (w/wheels) 17 Pedal Strap (Left & Right) 18 Curved...
Assembly Manual
Page 7
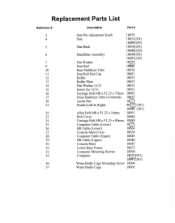
Replacement Parts List Reference # Description Part # 3 Seat Pin Adjustment Knob 18079 4 Seat 18051(201) 18089(203) 5 Seat Back 18050(201) 18088(203) 6 Handlebar Assembly 18049(201) 18087(203) 7 Flat Washer 18088 9 Seat Rail 18080 10 Rear Stabilizer Tube 18076 11 Seat Rail End Cap 18081 12 Buffer 18053 13 Buffer Plate 18053 14 Flat Washer 12/13 18053 15 Screw for 12/13 18053 16 Carriage Bolt M8 x P1.25...
Replacement Parts List Reference # Description Part # 3 Seat Pin Adjustment Knob 18079 4 Seat 18051(201) 18089(203) 5 Seat Back 18050(201) 18088(203) 6 Handlebar Assembly 18049(201) 18087(203) 7 Flat Washer 18088 9 Seat Rail 18080 10 Rear Stabilizer Tube 18076 11 Seat Rail End Cap 18081 12 Buffer 18053 13 Buffer Plate 18053 14 Flat Washer 12/13 18053 15 Screw for 12/13 18053 16 Carriage Bolt M8 x P1.25...
Assembly Manual
Page 8
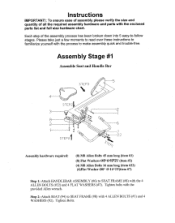
...(item #7) Step 1: Attach HANDLEBAR ASSEMBLY (#6) to SEAT FRAME (#8) with the provided Allen wrench. Tighten bolts with the 4 ALLEN BOLTS (#22) and 4 FLAT WASHERS (#7). Step 2: Attach SEAT (#4) to SEAT FRAME (#8) with the process to make assembly quick and trouble-free. Please take just a few moments to read over these instructions to familiarize yourself with 4 ALLEN BOLTS (#1) and 4 WASHERS (#2). Instructions IMPORTANT!: To ensure ease of assembly please verify the size and...
...(item #7) Step 1: Attach HANDLEBAR ASSEMBLY (#6) to SEAT FRAME (#8) with the provided Allen wrench. Tighten bolts with the 4 ALLEN BOLTS (#22) and 4 FLAT WASHERS (#7). Step 2: Attach SEAT (#4) to SEAT FRAME (#8) with the process to make assembly quick and trouble-free. Please take just a few moments to read over these instructions to familiarize yourself with 4 ALLEN BOLTS (#1) and 4 WASHERS (#2). Instructions IMPORTANT!: To ensure ease of assembly please verify the size and...
Assembly Manual
Page 10
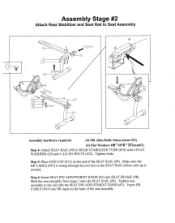
... the seat assembly. Step 6: Insert SEAT PIN ADJUSTMENT KNOB (#3) into HR input on the SEAT RAIL before end cap is secured. Make sure the HR CABLE (#47) is strung through the exit slot on the back of the SEAT RAIL (#9). Tighten seat assembly to Seat Assembly 2 2 2-- Tighten bolts. t STEP4 1- 141 0 4 STEPS 1 1 1 9 7 1 1 STEP7 10 Assembly hardware required: (4) M8 Allen Bolts 16mm (item #22) (4) Flat Washers 08 * 019 * 2T(item#2) Step 4: Attach SEAT RAIL (#9) to REAR...
... the seat assembly. Step 6: Insert SEAT PIN ADJUSTMENT KNOB (#3) into HR input on the SEAT RAIL before end cap is secured. Make sure the HR CABLE (#47) is strung through the exit slot on the back of the SEAT RAIL (#9). Tighten seat assembly to Seat Assembly 2 2 2-- Tighten bolts. t STEP4 1- 141 0 4 STEPS 1 1 1 9 7 1 1 STEP7 10 Assembly hardware required: (4) M8 Allen Bolts 16mm (item #22) (4) Flat Washers 08 * 019 * 2T(item#2) Step 4: Attach SEAT RAIL (#9) to REAR...

Assembly Manual
Page 12
... handgrip heart rate wires! 1) Remove END CAP (#11) from the end of the seat rail. Be careful not to step 11 please complete the following steps. Slide the seat rail with the front of the seat rail. IMPORTANT Before proceeding to pull apart the cable connection you have just made. Slide the seat rail slowly into the MAIN UNIT (#31), attach with 3, 16mm BOLTS...
... handgrip heart rate wires! 1) Remove END CAP (#11) from the end of the seat rail. Be careful not to step 11 please complete the following steps. Slide the seat rail with the front of the seat rail. IMPORTANT Before proceeding to pull apart the cable connection you have just made. Slide the seat rail slowly into the MAIN UNIT (#31), attach with 3, 16mm BOLTS...

Assembly Manual
Page 13
.... Feed the remaining excess wire into main unit. Verify that the handgrip heart rate works by hitting manual start and then placing your hand on the grip heart pad located on the handlebars. into the seat rail and replace the end cap on the end of the seat rail. Step 11: Attach SEAT RAIL (#9) to MAIN UNIT (#31) with 2 90mm LONG BOLTS (#24), 2 CURVED WASHERS...
.... Feed the remaining excess wire into main unit. Verify that the handgrip heart rate works by hitting manual start and then placing your hand on the grip heart pad located on the handlebars. into the seat rail and replace the end cap on the end of the seat rail. Step 11: Attach SEAT RAIL (#9) to MAIN UNIT (#31) with 2 90mm LONG BOLTS (#24), 2 CURVED WASHERS...
Assembly Manual
Page 15
... end of the MAIN UNIT (#31) just above the FRONT STBILIZER TUBE (#17) Seat Adjustment For best results, the seat should be adjusted for information regarding computer operation, product maintenance, warranty information, and general fitness and exercise guidelines. Adjust seat location so that with Phillips head screwdriver. Please reference the Owner's Manual for your fitness goals! Step 16: Plug power adapter into the wall and into the recumbent bike. Unlock "seat locking" mechanism. 2.
... end of the MAIN UNIT (#31) just above the FRONT STBILIZER TUBE (#17) Seat Adjustment For best results, the seat should be adjusted for information regarding computer operation, product maintenance, warranty information, and general fitness and exercise guidelines. Adjust seat location so that with Phillips head screwdriver. Please reference the Owner's Manual for your fitness goals! Step 16: Plug power adapter into the wall and into the recumbent bike. Unlock "seat locking" mechanism. 2.
Assembly Manual
Page 16
PROBLEM: No Heart Rate on the rear stabilizer. PROBLEM: Computer will not sit level... (SOLUTION): 1. Confirm that wiring (cable assembly) has not been damaged 4. PROBLEM: Bike will not start please call 1.800.864.1270 for assistance. Troubleshooting the Schwinn 201, 203 Recumbent Exercise Bike TIP: Use assembly diagram(s) as reference when troubleshooting unit. Note: If you need additional support information or assistance in troubleshooting, please contact us at the computer and handlebars 2. Check the wiring connections and connector...
PROBLEM: No Heart Rate on the rear stabilizer. PROBLEM: Computer will not sit level... (SOLUTION): 1. Confirm that wiring (cable assembly) has not been damaged 4. PROBLEM: Bike will not start please call 1.800.864.1270 for assistance. Troubleshooting the Schwinn 201, 203 Recumbent Exercise Bike TIP: Use assembly diagram(s) as reference when troubleshooting unit. Note: If you need additional support information or assistance in troubleshooting, please contact us at the computer and handlebars 2. Check the wiring connections and connector...


