Installation
Page 3
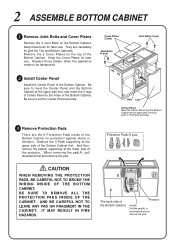
... the 2 Cover Plates on the Bottom Cabinet. Hole Leg Center Panel Meet the Center Panel and the Bottom Cabinet at the lower side of the projector. Keep these bolts for later use . Protection Pads (5 pcs) The back side of the Bottom Cabinet. Cover Plates (2 pcs) Joint Bolts (4 pcs) Joint Bolts ...to downward first and remove the pad. IT MAY RESULT IN FIRE HAZARDS. BE SURE TO REMOVE ALL THE PROTECTION PADS INSIDE OF THE CABINET. Projector Pad(A) Pull the pad(A) to the Bottom Cabinet. And then, remove the pad(A) supporting at the upper part first and push in the Panel...
... the 2 Cover Plates on the Bottom Cabinet. Hole Leg Center Panel Meet the Center Panel and the Bottom Cabinet at the lower side of the projector. Keep these bolts for later use . Protection Pads (5 pcs) The back side of the Bottom Cabinet. Cover Plates (2 pcs) Joint Bolts (4 pcs) Joint Bolts ...to downward first and remove the pad. IT MAY RESULT IN FIRE HAZARDS. BE SURE TO REMOVE ALL THE PROTECTION PADS INSIDE OF THE CABINET. Projector Pad(A) Pull the pad(A) to the Bottom Cabinet. And then, remove the pad(A) supporting at the upper part first and push in the Panel...
Installation
Page 4
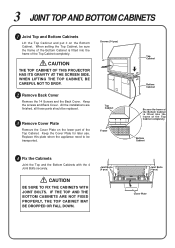
... FIXED PROPERLY, THE TOP CABINET MAY BE DROPPED OR FALL DOWN. Joint Bolts (4 pcs) Joint Bolts (4 pcs) Cover Plate CAUTION THE TOP CABINET OF THIS PROJECTOR HAS ITS GRAVITY AT THE SCREEN SIDE. All the installations are finished, all those parts should be transported. CAUTION BE SURE TO FIX THE CABINETS...
... FIXED PROPERLY, THE TOP CABINET MAY BE DROPPED OR FALL DOWN. Joint Bolts (4 pcs) Joint Bolts (4 pcs) Cover Plate CAUTION THE TOP CABINET OF THIS PROJECTOR HAS ITS GRAVITY AT THE SCREEN SIDE. All the installations are finished, all those parts should be transported. CAUTION BE SURE TO FIX THE CABINETS...
Installation
Page 6
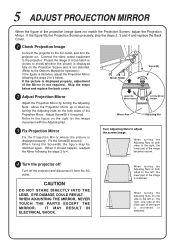
... the Screw(B) the figure may be distorted again. Refer to the AC outlet, and turn the projector on the right for operation.) If the figure is distorted, adjust the Projection Mirror following the steps 2 to check whether the picutre is displayed fully on both sides of the... When the figure of the image is stretched. If the figure fits the Projection Screen precisely, skip the steps 2, 3 and 4 and replace the Back Cover. 1 Check Projection Image Connect the projector to the figure on . Lift the Mirror Holder. EYE DAMAGE COULD RESULT. WHEN ADJUSTING THE MIRROR, ...
... the Screw(B) the figure may be distorted again. Refer to the AC outlet, and turn the projector on the right for operation.) If the figure is distorted, adjust the Projection Mirror following the steps 2 to check whether the picutre is displayed fully on both sides of the... When the figure of the image is stretched. If the figure fits the Projection Screen precisely, skip the steps 2, 3 and 4 and replace the Back Cover. 1 Check Projection Image Connect the projector to the figure on . Lift the Mirror Holder. EYE DAMAGE COULD RESULT. WHEN ADJUSTING THE MIRROR, ...
Owners Manual
Page 2
... for a Class A digital device, pursuant to work properly, see "TROUBLESHOOTING" section on page 43 and try out your projector's features. If your new projector. This Projector has a grounding-type AC line plug. Through the years, we suggest that your spend a little time reading this safety ... have been prevented, if the owner had followed the instructions in your projector fails to Part 15 of a new Rear-Projection Display, you with the limits for an extended time, unplug the projector from the projection lens. READ AND KEEP THIS OWNER'S MANUAL FOR LATER USE. Do not...
... for a Class A digital device, pursuant to work properly, see "TROUBLESHOOTING" section on page 43 and try out your projector's features. If your new projector. This Projector has a grounding-type AC line plug. Through the years, we suggest that your spend a little time reading this safety ... have been prevented, if the owner had followed the instructions in your projector fails to Part 15 of a new Rear-Projection Display, you with the limits for an extended time, unplug the projector from the projection lens. READ AND KEEP THIS OWNER'S MANUAL FOR LATER USE. Do not...

Owners Manual
Page 3
...safe operating condition. If liquid has been spilled into a compartment or similarly enclosed, the minimum distances must be maintained. c. If the projector does not operate normally by following conditions: a. Adjust only those controls that are required, be sure the service technician has used replacement... or over a radiator or heat register. Should you are provided for service. Do not cover the ventilation slot on the projectors. IMPORTANT SAFETY INSTRUCTIONS All the safety and operating instructions should be read before cleaning. Do not attempt to service this unit ...
...safe operating condition. If liquid has been spilled into a compartment or similarly enclosed, the minimum distances must be maintained. c. If the projector does not operate normally by following conditions: a. Adjust only those controls that are required, be sure the service technician has used replacement... or over a radiator or heat register. Should you are provided for service. Do not cover the ventilation slot on the projectors. IMPORTANT SAFETY INSTRUCTIONS All the safety and operating instructions should be read before cleaning. Do not attempt to service this unit ...
Owners Manual
Page 4
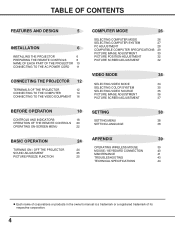
...CONTENTS FEATURES AND DESIGN 5 INSTALLATION 6 INSTALLING THE PROJECTOR 6 PREPARING THE REMOTE CONTROLS 8 NAME OF EACH PART OF THE PROJECTOR 10 CONNECTING TO THE AC POWER CORD 11 CONNECTING THE PROJECTOR 12 TERMINALS OF THE PROJECTOR 12 CONNECTING TO THE COMPUTER 14 CONNECTING TO THE ... LANGUAGE 38 OPERATING ON-SCREEN MENU 22 BASIC OPERATION 24 APPENDIX 39 OPERATING WIRELESS MOUSE 39 TURNING ON / OFF THE PROJECTOR 24 MOUSE / KEYBOARD CONNECTION 40 SOUND ADJUSTMENT 25 MAINTENANCE 41 PICTURE FREEZE FUNCTION 25 TROUBLESHOOTING 43 TECHNICAL SPECIFICATIONS 44 l ...
...CONTENTS FEATURES AND DESIGN 5 INSTALLATION 6 INSTALLING THE PROJECTOR 6 PREPARING THE REMOTE CONTROLS 8 NAME OF EACH PART OF THE PROJECTOR 10 CONNECTING TO THE AC POWER CORD 11 CONNECTING THE PROJECTOR 12 TERMINALS OF THE PROJECTOR 12 CONNECTING TO THE COMPUTER 14 CONNECTING TO THE ... LANGUAGE 38 OPERATING ON-SCREEN MENU 22 BASIC OPERATION 24 APPENDIX 39 OPERATING WIRELESS MOUSE 39 TURNING ON / OFF THE PROJECTOR 24 MOUSE / KEYBOARD CONNECTION 40 SOUND ADJUSTMENT 25 MAINTENANCE 41 PICTURE FREEZE FUNCTION 25 TROUBLESHOOTING 43 TECHNICAL SPECIFICATIONS 44 l ...
Owners Manual
Page 5
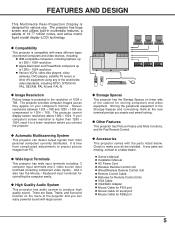
...easily. And it to a sales dealer. There are included. u Storage Spaces This projector has the Storage Spaces on lower side of 1024 x 768. Check to project picture images from PC. The projector provides computer images just as they appear on the menu of the world wide video standards... large screen and utilizes built-in the Storage Spaces and connecting them at the rear terminal provide you connect the projector. l Various VCRs, video disc players, video cameras, DVD players, satellite TV tuners or other AV equipment using any parts are compressed to 1280 ´ 1024 resolution. u...
...easily. And it to a sales dealer. There are included. u Storage Spaces This projector has the Storage Spaces on lower side of 1024 x 768. Check to project picture images from PC. The projector provides computer images just as they appear on the menu of the world wide video standards... large screen and utilizes built-in the Storage Spaces and connecting them at the rear terminal provide you connect the projector. l Various VCRs, video disc players, video cameras, DVD players, satellite TV tuners or other AV equipment using any parts are compressed to 1280 ´ 1024 resolution. u...
Owners Manual
Page 6
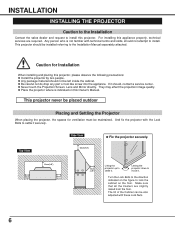
... dealer and request to lock the cabinet on the floor. Turn the Lock Bolts to the direction indicated on this projector. l Any package material should , contact a service center. l Never touch the Projection Screen, Lens and Mirror directly. l Be careful not do drop any part or tool like screw into the appliance. Any...
... dealer and request to lock the cabinet on the floor. Turn the Lock Bolts to the direction indicated on this projector. l Any package material should , contact a service center. l Never touch the Projection Screen, Lens and Mirror directly. l Be careful not do drop any part or tool like screw into the appliance. Any...
Owners Manual
Page 7
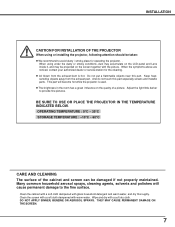
...°C CARE AND CLEANING The surface of the cabinet and screen can be projected on the quality of a picture. Many common household aerosol sprays, cleaning agents, solvents and polishes will become hot while the projector is hot. Do not put a flammable objects near this part especially screws and...dust may accumulate on the LCD panel and Lens inside it, and may be damaged if not properly maintained. When using or installing the projector, following attention should be taken: l We recommend to avoid dusty / smoky place for the cleaning. Keep heatsensitive objects away from the...
...°C CARE AND CLEANING The surface of the cabinet and screen can be projected on the quality of a picture. Many common household aerosol sprays, cleaning agents, solvents and polishes will become hot while the projector is hot. Do not put a flammable objects near this part especially screws and...dust may accumulate on the LCD panel and Lens inside it, and may be damaged if not properly maintained. When using or installing the projector, following attention should be taken: l We recommend to avoid dusty / smoky place for the cleaning. Keep heatsensitive objects away from the...

Owners Manual
Page 10
... slot. INSTALLATION NAME OF EACH PART OF THE PROJECTOR Front of the Projector PROJECTION SCREEN Do not touch the surface of fire or malfunction. 10 POWER CORD CONNECTOR Connect the AC Power Cord to page 11 for installation. Refer to this terminal. Rear of the Projector REAR TERMINAL Refer to ensure the ventilation and avoid a ...the Door and open it from overheating. SPEAKERS FRONT TERMINAL Refer to protect it . CASTER STORAGE SPACES Press the Door and pull the handle. This projector is equipped with the Cooling Fan to page 12 for details. LOCK BOLT Settle the...
... slot. INSTALLATION NAME OF EACH PART OF THE PROJECTOR Front of the Projector PROJECTION SCREEN Do not touch the surface of fire or malfunction. 10 POWER CORD CONNECTOR Connect the AC Power Cord to page 11 for installation. Refer to this terminal. Rear of the Projector REAR TERMINAL Refer to ensure the ventilation and avoid a ...the Door and open it from overheating. SPEAKERS FRONT TERMINAL Refer to protect it . CASTER STORAGE SPACES Press the Door and pull the handle. This projector is equipped with the Cooling Fan to page 12 for details. LOCK BOLT Settle the...
Owners Manual
Page 11
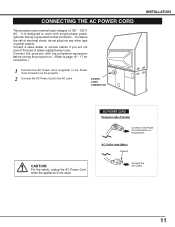
...neutral conductor. To reduce the risk of electrical shock, do not plug into any other type of power supply being in use. AC POWER CORD Projector side (Female) Connect to the AC outlet. AC Outlet side (Male) Ground Connect the AC Outlet. 11 POWER CORD CONNECTOR INSTALLATION CAUTION For ... 14 ~ 17 for connection.) 1 Connect the AC Power Cord (supplied) to the Power Cord Connector on the projector. 2 Connect the AC Power Cord to the Power Cord Connector on the projector. Consult a sales dealer or service station if you are not sure of the type of power system. CONNECTING THE...
...neutral conductor. To reduce the risk of electrical shock, do not plug into any other type of power supply being in use. AC POWER CORD Projector side (Female) Connect to the AC outlet. AC Outlet side (Male) Ground Connect the AC Outlet. 11 POWER CORD CONNECTOR INSTALLATION CAUTION For ... 14 ~ 17 for connection.) 1 Connect the AC Power Cord (supplied) to the Power Cord Connector on the projector. 2 Connect the AC Power Cord to the Power Cord Connector on the projector. Consult a sales dealer or service station if you are not sure of the type of power system. CONNECTING THE...

Owners Manual
Page 12
Rear Terminal COMPUTER IN 1 AUDIO 1 (STEREO) CONTROL PORT 1 VIDEO IN 1 VIDEO/Y C/Cb(B-Y) Cr(R-Y) S-VIDEO R-AUDIO-L (...it to page 16.) S-VIDEO Connect the S-VIDEO output from the computers to the left jack. Connect the projector with these equipment before turning them on. (Refer to page 14 ~ 17 for component video input, such...Control Cable (supplied). (Refer to page 21.) CONTROL PORT 2, 3 When controlling the computer with the Wireless Remote Control of this projector, connect the mouse port to these terminals. (Refer to page 14 and 15.) COMPUTER IN 2 COMPUTER IN 3 AUDIO 2 (...
Rear Terminal COMPUTER IN 1 AUDIO 1 (STEREO) CONTROL PORT 1 VIDEO IN 1 VIDEO/Y C/Cb(B-Y) Cr(R-Y) S-VIDEO R-AUDIO-L (...it to page 16.) S-VIDEO Connect the S-VIDEO output from the computers to the left jack. Connect the projector with these equipment before turning them on. (Refer to page 14 ~ 17 for component video input, such...Control Cable (supplied). (Refer to page 21.) CONTROL PORT 2, 3 When controlling the computer with the Wireless Remote Control of this projector, connect the mouse port to these terminals. (Refer to page 14 and 15.) COMPUTER IN 2 COMPUTER IN 3 AUDIO 2 (...

Owners Manual
Page 13
...player) to this terminal. And when the audio input of the computer to the projector with the projector's Wireless Remote Control Unit, connect control port (PS/2, Serial or ADB port) on your control the projector by computer you must connect Control Port 1 connector. l When removing the cable,... is stereo, be sure to connect the right and left channels to this terminal. Serial T X D R X D ----- When connecting to the projector, please observe the following precautions: l Be sure that is turned off. Hold the plug of the cable and remove it to the respective terminal.
...player) to this terminal. And when the audio input of the computer to the projector with the projector's Wireless Remote Control Unit, connect control port (PS/2, Serial or ADB port) on your control the projector by computer you must connect Control Port 1 connector. l When removing the cable,... is stereo, be sure to connect the right and left channels to this terminal. Serial T X D R X D ----- When connecting to the projector, please observe the following precautions: l Be sure that is turned off. Hold the plug of the cable and remove it to the respective terminal.
Owners Manual
Page 14
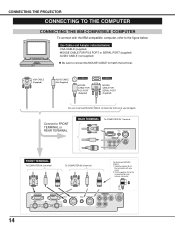
... · AUDIO CABLE (not supplied) u Be sure to connect the MOUSE CABLE to the arrow direction and remove connector. CONNECTING THE PROJECTOR CONNECTING TO THE COMPUTER CONNECTING THE IBM-COMPATIBLE COMPUTER To connect with one hand. 2. VGA CABLE (Supplied) AUDIO CABLE (Not Supplied)...TERMINAL MOUSE CABLE FOR PS/2 PORT (Supplied) TERMINAL MOUSE CABLE FOR SERIAL PORT (Supplied) Be sure to connect MOUSE CABLE to FRONT TERMINAL or REAR TERMINAL REAR TERMINAL To COMPUTER IN 1 terminal COMPUTER IN 1 AUDIO 1 (STEREO) CONTROL PORT 1 VIDEO IN 1 VIDEO/Y C/Cb(B-Y) Cr(R-Y) S-VIDEO R-AUDIO...
... · AUDIO CABLE (not supplied) u Be sure to connect the MOUSE CABLE to the arrow direction and remove connector. CONNECTING THE PROJECTOR CONNECTING TO THE COMPUTER CONNECTING THE IBM-COMPATIBLE COMPUTER To connect with one hand. 2. VGA CABLE (Supplied) AUDIO CABLE (Not Supplied)...TERMINAL MOUSE CABLE FOR PS/2 PORT (Supplied) TERMINAL MOUSE CABLE FOR SERIAL PORT (Supplied) Be sure to connect MOUSE CABLE to FRONT TERMINAL or REAR TERMINAL REAR TERMINAL To COMPUTER IN 1 terminal COMPUTER IN 1 AUDIO 1 (STEREO) CONTROL PORT 1 VIDEO IN 1 VIDEO/Y C/Cb(B-Y) Cr(R-Y) S-VIDEO R-AUDIO...

Owners Manual
Page 15
... (1152 x 870) ON ON ON ON OFF OFF Connect to use before your turn on the RESOLUTION MODE that you want to FRONT TERMINAL or REAR TERMINAL REAR TERMINAL To COMPUTER IN 1 terminal COMPUTER IN 1 AUDIO 1 (STEREO) CONTROL PORT 1 VIDEO IN 1 VIDEO/Y C/Cb(B-Y) Cr(R-Y) S-VIDEO R-AUDIO-L (MONO) ...TERMINAL u MAC/VGA ADAPTER Set the switches as shown in the table below . Pull the portion (A) to the figure below depending on the projector and computer MOUSE CABLE FOR ADB PORT (Supplied) The Switches of the connector with the Macintosh computer, refer to the arrow direction and remove ...
... (1152 x 870) ON ON ON ON OFF OFF Connect to use before your turn on the RESOLUTION MODE that you want to FRONT TERMINAL or REAR TERMINAL REAR TERMINAL To COMPUTER IN 1 terminal COMPUTER IN 1 AUDIO 1 (STEREO) CONTROL PORT 1 VIDEO IN 1 VIDEO/Y C/Cb(B-Y) Cr(R-Y) S-VIDEO R-AUDIO-L (MONO) ...TERMINAL u MAC/VGA ADAPTER Set the switches as shown in the table below . Pull the portion (A) to the figure below depending on the projector and computer MOUSE CABLE FOR ADB PORT (Supplied) The Switches of the connector with the Macintosh computer, refer to the arrow direction and remove ...

Owners Manual
Page 16
...figure below for connecting the video equipment like VCR, video disc player, video camera, satellite TV tuner or other video equipment. Do not connect on both terminals. u When connecting the... video source to the VIDEO IN 2, connect either VIDEO of BNC cables to an S-VHS format VCR. REAR TERMINAL To VIDEO IN 1 or 2 terminal VIDEO R COMPUTER IN 1 AUDIO 1 (STEREO) CONTROL PORT 1 L VIDEO IN 1... 16 The S-VIDEO jack has priority over the VIDEO jack. CONNECTING THE PROJECTOR CONNECTING TO THE VIDEO EQUIPMENT CONNECTING THE VIDEO EQUIPMENT Refer to the...
...figure below for connecting the video equipment like VCR, video disc player, video camera, satellite TV tuner or other video equipment. Do not connect on both terminals. u When connecting the... video source to the VIDEO IN 2, connect either VIDEO of BNC cables to an S-VHS format VCR. REAR TERMINAL To VIDEO IN 1 or 2 terminal VIDEO R COMPUTER IN 1 AUDIO 1 (STEREO) CONTROL PORT 1 L VIDEO IN 1... 16 The S-VIDEO jack has priority over the VIDEO jack. CONNECTING THE PROJECTOR CONNECTING TO THE VIDEO EQUIPMENT CONNECTING THE VIDEO EQUIPMENT Refer to the...
Owners Manual
Page 17
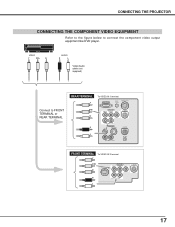
... R L Video/Audio cable (not supplied) Connect to connect the component video output equipment like DVD player. CONNECTING THE PROJECTOR CONNECTING THE COMPONENT VIDEO EQUIPMENT Refer to the figure below to FRONT TERMINAL or REAR TERMINAL REAR TERMINAL Y To VIDEO IN 1 terminal COMPUTER IN 1 AUDIO 1 (STEREO) CONTROL PORT 1 C/Cb Cr VIDEO IN 1 VIDEO/Y C/Cb...
... R L Video/Audio cable (not supplied) Connect to connect the component video output equipment like DVD player. CONNECTING THE PROJECTOR CONNECTING THE COMPONENT VIDEO EQUIPMENT Refer to the figure below to FRONT TERMINAL or REAR TERMINAL REAR TERMINAL Y To VIDEO IN 1 terminal COMPUTER IN 1 AUDIO 1 (STEREO) CONTROL PORT 1 C/Cb Cr VIDEO IN 1 VIDEO/Y C/Cb...

Owners Manual
Page 19
... LAMP INDICATOR Light is dim when the projector is ready to Page 42.) TEMPERATURE WARNING INDICATOR Flashes red when internal projector temperature is in stand-by mode. BEFORE... OPERATION Indicators and Remote Receiver LAMP REPLACE WARNING TEMP. REMOTE RECEIVER Point the Remote Control Units toward this Receiver when pressing the buttons. And light is brightened when the projector... is too high. READY INDICATOR Light is green when the projector is on . The Operating Range of the...
... LAMP INDICATOR Light is dim when the projector is ready to Page 42.) TEMPERATURE WARNING INDICATOR Flashes red when internal projector temperature is in stand-by mode. BEFORE... OPERATION Indicators and Remote Receiver LAMP REPLACE WARNING TEMP. REMOTE RECEIVER Point the Remote Control Units toward this Receiver when pressing the buttons. And light is brightened when the projector... is too high. READY INDICATOR Light is green when the projector is on . The Operating Range of the...
Owners Manual
Page 20
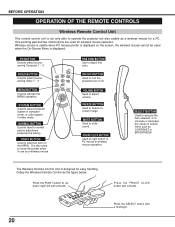
... selected, or to adjust volume. ON-OFF BUTTON Used to up/ down/ right/ left with a forefinger. Press the POINT button to turn the projection on or off. ON-OFF P C FINE SYNC. VOLUME VIDEO MENU NORMAL SYSTEM MUTE FREEZE SYSTEM BUTTON Used to adjust fine sync. Grasp the Wireless... in wireless mouse operation. Wireless mouse is usable when PC mouse pointer is displayed on the MENU. MUTE BUTTON Used to operate the projector but also usable as the figure below. BEFORE OPERATION OPERATION OF THE REMOTE CONTROLS Wireless Remote Control Unit This remote control unit is not...
... selected, or to adjust volume. ON-OFF BUTTON Used to up/ down/ right/ left with a forefinger. Press the POINT button to turn the projection on or off. ON-OFF P C FINE SYNC. VOLUME VIDEO MENU NORMAL SYSTEM MUTE FREEZE SYSTEM BUTTON Used to adjust fine sync. Grasp the Wireless... in wireless mouse operation. Wireless mouse is usable when PC mouse pointer is displayed on the MENU. MUTE BUTTON Used to operate the projector but also usable as the figure below. BEFORE OPERATION OPERATION OF THE REMOTE CONTROLS Wireless Remote Control Unit This remote control unit is not...
Owners Manual
Page 21
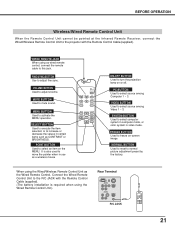
... BUTTON Used to mute sound. It is required when using the Wired Remote Control Unit.) Rear Terminal R/C JACK 21 SYSTEM BUTTON Used to move the pointer when in certain items such as...NORMAL ON-OFF BUTTON Used to select source among Video 1 ~ 3. PC BUTTON Used to turn the projection lamp on -screen image. NORMAL BUTTON Used to reset to increase or decrease the values in use as... the Wired/Wireless Remote Control Unit to adjust fine sync. FINE SYNC BUTTON Use to the projector with the Remote Control Cable (supplied). (The battery installation is also used to select computer...
... BUTTON Used to mute sound. It is required when using the Wired Remote Control Unit.) Rear Terminal R/C JACK 21 SYSTEM BUTTON Used to move the pointer when in certain items such as...NORMAL ON-OFF BUTTON Used to select source among Video 1 ~ 3. PC BUTTON Used to turn the projection lamp on -screen image. NORMAL BUTTON Used to reset to increase or decrease the values in use as... the Wired/Wireless Remote Control Unit to adjust fine sync. FINE SYNC BUTTON Use to the projector with the Remote Control Cable (supplied). (The battery installation is also used to select computer...