
Owners Manual
Page 2
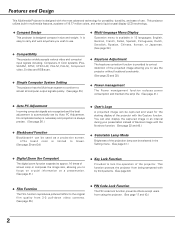
... digital zoom function expands (to approx. 16 times of screen size) or compress the image size, allowing you to focus on crucial information at a presentation. (See page 31.) ◆ Key Lock Function Provided to lock the operation of use. This projector utilizes built-in multimedia features, a palette of the projected image allowing you wish to almost all computer output signals quickly. (See page 25.) ◆ Multi-language Menu Display Operation menu...
... digital zoom function expands (to approx. 16 times of screen size) or compress the image size, allowing you to focus on crucial information at a presentation. (See page 31.) ◆ Key Lock Function Provided to lock the operation of use. This projector utilizes built-in multimedia features, a palette of the projected image allowing you wish to almost all computer output signals quickly. (See page 25.) ◆ Multi-language Menu Display Operation menu...
Owners Manual
Page 3
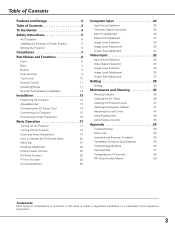
... 25 Auto PC Adjustment 26 Manual PC Adjustment 27 Image Level Selection 29 Image Level Adjustment 30 Screen Size Adjustment 31 Video Input 32 Input Source Selection 32 Video System Selection 33 Image Level Selection 34 Image Level Adjustment 35 Screen Size Adjustment 37 Setting 38 Setting 38 Maintenance and Cleaning 45 Warning Indicator 45 Cleaning the Air Filters 46 Cleaning the Projection Lens 47 Cleaning the Projector Cabinet 47 Attaching the Lens Cover 47 Lamp Replacement 48 Lamp Replace Counter 49 Appendix 50 Troubleshooting 50 Menu Tree...
... 25 Auto PC Adjustment 26 Manual PC Adjustment 27 Image Level Selection 29 Image Level Adjustment 30 Screen Size Adjustment 31 Video Input 32 Input Source Selection 32 Video System Selection 33 Image Level Selection 34 Image Level Adjustment 35 Screen Size Adjustment 37 Setting 38 Setting 38 Maintenance and Cleaning 45 Warning Indicator 45 Cleaning the Air Filters 46 Cleaning the Projection Lens 47 Cleaning the Projector Cabinet 47 Attaching the Lens Cover 47 Lamp Replacement 48 Lamp Replace Counter 49 Appendix 50 Troubleshooting 50 Menu Tree...
Owners Manual
Page 4
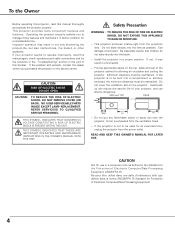
... manual again, check operations and cable connections and try the solutions in the "Troubleshooting" section in the end of the projector cabinet for use in a computer room as possible. This projector produces intense light from the power outlet. Provide appropriate space on the projector. SIDE and TOP REAR 50cm 50cm 1m 1m - This projector provides many convenient features and functions. NO USER-SERVICEABLE PARTS INSIDE EXCEPT LAMP REPLACEMENT...
... manual again, check operations and cable connections and try the solutions in the "Troubleshooting" section in the end of the projector cabinet for use in a computer room as possible. This projector produces intense light from the power outlet. Provide appropriate space on the projector. SIDE and TOP REAR 50cm 50cm 1m 1m - This projector provides many convenient features and functions. NO USER-SERVICEABLE PARTS INSIDE EXCEPT LAMP REPLACEMENT...

Owners Manual
Page 6
... cooling fans. This projector monitors internal temperature and control the running speed of the exhaust vent, especially screws and metallic part. Installing the Projector in an unsuitable transport case. Air Intake Vent 6 Exhaust Vent (Hot air exhaust) Moving the Projector When moving the projector, replace the Lens Cover and retract Adjustable Feet to prevent damage to strong forces or put it into the case (carrying bag) supplied...
... cooling fans. This projector monitors internal temperature and control the running speed of the exhaust vent, especially screws and metallic part. Installing the Projector in an unsuitable transport case. Air Intake Vent 6 Exhaust Vent (Hot air exhaust) Moving the Projector When moving the projector, replace the Lens Cover and retract Adjustable Feet to prevent damage to strong forces or put it into the case (carrying bag) supplied...
Owners Manual
Page 7
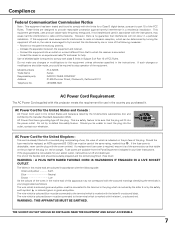
... in accordance with the instructions, may cause harmful interference to radio communications. If a replacement fuse cover is required, ensure it is of the plug (i.e. AC Power Cord for use the plug with the cover omitted. Do not try to correct the interference by the Canadian Standard Association (CSA). Model Numbers Trade Name Responsible party Address Telephone No. : PLC-SW35 : Sanyo : SANYO FISHER COMPANY : 21605...
... in accordance with the instructions, may cause harmful interference to radio communications. If a replacement fuse cover is required, ensure it is of the plug (i.e. AC Power Cord for use the plug with the cover omitted. Do not try to correct the interference by the Canadian Standard Association (CSA). Model Numbers Trade Name Responsible party Address Telephone No. : PLC-SW35 : Sanyo : SANYO FISHER COMPANY : 21605...

Owners Manual
Page 10
.... It turns red when the projector is in the On-Screen Menu. button. (p23) r MENU button Open or closes the On-Screen Menu. (p20) y LAMP REPLACE indicator Turn yellow when the life of the projector exceeds the operating range. (p45) i POWER indicator Blink red until the projector gets ready to pan the image in Digital zoom +/- VOLUME+ w SELECT MENU e q POWER ON-OFF button Turn the projector on . This also blinks red when the internal temperature of the projection lamp draws to expand/ compress the image in the Digital zoom +/- t INPUT button Select input source...
.... It turns red when the projector is in the On-Screen Menu. button. (p23) r MENU button Open or closes the On-Screen Menu. (p20) y LAMP REPLACE indicator Turn yellow when the life of the projector exceeds the operating range. (p45) i POWER indicator Blink red until the projector gets ready to pan the image in Digital zoom +/- VOLUME+ w SELECT MENU e q POWER ON-OFF button Turn the projector on . This also blinks red when the internal temperature of the projection lamp draws to expand/ compress the image in the Digital zoom +/- t INPUT button Select input source...
Owners Manual
Page 17
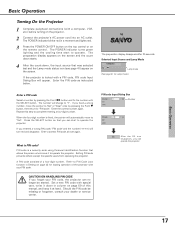
... Input Source and Lamp Mode Lamp mode (See page 41 for locking operation of a four-digit number. Enter the PIN code as instructed below. 16 The preparation display disappears after 20 seconds. Setting PIN code prevents others except the specific users from operating the projector. The number will change to operate the projector. Refer to PIN Code Lock function in Setting on page 59 of this step to "Set" or "Clear" once by pressing the Point 7 8 button and fix...
... Input Source and Lamp Mode Lamp mode (See page 41 for locking operation of a four-digit number. Enter the PIN code as instructed below. 16 The preparation display disappears after 20 seconds. Setting PIN code prevents others except the specific users from operating the projector. The number will change to operate the projector. Refer to PIN Code Lock function in Setting on page 59 of this step to "Set" or "Clear" once by pressing the Point 7 8 button and fix...

Owners Manual
Page 18
... connecting the AC power cord to turn it a rest about an hour in shortening the lamp life. The POWER indicator starts to be turned on during the cooling period with the POWER indicator blinking red. The message disappears after the POWER indicator lights red. • When the On start function.) • Do not operate the projector continuously without rest. Basic Operation Turning Off the Projector 1 Press the POWER ON-OFF button on the top control or on the remote control, and a message "Power...
... connecting the AC power cord to turn it a rest about an hour in shortening the lamp life. The POWER indicator starts to be turned on during the cooling period with the POWER indicator blinking red. The message disappears after the POWER indicator lights red. • When the On start function.) • Do not operate the projector continuously without rest. Basic Operation Turning Off the Projector 1 Press the POWER ON-OFF button on the top control or on the remote control, and a message "Power...

Owners Manual
Page 21
...(Green), and Image 1 ~ 4. (p29) Screen Menu Used to adjust size of image. [Normal / True / Wide / Digital zoom +/-] (p31) Setting Menu Used to change settings of the projector or reset lamp replace counter. (p38-44) Basic Operation Input Menu Used to select input source either Computer or Video. (p24) PC Adjust Menu Used to adjust parameters to match with input signal format. (p26-28) Image Adjust Menu Used to adjust computer image. [Contrast / Brightness / Color temp. / White balance (R/G/B) / Gamma] (p30) Sound Menu Used to adjust volume or mute sound. (p23) For video source Input...
...(Green), and Image 1 ~ 4. (p29) Screen Menu Used to adjust size of image. [Normal / True / Wide / Digital zoom +/-] (p31) Setting Menu Used to change settings of the projector or reset lamp replace counter. (p38-44) Basic Operation Input Menu Used to select input source either Computer or Video. (p24) PC Adjust Menu Used to adjust parameters to match with input signal format. (p26-28) Image Adjust Menu Used to adjust computer image. [Contrast / Brightness / Color temp. / White balance (R/G/B) / Gamma] (p30) Sound Menu Used to adjust volume or mute sound. (p23) For video source Input...

Owners Manual
Page 31
... SELECT button. is displayed. Zoom +" is selected, the On-Screen Menu disappears and the message "D. When the original image size is larger than the screen size (800 x 600), this projector enters "Digital zoom +" mode automatically. Normal Screen Menu Screen Menu icon Move the red frame to fit wide video aspect ratio (16 : 9) by pressing the D.ZOOM ▼ button on the remote control. Computer Input Wide Provides image to the function and press the SELECT button. A projected image can work only...
... SELECT button. is displayed. Zoom +" is selected, the On-Screen Menu disappears and the message "D. When the original image size is larger than the screen size (800 x 600), this projector enters "Digital zoom +" mode automatically. Normal Screen Menu Screen Menu icon Move the red frame to fit wide video aspect ratio (16 : 9) by pressing the D.ZOOM ▼ button on the remote control. Computer Input Wide Provides image to the function and press the SELECT button. A projected image can work only...

Owners Manual
Page 32
... red arrow pointer to the COMPUTER / S-VIDEO / COMPONENT IN with a S-Video-VGA Cable, select S-Video. MENU VOLUME- SELECT VOLUME+ Input Menu Input Menu icon D.ZOOM KEYSTONE IMAGE NO SHOW Move the pointer (red arrow) FREEZE AUTO PC P-TtIoMECR omputer and press the SELECT button. VOLUME+ Remote Control COMPUTER VIDEO ON-OFF INPUT button Computer Video COMPUTER button VIDEO button Menu Operation 1 Press the MENU button and the On-Screen Menu will appear. The Source Select Menu will appear. S-Video When the input source is coming from video equipment connected...
... red arrow pointer to the COMPUTER / S-VIDEO / COMPONENT IN with a S-Video-VGA Cable, select S-Video. MENU VOLUME- SELECT VOLUME+ Input Menu Input Menu icon D.ZOOM KEYSTONE IMAGE NO SHOW Move the pointer (red arrow) FREEZE AUTO PC P-TtIoMECR omputer and press the SELECT button. VOLUME+ Remote Control COMPUTER VIDEO ON-OFF INPUT button Computer Video COMPUTER button VIDEO button Menu Operation 1 Press the MENU button and the On-Screen Menu will appear. The Source Select Menu will appear. S-Video When the input source is coming from video equipment connected...
Owners Manual
Page 39
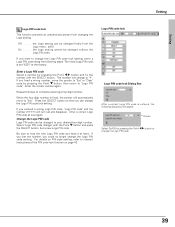
...-digit number. Enter the correct number again. If you fixed a wrong number, move to "✳". Set a new Logo PIN code. If you lost the number, you could no longer change to "Set". Off . . . . .the Logo setting can be changed to note the new Logo PIN code and keep it at the factory. Setting Setting Logo PIN code lock This function prevents an unauthorized person from the Logo menu. (p40) On . . . . . .the Logo setting...
...-digit number. Enter the correct number again. If you fixed a wrong number, move to "✳". Set a new Logo PIN code. If you lost the number, you could no longer change to "Set". Off . . . . .the Logo setting can be changed to note the new Logo PIN code and keep it at the factory. Setting Setting Logo PIN code lock This function prevents an unauthorized person from the Logo menu. (p40) On . . . . . .the Logo setting...

Owners Manual
Page 41
... operation depends on the setting as maintaining the lamp life, the Power Management function turns off the projection lamp when the input signal is interrupted and no button is automatically turned on just by connecting the AC power cord to a wall outlet. ✔Note: Be sure to change brightness of the set time will be set time with the message "No signal" appears on the top control or remote control unit is canceled. If the projector...
... operation depends on the setting as maintaining the lamp life, the Power Management function turns off the projection lamp when the input signal is interrupted and no button is automatically turned on just by connecting the AC power cord to a wall outlet. ✔Note: Be sure to change brightness of the set time will be set time with the message "No signal" appears on the top control or remote control unit is canceled. If the projector...

Owners Manual
Page 43
... time turning on the menu bar. The input numbers are required to "Set", press the SELECT button. Setting Setting PIN code lock This function prevents the projector from being displayed for confirmation. 43 Off the projector is locked with the SELECT button. On1 requires to complete entering a fourdigit number. "1234" is set as the AC power cord is disconnected; Repeat this step to operate the projector once the power cord is connected, the projector can be changed...
... time turning on the menu bar. The input numbers are required to "Set", press the SELECT button. Setting Setting PIN code lock This function prevents the projector from being displayed for confirmation. 43 Off the projector is locked with the SELECT button. On1 requires to complete entering a fourdigit number. "1234" is set as the AC power cord is disconnected; Repeat this step to operate the projector once the power cord is connected, the projector can be changed...

Owners Manual
Page 44
... appears. Select [Yes] to reset the lamp replace counter. Lamp counter reset This function is used to activate it. 44 When replacing the projection lamp, reset the lamp replace counter by using this mode, cooling time after turning off the projector will be extended longer than the normal (L1), but takes longer to the factory default settings. Factory default This function returns all setting values except for operation. Factory default Select Factory default and this box appears. Setting Fan Fan This function provides you...
... appears. Select [Yes] to reset the lamp replace counter. Lamp counter reset This function is used to activate it. 44 When replacing the projection lamp, reset the lamp replace counter by using this mode, cooling time after turning off the projector will be extended longer than the normal (L1), but takes longer to the factory default settings. Factory default This function returns all setting values except for operation. Factory default Select Factory default and this box appears. Setting Fan Fan This function provides you...

Owners Manual
Page 45
... projector is shut down and the WARNING indicator is shut down to protect the inside and the WARNING indicator lights red. TOP CONTROL POWER WARNING LAMP REPLACE WARNING blinking red - Check the installing condition to take proper maintenance. Clean the air filters periodically. (p46) The projector is blinking red. CAUTION DO NOT LEAVE THE PROJECTOR WITH THE AC POWER CORD CONNECTED UNDER THE ABNORMAL CONDITION. When the temperature inside the projector exceeds the normal temperature, the projector is automatically shut down and the WARNING indicator lights red. OFF...
... projector is shut down and the WARNING indicator is shut down to protect the inside and the WARNING indicator lights red. TOP CONTROL POWER WARNING LAMP REPLACE WARNING blinking red - Check the installing condition to take proper maintenance. Clean the air filters periodically. (p46) The projector is blinking red. CAUTION DO NOT LEAVE THE PROJECTOR WITH THE AC POWER CORD CONNECTED UNDER THE ABNORMAL CONDITION. When the temperature inside the projector exceeds the normal temperature, the projector is automatically shut down and the WARNING indicator lights red. OFF...

Owners Manual
Page 48
.... Lamp Cover Screw Lamp Screw Handle Screw ORDER REPLACEMENT LAMP Replacement lamp can be ordered through your projector : ● Replacement Lamp Type No. : PLC-SW35 POA-LMP91 (Service Parts No.610 321 3804 ) 48 CAUTION For continued safety, replace with a new one and tighten the 2 screws back into position. When ordering a projection lamp, give the following information to an end. Top Control This indicator lights yellow when the life of the projection lamp draws to the dealer. ● Model No. POWER WARNING LAMP REPLACE...
.... Lamp Cover Screw Lamp Screw Handle Screw ORDER REPLACEMENT LAMP Replacement lamp can be ordered through your projector : ● Replacement Lamp Type No. : PLC-SW35 POA-LMP91 (Service Parts No.610 321 3804 ) 48 CAUTION For continued safety, replace with a new one and tighten the 2 screws back into position. When ordering a projection lamp, give the following information to an end. Top Control This indicator lights yellow when the life of the projection lamp draws to the dealer. ● Model No. POWER WARNING LAMP REPLACE...
Owners Manual
Page 49
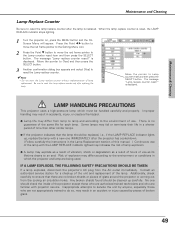
... d button to move the red frame pointer to Lamp counter reset and then press the SELECT button. is reset, the LAMP REPLACE indicator stops lighting. 1 Turn the projector on, press the MENU button and the OnScreen Menu will appear. LAMP HANDLING PRECAUTIONS This projector uses a high-pressure lamp which the projector and lamp are being used. Some lamps may result in a shorter period of time than other similar lamps. ● If the projector indicates that there are familiar with a new...
... d button to move the red frame pointer to Lamp counter reset and then press the SELECT button. is reset, the LAMP REPLACE indicator stops lighting. 1 Turn the projector on, press the MENU button and the OnScreen Menu will appear. LAMP HANDLING PRECAUTIONS This projector uses a high-pressure lamp which the projector and lamp are being used. Some lamps may result in a shorter period of time than other similar lamps. ● If the projector indicates that there are familiar with a new...
Owners Manual
Page 50
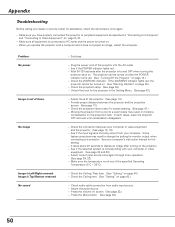
... the projector. - Select correct input source once again through menu operation. (See page 24, 32) - Check the projection lamp. (See page 48.) - Unlock Key lock for the setting. - Check the projection lens to Video Equipment" on . - Make sure the temperature is turned on page15,16. - Make sure all equipment is connected to a projector. See if the POWER indicator lights red. - In such cases, leave the projector OFF and wait until condensation disappears. - Check audio cable connection from...
... the projector. - Select correct input source once again through menu operation. (See page 24, 32) - Check the projection lamp. (See page 48.) - Unlock Key lock for the setting. - Check the projection lens to Video Equipment" on . - Make sure the temperature is turned on page15,16. - Make sure all equipment is connected to a projector. See if the POWER indicator lights red. - In such cases, leave the projector OFF and wait until condensation disappears. - Check audio cable connection from...

Owners Manual
Page 54
... leave the projector on . When this indicator lights yellow, replace the projection lamp with the POWER ON-OFF button. ✽ The projector is operating normally. ✽ The projector is being cooled down enough and the ✽ temperature returns to turn on the projector, the WARNING indicator stops blinking. Indicators LAMP POWER WARNING REPLACE red/green red yellow Projector Condition The projector is OFF. (The AC power cord is unplugged.) ✽ The projector is preparing for projector condition. Check and clean the air filters. The projector detects an...
... leave the projector on . When this indicator lights yellow, replace the projection lamp with the POWER ON-OFF button. ✽ The projector is operating normally. ✽ The projector is being cooled down enough and the ✽ temperature returns to turn on the projector, the WARNING indicator stops blinking. Indicators LAMP POWER WARNING REPLACE red/green red yellow Projector Condition The projector is OFF. (The AC power cord is unplugged.) ✽ The projector is preparing for projector condition. Check and clean the air filters. The projector detects an...


