Sanyo SU33 - PLC SVGA LCD Projector Support and Manuals
Get Help and Manuals for this Sanyo item
Popular Sanyo SU33 Manual Pages
Instruction Manual, PLC-SU33 - Page 2

...
50cm
G Do not put any flammable object or spray can reduce the service life of this manual thoroughly and operate the projector properly. If the projector is exhausted from the ventilation holes. Do not stare directly into the beam. NO USERSERVICEABLE PARTS INSIDE EXCEPT LAMP REPLACEMENT. THIS SYMBOL INDICATES THAT DANGEROUS VOLTAGE CONSTITUTING A RISK OF ELECTRIC SHOCK...
Instruction Manual, PLC-SU33 - Page 4

...Parts Department indicated in your User Instructions.
Model Numbers Trade Name Responsible party Address
Telephone No.
: PLC-SU33 : Sanyo : SANYO...projector meets the requirement for the United Kingdom :
This cord is already fitted with the letter N or coloured black. AC Power Cord for help. THE SOCKET-OUTLET SHOULD BE INSTALLED... the fuse need to be replaced, an ASTA approved BS 1362...
Instruction Manual, PLC-SU33 - Page 5

... SPECIFICATIONS
22
23
PC ADJUSTMENT
24
NAME OF EACH PART OF PROJECTOR
7
AUTO PC ADJUSTMENT
24
SETTING-UP PROJECTOR
8
MANUAL PC ADJUSTMENT
25
CONNECTING AC POWER CORD
8
PICTURE IMAGE ADJUSTMENTS
27
POSITIONING PROJECTOR
9
IMAGE LEVEL SELECT
27
ADJUSTABLE FEET
9
IMAGE LEVEL ADJUSTMENT
28
MOVING PROJECTOR
10
PICTURE SCREEN ADJUSTMENT
29
CONNECTING PROJECTOR
11 VIDEO...
Instruction Manual, PLC-SU33 - Page 6

... video signals are recognized and the best adjustment is always precise. N Multi-Scan System
This projector has Multi-Scan System to conform to 1280 x 1024 resolution. FEATURES AND DESIGN
This Multimedia Projector is designed with the most advanced technology for portability, durability, and ease of frequency and other settings. This projector utilizes built-in ; Projection Lamp...
Instruction Manual, PLC-SU33 - Page 8

... AC Power Cord does not match your AC outlet, contact your projector.
Consult your authorized dealer or service station if you use . NOTE ON THE POWER CORD
AC Power...and consumes a little electric power. PREPARATION
SETTING-UP PROJECTOR
CONNECTING AC POWER CORD
This projector uses nominal input voltages of power system. Connect a projector with single-phase power systems having a ...
Instruction Manual, PLC-SU33 - Page 13

... not supplied with this projector.)
• Video Cable (RCA x 1 or RCA x 3) ✽ • S-VIDEO Cable ✽ • Audio Cable (RCA x 2) ✽
Video Source (example) Video Cassette Recorder
Video Disc Player
Component video output equipment. (such as DVD player or high-definition TV source.)
S-VIDEO Output
Composite Component Video Output Audio Output
Video Output
(Y, Pb/Cb, Pr...
Instruction Manual, PLC-SU33 - Page 18

... system of projector or reset Lamp Replace Counter. (Refer to P35, 36)
INPUT MENU
Used to select input source either Video or Computer....image. [Normal / True / Wide / Digital zoom +/-] (Refer to P29)
SETTING MENU
Used to change settings of selected video source. (Refer to P31)
IMAGE ADJUST MENU
Used to adjust picture image. [Contrast...GUIDE WINDOW
Shows selected item of image to Normal or Wide. (...
Instruction Manual, PLC-SU33 - Page 19

...projector's AC Power Cord into an AC outlet.
LAMP Indicator lights bright and READY Indicator is automatically turned off . During this "Cooling Down" period, this projector or service center.
19
TO MAINTAIN THE LIFE OF LAMP, ONCE YOU TURN PROJECTOR... can turn off and disconnect AC Power Cord from PC or Video source appears after 30 seconds.
30
Preparation Display disappears after 4...
Instruction Manual, PLC-SU33 - Page 22

... tunes to incoming signal and projects proper image without any special setting. (Some computers need setting manually.)
Note : Projector may display one of computers based on VGA, SVGA, XGA or SXGA (refer to TROUBLESHOOTING on page 23).
If projector cannot reproduce proper image, select correct input source through MENU OPERATION (see below). RGB (Digital) When digital...
Instruction Manual, PLC-SU33 - Page 24

... on Remote Control Unit. NOTE G Fine sync, Total dots and Picture Position of MANUAL PC ADJUSTMENT section (P26).
PC ADJUST MENU
PC ADJUST Menu icon Move a red ...projector. Auto PC Adj.
1 Press MENU button and ON-SCREEN MENU will appear. Adjustment parameters from Auto PC Adjustment can be also executed by selecting Mode in this function, manual adjustments are memorized, the setting...
Instruction Manual, PLC-SU33 - Page 37

... the screw.
5 Connect AC Power Cord to the dealer. G Model No. The glass can be ordered through your projector
:
G Replacement Lamp Type No. :
PLC-SU33
POA-LMP35
(Service Parts No. 610 293 2751)
37 Make sure that Lamp Assembly is set properly. LAMP COVER
SCREW
LAMP ASSEMBLY
SCREW
HANDLE
ORDER REPLACEMENT LAMP
Replacement Lamp can shatter and may cause injury.
Do not drop...
Instruction Manual, PLC-SU33 - Page 38

... must be cleaned up , replace the lamp with projector service. G If the projector indicates that there are familiar with a new one should check the inside of the lamp. Any broken shards found should be replaced, i.e., if the LAMP REPLACE INDICATOR lights up carefully. Press POINT LEFT/RIGHT button(s) to move a red frame pointer to SETTING Menu icon (refer to page...
Instruction Manual, PLC-SU33 - Page 41

... your AC outlet. G Adjust the audio source. G Press MUTE button.
41 APPENDIX
TROUBLESHOOTING
Before calling your computer. 5. The problem may result in the section "CONNECTING PROJECTOR" on page 19.)
G Check Projection Lamp. (Refer to your computer or video equipment as follows:
1.
LAMP indicator lights bright, and READY indicator is at least 3.0' (0.9m) from audio input...
Instruction Manual, PLC-SU33 - Page 42
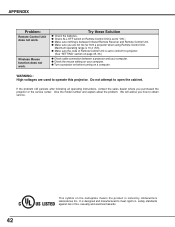
... Laboratories Inc. G Make sure the code of fire, casualty and electrical hazards. If the problem still persists after following all operating instructions, contact the sales dealer where you how to projector.
(See "SETTING" section on your computer. safety standards against risk of Remote Control Unit is set to conform to obtain service.
42
This symbol on a computer...
Instruction Manual, PLC-SU33 - Page 45

T X D
-----
7 GND
GND
-----
8 ----- Data 3 + Data 4 Ground
APPENDIX
OPTIONAL PARTS
The parts listed below are different in each country.
Contact the
sales dealer for details. R X D
-----
2 CLK
-----
When using Wireless Imager, set the following model name to the sales dealer. ADB
3 DATA
-----
-----
4 GND
GND
GND
5 ----- G Control Cable (Serial Port) G Control ...
Sanyo SU33 Reviews
We have not received any reviews for Sanyo yet.