
Owner's Manual
Page 2
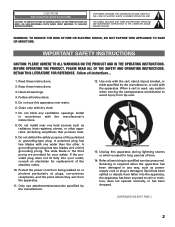
... blade or the third prong are provided for your outlet, consult an electrician for long periods of the polarized or grounding-type plug. Protect the power cord from being walked on or pinched particularly at plugs, convenience receptacles, and the point where they exit from tip-over. 13. When a cart is...
... blade or the third prong are provided for your outlet, consult an electrician for long periods of the polarized or grounding-type plug. Protect the power cord from being walked on or pinched particularly at plugs, convenience receptacles, and the point where they exit from tip-over. 13. When a cart is...
Owner's Manual
Page 3
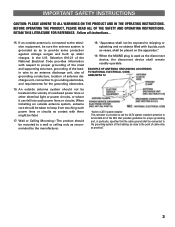
Follow all instructions... 15. If an outside antenna system, extreme care should be taken to keep from touching such power lines or circuits as the disconnect device, the disconnect device shall remain readily operable. Selection 810-21 of the National Electrical Code...might be exposed to grounding electrodes, and requirements for proper grounding and, in the vicinity of overhead power lines or other electrical light or power circuits, or where it can fall into such power lines or circuits. In the U.S. Wall or Ceiling Mounting-The product should not be located in ...
Follow all instructions... 15. If an outside antenna system, extreme care should be taken to keep from touching such power lines or circuits as the disconnect device, the disconnect device shall remain readily operable. Selection 810-21 of the National Electrical Code...might be exposed to grounding electrodes, and requirements for proper grounding and, in the vicinity of overhead power lines or other electrical light or power circuits, or where it can fall into such power lines or circuits. In the U.S. Wall or Ceiling Mounting-The product should not be located in ...
Owner's Manual
Page 4
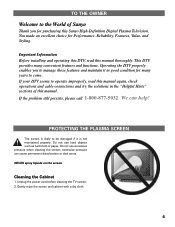
... this manual thoroughly. NEVER spray liquids on the screen. If the problem still persists, please call 1-800-877-5032. PROTECTING THE PLASMA SCREEN The screen is not maintained properly. Do not use hard objects such as hard cloth or paper. Gently wipe the screen and... operations and cable connections and try the solutions in good condition for Performance, Reliability, Features, Value, and Styling. Unplug the power cord before cleaning the TV screen. 2. Important Information Before installing and operating this DTV, read this Sanyo High-Definition Digital Plasma Television.
... this manual thoroughly. NEVER spray liquids on the screen. If the problem still persists, please call 1-800-877-5032. PROTECTING THE PLASMA SCREEN The screen is not maintained properly. Do not use hard objects such as hard cloth or paper. Gently wipe the screen and... operations and cable connections and try the solutions in good condition for Performance, Reliability, Features, Value, and Styling. Unplug the power cord before cleaning the TV screen. 2. Important Information Before installing and operating this DTV, read this Sanyo High-Definition Digital Plasma Television.
Owner's Manual
Page 5
... 4 TO THE OWNER 2 FEATURES 6 SPECIFICATIONS 7 HANDLING PRECAUTIONS 8 POSITIONING PRECAUTIONS 8 REMOVING THE PLASMA STAND (OPTIONAL 9 WALL MOUNTING (OPTIONAL 9 HDTV BACK RIGHT SIDE PANEL-JACKS LOCATIONS & FUNCTIONS 10 HDTV BACK SIDE PANEL-JACKS LOCATIONS & FUNCTIONS 11 ~...42 TV Ratings (Age and Content-Based) Symbol Explanation 43 MPAA Movie Ratings (Age-Based) Symbol Explanation 43 Picture/Sound Adjustment 44 ~ 45 Helpful Hints for Picture/Sound 45 Menu Language 46 Energy (Power) Saver 47 Picture Rotation (Screen Saver 48 White Pattern (Panel Repair 49 GLOSSARY OF TERMS 50 FAQ...
... 4 TO THE OWNER 2 FEATURES 6 SPECIFICATIONS 7 HANDLING PRECAUTIONS 8 POSITIONING PRECAUTIONS 8 REMOVING THE PLASMA STAND (OPTIONAL 9 WALL MOUNTING (OPTIONAL 9 HDTV BACK RIGHT SIDE PANEL-JACKS LOCATIONS & FUNCTIONS 10 HDTV BACK SIDE PANEL-JACKS LOCATIONS & FUNCTIONS 11 ~...42 TV Ratings (Age and Content-Based) Symbol Explanation 43 MPAA Movie Ratings (Age-Based) Symbol Explanation 43 Picture/Sound Adjustment 44 ~ 45 Helpful Hints for Picture/Sound 45 Menu Language 46 Energy (Power) Saver 47 Picture Rotation (Screen Saver 48 White Pattern (Panel Repair 49 GLOSSARY OF TERMS 50 FAQ...
Owner's Manual
Page 7
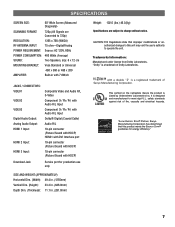
...void the user's authority to 720p) RESOLUTION: 1365 x 768 (WXGA) RF ANTENNA INPUT: 75 ohm-Digital/Analog POWER REQUIREMENT: Source: AC 120V, 60Hz POWER CONSUMPTION: 460 Watts (Average) SOUND: MOUNTING BRACKET: AMPLIFIER: Two Speakers, size: 6 x 12 cm Vesa ... Trademarks Information: Manufactured under license from Dolby Laboratories. "Dolby" is a registered trademark of Sanyo Manufacturing Corporation. It is Listed by Underwriters' Laboratories Inc. SPECIFICATIONS SCREEN SIZE: 50" Wide Screen (Measured Diagonally) SCANNING FORMAT: 720p (All Signals are subject to change without...
...void the user's authority to 720p) RESOLUTION: 1365 x 768 (WXGA) RF ANTENNA INPUT: 75 ohm-Digital/Analog POWER REQUIREMENT: Source: AC 120V, 60Hz POWER CONSUMPTION: 460 Watts (Average) SOUND: MOUNTING BRACKET: AMPLIFIER: Two Speakers, size: 6 x 12 cm Vesa ... Trademarks Information: Manufactured under license from Dolby Laboratories. "Dolby" is a registered trademark of Sanyo Manufacturing Corporation. It is Listed by Underwriters' Laboratories Inc. SPECIFICATIONS SCREEN SIZE: 50" Wide Screen (Measured Diagonally) SCANNING FORMAT: 720p (All Signals are subject to change without...
Owner's Manual
Page 8
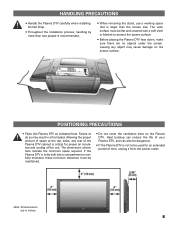
... and cooling of time, unplug it from the power outlet. Failure to do so may cause damage on the Plasma DTV. Heat build-up can reduce the life of your Plasma DTV, and can also be dangerous. • If the Plasma DTV is to be built into a compartment or...cover the ventilation slots on the screen surface. POSITIONING PRECAUTIONS • Place this Plasma DTV as indicated here. HANDLING PRECAUTIONS • Handle the Plasma DTV carefully when installing. Leaving any object may result in inches. 8 If the Plasma DTV is not to protect the screen surface. • Before placing the...
... and cooling of time, unplug it from the power outlet. Failure to do so may cause damage on the Plasma DTV. Heat build-up can reduce the life of your Plasma DTV, and can also be dangerous. • If the Plasma DTV is to be built into a compartment or...cover the ventilation slots on the screen surface. POSITIONING PRECAUTIONS • Place this Plasma DTV as indicated here. HANDLING PRECAUTIONS • Handle the Plasma DTV carefully when installing. Leaving any object may result in inches. 8 If the Plasma DTV is not to protect the screen surface. • Before placing the...
Owner's Manual
Page 10
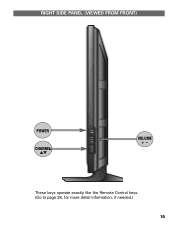
These keys operate exactly like the Remote Control keys. (Go to page 28, for more detail information, if needed.) 10 RIGHT SIDE PANEL (VIEWED FROM FRONT) POWER CHANNEL LM VOLUME + -
These keys operate exactly like the Remote Control keys. (Go to page 28, for more detail information, if needed.) 10 RIGHT SIDE PANEL (VIEWED FROM FRONT) POWER CHANNEL LM VOLUME + -
Owner's Manual
Page 12
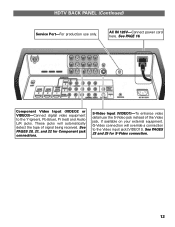
... Audio L/R jacks. See PAGES 20, 21, and 22 for S-Video connection. 12 See PAGES 23 and 25 for Component jack connections. AC IN 120V-Connect power cord here. See PAGE 16. HDTV BACK PANEL (Continued) Service Port-For production use the S-Video jack instead of the Video jack, if available on...
... Audio L/R jacks. See PAGES 20, 21, and 22 for S-Video connection. 12 See PAGES 23 and 25 for Component jack connections. AC IN 120V-Connect power cord here. See PAGE 16. HDTV BACK PANEL (Continued) Service Port-For production use the S-Video jack instead of the Video jack, if available on...
Owner's Manual
Page 16
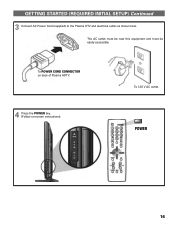
To 120 V AC outlet. The AC outlet must be near this equipment and must be easily accessible. To POWER CORD CONNECTOR on back of Plasma HDTV. 4 Press the POWER key. (Follow on-screen instructions). GETTING STARTED (REQUIRED INITIAL SETUP) Continued 3 Connect AC Power Cord (supplied) to the Plasma DTV and electrical outlet as shown here. POWER 16
To 120 V AC outlet. The AC outlet must be near this equipment and must be easily accessible. To POWER CORD CONNECTOR on back of Plasma HDTV. 4 Press the POWER key. (Follow on-screen instructions). GETTING STARTED (REQUIRED INITIAL SETUP) Continued 3 Connect AC Power Cord (supplied) to the Plasma DTV and electrical outlet as shown here. POWER 16
Owner's Manual
Page 30
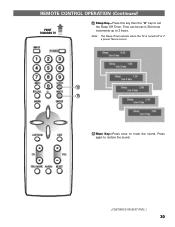
REMOTE CONTROL OPERATION (Continued) POINT TOWARDS TV « 12 Sleep Key-Press this key then the "0" key to set in 30-minute increments up to 3 hours. Note: The Sleep Timer cancels when the TV is turned off or if a power failure occurs. 12 13 13 Mute Key-Press once to restore the sound. (CONTINUED ON NEXT PAGE.) 30 Time can be set the Sleep Off Timer. Press again to mute the sound.
REMOTE CONTROL OPERATION (Continued) POINT TOWARDS TV « 12 Sleep Key-Press this key then the "0" key to set in 30-minute increments up to 3 hours. Note: The Sleep Timer cancels when the TV is turned off or if a power failure occurs. 12 13 13 Mute Key-Press once to restore the sound. (CONTINUED ON NEXT PAGE.) 30 Time can be set the Sleep Off Timer. Press again to mute the sound.
Owner's Manual
Page 47
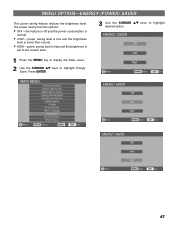
The power saving function options: • OFF - power saving level is low and the brightness level is set to the lowest level. 3 Use the CURSOR LM keys to highlight desired option. 1 Press the MENU key to display the Main menu. 2 Use the CURSOR LM keys to highlight Energy Saver. Press ENTER. 47 power saving level is high and the brightness is lower than normal. • HIGH - MENU OPTION-ENERGY (POWER) SAVER This power saving feature reduces the brightness level. the feature is off and the power consumption is normal. • LOW -
The power saving function options: • OFF - power saving level is low and the brightness level is set to the lowest level. 3 Use the CURSOR LM keys to highlight desired option. 1 Press the MENU key to display the Main menu. 2 Use the CURSOR LM keys to highlight Energy Saver. Press ENTER. 47 power saving level is high and the brightness is lower than normal. • HIGH - MENU OPTION-ENERGY (POWER) SAVER This power saving feature reduces the brightness level. the feature is off and the power consumption is normal. • LOW -
Owner's Manual
Page 51
...Where is likely to select the component outputs or S-Video output. 9. Then press the INPUT key on the remote two times to operate a Sanyo television only. 7. Press the RESET key on the remote control to the audio connection being used . 14. No, this remote control is turned... when cleaning the screen; Do not use the menu system to perform a "Digital Add-on -the-air 24 hours a day. Unplug the power cord before cleaning the TV screen. 2. Picture quality is HD Ultimate HDMI 1 / 2 / 3 Ultimate 11. excessive pressure can cause permanent discoloration or dark spots. What...
...Where is likely to select the component outputs or S-Video output. 9. Then press the INPUT key on the remote two times to operate a Sanyo television only. 7. Press the RESET key on the remote control to the audio connection being used . 14. No, this remote control is turned... when cleaning the screen; Do not use the menu system to perform a "Digital Add-on -the-air 24 hours a day. Unplug the power cord before cleaning the TV screen. 2. Picture quality is HD Ultimate HDMI 1 / 2 / 3 Ultimate 11. excessive pressure can cause permanent discoloration or dark spots. What...


