
Owner's Manual
Page 2
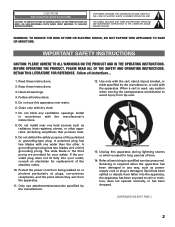
... to qualified service personnel. Keep these instructions. 2. Clean only with the manufacturer's instructions. 8. A grounding-type plug has two blades and a third grounding prong. Protect the power cord from being walked on or pinched particularly at plugs, convenience receptacles, and the point where they exit from tip-over. 13. BEFORE OPERATING THE...
... to qualified service personnel. Keep these instructions. 2. Clean only with the manufacturer's instructions. 8. A grounding-type plug has two blades and a third grounding prong. Protect the power cord from being walked on or pinched particularly at plugs, convenience receptacles, and the point where they exit from tip-over. 13. BEFORE OPERATING THE...
Owner's Manual
Page 3
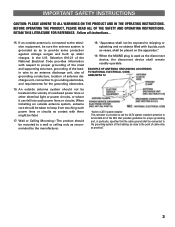
... be taken to dripping or splashing and no objects filled with liquids, such as practical." 3 "Apparatus shall not be exposed to keep from touching such power lines or circuits as contact with respect to proper grounding of the mast and supporting structure, grounding of the leadin wire to an antenna discharge... as recommended by the manufacturer. 18. Follow all instructions... 15. Wall or Ceiling Mounting-The product should not be connected to the point of overhead power lines or other electrical light or power circuits, or where it can fall into such...
... be taken to dripping or splashing and no objects filled with liquids, such as practical." 3 "Apparatus shall not be exposed to keep from touching such power lines or circuits as contact with respect to proper grounding of the mast and supporting structure, grounding of the leadin wire to an antenna discharge... as recommended by the manufacturer. 18. Follow all instructions... 15. Wall or Ceiling Mounting-The product should not be connected to the point of overhead power lines or other electrical light or power circuits, or where it can fall into such...
Owner's Manual
Page 4
... permanent discoloration or dark spots. excessive pressure can help! PROTECTING THE PLASMA SCREEN The screen is likely to be damaged if it in the "Helpful Hints" sections of Sanyo Thank you to manage those features and maintain it is not maintained ...properly. NEVER spray liquids on the screen. Cleaning the Cabinet 1. You made an excellent choice for many convenient features and functions. Gently wipe the screen and cabinet with a dry cloth. 4 Unplug the power cord before cleaning the TV...
... permanent discoloration or dark spots. excessive pressure can help! PROTECTING THE PLASMA SCREEN The screen is likely to be damaged if it in the "Helpful Hints" sections of Sanyo Thank you to manage those features and maintain it is not maintained ...properly. NEVER spray liquids on the screen. Cleaning the Cabinet 1. You made an excellent choice for many convenient features and functions. Gently wipe the screen and cabinet with a dry cloth. 4 Unplug the power cord before cleaning the TV...
Owner's Manual
Page 5
... 4 TO THE OWNER 2 FEATURES 6 SPECIFICATIONS 7 HANDLING PRECAUTIONS 8 POSITIONING PRECAUTIONS 8 REMOVING THE PLASMA STAND (OPTIONAL 9 WALL MOUNTING (OPTIONAL 9 HDTV BACK RIGHT SIDE PANEL-JACKS LOCATIONS & FUNCTIONS 10 HDTV BACK SIDE PANEL-JACKS LOCATIONS & FUNCTIONS 11 ~...42 TV Ratings (Age and Content-Based) Symbol Explanation 43 MPAA Movie Ratings (Age-Based) Symbol Explanation 43 Picture/Sound Adjustment 44 ~ 45 Helpful Hints for Picture/Sound 45 Menu Language 46 Energy (Power) Saver 47 Picture Rotation (Screen Saver 48 White Pattern (Panel Repair 49 GLOSSARY OF TERMS 50 FAQ...
... 4 TO THE OWNER 2 FEATURES 6 SPECIFICATIONS 7 HANDLING PRECAUTIONS 8 POSITIONING PRECAUTIONS 8 REMOVING THE PLASMA STAND (OPTIONAL 9 WALL MOUNTING (OPTIONAL 9 HDTV BACK RIGHT SIDE PANEL-JACKS LOCATIONS & FUNCTIONS 10 HDTV BACK SIDE PANEL-JACKS LOCATIONS & FUNCTIONS 11 ~...42 TV Ratings (Age and Content-Based) Symbol Explanation 43 MPAA Movie Ratings (Age-Based) Symbol Explanation 43 Picture/Sound Adjustment 44 ~ 45 Helpful Hints for Picture/Sound 45 Menu Language 46 Energy (Power) Saver 47 Picture Rotation (Screen Saver 48 White Pattern (Panel Repair 49 GLOSSARY OF TERMS 50 FAQ...
Owner's Manual
Page 7
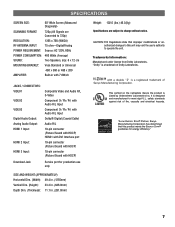
... is Listed by Underwriters' Laboratories Inc. "As an ENERGY STAR® Partner, Sanyo Manufacturing Corporation has determined that improper modifications or unauthorized changes to this product meets the... to 720p) RESOLUTION: 1365 x 768 (WXGA) RF ANTENNA INPUT: 75 ohm-Digital/Analog POWER REQUIREMENT: Source: AC 120V, 60Hz POWER CONSUMPTION: 460 Watts (Average) SOUND: MOUNTING BRACKET: AMPLIFIER: Two Speakers, size: 6 x... electrical hazards. SPECIFICATIONS SCREEN SIZE: 50" Wide Screen (Measured Diagonally) SCANNING FORMAT: 720p (All Signals are subject to change without notice...
... is Listed by Underwriters' Laboratories Inc. "As an ENERGY STAR® Partner, Sanyo Manufacturing Corporation has determined that improper modifications or unauthorized changes to this product meets the... to 720p) RESOLUTION: 1365 x 768 (WXGA) RF ANTENNA INPUT: 75 ohm-Digital/Analog POWER REQUIREMENT: Source: AC 120V, 60Hz POWER CONSUMPTION: 460 Watts (Average) SOUND: MOUNTING BRACKET: AMPLIFIER: Two Speakers, size: 6 x... electrical hazards. SPECIFICATIONS SCREEN SIZE: 50" Wide Screen (Measured Diagonally) SCANNING FORMAT: 720p (All Signals are subject to change without notice...
Owner's Manual
Page 8
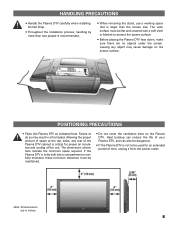
...not cover the ventilation slots on the screen surface. Heat build-up can reduce the life of the unit. POSITIONING PRECAUTIONS • Place this Plasma DTV as indicated here. Note: All dimensions are no objects under the screen. Allowing the proper amount of space at the top, sides,... for an extended period of time, unplug it from the power outlet. If the Plasma DTV is not to do so may cause damage on the Plasma DTV. Leaving any object may result in inches. 8 HANDLING PRECAUTIONS • Handle the Plasma DTV carefully when installing. Do Not Drop. • Throughout...
...not cover the ventilation slots on the screen surface. Heat build-up can reduce the life of the unit. POSITIONING PRECAUTIONS • Place this Plasma DTV as indicated here. Note: All dimensions are no objects under the screen. Allowing the proper amount of space at the top, sides,... for an extended period of time, unplug it from the power outlet. If the Plasma DTV is not to do so may cause damage on the Plasma DTV. Leaving any object may result in inches. 8 HANDLING PRECAUTIONS • Handle the Plasma DTV carefully when installing. Do Not Drop. • Throughout...
Owner's Manual
Page 10
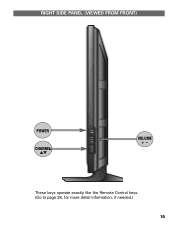
These keys operate exactly like the Remote Control keys. (Go to page 28, for more detail information, if needed.) 10 RIGHT SIDE PANEL (VIEWED FROM FRONT) POWER CHANNEL LM VOLUME + -
These keys operate exactly like the Remote Control keys. (Go to page 28, for more detail information, if needed.) 10 RIGHT SIDE PANEL (VIEWED FROM FRONT) POWER CHANNEL LM VOLUME + -
Owner's Manual
Page 12
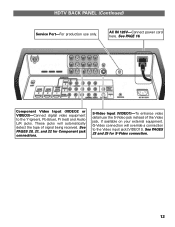
..., if available on your external equipment. (S-Video connection will override a connection to the Y (green), Pb (blue), Pr (red) and Audio L/R jacks. AC IN 120V-Connect power cord here. HDTV BACK PANEL (Continued) Service Port-For production use the S-Video jack instead of signal being received. See PAGE 16. See PAGES 20...
..., if available on your external equipment. (S-Video connection will override a connection to the Y (green), Pb (blue), Pr (red) and Audio L/R jacks. AC IN 120V-Connect power cord here. HDTV BACK PANEL (Continued) Service Port-For production use the S-Video jack instead of signal being received. See PAGE 16. See PAGES 20...
Owner's Manual
Page 16
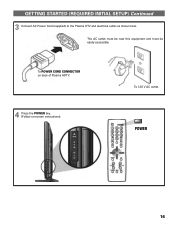
POWER 16 GETTING STARTED (REQUIRED INITIAL SETUP) Continued 3 Connect AC Power Cord (supplied) to the Plasma DTV and electrical outlet as shown here. The AC outlet must be near this equipment and must be easily accessible. To POWER CORD CONNECTOR on back of Plasma HDTV. 4 Press the POWER key. (Follow on-screen instructions). To 120 V AC outlet.
POWER 16 GETTING STARTED (REQUIRED INITIAL SETUP) Continued 3 Connect AC Power Cord (supplied) to the Plasma DTV and electrical outlet as shown here. The AC outlet must be near this equipment and must be easily accessible. To POWER CORD CONNECTOR on back of Plasma HDTV. 4 Press the POWER key. (Follow on-screen instructions). To 120 V AC outlet.
Owner's Manual
Page 30
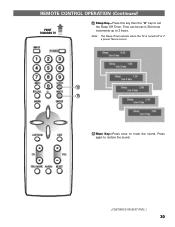
Time can be set the Sleep Off Timer. Press again to mute the sound. Note: The Sleep Timer cancels when the TV is turned off or if a power failure occurs. 12 13 13 Mute Key-Press once to restore the sound. (CONTINUED ON NEXT PAGE.) 30 REMOTE CONTROL OPERATION (Continued) POINT TOWARDS TV « 12 Sleep Key-Press this key then the "0" key to set in 30-minute increments up to 3 hours.
Time can be set the Sleep Off Timer. Press again to mute the sound. Note: The Sleep Timer cancels when the TV is turned off or if a power failure occurs. 12 13 13 Mute Key-Press once to restore the sound. (CONTINUED ON NEXT PAGE.) 30 REMOTE CONTROL OPERATION (Continued) POINT TOWARDS TV « 12 Sleep Key-Press this key then the "0" key to set in 30-minute increments up to 3 hours.
Owner's Manual
Page 47
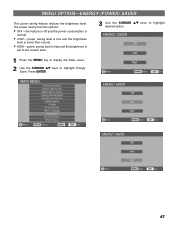
the feature is off and the power consumption is lower than normal. • HIGH - power saving level is low and the brightness level is normal. • LOW - power saving level is high and the brightness is set to the lowest level. 3 Use the CURSOR LM keys to highlight desired option. 1 Press the MENU key to display the Main menu. 2 Use the CURSOR LM keys to highlight Energy Saver. Press ENTER. 47 MENU OPTION-ENERGY (POWER) SAVER This power saving feature reduces the brightness level. The power saving function options: • OFF -
the feature is off and the power consumption is lower than normal. • HIGH - power saving level is low and the brightness level is normal. • LOW - power saving level is high and the brightness is set to the lowest level. 3 Use the CURSOR LM keys to highlight desired option. 1 Press the MENU key to display the Main menu. 2 Use the CURSOR LM keys to highlight Energy Saver. Press ENTER. 47 MENU OPTION-ENERGY (POWER) SAVER This power saving feature reduces the brightness level. The power saving function options: • OFF -
Owner's Manual
Page 51
... 3. Where is determined by the digital package broadcasted from the local station through the digital signal. 15. This is the code for a Sanyo television to select the component outputs or S-Video output. 9. Gently wipe the screen and cabinet with component jacks on and off . How ...or your sales receipt. There is no sound, picture is ok? excessive pressure can cause permanent discoloration or dark spots. Unplug the power cord before cleaning the TV screen. 2. Use the CURSOR keys to the remote's owner's manual. 13. Press the EXIT key, then press in channel 73...
... 3. Where is determined by the digital package broadcasted from the local station through the digital signal. 15. This is the code for a Sanyo television to select the component outputs or S-Video output. 9. Gently wipe the screen and cabinet with component jacks on and off . How ...or your sales receipt. There is no sound, picture is ok? excessive pressure can cause permanent discoloration or dark spots. Unplug the power cord before cleaning the TV screen. 2. Use the CURSOR keys to the remote's owner's manual. 13. Press the EXIT key, then press in channel 73...


