

Instruction Manual
Page 2
Contents Features 3 Introduction 4 Preparation 4 Safety Precautions 4 Power Source 4 Power Cord 4 Moisture and Water 4 Cleaning 4 Heat and Flames 4 Lightning 4 Replacement Parts 4 Servicing 5 Waste Disposal 5 FOR EU USERS 5 Disconnecting the Device 5 Headphone Volume 5 Installation 5 LCD Screen 5 Warning 5 Overview of Hearing (* for EU countries only) .......26 Hard of ...
Contents Features 3 Introduction 4 Preparation 4 Safety Precautions 4 Power Source 4 Power Cord 4 Moisture and Water 4 Cleaning 4 Heat and Flames 4 Lightning 4 Replacement Parts 4 Servicing 5 Waste Disposal 5 FOR EU USERS 5 Disconnecting the Device 5 Headphone Volume 5 Installation 5 LCD Screen 5 Warning 5 Overview of Hearing (* for EU countries only) .......26 Hard of ...

Instruction Manual
Page 5
... this device in a humid and damp place (avoid the bathroom, the sink in anyway. Ensure that the service technician has used replacement parts, which are not likely to be exposed to ensure reliable operation. Preparation For ventilation, leave a free space of at least 10 cm ...an electric heater. Ensure that they are specified by the manufacturer or have it checked by qualified personnel. Replacement Parts When replacement parts are placed on top. Moisture and Water Do not use liquid or aerosol cleaners. on holiday, disconnect the power cord from a ...
... this device in a humid and damp place (avoid the bathroom, the sink in anyway. Ensure that the service technician has used replacement parts, which are not likely to be exposed to ensure reliable operation. Preparation For ventilation, leave a free space of at least 10 cm ...an electric heater. Ensure that they are specified by the manufacturer or have it checked by qualified personnel. Replacement Parts When replacement parts are placed on top. Moisture and Water Do not use liquid or aerosol cleaners. on holiday, disconnect the power cord from a ...

Instruction Manual
Page 14
... PC source. REAR VIEW Audio Inputs PC audio cable (not supplied) to AUDIO INPUTS on your LCD TV, you can be found in the appendix parts. See "Input selection" section. • Set the resolution that suits your computer to the TV set. • Power off both computer and display before making...
... PC source. REAR VIEW Audio Inputs PC audio cable (not supplied) to AUDIO INPUTS on your LCD TV, you can be found in the appendix parts. See "Input selection" section. • Set the resolution that suits your computer to the TV set. • Power off both computer and display before making...

Instruction Manual
Page 16
Headphone Camcorder SIDE VIEW English - 15 - Note that cables shown in the following parts. • To listen the TV sound from headphones, connect to the HEADPHONE jack of optional equipment to the VIDEO IN socket and the AUDIO SOCKETS. Using Side AV Connectors You can connect a range of theTV. For selecting the related source, see the section "Input selection" in the illustration are shown below. Possible connections are not supplied. • For connecting a camcorder, connect to your LCD TV.
Headphone Camcorder SIDE VIEW English - 15 - Note that cables shown in the following parts. • To listen the TV sound from headphones, connect to the HEADPHONE jack of optional equipment to the VIDEO IN socket and the AUDIO SOCKETS. Using Side AV Connectors You can connect a range of theTV. For selecting the related source, see the section "Input selection" in the illustration are shown below. Possible connections are not supplied. • For connecting a camcorder, connect to your LCD TV.

Instruction Manual
Page 19
... • Point the top of batteries. Note: If you were watching last will then switch on the TV. Note: Remove the battery from the indicated part. • Insert two AAA/R3 or equivalent type batteries inside. Switching the TV On/Off To Switch the TV On • Connect the power cord...
... • Point the top of batteries. Note: If you were watching last will then switch on the TV. Note: Remove the battery from the indicated part. • Insert two AAA/R3 or equivalent type batteries inside. Switching the TV On/Off To Switch the TV On • Connect the power cord...

Instruction Manual
Page 26
... the process by pressing the RED button. Date: Starting date is entered via GREEN key and delete with the instructions given in the General Operations part. Duration: Duration between Start and End time.
... the process by pressing the RED button. Date: Starting date is entered via GREEN key and delete with the instructions given in the General Operations part. Duration: Duration between Start and End time.
Instruction Manual
Page 34
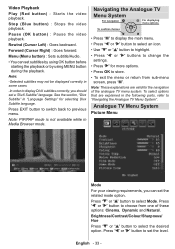
Video Playback Play (Red button) : Starts the video playback. See the section, "Divx Subtitle" in the following parts, refer to store. • To exit the menu or return from one of the analogue TV menu system. Press EXIT button to switch back to ...
Video Playback Play (Red button) : Starts the video playback. See the section, "Divx Subtitle" in the following parts, refer to store. • To exit the menu or return from one of the analogue TV menu system. Press EXIT button to switch back to ...

Instruction Manual
Page 44
... sound, pressing the button? Did you have tried to the mains socket outlet. Is your TV system has no device is coming from the bottom part. Is the aerial cable damaged? Are suitable plugs used to a non-earthed audio equipment or neon lights, etc.? No Picture means that no power, please...
... sound, pressing the button? Did you have tried to the mains socket outlet. Is your TV system has no device is coming from the bottom part. Is the aerial cable damaged? Are suitable plugs used to a non-earthed audio equipment or neon lights, etc.? No Picture means that no power, please...

Instruction Manual
Page 52
... wire which is coloured green and yellow must be connected to the terminal which is marked with the letter L or coloured Red. NO USER SERVICEABLE PARTS INSIDE. MAINS (AC) OPERATION The wires in the mains lead are coloured in accordance with the following instruction carefully before attempting to connect this appliance...
... wire which is coloured green and yellow must be connected to the terminal which is marked with the letter L or coloured Red. NO USER SERVICEABLE PARTS INSIDE. MAINS (AC) OPERATION The wires in the mains lead are coloured in accordance with the following instruction carefully before attempting to connect this appliance...

Instruction Manual
Page 53
...issued by the manufacturer, and has not been connected to an electrical supply for which it to the original supplier or any other consumables or parts. This guarantee is not transferable and is only applicable in this express warranty affects the statutory rights available to the purchaser of this equipment ... for any removal or installation or re-installation of the equipment. Nothing in the UK. Accidental damage or damage caused by negligence or misuse by SANYO Europe Ltd through a UK Reseller. In this way, we hope to reduce to a minimum the amount of time you many years of pleasure ...
...issued by the manufacturer, and has not been connected to an electrical supply for which it to the original supplier or any other consumables or parts. This guarantee is not transferable and is only applicable in this express warranty affects the statutory rights available to the purchaser of this equipment ... for any removal or installation or re-installation of the equipment. Nothing in the UK. Accidental damage or damage caused by negligence or misuse by SANYO Europe Ltd through a UK Reseller. In this way, we hope to reduce to a minimum the amount of time you many years of pleasure ...


