Skype Guide Ver.1.0 (English)
Page 5
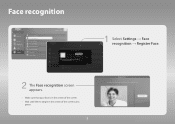
... of the screen. • Wait until the rectangle in the center of the screen turns green. 5 1 Select Settings → Face recognition → Register Face. Take Picture Face recognition Skype Credit : 0 Contacts History Call phones Profile Settings General Settings Face recognition Video Settings Privacy Settings Blocked Contacts Call Forwarding Voicemail About Skype...
... of the screen. • Wait until the rectangle in the center of the screen turns green. 5 1 Select Settings → Face recognition → Register Face. Take Picture Face recognition Skype Credit : 0 Contacts History Call phones Profile Settings General Settings Face recognition Video Settings Privacy Settings Blocked Contacts Call Forwarding Voicemail About Skype...
Skype Guide Ver.1.0 (English)
Page 7
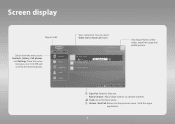
... Sign out. { Add a Contact: Add a Skype contact or a phone number. Video Call testPhoneNumber samsungskypetest Voice Call Your Skype Name, online status, mood message and profile picture. 1/1 a Sign Out { Add a Contact T Tools R Return a Sign Out: Select to the desired option.
... Sign out. { Add a Contact: Add a Skype contact or a phone number. Video Call testPhoneNumber samsungskypetest Voice Call Your Skype Name, online status, mood message and profile picture. 1/1 a Sign Out { Add a Contact T Tools R Return a Sign Out: Select to the desired option.
User Manual Ver.1.0 (English)
Page 4
...Subtitle Display Options TV Settings Basic Picture Settings 76 Changing the Picture Mode 77 Picture Quality 77 Applying the Current Picture Quality Setting to Another Input 78 Picture Size 79 Screen Position 79 Picture Off 79 Reset Image Settings Advanced Settings Picture Options Basic Sound Settings 84 ...Changing the Sound Mode 85 Adjusting the Sound Settings 85 Auto Volume 85 TV Installation Type 85 Resetting the Sound 3D Audio Speaker Settings 87 Speaker Select 88 Digital Audio Output 88 Samsung...
...Subtitle Display Options TV Settings Basic Picture Settings 76 Changing the Picture Mode 77 Picture Quality 77 Applying the Current Picture Quality Setting to Another Input 78 Picture Size 79 Screen Position 79 Picture Off 79 Reset Image Settings Advanced Settings Picture Options Basic Sound Settings 84 ...Changing the Sound Mode 85 Adjusting the Sound Settings 85 Auto Volume 85 TV Installation Type 85 Resetting the Sound 3D Audio Speaker Settings 87 Speaker Select 88 Digital Audio Output 88 Samsung...
User Manual Ver.1.0 (English)
Page 7
Other Information Support 132 Remote Management 133 What is Remote Support? 133 How Does it Work? 134 e-Manual 134 Self Diagnosis 134 Picture Test 135 Sound Test 135 Motion Control Environment Check 135 Signal Information 135 Reset 136 Updating the Software 136 Update now 136 Auto Update 137 ... 5500, LED 5500 series and above 138 IBM 138 MAC 139 VESA DMT 140 LED 4300 series models 140 IBM 140 MAC 141 VESA DMT Picture Size and Input Signal Supported 3D Resolutions 143 HDMI 143 3D Format: L/R, T/B 143 3D Format: Frame Packing 144 Component 144 Digital Channel 144 Videos/Photos...
Other Information Support 132 Remote Management 133 What is Remote Support? 133 How Does it Work? 134 e-Manual 134 Self Diagnosis 134 Picture Test 135 Sound Test 135 Motion Control Environment Check 135 Signal Information 135 Reset 136 Updating the Software 136 Update now 136 Auto Update 137 ... 5500, LED 5500 series and above 138 IBM 138 MAC 139 VESA DMT 140 LED 4300 series models 140 IBM 140 MAC 141 VESA DMT Picture Size and Input Signal Supported 3D Resolutions 143 HDMI 143 3D Format: L/R, T/B 143 3D Format: Frame Packing 144 Component 144 Digital Channel 144 Videos/Photos...
User Manual Ver.1.0 (English)
Page 10
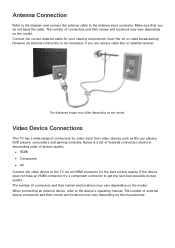
... of connectors and their names and locations may vary depending on the manufacturer. When connecting an external device, refer to get the next best possible picture quality. If the device does not have an HDMI connector, try a component connector to the device's operating manual. Make sure that you are using a cable... depending on the model. Antenna Connection Refer to the diagram and connect the antenna cable to the TV via an HDMI connector for the best picture quality. The number of external device connectors and their names and locations may differ depending on the model.
... of connectors and their names and locations may vary depending on the manufacturer. When connecting an external device, refer to get the next best possible picture quality. If the device does not have an HDMI connector, try a component connector to the device's operating manual. Make sure that you are using a cable... depending on the model. Antenna Connection Refer to the diagram and connect the antenna cable to the TV via an HDMI connector for the best picture quality. The number of external device connectors and their names and locations may differ depending on the model.

User Manual Ver.1.0 (English)
Page 21
Blocking based on Movie Rating (MPAA) Block movies based on its English Canadian rating. From the MPAA: "The Motion Picture Association of the rating categories to block that category and all higher categories. Children under 17 should be suitable for children 8 years and over to ...
Blocking based on Movie Rating (MPAA) Block movies based on its English Canadian rating. From the MPAA: "The Motion Picture Association of the rating categories to block that category and all higher categories. Children under 17 should be suitable for children 8 years and over to ...

User Manual Ver.1.0 (English)
Page 27
...●● The USB right angle adapter: Connect the Samsung Wireless LAN Adapter using the USB right angle adapter. ●● The USB extension cable: Connect the Samsung Wireless LAN Adapter using a standard router or modem. The picture may appear corrupted or have static for some channels when... the TV is sold separately. The Samsung Wireless LAN Adapter is connected to the USB port. To ...
...●● The USB right angle adapter: Connect the Samsung Wireless LAN Adapter using the USB right angle adapter. ●● The USB extension cable: Connect the Samsung Wireless LAN Adapter using a standard router or modem. The picture may appear corrupted or have static for some channels when... the TV is sold separately. The Samsung Wireless LAN Adapter is connected to the USB port. To ...

User Manual Ver.1.0 (English)
Page 65
..." section for details. Keep the face to be visible to enter password as well for increased security for the Samsung account. 333 Select Take Picture, and the user's face appears on the screen. The face is better to select the checkbox beside I want to the camera. Refer to the Smart...addition, keep your face. Shadows prevent the camera from the Smart Hub account information screen "" Log into Smart Hub first. 111 Open the (Smart Features > Samsung Account > Edit Profile) menu, and select Register Face. 222 Read the instruction, select OK, and then enter the password for higher security.
..." section for details. Keep the face to be visible to enter password as well for increased security for the Samsung account. 333 Select Take Picture, and the user's face appears on the screen. The face is better to select the checkbox beside I want to the camera. Refer to the Smart...addition, keep your face. Shadows prevent the camera from the Smart Hub account information screen "" Log into Smart Hub first. 111 Open the (Smart Features > Samsung Account > Edit Profile) menu, and select Register Face. 222 Read the instruction, select OK, and then enter the password for higher security.

User Manual Ver.1.0 (English)
Page 66
However, a user account appears in . 444 Enter the password for the Samsung account. Shadows prevent the camera from the login window. Face Recognition Login Select Face recognition, and then select Start from recognizing your expression as neutral ..., a list of corresponding accounts appears. "" Keep your face accurately. If the TV recognizes two or more accurate, scan the user's face again. 555 Select Take Picture. Keep the face completely within the red round. In addition, keep your face. The TV automatically recognizes the user's face. 222 Select a face to proceed...
However, a user account appears in . 444 Enter the password for the Samsung account. Shadows prevent the camera from the login window. Face Recognition Login Select Face recognition, and then select Start from recognizing your expression as neutral ..., a list of corresponding accounts appears. "" Keep your face accurately. If the TV recognizes two or more accurate, scan the user's face again. 555 Select Take Picture. Keep the face completely within the red round. In addition, keep your face. The TV automatically recognizes the user's face. 222 Select a face to proceed...
User Manual Ver.1.0 (English)
Page 76
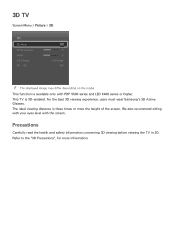
For the best 3D viewing experience, users must wear Samsung's 3D Active Glasses. Precautions Carefully read the health and safety information concerning 3D viewing before viewing the TV in 3D. The ideal viewing distance is three times or more information. 3D TV Screen Menu > Picture > 3D 3D 3D Mode 3D Perspective Depth L/R Change...
For the best 3D viewing experience, users must wear Samsung's 3D Active Glasses. Precautions Carefully read the health and safety information concerning 3D viewing before viewing the TV in 3D. The ideal viewing distance is three times or more information. 3D TV Screen Menu > Picture > 3D 3D 3D Mode 3D Perspective Depth L/R Change...
User Manual Ver.1.0 (English)
Page 77
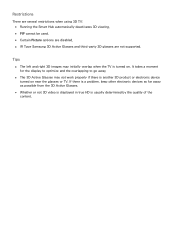
... 3D TV: ●● Running the Smart Hub automatically deactivates 3D viewing. ●● PIP cannot be used. ●● Certain Picture options are disabled. ●● IR Type Samsung 3D Active Glasses and third-party 3D glasses are not supported. Tips ●● The left and right 3D images may not...
... 3D TV: ●● Running the Smart Hub automatically deactivates 3D viewing. ●● PIP cannot be used. ●● Certain Picture options are disabled. ●● IR Type Samsung 3D Active Glasses and third-party 3D glasses are not supported. Tips ●● The left and right 3D images may not...
User Manual Ver.1.0 (English)
Page 78
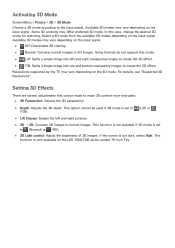
... option cannot be made to 3D images. This function is not available if 3D mode is too dark, select High. Activating 3D Mode Screen Menu > Picture > 3D > 3D Mode Choose a 3D mode according to (Normal) or (Off). ●● 3D Light control: Adjust the brightness of 3D images. Some 3D contents... may vary depending on the 3D mode. In this mode. ● ● L/R: Splits a single image into left and right pictures. ●● 3D → 2D: Converts 3D images to create the 3D effect. For details, see "Supported 3D Resolutions".
... option cannot be made to 3D images. This function is not available if 3D mode is too dark, select High. Activating 3D Mode Screen Menu > Picture > 3D > 3D Mode Choose a 3D mode according to (Normal) or (Off). ●● 3D Light control: Adjust the brightness of 3D images. Some 3D contents... may vary depending on the 3D mode. In this mode. ● ● L/R: Splits a single image into left and right pictures. ●● 3D → 2D: Converts 3D images to create the 3D effect. For details, see "Supported 3D Resolutions".

User Manual Ver.1.0 (English)
Page 79
.../deactivates PIP. ●● Antenna: Select either Air or Cable as a picture-in -picture, the main screen's source must be set to Component or HDMI. PIP Screen Menu > Picture > PIP Try Now Picture 3D PIP Advanced Settings Picture Options Picture Off Apply Picture Mode Reset Picture Off All Sources "" The displayed image may differ depending on the main...
.../deactivates PIP. ●● Antenna: Select either Air or Cable as a picture-in -picture, the main screen's source must be set to Component or HDMI. PIP Screen Menu > Picture > PIP Try Now Picture 3D PIP Advanced Settings Picture Options Picture Off Apply Picture Mode Reset Picture Off All Sources "" The displayed image may differ depending on the main...

User Manual Ver.1.0 (English)
Page 80
Analog pictures can fine tune the signal and/or reduce noise to reset the Fine Tune operation. Fine Tune Screen Menu > Broadcasting > Channel Settings > Fine Tune Try Now Clear up the picture. Select Reset to clear up shaky pictures. If this happens, you can become shaky and full of noise. Fine tune the pictures until they are clear and then select Save or Close. Analog Screen Calibration Channel Settings Fine Tune Clear Scrambled Channel "" The displayed image may differ depending on the model. This option is only available for analog broadcasts.
Analog pictures can fine tune the signal and/or reduce noise to reset the Fine Tune operation. Fine Tune Screen Menu > Broadcasting > Channel Settings > Fine Tune Try Now Clear up the picture. Select Reset to clear up shaky pictures. If this happens, you can become shaky and full of noise. Fine tune the pictures until they are clear and then select Save or Close. Analog Screen Calibration Channel Settings Fine Tune Clear Scrambled Channel "" The displayed image may differ depending on the model. This option is only available for analog broadcasts.
User Manual Ver.1.0 (English)
Page 81
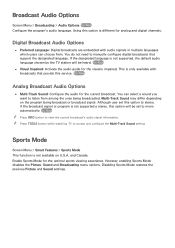
...the optimal sports viewing experience. "" Press TOOLS button while watching TV to listen from . Disabling Sports Mode restores the previous Picture and Sound settings. If the designated language is not supported, the default audio language chosen by the TV station will be...9679;● Preferred Language: Digital broadcasts are embedded with broadcasts that support the designated language. However, enabling Sports Mode disables the Picture, Sound and Broadcasting menu options. and Canada. Try Now Analog Broadcast Audio Options ●● Multi-Track Sound: Configure the ...
...the optimal sports viewing experience. "" Press TOOLS button while watching TV to listen from . Disabling Sports Mode restores the previous Picture and Sound settings. If the designated language is not supported, the default audio language chosen by the TV station will be...9679;● Preferred Language: Digital broadcasts are embedded with broadcasts that support the designated language. However, enabling Sports Mode disables the Picture, Sound and Broadcasting menu options. and Canada. Try Now Analog Broadcast Audio Options ●● Multi-Track Sound: Configure the ...
User Manual Ver.1.0 (English)
Page 83
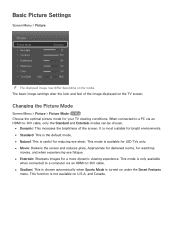
Changing the Picture Mode Screen Menu > Picture > Picture Mode Try Now Choose the optimal picture mode for reducing eye strain. It is most suitable for bright environments. ●● Standard: This is the default mode. ●&#... This mode is not available on under the Smart Features menu. The basic image settings alter the look and feel of the screen. Basic Picture Settings Screen Menu > Picture Picture Picture Mode •• Backlight •• Contrast •• Brightness •• Sharpness •• Color •• Tint ...
Changing the Picture Mode Screen Menu > Picture > Picture Mode Try Now Choose the optimal picture mode for reducing eye strain. It is most suitable for bright environments. ●● Standard: This is the default mode. ●&#... This mode is not available on under the Smart Features menu. The basic image settings alter the look and feel of the screen. Basic Picture Settings Screen Menu > Picture Picture Picture Mode •• Backlight •• Contrast •• Brightness •• Sharpness •• Color •• Tint ...
User Manual Ver.1.0 (English)
Page 84
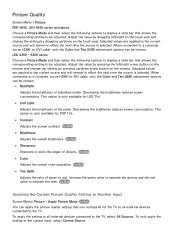
.... Try Now ●● Sharpness Sharpens or dulls the edges of green to red. Try Now Applying the Current Picture Quality Setting to Another Input Screen Menu> Picture > Apply Picture Mode Try Now You can be chosen. ●● Backlight Adjusts the brightness of the panel. Adjust the value ...button on the remote and change the setting by pressing up /down arrow button on the touch pad. LED 4300 - 6300 series Choose a Picture Mode and then select the following options to display a slide bar that allows the corresponding setting to be adjusted. Try Now ●● Brightness...
.... Try Now ●● Sharpness Sharpens or dulls the edges of green to red. Try Now Applying the Current Picture Quality Setting to Another Input Screen Menu> Picture > Apply Picture Mode Try Now You can be chosen. ●● Backlight Adjusts the brightness of the panel. Adjust the value ...button on the remote and change the setting by pressing up /down arrow button on the touch pad. LED 4300 - 6300 series Choose a Picture Mode and then select the following options to display a slide bar that allows the corresponding setting to be adjusted. Try Now ●● Brightness...
User Manual Ver.1.0 (English)
Page 85
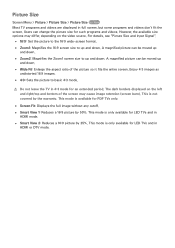
... burn). This mode is available for LED TVs and in full screen, but some programs and videos don't fit the screen. A magnified picture can change the picture size for LED TVs and in 4:3 mode for an extended period. This mode is only available for PDP TVs only. ●● Screen... Fit: Displays the full image without any cutoff. ●● Smart View 1: Reduces a 16:9 picture by 25%. This is only available for such programs and videos. This mode is not covered by the warranty. The dark borders displayed on the...
... burn). This mode is available for LED TVs and in full screen, but some programs and videos don't fit the screen. A magnified picture can change the picture size for LED TVs and in 4:3 mode for an extended period. This mode is only available for PDP TVs only. ●● Screen... Fit: Displays the full image without any cutoff. ●● Smart View 1: Reduces a 16:9 picture by 25%. This is only available for such programs and videos. This mode is not covered by the warranty. The dark borders displayed on the...
User Manual Ver.1.0 (English)
Page 86
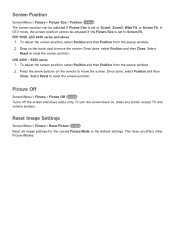
.... Select Reset to reset the screen position. Reset Image Settings Screen Menu > Picture > Reset Picture Try Now Reset all image settings for the current Picture Mode to Zoom1, Zoom2, Wide Fit, or Screen Fit. Picture Off Screen Menu > Picture > Picture Off Try Now Turns off the screen and plays audio only. Once done,... select Position and then Close. This does not affect other Picture Modes. PDP 5500, LED 6400 series and above 111 To adjust the screen position, select Position and then Position from the popup ...
.... Select Reset to reset the screen position. Reset Image Settings Screen Menu > Picture > Reset Picture Try Now Reset all image settings for the current Picture Mode to Zoom1, Zoom2, Wide Fit, or Screen Fit. Picture Off Screen Menu > Picture > Picture Off Try Now Turns off the screen and plays audio only. Once done,... select Position and then Close. This does not affect other Picture Modes. PDP 5500, LED 6400 series and above 111 To adjust the screen position, select Position and then Position from the popup ...

User Manual Ver.1.0 (English)
Page 87
... ●● Black Tone Adjusts the black color depth. The Advanced Settings option is only available when Picture Mode is connected to achieve the optimal contrast setting. Try Now Advanced Settings Screen Menu > Picture > Advanced Settings Try Now Advanced Settings Dynamic Contrast Black Tone Flesh Tone RGB Only Mode Color Space White...
... ●● Black Tone Adjusts the black color depth. The Advanced Settings option is only available when Picture Mode is connected to achieve the optimal contrast setting. Try Now Advanced Settings Screen Menu > Picture > Advanced Settings Try Now Advanced Settings Dynamic Contrast Black Tone Flesh Tone RGB Only Mode Color Space White...

