

Open Source Guide (ENGLISH)
Page 1
..., a complete machine-readable copy of the corresponding source code, to contest validity of any problems introduced by the Free Software Foundation. You may not impose any work based on you (whether by all modules it contains, plus the scripts used for copying, distributing or modifying the Program or works based on the Program), you could satisfy both it and "any later version...
..., a complete machine-readable copy of the corresponding source code, to contest validity of any problems introduced by the Free Software Foundation. You may not impose any work based on you (whether by all modules it contains, plus the scripts used for copying, distributing or modifying the Program or works based on the Program), you could satisfy both it and "any later version...

Open Source Guide (ENGLISH)
Page 2
...terms, attach the following notices to most effectively convey the exclusion of warranty; You can redistribute and change. and each source file to the library. 16. IN NO EVENT UNLESS REQUIRED BY...USE OR INABILITY TO USE THE LIBRARY (INCLUDING BUT NOT LIMITED TO LOSS OF DATA OR DATA BEING RENDERED INACCURATE OR LOSSES SUSTAINED BY YOU OR THIRD PARTIES OR A FAILURE OF THE LIBRARY TO OPERATE WITH ANY OTHER SOFTWARE..., and you want it to be of the greatest possible use to the public, we recommend making it free software that everyone can do so by permitting redistribution under the terms...
...terms, attach the following notices to most effectively convey the exclusion of warranty; You can redistribute and change. and each source file to the library. 16. IN NO EVENT UNLESS REQUIRED BY...USE OR INABILITY TO USE THE LIBRARY (INCLUDING BUT NOT LIMITED TO LOSS OF DATA OR DATA BEING RENDERED INACCURATE OR LOSSES SUSTAINED BY YOU OR THIRD PARTIES OR A FAILURE OF THE LIBRARY TO OPERATE WITH ANY OTHER SOFTWARE..., and you want it to be of the greatest possible use to the public, we recommend making it free software that everyone can do so by permitting redistribution under the terms...

User Manual (user Manual) (ver.1.0) (English)
Page 6
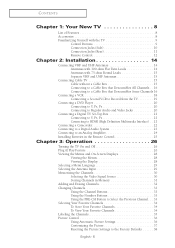
... Connecting to HDMI (High Definition Multimedia Interface) . . 21 Connecting a Camcorder 22 Connecting to a Digital Audio System 23 Connecting to an Analog Amplifier 24 Installing Batteries in the Remote Control 25 Chapter 3: Operation 26 Turning the TV On and Off 26 Plug & Play Feature 26 Viewing the Menus and On-Screen Displays 28 Viewing the Menus 28 Viewing the Display 28 Selecting a Menu Language 29 Selecting the Antenna Input 29 Memorizing the Channels 30 Selecting the Video Signal Source...
... Connecting to HDMI (High Definition Multimedia Interface) . . 21 Connecting a Camcorder 22 Connecting to a Digital Audio System 23 Connecting to an Analog Amplifier 24 Installing Batteries in the Remote Control 25 Chapter 3: Operation 26 Turning the TV On and Off 26 Plug & Play Feature 26 Viewing the Menus and On-Screen Displays 28 Viewing the Menus 28 Viewing the Display 28 Selecting a Menu Language 29 Selecting the Antenna Input 29 Memorizing the Channels 30 Selecting the Video Signal Source...
User Manual (user Manual) (ver.1.0) (English)
Page 7
... 65 Viewing Closed Captions (On-Screen Text Messages 67 Menu Transparency Level 69 Setting the Function Help 69 Electronic Program Guide 70 Using the Electronic Program Guide 71 Viewing Information about a Single Channel 72 Viewing Information about Channels 73 Remind List 74 Reminded Viewing List 74 To View the Remind List 75 To Remove the Scheduled Programs 75 Customizing Your Remote Control 76 Setting Up Your Remote Control to Operate Your VCR (Cable box or DVD player 76 Remote Control Codes 77 Chapter 5: Troubleshooting 78 Identifying Problems 78...
... 65 Viewing Closed Captions (On-Screen Text Messages 67 Menu Transparency Level 69 Setting the Function Help 69 Electronic Program Guide 70 Using the Electronic Program Guide 71 Viewing Information about a Single Channel 72 Viewing Information about Channels 73 Remind List 74 Reminded Viewing List 74 To View the Remind List 75 To Remove the Scheduled Programs 75 Customizing Your Remote Control 76 Setting Up Your Remote Control to Operate Your VCR (Cable box or DVD player 76 Remote Control Codes 77 Chapter 5: Troubleshooting 78 Identifying Problems 78...

User Manual (user Manual) (ver.1.0) (English)
Page 12
... favorite channels. P.MODE Adjust the TV picture by selecting one of the preset factory settings (or select your VCR, DVD, Cable box, and some Samsung Set-top boxes. " GUIDE Press to select channels over 100. CH (Favorite Channel) Press to switch between Component 1, 2 or HDMI mode. ˇ ANTENNA Press to select "Air" or "Cable". ¨ Number buttons Press to select channels directly on the TV. ˆ +100 Press to display the on-screen Electronic Program Guide (EPG). ' MENU Displays...
... favorite channels. P.MODE Adjust the TV picture by selecting one of the preset factory settings (or select your VCR, DVD, Cable box, and some Samsung Set-top boxes. " GUIDE Press to select channels over 100. CH (Favorite Channel) Press to switch between Component 1, 2 or HDMI mode. ˇ ANTENNA Press to select "Air" or "Cable". ¨ Number buttons Press to select channels directly on the TV. ˆ +100 Press to display the on-screen Electronic Program Guide (EPG). ' MENU Displays...

User Manual (user Manual) (ver.1.0) (English)
Page 18
... INSTALLATION Connecting a VCR These instructions assume that you have a mono VCR, connect L(mono) to VCR audio out using only one audio cable. 2 3 Connect a video or S-video cable between the "AV IN 1 (VIDEO)" ("AV IN 2/3 (VIDEO)" or "S-VIDEO IN 1") jack on the TV and the VIDEO OUT jack on the VCR. 1 3 Refer to your VCR's instructions for more information about how to view your local electronics store). TV Rear Panel 2 Connect a set of...
... INSTALLATION Connecting a VCR These instructions assume that you have a mono VCR, connect L(mono) to VCR audio out using only one audio cable. 2 3 Connect a video or S-video cable between the "AV IN 1 (VIDEO)" ("AV IN 2/3 (VIDEO)" or "S-VIDEO IN 1") jack on the TV and the VIDEO OUT jack on the VCR. 1 3 Refer to your VCR's instructions for more information about how to view your local electronics store). TV Rear Panel 2 Connect a set of...

User Manual (user Manual) (ver.1.0) (English)
Page 20
... Rear Panel 2 Connect a video cable between the "COMPONENT IN 1 (Y, PB, PR)" (or "COMPONENT IN 2 (Y, PB, PR)") jacks on the TV and the COMPONENT VIDEO OUT (Y, PB, PR) jacks on the DVD player. For an explanation of Component 2 video, see your TV. • Please be sure to match the color coded input terminals and cable jacks. The Y Component video 1 and 2 input jacks also function as the regular (composite) video 2and 3 input jacks. 2 1 The component audio...
... Rear Panel 2 Connect a video cable between the "COMPONENT IN 1 (Y, PB, PR)" (or "COMPONENT IN 2 (Y, PB, PR)") jacks on the TV and the COMPONENT VIDEO OUT (Y, PB, PR) jacks on the DVD player. For an explanation of Component 2 video, see your TV. • Please be sure to match the color coded input terminals and cable jacks. The Y Component video 1 and 2 input jacks also function as the regular (composite) video 2and 3 input jacks. 2 1 The component audio...
User Manual (user Manual) (ver.1.0) (English)
Page 21
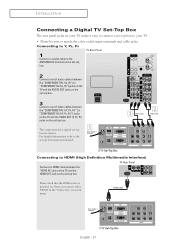
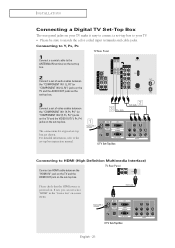
...)" (or "COMPONENT IN 2 (Y, PB, PR)") jacks on the TV and the VIDEO OUT (Y, PB, PR) jacks on the set-top box. 1 The connections for a typical set -top box to your TV. • Please be sure to match the color coded input terminals and cable jacks. If not, you can not select "HDMI" in the "Source List" on . English - 21 INSTALLATION Connecting a Digital TV Set-Top Box The rear panel jacks on...
...)" (or "COMPONENT IN 2 (Y, PB, PR)") jacks on the TV and the VIDEO OUT (Y, PB, PR) jacks on the set-top box. 1 The connections for a typical set -top box to your TV. • Please be sure to match the color coded input terminals and cable jacks. If not, you can not select "HDMI" in the "Source List" on . English - 21 INSTALLATION Connecting a Digital TV Set-Top Box The rear panel jacks on...

User Manual (user Manual) (ver.1.0) (English)
Page 26
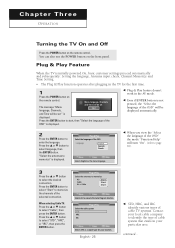
... displayed automatically. 2 Press the ENTER button to select the desired connection. Plug & Play Select the cable system STD HRC IRC Selects STD as the menu language. 3 Press the ... The message "Menu language, Channels, Menu language, Channels, and Time will be set Start and Time will be set " is initially powered On, basic customer settings proceed automatically and subsequently: Setting the language, Antenna input check, Channel Memorize and Time Setting. • The Plug & Play function operates after plugging...
... displayed automatically. 2 Press the ENTER button to select the desired connection. Plug & Play Select the cable system STD HRC IRC Selects STD as the menu language. 3 Press the ... The message "Menu language, Channels, Menu language, Channels, and Time will be set Start and Time will be set " is initially powered On, basic customer settings proceed automatically and subsequently: Setting the language, Antenna input check, Channel Memorize and Time Setting. • The Plug & Play function operates after plugging...
User Manual (user Manual) (ver.1.0) (English)
Page 58
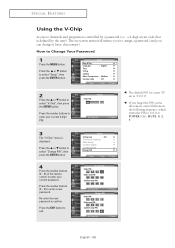
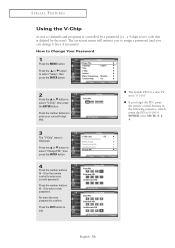
... FEATURES Using the V-Chip Access to channels and programs is controlled by the user). T V Setup Plug & Play √ Language : English √ Time √ V-Chip √ Caption √ Menu Transparency : Medium √ Function Help : Off √ 2 T V Press the ... Press the ... Press the ▲ or ▼ button to Change Your Password 1 Press the MENU button. Re-enter the new password to select "V-Chip", then press the ENTER button. The on the remote control to 0-0-0-0: POWER...
... FEATURES Using the V-Chip Access to channels and programs is controlled by the user). T V Setup Plug & Play √ Language : English √ Time √ V-Chip √ Caption √ Menu Transparency : Medium √ Function Help : Off √ 2 T V Press the ... Press the ... Press the ▲ or ▼ button to Change Your Password 1 Press the MENU button. Re-enter the new password to select "V-Chip", then press the ENTER button. The on the remote control to 0-0-0-0: POWER...

User Manual (user Manual) (ver.1.0) (English)
Page 70
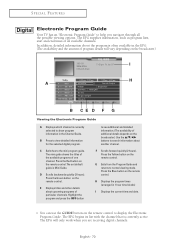
... the possible viewing options. H Displays the program times (arranged in the EPG. (The availability and the amount of program details will only work when you navigate through all available channels. The mini guide shows the titles of the available programs of particular channels. D Scrolls backwards quickly (2 hours). Press the Blue button on the remote control.The set default guide is Mini Guide. Press the Green button on the remote control and repeatedly...
... the possible viewing options. H Displays the program times (arranged in the EPG. (The availability and the amount of program details will only work when you navigate through all available channels. The mini guide shows the titles of the available programs of particular channels. D Scrolls backwards quickly (2 hours). Press the Blue button on the remote control.The set default guide is Mini Guide. Press the Green button on the remote control and repeatedly...
User Manual (user Manual) (ver.1.0) (English)
Page 78
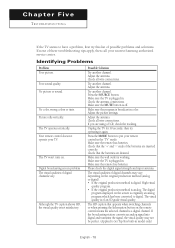
... e TROUBLESHOOTING If the TV seems to Set Top Box built-in model only.) English - 78 Identifying Problems Problem Poor picture. Digital broadcasting screen problem The visual qualities of an SD grade visual quality. Make sure the remote has batteries. Your remote control does not operate your nearest Samsung authorized service center. Make sure the MUTE button is of digital channels vary. Check all wire connections. The HD caption that appears when switching channels...
... e TROUBLESHOOTING If the TV seems to Set Top Box built-in model only.) English - 78 Identifying Problems Problem Poor picture. Digital broadcasting screen problem The visual qualities of an SD grade visual quality. Make sure the remote has batteries. Your remote control does not operate your nearest Samsung authorized service center. Make sure the MUTE button is of digital channels vary. Check all wire connections. The HD caption that appears when switching channels...
User Manual (user Manual) (ver.1.0) (English)
Page 6
... Connecting to HDMI (High Definition Multimedia Interface) . . 21 Connecting a Camcorder 22 Connecting to a Digital Audio System 23 Connecting to an Analog Amplifier 24 Installing Batteries in the Remote Control 25 Chapter 3: Operation 26 Turning the TV On and Off 26 Plug & Play Feature 26 Viewing the Menus and On-Screen Displays 28 Viewing the Menus 28 Viewing the Display 28 Selecting a Menu Language 29 Selecting the Antenna Input 29 Memorizing the Channels 30 Selecting the Video Signal Source...
... Connecting to HDMI (High Definition Multimedia Interface) . . 21 Connecting a Camcorder 22 Connecting to a Digital Audio System 23 Connecting to an Analog Amplifier 24 Installing Batteries in the Remote Control 25 Chapter 3: Operation 26 Turning the TV On and Off 26 Plug & Play Feature 26 Viewing the Menus and On-Screen Displays 28 Viewing the Menus 28 Viewing the Display 28 Selecting a Menu Language 29 Selecting the Antenna Input 29 Memorizing the Channels 30 Selecting the Video Signal Source...

User Manual (user Manual) (ver.1.0) (English)
Page 7
... 65 Viewing Closed Captions (On-Screen Text Messages 67 Menu Transparency Level 69 Setting the Function Help 69 Electronic Program Guide 70 Using the Electronic Program Guide 71 Viewing Information about a Single Channel 72 Viewing Information about Channels 73 Remind List 74 Reminded Viewing List 74 To View the Remind List 75 To Remove the Scheduled Programs 75 Customizing Your Remote Control 76 Setting Up Your Remote Control to Operate Your VCR (Cable box or DVD player 76 Remote Control Codes 77 Chapter 5: Troubleshooting 78 Identifying Problems 78...
... 65 Viewing Closed Captions (On-Screen Text Messages 67 Menu Transparency Level 69 Setting the Function Help 69 Electronic Program Guide 70 Using the Electronic Program Guide 71 Viewing Information about a Single Channel 72 Viewing Information about Channels 73 Remind List 74 Reminded Viewing List 74 To View the Remind List 75 To Remove the Scheduled Programs 75 Customizing Your Remote Control 76 Setting Up Your Remote Control to Operate Your VCR (Cable box or DVD player 76 Remote Control Codes 77 Chapter 5: Troubleshooting 78 Identifying Problems 78...

User Manual (user Manual) (ver.1.0) (English)
Page 12
... switch between Component 1, 2 or HDMI mode. ˇ ANTENNA Press to select "Air" or "Cable". ¨ Number buttons Press to select channels directly on and off the sound. When using the on -screen menu. Ò MODE Selects a target device to be controlled by selecting one of the preset factory settings (or select your personal, customized picture settings). YOUR NEW TV Remote Control You can also use the remote control up to operate your VCR, DVD, Cable box, and some Samsung Set...
... switch between Component 1, 2 or HDMI mode. ˇ ANTENNA Press to select "Air" or "Cable". ¨ Number buttons Press to select channels directly on and off the sound. When using the on -screen menu. Ò MODE Selects a target device to be controlled by selecting one of the preset factory settings (or select your personal, customized picture settings). YOUR NEW TV Remote Control You can also use the remote control up to operate your VCR, DVD, Cable box, and some Samsung Set...
User Manual (user Manual) (ver.1.0) (English)
Page 21
..., refer to match the color coded input terminals and cable jacks. English - 21 Please check that the HDMI source is powered on -screen menu. Connecting to Y, PB, PR TV Rear Panel 1 Connect a coaxial cable to the ANTENNA IN terminal on the set-top box. 2 Connect a set of audio cables between the "COMPONENT IN 1 (L, R)" (or "COMPONENT IN 2 (L, R)") jacks on the TV and the AUDIO OUT jacks on the set-top box. 3 Connect a set of video cables between the "HDMI IN" jack on...
..., refer to match the color coded input terminals and cable jacks. English - 21 Please check that the HDMI source is powered on -screen menu. Connecting to Y, PB, PR TV Rear Panel 1 Connect a coaxial cable to the ANTENNA IN terminal on the set-top box. 2 Connect a set of audio cables between the "COMPONENT IN 1 (L, R)" (or "COMPONENT IN 2 (L, R)") jacks on the TV and the AUDIO OUT jacks on the set-top box. 3 Connect a set of video cables between the "HDMI IN" jack on...
User Manual (user Manual) (ver.1.0) (English)
Page 26
... connection. or † button to memorize the channels of the OSD Language : English Spanish French Selects English as a signal type for the first time. 1 Press the POWER button on the remote control. C h a pOtPEeRArTIOTN h r e e OPERATION Turning the TV On and Off Press the POWER button on the remote control. The message "Menu language, Channels, Menu language, Channels, and Time will be set " is displayed. Press the ... Press the ENTER button to select "Start" to select "Cable...
... connection. or † button to memorize the channels of the OSD Language : English Spanish French Selects English as a signal type for the first time. 1 Press the POWER button on the remote control. C h a pOtPEeRArTIOTN h r e e OPERATION Turning the TV On and Off Press the POWER button on the remote control. The message "Menu language, Channels, Menu language, Channels, and Time will be set " is displayed. Press the ... Press the ENTER button to select "Start" to select "Cable...
User Manual (user Manual) (ver.1.0) (English)
Page 58
... **** Enter new PIN **** Confirm new PIN **** English - 58 SPECIAL FEATURES Using the V-Chip Access to channels and programs is controlled by a password (i.e., a 4-digit secret code that is displayed. Press the ▲ or ▼ button to Change Your Password 1 Press the MENU button. T V Setup Plug & Play √ Language : English √ Time √ V-Chip √ Caption √ Menu Transparency : Medium √ Function Help : On √ 2 T V Press the ... Press the number buttons to enter your current...
... **** Enter new PIN **** Confirm new PIN **** English - 58 SPECIAL FEATURES Using the V-Chip Access to channels and programs is controlled by a password (i.e., a 4-digit secret code that is displayed. Press the ▲ or ▼ button to Change Your Password 1 Press the MENU button. T V Setup Plug & Play √ Language : English √ Time √ V-Chip √ Caption √ Menu Transparency : Medium √ Function Help : On √ 2 T V Press the ... Press the number buttons to enter your current...
User Manual (user Manual) (ver.1.0) (English)
Page 70
... detailed information. (The availability of program details will only work when you navigate through all available channels. F Scrolls forward quickly (2 hours). Notting Hill 9 - 1 KBS D - 2 Toy story 11-1 MBC - Press the Green button on the remote control. H Displays the program times (arranged in the Channel Guide. DTV Today sports Prog Info Mini Guide -2Hours +2Hours Exit B CE D F G Viewing the Electronic Program Guide A Displays which channel is often available in the...
... detailed information. (The availability of program details will only work when you navigate through all available channels. F Scrolls forward quickly (2 hours). Notting Hill 9 - 1 KBS D - 2 Toy story 11-1 MBC - Press the Green button on the remote control. H Displays the program times (arranged in the Channel Guide. DTV Today sports Prog Info Mini Guide -2Hours +2Hours Exit B CE D F G Viewing the Electronic Program Guide A Displays which channel is often available in the...

User Manual (user Manual) (ver.1.0) (English)
Page 78
... Set Top Box built-in . Try another channel. Press the SOURCE button. Make sure the remote has batteries. Identifying Problems Problem Poor picture. Picture rolls vertically. Try another channel. Make sure the MUTE button is working. Check all wire connections. Make sure the TV is broadcast in . Digital broadcasting screen problem The visual qualities of these troubleshooting tips apply, then call your nearest Samsung authorized service center. Please check the digital signal...
... Set Top Box built-in . Try another channel. Press the SOURCE button. Make sure the remote has batteries. Identifying Problems Problem Poor picture. Picture rolls vertically. Try another channel. Make sure the MUTE button is working. Check all wire connections. Make sure the TV is broadcast in . Digital broadcasting screen problem The visual qualities of these troubleshooting tips apply, then call your nearest Samsung authorized service center. Please check the digital signal...


