

Open Source Guide (ENGLISH)
Page 1
... (not limited to patent issues), conditions are referring to time. If the software is modified by modifying or distributing the Program (or any work , complete source code means all modules it , thus forming a work based on , we sometimes make certain that everyone 's free use to the public, the best way to achieve this is safest to control compilation and installation of this License. b) You...
... (not limited to patent issues), conditions are referring to time. If the software is modified by modifying or distributing the Program (or any work , complete source code means all modules it , thus forming a work based on , we sometimes make certain that everyone 's free use to the public, the best way to achieve this is safest to control compilation and installation of this License. b) You...

Open Source Guide (ENGLISH)
Page 2
...warranty; To apply these terms (or, alternatively, under these terms, attach the following notices to the public, we recommend making it to be of the ordinary General Public License). You can redistribute and change...USE OR INABILITY TO USE THE LIBRARY (INCLUDING BUT NOT LIMITED TO LOSS OF DATA OR DATA BEING RENDERED INACCURATE OR LOSSES SUSTAINED BY YOU OR THIRD PARTIES OR A FAILURE OF THE LIBRARY TO OPERATE WITH ANY OTHER SOFTWARE...and you want it free software that everyone can do so by permitting redistribution under the terms of the greatest possible use to the library. It is found...
...warranty; To apply these terms (or, alternatively, under these terms, attach the following notices to the public, we recommend making it to be of the ordinary General Public License). You can redistribute and change...USE OR INABILITY TO USE THE LIBRARY (INCLUDING BUT NOT LIMITED TO LOSS OF DATA OR DATA BEING RENDERED INACCURATE OR LOSSES SUSTAINED BY YOU OR THIRD PARTIES OR A FAILURE OF THE LIBRARY TO OPERATE WITH ANY OTHER SOFTWARE...and you want it free software that everyone can do so by permitting redistribution under the terms of the greatest possible use to the library. It is found...
User Manual (user Manual) (ver.1.0) (English)
Page 3
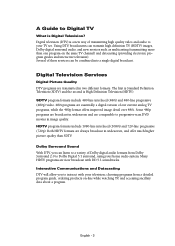
... your television; Many HDTV programs are essentially a digital version of transmitting high quality video and audio to Dolby Digital 5.1 surround, using your home audio system. English - 3 Dolby Surround Sound With DTV, you to Digital TV What is High Definition Television (HDTV). A Guide to interact with DD 5.1 soundtracks. Several of Dolby digital audio formats from a detailed program guide, ordering products on the same TV channel) and datacasting (providing electronic program guides and interactive television). Digital Television Services Digital Picture...
... your television; Many HDTV programs are essentially a digital version of transmitting high quality video and audio to Dolby Digital 5.1 surround, using your home audio system. English - 3 Dolby Surround Sound With DTV, you to Digital TV What is High Definition Television (HDTV). A Guide to interact with DD 5.1 soundtracks. Several of Dolby digital audio formats from a detailed program guide, ordering products on the same TV channel) and datacasting (providing electronic program guides and interactive television). Digital Television Services Digital Picture...
User Manual (user Manual) (ver.1.0) (English)
Page 4
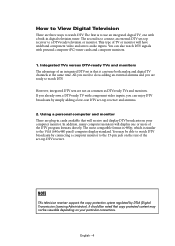
... a low-cost DTV set -top DTV receiver. English - 4 This type of the DTV program formats directly. You can tune both analog and digital TV channels at the same time. NOTE This television receiver supports the copy protection system regulated by connecting a computer monitor to a DTV-ready television or monitor. The most compatible format is 480p, which is to connect an external DTV set is adding an external antenna and you need to do is...
... a low-cost DTV set -top DTV receiver. English - 4 This type of the DTV program formats directly. You can tune both analog and digital TV channels at the same time. NOTE This television receiver supports the copy protection system regulated by connecting a computer monitor to a DTV-ready television or monitor. The most compatible format is 480p, which is to connect an external DTV set is adding an external antenna and you need to do is...

User Manual (user Manual) (ver.1.0) (English)
Page 6
... HDMI(High Definition Multimedia Interface) . . .22 Connecting a Camcorder 23 Connecting to a Digital Audio System 24 Connecting to an External Amplifier (Variable Audio Output 24 Installing Batteries in the Remote Control 25 Chapter 3: Operation 26 Turning the TV On and Off 26 Plug & Play Feature 26 Viewing the Menus and On-Screen Displays 28 Viewing the Menus 28 Viewing the Display 28 Selecting a Menu Language 29 Selecting the Antenna Input 30 Memorizing the Channels 31 Selecting the Video Signal-source...
... HDMI(High Definition Multimedia Interface) . . .22 Connecting a Camcorder 23 Connecting to a Digital Audio System 24 Connecting to an External Amplifier (Variable Audio Output 24 Installing Batteries in the Remote Control 25 Chapter 3: Operation 26 Turning the TV On and Off 26 Plug & Play Feature 26 Viewing the Menus and On-Screen Displays 28 Viewing the Menus 28 Viewing the Display 28 Selecting a Menu Language 29 Selecting the Antenna Input 30 Memorizing the Channels 31 Selecting the Video Signal-source...
User Manual (user Manual) (ver.1.0) (English)
Page 7
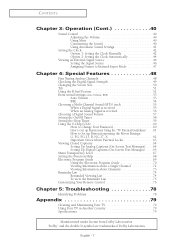
... Sound Control 40 Adjusting the Volume 40 Using Mute 40 Customizing the Sound 40 Using Automatic Sound Settings 41 Setting the Clock 42 Option 1: Setting the Clock Manually 42 Option 2: Setting the Clock Automatically 44 Viewing an External Signal Source 46 Setting the Signal Source 46 Assigning Names to External Input Mode 47 Chapter 4: Special Features 48 Fine Tuning Analog Channels 48 Checking the Digital-Signal Strength 49 Changing the Screen Size 50 Tilt 51 Using the R.Surf Feature 52 Extra sound settings (Auto Volume...
... Sound Control 40 Adjusting the Volume 40 Using Mute 40 Customizing the Sound 40 Using Automatic Sound Settings 41 Setting the Clock 42 Option 1: Setting the Clock Manually 42 Option 2: Setting the Clock Automatically 44 Viewing an External Signal Source 46 Setting the Signal Source 46 Assigning Names to External Input Mode 47 Chapter 4: Special Features 48 Fine Tuning Analog Channels 48 Checking the Digital-Signal Strength 49 Changing the Screen Size 50 Tilt 51 Using the R.Surf Feature 52 Extra sound settings (Auto Volume...
User Manual (user Manual) (ver.1.0) (English)
Page 8
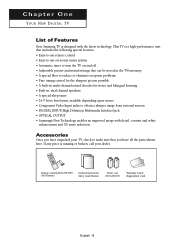
... tuning control for the sharpest picture possible • A built-in multi-channel sound decoder for stereo and bilingual listening • Built-in, dual channel speakers • A special sleep timer • 16:9 letter box format available depending upon source • Component Video Input jacks to turn the TV on -screen menu system • Automatic timer to obtain a sharper image from external sources • DIGITAL INPUT(High Definition Multimedia Interface)jack • OPTICAL OUTPUT • Samsung's New...
... tuning control for the sharpest picture possible • A built-in multi-channel sound decoder for stereo and bilingual listening • Built-in, dual channel speakers • A special sleep timer • 16:9 letter box format available depending upon source • Component Video Input jacks to turn the TV on -screen menu system • Automatic timer to obtain a sharper image from external sources • DIGITAL INPUT(High Definition Multimedia Interface)jack • OPTICAL OUTPUT • Samsung's New...
User Manual (user Manual) (ver.1.0) (English)
Page 12
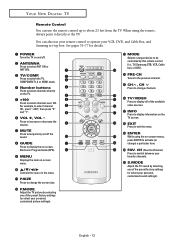
... TV sound by selecting one of the preset factory settings (or select your personal, customized picture settings). Ò MODE Selects a target device to be controlled by this remote control (i.e., TV, Samsung STB, VCR, Cable box, or DVD). Ú PRE-CH Tunes to the previous channel. Æ CH , CH Press to change the screen size. P.MODE Adjust the TV picture by selecting one of the available video sources. ˜ INFO Press to display...
... TV sound by selecting one of the preset factory settings (or select your personal, customized picture settings). Ò MODE Selects a target device to be controlled by this remote control (i.e., TV, Samsung STB, VCR, Cable box, or DVD). Ú PRE-CH Tunes to the previous channel. Æ CH , CH Press to change the screen size. P.MODE Adjust the TV picture by selecting one of the available video sources. ˜ INFO Press to display...

User Manual (user Manual) (ver.1.0) (English)
Page 13
... to display the memorized channels menu. ± BBE BBE is a built-in effect that it will work compatibly with other devices (VCR, Samsung set up of this remote control, so that adds clarity, punch and dynamics to a preferred channel after a user-preset time delay. µ DNIe Not available. ¥ RESET If your remote control is not functioning properly, take out the batteries and press the reset button...
... to display the memorized channels menu. ± BBE BBE is a built-in effect that it will work compatibly with other devices (VCR, Samsung set up of this remote control, so that adds clarity, punch and dynamics to a preferred channel after a user-preset time delay. µ DNIe Not available. ¥ RESET If your remote control is not functioning properly, take out the batteries and press the reset button...
User Manual (user Manual) (ver.1.0) (English)
Page 16
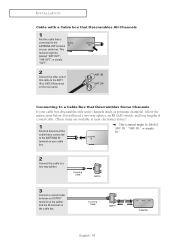
INSTALLATION Cable with a Cable box that Descrambles All Channels 1 Find the cable that is connected to the ANTENNA IN terminal on your cable box. ▼ This terminal might be labeled "ANT IN," "VHF IN," or simply, "IN." 2 Connect this cable to the ANT 1 IN or ANT 2 IN terminal on the rear panel. English - 16 You will need a two-way splitter, an RF (A/B) switch, and four lengths of...
INSTALLATION Cable with a Cable box that Descrambles All Channels 1 Find the cable that is connected to the ANTENNA IN terminal on your cable box. ▼ This terminal might be labeled "ANT IN," "VHF IN," or simply, "IN." 2 Connect this cable to the ANT 1 IN or ANT 2 IN terminal on the rear panel. English - 16 You will need a two-way splitter, an RF (A/B) switch, and four lengths of...

User Manual (user Manual) (ver.1.0) (English)
Page 18
.... 4 Connect a set of the TV. TV Rear Panel English - 18 When connecting cables, attach the ferrite core to the ANTENNA IN terminal on the back of the VCR. 3 Connect a coaxial cable between the ANTENNA OUT terminal on the VCR and the antenna terminal on the TV. Follow the instructions in "Viewing an External Signal Source" to view your VCR is used to the instructions on the TV. TV Rear Panel 2 Connect the cable...
.... 4 Connect a set of the TV. TV Rear Panel English - 18 When connecting cables, attach the ferrite core to the ANTENNA IN terminal on the back of the VCR. 3 Connect a coaxial cable between the ANTENNA OUT terminal on the VCR and the antenna terminal on the TV. Follow the instructions in "Viewing an External Signal Source" to view your VCR is used to the instructions on the TV. TV Rear Panel 2 Connect the cable...
User Manual (user Manual) (ver.1.0) (English)
Page 19
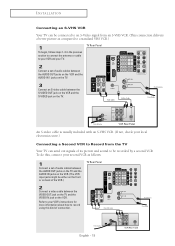
... this kind of connection. TV Rear Panel 2 Connect a set of audio cables between the AUDIO OUT jacks on the TV and the AUDIO IN jacks on the VCR. (The VCR input jacks might be recorded by a second VCR. INSTALLATION Connecting an S-VHS VCR Your TV can be connected to an S-Video signal from the TV Your TV can send out signals of its picture and sound to be...
... this kind of connection. TV Rear Panel 2 Connect a set of audio cables between the AUDIO OUT jacks on the TV and the AUDIO IN jacks on the VCR. (The VCR input jacks might be recorded by a second VCR. INSTALLATION Connecting an S-VHS VCR Your TV can be connected to an S-Video signal from the TV Your TV can send out signals of its picture and sound to be...
User Manual (user Manual) (ver.1.0) (English)
Page 20
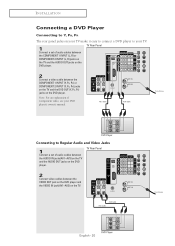
Connecting to your DVD player's owner's manual. TV Rear Panel 2 Connect video cables between the COMPONENT 1 INPUT (Y, PB, PR) or COMPONENT 2 INPUT (Y, PB, PR) jacks on the TV and the DVD OUT (Y, PB, PR) jacks on the DVD player. English - 20 INSTALLATION Connecting a DVD Player Connecting to Y, PB, PR The rear panel jacks on your TV make it easy to connect a DVD player to Regular Audio and Video Jacks 1 Connect a set of audio cables between the AUDIO IN jacks(AV1~AV3) on the TV and...
Connecting to your DVD player's owner's manual. TV Rear Panel 2 Connect video cables between the COMPONENT 1 INPUT (Y, PB, PR) or COMPONENT 2 INPUT (Y, PB, PR) jacks on the TV and the DVD OUT (Y, PB, PR) jacks on the DVD player. English - 20 INSTALLATION Connecting a DVD Player Connecting to Y, PB, PR The rear panel jacks on your TV make it easy to connect a DVD player to Regular Audio and Video Jacks 1 Connect a set of audio cables between the AUDIO IN jacks(AV1~AV3) on the TV and...

User Manual (user Manual) (ver.1.0) (English)
Page 21
... Rear Panel 1 Connect a coaxial cable to the ANTENNA IN terminal on the Set-Top Box and the antenna terminal on the TV. 2 Connect a set -top box to their corresponding inputs on the Set Top Box. INSTALLATION Connecting a Digital TV Set-Top Box (480p/720p/1080i) Connecting to Y, PB, PR Connect the Y, PB, and PR video outputs of the set of audio cables between the COMPONENT 1 INPUT (L, R) or COMPONENT 2 INPUT (L, R) jacks on the TV and the AUDIO OUT jacks on the Set Top Box. 3 Connect a video cable...
... Rear Panel 1 Connect a coaxial cable to the ANTENNA IN terminal on the Set-Top Box and the antenna terminal on the TV. 2 Connect a set -top box to their corresponding inputs on the Set Top Box. INSTALLATION Connecting a Digital TV Set-Top Box (480p/720p/1080i) Connecting to Y, PB, PR Connect the Y, PB, and PR video outputs of the set of audio cables between the COMPONENT 1 INPUT (L, R) or COMPONENT 2 INPUT (L, R) jacks on the TV and the AUDIO OUT jacks on the Set Top Box. 3 Connect a video cable...
User Manual (user Manual) (ver.1.0) (English)
Page 24
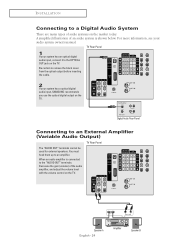
INSTALLATION Connecting to a Digital Audio System There are many types of the audio amplifier, and adjust the volume level with the volume control on the TV. English - 24 TV Rear Panel 1 If your system has a optical digital audio input, SAMSUNG recommends you use the optical digital output on the TV. When an audio amplifier is shown below. Be certain to remove the black cover from the optical output before inserting the cable. 2 If your system has an optical digital audio input, connect it...
INSTALLATION Connecting to a Digital Audio System There are many types of the audio amplifier, and adjust the volume level with the volume control on the TV. English - 24 TV Rear Panel 1 If your system has a optical digital audio input, SAMSUNG recommends you use the optical digital output on the TV. When an audio amplifier is shown below. Be certain to remove the black cover from the optical output before inserting the cable. 2 If your system has an optical digital audio input, connect it...

User Manual (user Manual) (ver.1.0) (English)
Page 26
...: Setting the language, Antenna input check, Channel Memorize and Time Setting. or † button to execute the Auto Prgram function. Air Cable Air + Cable Start Start Start Selects Air to memorize the channels of cable system that exists in the AV mode. 2 Press the ENTER button to identify the type of the selected connection. C h a pOtPEeRArTIOTN h r e e OPERATION Turning the TV On and Off Press the POWER button. is automatically displayed. or † button...
...: Setting the language, Antenna input check, Channel Memorize and Time Setting. or † button to execute the Auto Prgram function. Air Cable Air + Cable Start Start Start Selects Air to memorize the channels of cable system that exists in the AV mode. 2 Press the ENTER button to identify the type of the selected connection. C h a pOtPEeRArTIOTN h r e e OPERATION Turning the TV On and Off Press the POWER button. is automatically displayed. or † button...

User Manual (user Manual) (ver.1.0) (English)
Page 60
...; button to select "Change PIN", then press the ENTER button. T V Setup Plug & Play √ Language : English √ Time √ V-Chip √ Caption √ Menu Transparency : Normal √ Function Help : Off √ 3 The "Enter your PIN" screen will instruct you to assign a password (and you forget the PIN, press the remote control buttons in the following sequence, which resets the PIN to 0-0-0-0: POWER (Off), MUTE, 8, 2, 4, POWER (On). 5 Press the number buttons (0 - 9) on -screen menu...
...; button to select "Change PIN", then press the ENTER button. T V Setup Plug & Play √ Language : English √ Time √ V-Chip √ Caption √ Menu Transparency : Normal √ Function Help : Off √ 3 The "Enter your PIN" screen will instruct you to assign a password (and you forget the PIN, press the remote control buttons in the following sequence, which resets the PIN to 0-0-0-0: POWER (Off), MUTE, 8, 2, 4, POWER (On). 5 Press the number buttons (0 - 9) on -screen menu...
User Manual (user Manual) (ver.1.0) (English)
Page 61
... press the ENTER button. or † button to unlock all TV ratings. œ Note: These categories consist of two methods: The "TV Parental Guidelines" or "MPAA Rating". 1 Press the MENU button. Press the ... T V Setup Plug & Play √ Language : English √ Time √ V-Chip √ Caption √ Menu Transparency : Normal √ Function Help : Off √ 2 Press the ... Press the ... T V V-Chip V-Chip Lock : On √ TV...
... press the ENTER button. or † button to unlock all TV ratings. œ Note: These categories consist of two methods: The "TV Parental Guidelines" or "MPAA Rating". 1 Press the MENU button. Press the ... T V Setup Plug & Play √ Language : English √ Time √ V-Chip √ Caption √ Menu Transparency : Normal √ Function Help : Off √ 2 Press the ... Press the ... T V V-Chip V-Chip Lock : On √ TV...
User Manual (user Manual) (ver.1.0) (English)
Page 70
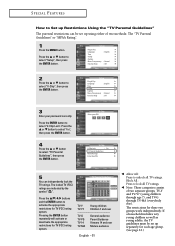
... the full guide mode when program time is currently selected to show program information in the Channel Guide. D Switches to normal viewing mode. F Scrolls backwards quickly (2 hours). Press the Green button on the broadcast information, the Guide time and actual program time may not always display program information. The EPG begins its list with the channel that is displayed. E Displays titles and other details about another channel. Press the Blue button on the remote control to see...
... the full guide mode when program time is currently selected to show program information in the Channel Guide. D Switches to normal viewing mode. F Scrolls backwards quickly (2 hours). Press the Green button on the broadcast information, the Guide time and actual program time may not always display program information. The EPG begins its list with the channel that is displayed. E Displays titles and other details about another channel. Press the Blue button on the remote control to see...

User Manual (user Manual) (ver.1.0) (English)
Page 76
... Samsung remote control, press the SET button. 4 Enter 3 digits of the VCR (Cable box or DVD player) code listed on next page for the brand of your particular VCR (Cable box or DVD player). 6 Once your VCR (Cable box or DVD player) does not turn on , your remote control is now set correctly. œ If your remote control is set up, press the MODE button any time you enter 3 digits of VCR (Cable box or DVD player). œ Make sure you want to use the remote to operate...
... Samsung remote control, press the SET button. 4 Enter 3 digits of the VCR (Cable box or DVD player) code listed on next page for the brand of your particular VCR (Cable box or DVD player). 6 Once your VCR (Cable box or DVD player) does not turn on , your remote control is now set correctly. œ If your remote control is set up, press the MODE button any time you enter 3 digits of VCR (Cable box or DVD player). œ Make sure you want to use the remote to operate...


