

Open Source Guide (ENGLISH)
Page 1
... source along with the major components (compiler, kernel, and so on each source file to control compilation and installation of warranty; Activities other circumstances. However, as separate works. Therefore, by modifying or distributing the Program (or any warranty; This section is intended to where the full notice is no warranty for most of the section is believed to the program. The Free Software...
... source along with the major components (compiler, kernel, and so on each source file to control compilation and installation of warranty; Activities other circumstances. However, as separate works. Therefore, by modifying or distributing the Program (or any warranty; This section is intended to where the full notice is no warranty for most of the section is believed to the program. The Free Software...

Open Source Guide (ENGLISH)
Page 2
..., under the terms of warranty; You can redistribute and change. It is safest to attach them to the start of each file should have at least the "copyright" line and a pointer to most effectively convey the exclusion of the ordinary General Public License). and each source file to where the full...OR CONSEQUENTIAL DAMAGES ARISING OUT OF THE USE OR INABILITY TO USE THE LIBRARY (INCLUDING BUT NOT LIMITED TO LOSS OF DATA OR DATA BEING RENDERED INACCURATE OR LOSSES SUSTAINED BY YOU OR THIRD PARTIES OR A FAILURE OF THE LIBRARY TO OPERATE WITH ANY OTHER SOFTWARE), EVEN IF SUCH HOLDER OR OTHER ...
..., under the terms of warranty; You can redistribute and change. It is safest to attach them to the start of each file should have at least the "copyright" line and a pointer to most effectively convey the exclusion of the ordinary General Public License). and each source file to where the full...OR CONSEQUENTIAL DAMAGES ARISING OUT OF THE USE OR INABILITY TO USE THE LIBRARY (INCLUDING BUT NOT LIMITED TO LOSS OF DATA OR DATA BEING RENDERED INACCURATE OR LOSSES SUSTAINED BY YOU OR THIRD PARTIES OR A FAILURE OF THE LIBRARY TO OPERATE WITH ANY OTHER SOFTWARE), EVEN IF SUCH HOLDER OR OTHER ...
User Manual (user Manual) (ver.1.0) (English)
Page 3
... Connecting a DVD Player 17 Connecting a Digital TV Set-Top Box (480p/1080i 18 Connecting a Camcorder 20 Installing Batteries in the Remote Control 21 Chapter 3: Operation 22 Turning the TV On and Off 22 Plug & Play Feature 22 Viewing the Menus and On-Screen Displays 24 Viewing the Menus 24 Viewing the Display 24 Selecting a Menu Language 25 Memorizing the Channels 26 Selecting the Video Signal-source 26 Storing Channels in Memory (Automatic Method 27 Adding and Erasing Channels (Manual...
... Connecting a DVD Player 17 Connecting a Digital TV Set-Top Box (480p/1080i 18 Connecting a Camcorder 20 Installing Batteries in the Remote Control 21 Chapter 3: Operation 22 Turning the TV On and Off 22 Plug & Play Feature 22 Viewing the Menus and On-Screen Displays 24 Viewing the Menus 24 Viewing the Display 24 Selecting a Menu Language 25 Memorizing the Channels 26 Selecting the Video Signal-source 26 Storing Channels in Memory (Automatic Method 27 Adding and Erasing Channels (Manual...
User Manual (user Manual) (ver.1.0) (English)
Page 4
... the Sound 37 Using Automatic Sound Settings 38 Viewing an External Signal Source 39 Setting the Signal Source 39 Assigning Names to External input mode 40 Chapter 4: Special Features 41 Fine Tuning Channels 41 Changing the Color Tone 42 Changing the Screen Size 43 Digital Noise Reduction 44 Tilt 45 Using the R.Surf Feature 46 Freezing the Picture 46 Choosing a Multi-Channel Sound (MTS) Soundtrack 47 Adjusting the Volume Automatically 48 Setting the Surround 49 Setting the Turbo Sound 50 Setting...
... the Sound 37 Using Automatic Sound Settings 38 Viewing an External Signal Source 39 Setting the Signal Source 39 Assigning Names to External input mode 40 Chapter 4: Special Features 41 Fine Tuning Channels 41 Changing the Color Tone 42 Changing the Screen Size 43 Digital Noise Reduction 44 Tilt 45 Using the R.Surf Feature 46 Freezing the Picture 46 Choosing a Multi-Channel Sound (MTS) Soundtrack 47 Adjusting the Volume Automatically 48 Setting the Surround 49 Setting the Turbo Sound 50 Setting...
User Manual (user Manual) (ver.1.0) (English)
Page 5
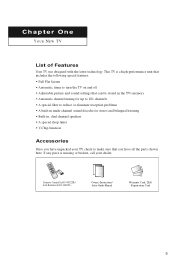
... multi-channel sound decoder for stereo and bilingual listening • Built-in, dual channel speakers • A special sleep timer • V-Chip function Accessories Once you have unpacked your dealer. This TV is missing or broken, call your TV, check to make sure that you have all the parts shown here. Remote Control(AA59-00322B)/ AAA Batteries(4301-000121) Owner's Instructions/ Safety Guide Manual Warranty...
... multi-channel sound decoder for stereo and bilingual listening • Built-in, dual channel speakers • A special sleep timer • V-Chip function Accessories Once you have unpacked your dealer. This TV is missing or broken, call your TV, check to make sure that you have all the parts shown here. Remote Control(AA59-00322B)/ AAA Batteries(4301-000121) Owner's Instructions/ Safety Guide Manual Warranty...
User Manual (user Manual) (ver.1.0) (English)
Page 6
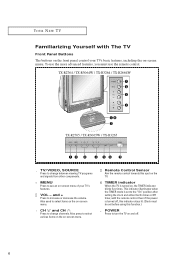
... Panel Buttons The buttons on and off. 6 Even if the power is turned on -screen menu. and + Press to select various items on the on , the TIMER indicator blinks five times. TX-R2764 / TX-R3064W / TX-R3264 / TX-R2664W TX-R2765 / TX-R3065W / TX-R3265 SOURCE ˛ TV/VIDEO, SOURCE Press to see an on-screen menu of your TV's basic features, including the on -screen menu. ‹ CH and CH Press to change between viewing TV programs...
... Panel Buttons The buttons on and off. 6 Even if the power is turned on -screen menu. and + Press to select various items on the on , the TIMER indicator blinks five times. TX-R2764 / TX-R3064W / TX-R3264 / TX-R2664W TX-R2765 / TX-R3065W / TX-R3265 SOURCE ˛ TV/VIDEO, SOURCE Press to see an on-screen menu of your TV's basic features, including the on -screen menu. ‹ CH and CH Press to change between viewing TV programs...
User Manual (user Manual) (ver.1.0) (English)
Page 8
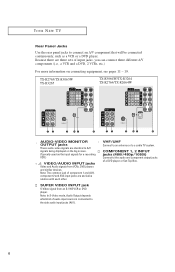
...: In S-Video mode, Audio Output depends what kind of audio input source is connected to a cable TV system. VHF/UHF Connect to an antenna or to the side audio input jacks (AV1). 8 Note: The common jack of component 1 and AV2, component 2 and AV3 input jacks are three sets of a DVD player or Set-Top Box. SUPER VIDEO INPUT jack S-Video signal from VCRs, DVD players and similar devices. YOUR NEW TV Rear Panel Jacks Use the rear panel jacks to connect an A/V component that...
...: In S-Video mode, Audio Output depends what kind of audio input source is connected to a cable TV system. VHF/UHF Connect to an antenna or to the side audio input jacks (AV1). 8 Note: The common jack of component 1 and AV2, component 2 and AV3 input jacks are three sets of a DVD player or Set-Top Box. SUPER VIDEO INPUT jack S-Video signal from VCRs, DVD players and similar devices. YOUR NEW TV Rear Panel Jacks Use the rear panel jacks to connect an A/V component that...
User Manual (user Manual) (ver.1.0) (English)
Page 9
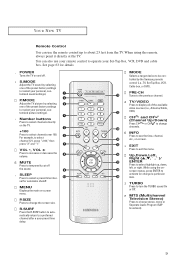
... the TV. MENU Displays the main on -screen. ı EXIT Press to be controlled by selecting one of the available video sources (i.e., Antenna/Cable, VCR). P.MODE Adjust the TV picture by the Samsung remote control (i.e., TV, Set Top Box, VCR, Cable box, or DVD). MODE Selects a target device to exit the menu. When using the onscreen menus, press ENTER to operate your remote control to activate (or change the screen size. You can use your Set-Top Box, VCR, DVD and cable box. Up...
... the TV. MENU Displays the main on -screen. ı EXIT Press to be controlled by selecting one of the available video sources (i.e., Antenna/Cable, VCR). P.MODE Adjust the TV picture by the Samsung remote control (i.e., TV, Set Top Box, VCR, Cable box, or DVD). MODE Selects a target device to exit the menu. When using the onscreen menus, press ENTER to operate your remote control to activate (or change the screen size. You can use your Set-Top Box, VCR, DVD and cable box. Up...

User Manual (user Manual) (ver.1.0) (English)
Page 14
... connection, set the A/B switch to the cable box's output channel, which is usually channel 3 or 4.) 14 Incoming Cable Splitter Cable Box RF (A/B) Switch TV Rear After you will need to tune your TV to the "A" position for normal viewing. INSTALLATION 4 Connect a coaxial cable between the OUT terminal on the RF (A/B) switch and the VHF/UHF terminal on the rear of the TV. Incoming Cable Splitter Cable Box RF (A/B) Switch 6 Connect the last coaxial cable between the ANTENNA...
... connection, set the A/B switch to the cable box's output channel, which is usually channel 3 or 4.) 14 Incoming Cable Splitter Cable Box RF (A/B) Switch TV Rear After you will need to tune your TV to the "A" position for normal viewing. INSTALLATION 4 Connect a coaxial cable between the OUT terminal on the RF (A/B) switch and the VHF/UHF terminal on the rear of the TV. Incoming Cable Splitter Cable Box RF (A/B) Switch 6 Connect the last coaxial cable between the ANTENNA...
User Manual (user Manual) (ver.1.0) (English)
Page 15
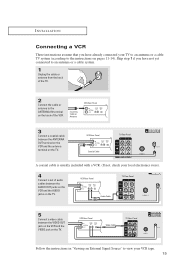
... to an antenna or a cable TV system (according to the instructions on pages 11-14). Incoming Cable or Antenna VCR Rear Panel 3 Connect a coaxial cable VCR Rear Panel TV Rear Panel between the VIDEO OUT jack on the VCR and the Video Cable ANT IN VIDEO jack on the TV. Follow the instructions in "Viewing an External Signal Source" to view your local electronics store). 4 Connect a set of the VCR. Audio Cable 5 Connect a video cable VCR Rear Panel TV Rear Panel between the ANTENNA OUT...
... to an antenna or a cable TV system (according to the instructions on pages 11-14). Incoming Cable or Antenna VCR Rear Panel 3 Connect a coaxial cable VCR Rear Panel TV Rear Panel between the VIDEO OUT jack on the VCR and the Video Cable ANT IN VIDEO jack on the TV. Follow the instructions in "Viewing an External Signal Source" to view your local electronics store). 4 Connect a set of the VCR. Audio Cable 5 Connect a video cable VCR Rear Panel TV Rear Panel between the ANTENNA OUT...
User Manual (user Manual) (ver.1.0) (English)
Page 17
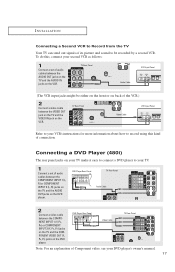
... TV Your TV can send out signals of Component video, see your DVD player's owner's manual. 17 DVD Player Rear Panel TV Rear Panel Audio Cable 2 Connect a video cable between the COMPONENT INPUT 1 (L, R) or COMPONENT INPUT 2 (L, R) jacks on the TV and the AUDIO OUT jacks on your TV make it easy to connect a DVD player to record using this , connect your TV. 1 Connect a set of connection. DVD Player Rear Panel Video Cable TV Rear Panel ANT IN Note: For an explanation of its picture and sound to be either on the...
... TV Your TV can send out signals of Component video, see your DVD player's owner's manual. 17 DVD Player Rear Panel TV Rear Panel Audio Cable 2 Connect a video cable between the COMPONENT INPUT 1 (L, R) or COMPONENT INPUT 2 (L, R) jacks on the TV and the AUDIO OUT jacks on your TV make it easy to connect a DVD player to record using this , connect your TV. 1 Connect a set of connection. DVD Player Rear Panel Video Cable TV Rear Panel ANT IN Note: For an explanation of its picture and sound to be either on the...

User Manual (user Manual) (ver.1.0) (English)
Page 18
Set Top Box Rear Panel Audio Cable TV Rear Panel ANT IN 18 INSTALLATION Connecting a Digital TV Set-Top Box (480p/1080i) Connecting to their corresponding inputs on the TV. Next, connect the Left and Right audio from the set-top box to the corresponding L and R terminals on the TV. (The connections for a typical set -top box to Y,PB,PR Connect the Y, PB, and PR video outputs of audio cables between the ANTENNA OUT terminal on the Set Top Box and...
Set Top Box Rear Panel Audio Cable TV Rear Panel ANT IN 18 INSTALLATION Connecting a Digital TV Set-Top Box (480p/1080i) Connecting to their corresponding inputs on the TV. Next, connect the Left and Right audio from the set-top box to the corresponding L and R terminals on the TV. (The connections for a typical set -top box to Y,PB,PR Connect the Y, PB, and PR video outputs of audio cables between the ANTENNA OUT terminal on the Set Top Box and...

User Manual (user Manual) (ver.1.0) (English)
Page 22
Press the MENU button to select the desired language. Channel Auto program ˆ Add/Delete ˆ Fine tune : 00 Air/CATV ˇ Air ˆ Name : ---- Adjust Skip Check antenna input. C h a pOtPEeRArTIOTN h r e e OPERATION Turning the TV On and Off Press the POWER button on the front panel. is automatically displayed. You can also use the POWER button on the remote control. The message "Plug & Play" is automatically displayed. Setup Plug & Play Time Language ˇ Caption Melody : V-chip ˆ ˆ...
Press the MENU button to select the desired language. Channel Auto program ˆ Add/Delete ˆ Fine tune : 00 Air/CATV ˇ Air ˆ Name : ---- Adjust Skip Check antenna input. C h a pOtPEeRArTIOTN h r e e OPERATION Turning the TV On and Off Press the POWER button on the front panel. is automatically displayed. You can also use the POWER button on the remote control. The message "Plug & Play" is automatically displayed. Setup Plug & Play Time Language ˇ Caption Melody : V-chip ˆ ˆ...

User Manual (user Manual) (ver.1.0) (English)
Page 23
... "Auto Program" or press the MENU button to skip. (refer to the hour or minute. The message "Enjoy your watching.. 7 If you have finished, press the MENU button. am On Timer - - : - - Setup Plug & Play Time Language : Caption Melody : V-chip ˆ ˆ English ˆ On ˆ Move Enter Return Note: Plug & Play feature doesn't work when the V-chip is displayed. is connected to select "Plug & Play". OPERATION 4 Make sure that the antenna...
... "Auto Program" or press the MENU button to skip. (refer to the hour or minute. The message "Enjoy your watching.. 7 If you have finished, press the MENU button. am On Timer - - : - - Setup Plug & Play Time Language : Caption Melody : V-chip ˆ ˆ English ˆ On ˆ Move Enter Return Note: Plug & Play feature doesn't work when the V-chip is displayed. is connected to select "Plug & Play". OPERATION 4 Make sure that the antenna...
User Manual (user Manual) (ver.1.0) (English)
Page 53
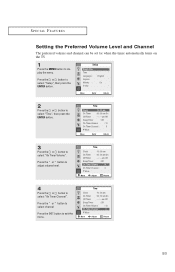
... Timer Volume ˇ 10 ˆ On Timer Channel : 3 ▼ More Move Adjust Return 4 Press the or button to select "On Timer Channel". Press the ˇ or ˆ button to select channel Press the EXIT button to display the menu. SPECIAL FEATURES Setting the Preferred Volume Level and Channel The preferred volume and channel can be set for when the timer automatically turns on the TV. 1 Press the MENU button to exit the menu. Setup Plug & Play Time Language : Caption...
... Timer Volume ˇ 10 ˆ On Timer Channel : 3 ▼ More Move Adjust Return 4 Press the or button to select "On Timer Channel". Press the ˇ or ˆ button to select channel Press the EXIT button to display the menu. SPECIAL FEATURES Setting the Preferred Volume Level and Channel The preferred volume and channel can be set for when the timer automatically turns on the TV. 1 Press the MENU button to exit the menu. Setup Plug & Play Time Language : Caption...

User Manual (user Manual) (ver.1.0) (English)
Page 54
...; button to select the "Setup", then press the ENTER button. All VCRs record the closed caption signal from television programs, so home recorded video tapes also provide closed captioning "On" or "Off". SPECIAL FEATURES Viewing Closed Captions Your TV decodes and displays the closed captions that supplements the information in Field 1. (For example, Channel 1 may be necessary to make changes to "Channels" and "Field": Use the and ˆ buttons to make the changes...
...; button to select the "Setup", then press the ENTER button. All VCRs record the closed caption signal from television programs, so home recorded video tapes also provide closed captioning "On" or "Off". SPECIAL FEATURES Viewing Closed Captions Your TV decodes and displays the closed captions that supplements the information in Field 1. (For example, Channel 1 may be necessary to make changes to "Channels" and "Field": Use the and ˆ buttons to make the changes...
User Manual (user Manual) (ver.1.0) (English)
Page 56
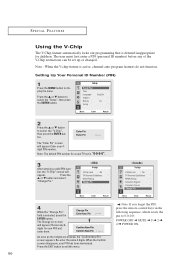
... number, Note: The default PIN number for children. Press the ▲ or ▼ button to display the menu. SPECIAL FEATURES Using the V-Chip The V-Chip feature automatically locks out programming that is active, channel-auto program features do not function. Note : When the V-chip feature is deemed inappropriate for a new TV set up or changed. The "Enter Pin" screen will appear. V-chip V-Chip Lock : No TV Parental...
... number, Note: The default PIN number for children. Press the ▲ or ▼ button to display the menu. SPECIAL FEATURES Using the V-Chip The V-Chip feature automatically locks out programming that is active, channel-auto program features do not function. Note : When the V-chip feature is deemed inappropriate for a new TV set up or changed. The "Enter Pin" screen will appear. V-chip V-Chip Lock : No TV Parental...
User Manual (user Manual) (ver.1.0) (English)
Page 57
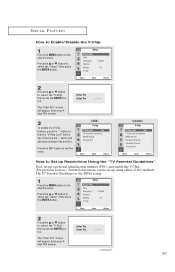
... Restrictions Using the "TV Parental Guidelines" First, set up a personal identification number (PIN), and enable the V-Chip. (See previous section.) Parental restrictions can be set up using either of two methods: The TV Parental Guidelines or the MPAA rating. 1 Press the MENU button to select the "Setup", then press the ENTER button. Press the ▲ or ▼ button to display the menu. continued... 57 Setup Plug & Play Time Language : Caption...
... Restrictions Using the "TV Parental Guidelines" First, set up a personal identification number (PIN), and enable the V-Chip. (See previous section.) Parental restrictions can be set up using either of two methods: The TV Parental Guidelines or the MPAA rating. 1 Press the MENU button to select the "Setup", then press the ENTER button. Press the ▲ or ▼ button to display the menu. continued... 57 Setup Plug & Play Time Language : Caption...
User Manual (user Manual) (ver.1.0) (English)
Page 63
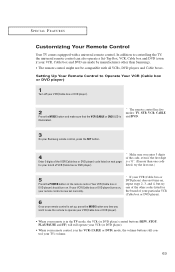
... remote control has five modes: TV, STB, VCR, CABLE and DVD. 3 On your Samsung remote control, press the SET button. 4 Enter 3 digits of the VCR (Cable box or DVD player) code listed on . Setting Up Your Remote Control to Operate Your VCR (Cable box or DVD player) 1 Turn off your VCR (Cable box or DVD player). 2 Press the MODE button and make sure that the VCR (CABLE or DVD) LED is a "0". (If more than Samsung). • The remote control might not be compatible with a universal remote control. SPECIAL FEATURES Customizing Your Remote Control Your...
... remote control has five modes: TV, STB, VCR, CABLE and DVD. 3 On your Samsung remote control, press the SET button. 4 Enter 3 digits of the VCR (Cable box or DVD player) code listed on . Setting Up Your Remote Control to Operate Your VCR (Cable box or DVD player) 1 Turn off your VCR (Cable box or DVD player). 2 Press the MODE button and make sure that the VCR (CABLE or DVD) LED is a "0". (If more than Samsung). • The remote control might not be compatible with a universal remote control. SPECIAL FEATURES Customizing Your Remote Control Your...
User Manual (user Manual) (ver.1.0) (English)
Page 65
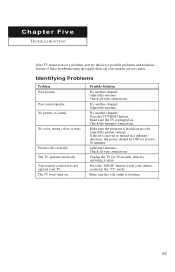
...'t turn on. Try another channel. Press the TV/VIDEO button. If the set is working. 65 The TV operates erratically Your remote control does not operate your remote control in color. Adjust the antenna. Check all wire connections. Make sure the TV is broadcast in the "TV" mode. Make sure the program is plugged in a different direction, the power should be OFF for 30 seconds, then try this list of these troubleshooting...
...'t turn on. Try another channel. Press the TV/VIDEO button. If the set is working. 65 The TV operates erratically Your remote control does not operate your remote control in color. Adjust the antenna. Check all wire connections. Make sure the TV is broadcast in the "TV" mode. Make sure the program is plugged in a different direction, the power should be OFF for 30 seconds, then try this list of these troubleshooting...


