

Open Source Guide (ENGLISH)
Page 1
.... The original manual has wrong versions of the free software distribution system, which is copyrighted by the Free Software Foundation, write to work as to the offer to distribute corresponding source code. (This alternative is allowed only for a work means the preferred form of the work based on the recipients' exercise of the rights granted herein. This product uses some software programs which the...
.... The original manual has wrong versions of the free software distribution system, which is copyrighted by the Free Software Foundation, write to work as to the offer to distribute corresponding source code. (This alternative is allowed only for a work means the preferred form of the work based on the recipients' exercise of the rights granted herein. This product uses some software programs which the...

Open Source Guide (ENGLISH)
Page 2
...INCIDENTAL OR CONSEQUENTIAL DAMAGES ARISING OUT OF THE USE OR INABILITY TO USE THE LIBRARY (INCLUDING BUT NOT LIMITED TO LOSS OF DATA OR DATA BEING RENDERED INACCURATE OR LOSSES SUSTAINED BY YOU OR THIRD PARTIES OR A FAILURE OF THE LIBRARY TO OPERATE WITH ANY OTHER SOFTWARE), EVEN IF SUCH HOLDER OR OTHER PARTY... HAS BEEN ADVISED OF THE POSSIBILITY OF SUCH DAMAGES. How to Apply These Terms to Your New Libraries If you develop a new library, and you want it free software that everyone can do so by ...
...INCIDENTAL OR CONSEQUENTIAL DAMAGES ARISING OUT OF THE USE OR INABILITY TO USE THE LIBRARY (INCLUDING BUT NOT LIMITED TO LOSS OF DATA OR DATA BEING RENDERED INACCURATE OR LOSSES SUSTAINED BY YOU OR THIRD PARTIES OR A FAILURE OF THE LIBRARY TO OPERATE WITH ANY OTHER SOFTWARE), EVEN IF SUCH HOLDER OR OTHER PARTY... HAS BEEN ADVISED OF THE POSSIBILITY OF SUCH DAMAGES. How to Apply These Terms to Your New Libraries If you develop a new library, and you want it free software that everyone can do so by ...
User Manual (user Manual) (ver.1.0) (English)
Page 2
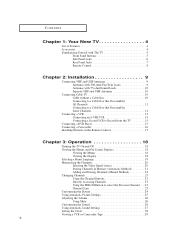
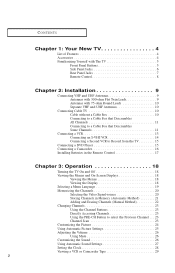
... Connecting a DVD Player 15 Connecting a Camcorder 16 Installing Batteries in the Remote Control 17 Chapter 3: Operation 18 Turning the TV On and Off 18 Viewing the Menus and On-Screen Displays 18 Viewing the Menus 18 Viewing the Display 18 Selecting a Menu Language 19 Memorizing the Channels 20 Selecting the Video Signal-source 20 Storing Channels in Memory (Automatic Method 21 Adding and Erasing Channels (Manual Method 22 Changing Channels 23 Using the Channel Buttons 23 Directly Accessing Channels 23 Using...
... Connecting a DVD Player 15 Connecting a Camcorder 16 Installing Batteries in the Remote Control 17 Chapter 3: Operation 18 Turning the TV On and Off 18 Viewing the Menus and On-Screen Displays 18 Viewing the Menus 18 Viewing the Display 18 Selecting a Menu Language 19 Memorizing the Channels 20 Selecting the Video Signal-source 20 Storing Channels in Memory (Automatic Method 21 Adding and Erasing Channels (Manual Method 22 Changing Channels 23 Using the Channel Buttons 23 Directly Accessing Channels 23 Using...

User Manual (user Manual) (ver.1.0) (English)
Page 4
...-screen menu system • Automatic timer to turn the TV on and off • Adjustable picture and sound settings that can be stored in the TV's memory • Automatic channel tuning for up to 181 channels • A special filter to reduce or eliminate reception problems • Fine tuning control for the sharpest picture possible • Built-in, dual channel speakers • A special sleep timer • Surround, Turbo sound, Auto Volume...
...-screen menu system • Automatic timer to turn the TV on and off • Adjustable picture and sound settings that can be stored in the TV's memory • Automatic channel tuning for up to 181 channels • A special filter to reduce or eliminate reception problems • Fine tuning control for the sharpest picture possible • Built-in, dual channel speakers • A special sleep timer • Surround, Turbo sound, Auto Volume...
User Manual (user Manual) (ver.1.0) (English)
Page 7
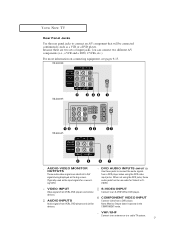
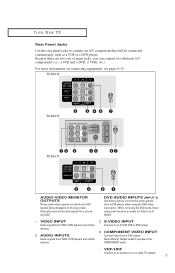
...Connect video from VCRs, DVD players and similar devices. AUDIO INPUTS Audio signals from a DVD player. TX-R2028 TX-R2035 TX-R1635 ˛ AUDIO-VIDEO MONITOR OUTPUTS These audio-video signals are two sets of input jacks, you can connect two different A/V components (i.e., a VCR and a DVD, 2 VCRs, etc.) For more information on the big screen. (Typically used as the input signals for a recording VCR.) ‹ DVD AUDIO INPUTS (INPUT 2) Use these audio jacks function as a VCR or a DVD player. Note: Monitor Output doesn't operate in the COMPONENT mode. , VHF/UHF Connect to an antenna...
...Connect video from VCRs, DVD players and similar devices. AUDIO INPUTS Audio signals from a DVD player. TX-R2028 TX-R2035 TX-R1635 ˛ AUDIO-VIDEO MONITOR OUTPUTS These audio-video signals are two sets of input jacks, you can connect two different A/V components (i.e., a VCR and a DVD, 2 VCRs, etc.) For more information on the big screen. (Typically used as the input signals for a recording VCR.) ‹ DVD AUDIO INPUTS (INPUT 2) Use these audio jacks function as a VCR or a DVD player. Note: Monitor Output doesn't operate in the COMPONENT mode. , VHF/UHF Connect to an antenna...
User Manual (user Manual) (ver.1.0) (English)
Page 8
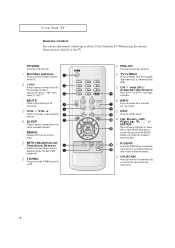
... the volume. fl SLEEP Press to display all of the available video sources (i.e., Antenna/Cable, VCR). MTS (Multichannel Television Stereo) Press to the previous channel. PRE-CH Tunes to choose stereo, mono or Separate Audio Program (SAP broadcast). TV/VIDEO Press to select a preset time interval for automatic shutoff. , MENU Displays the main on -screen. CH.SCAN Press to have the TV automatically scan all of the channels it...
... the volume. fl SLEEP Press to display all of the available video sources (i.e., Antenna/Cable, VCR). MTS (Multichannel Television Stereo) Press to the previous channel. PRE-CH Tunes to choose stereo, mono or Separate Audio Program (SAP broadcast). TV/VIDEO Press to select a preset time interval for automatic shutoff. , MENU Displays the main on -screen. CH.SCAN Press to have the TV automatically scan all of the channels it...
User Manual (user Manual) (ver.1.0) (English)
Page 10
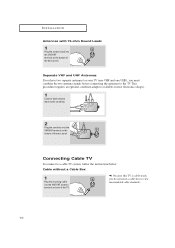
... UHF), you do not need a cable box to view unscrambled cable channels. 10 INSTALLATION Antennas with 75-ohm Round Leads 1 Plug the antenna lead into the VHF/UHF antenna terminal on back of the TV. ▼ Because this TV is cable-ready, you must combine the two antenna signals before connecting the antennas to the TV. Connecting Cable TV To connect to the combiner. 2 Plug the combiner into the VHF...
... UHF), you do not need a cable box to view unscrambled cable channels. 10 INSTALLATION Antennas with 75-ohm Round Leads 1 Plug the antenna lead into the VHF/UHF antenna terminal on back of the TV. ▼ Because this TV is cable-ready, you must combine the two antenna signals before connecting the antennas to the TV. Connecting Cable TV To connect to the combiner. 2 Plug the combiner into the VHF...
User Manual (user Manual) (ver.1.0) (English)
Page 11
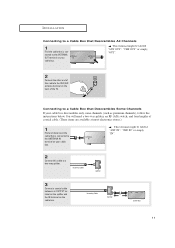
INSTALLATION Connecting to a Cable Box that Descrambles All Channels 1 Find the cable that is connected to the ANTENNA IN terminal on your cable box. ▼ This terminal might be labeled "ANT IN", "VHF IN" or simply, "IN". 2 Connect this cable to the ANTENNA OUT terminal on your cable box descrambles only some channels (such as premium channels), follow the instructions below. You will need a two-way splitter, an RF (A/B) switch, and...
INSTALLATION Connecting to a Cable Box that Descrambles All Channels 1 Find the cable that is connected to the ANTENNA IN terminal on your cable box. ▼ This terminal might be labeled "ANT IN", "VHF IN" or simply, "IN". 2 Connect this cable to the ANTENNA OUT terminal on your cable box descrambles only some channels (such as premium channels), follow the instructions below. You will need a two-way splitter, an RF (A/B) switch, and...
User Manual (user Manual) (ver.1.0) (English)
Page 12
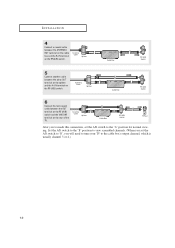
... view scrambled channels. (When you set the A/B switch to "B", you 've made this connection, set the A/B switch to the cable box's output channel, which is usually channel 3 or 4.) 12 Incoming Cable Splitter Cable Box RF (A/B) Switch 5 Connect another cable between the other OUT terminal on the splitter and the A-IN terminal on the rear of the TV. Incoming Cable Splitter Cable Box RF (A/B) Switch 6 Connect the last coaxial cable between the ANTENNA OUT terminal on the cable box...
... view scrambled channels. (When you set the A/B switch to "B", you 've made this connection, set the A/B switch to the cable box's output channel, which is usually channel 3 or 4.) 12 Incoming Cable Splitter Cable Box RF (A/B) Switch 5 Connect another cable between the other OUT terminal on the splitter and the A-IN terminal on the rear of the TV. Incoming Cable Splitter Cable Box RF (A/B) Switch 6 Connect the last coaxial cable between the ANTENNA OUT terminal on the cable box...
User Manual (user Manual) (ver.1.0) (English)
Page 13
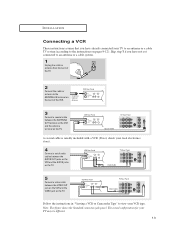
...). 4 Connect a set of the VCR. Note: This figure shows the Standard connector-jack panel. Incoming Cable or Antenna VCR Rear Panel 3 Connect a coaxial cable between the ANTENNA OUT terminal on the VCR and the antenna terminal on the TV. INSTALLATION Connecting a VCR These instructions assume that you have already connected your TV to an antenna or a cable TV system (according to the instructions on pages 9-12). VCR Rear Panel TV Rear Panel Audio Cable 5 Connect a video cable...
...). 4 Connect a set of the VCR. Note: This figure shows the Standard connector-jack panel. Incoming Cable or Antenna VCR Rear Panel 3 Connect a coaxial cable between the ANTENNA OUT terminal on the VCR and the antenna terminal on the TV. INSTALLATION Connecting a VCR These instructions assume that you have already connected your TV to an antenna or a cable TV system (according to the instructions on pages 9-12). VCR Rear Panel TV Rear Panel Audio Cable 5 Connect a video cable...
User Manual (user Manual) (ver.1.0) (English)
Page 15
... out signals of its picture and sound to be either on the front or on back of the VCR.) 2 Connect a video cable between the VIDEO OUT jack on the TV and the VIDEO IN jack on the VCR. Note: Only 480i formats are supported. 1 Connect a set of Component video, see your DVD player's owner's manual. 15 TV Rear Panel Video Cable VCR Input Panel Refer to record using this , connect your TV. TV Rear Panel VCR Input Panel Audio Cable (The VCR input...
... out signals of its picture and sound to be either on the front or on back of the VCR.) 2 Connect a video cable between the VIDEO OUT jack on the TV and the VIDEO IN jack on the VCR. Note: Only 480i formats are supported. 1 Connect a set of Component video, see your DVD player's owner's manual. 15 TV Rear Panel Video Cable VCR Input Panel Refer to record using this , connect your TV. TV Rear Panel VCR Input Panel Audio Cable (The VCR input...
User Manual (user Manual) (ver.1.0) (English)
Page 18
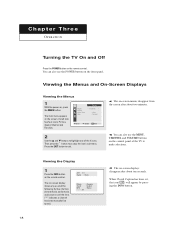
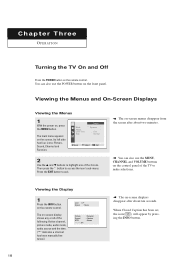
... Closed Caption has been set, the icon( ) will appear by pressing the INFO button. 18 on the remote control. am : Dynamic : Custom : Stereo ▼ The on -screen display shows any or all of the 4 icons. You can also use the MENU, CHANNEL and VOLUME buttons on the front panel. You can also use the POWER button on the control panel of the TV to access the icon's sub-menu. C h a pOtPEeRArTIOTN h r e e OPERATION Turning the...
... Closed Caption has been set, the icon( ) will appear by pressing the INFO button. 18 on the remote control. am : Dynamic : Custom : Stereo ▼ The on -screen display shows any or all of the 4 icons. You can also use the MENU, CHANNEL and VOLUME buttons on the front panel. You can also use the POWER button on the control panel of the TV to access the icon's sub-menu. C h a pOtPEeRArTIOTN h r e e OPERATION Turning the...
User Manual (user Manual) (ver.1.0) (English)
Page 39
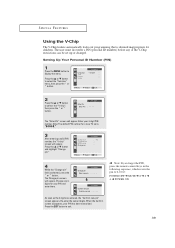
... Enter new pin : - - - - Setting Up Your Personal ID Number (PIN) 1 Press the MENU button to select the "V-chip", then press the ˇ or ˆ button. Re-enter the same 4 digits. SPECIAL FEATURES Using the V-Chip The V-Chip feature automatically locks out programming that is deemed inappropriate for a new TV set up or changed. Language Time Caption V-chip Function ˇ English ˆ ˆ ˆ...
... Enter new pin : - - - - Setting Up Your Personal ID Number (PIN) 1 Press the MENU button to select the "V-chip", then press the ˇ or ˆ button. Re-enter the same 4 digits. SPECIAL FEATURES Using the V-Chip The V-Chip feature automatically locks out programming that is deemed inappropriate for a new TV set up or changed. Language Time Caption V-chip Function ˇ English ˆ ˆ ˆ...
User Manual (user Manual) (ver.1.0) (English)
Page 44
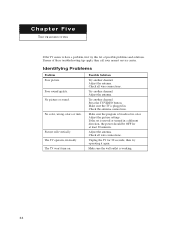
No color, wrong colors or tints. Try another channel. Check the antenna connections. Adjust the antenna. No picture or sound. Check all wire connections. Press the TV/VIDEO button. Make sure the TV is moved or turned in a different direction, the power should be OFF for 30 seconds, then try this list of these troubleshooting tips apply, then call your nearest service center. If the set is plugged in color. The...
No color, wrong colors or tints. Try another channel. Check the antenna connections. Adjust the antenna. No picture or sound. Check all wire connections. Press the TV/VIDEO button. Make sure the TV is moved or turned in a different direction, the power should be OFF for 30 seconds, then try this list of these troubleshooting tips apply, then call your nearest service center. If the set is plugged in color. The...
User Manual (user Manual) (ver.1.0) (English)
Page 2
... Connecting a DVD Player 15 Connecting a Camcorder 16 Installing Batteries in the Remote Control 17 Chapter 3: Operation 18 Turning the TV On and Off 18 Viewing the Menus and On-Screen Displays 18 Viewing the Menus 18 Viewing the Display 18 Selecting a Menu Language 19 Memorizing the Channels 20 Selecting the Video Signal-source 20 Storing Channels in Memory (Automatic Method 21 Adding and Erasing Channels (Manual Method 22 Changing Channels 23 Using the Channel Buttons 23 Directly Accessing Channels 23 Using...
... Connecting a DVD Player 15 Connecting a Camcorder 16 Installing Batteries in the Remote Control 17 Chapter 3: Operation 18 Turning the TV On and Off 18 Viewing the Menus and On-Screen Displays 18 Viewing the Menus 18 Viewing the Display 18 Selecting a Menu Language 19 Memorizing the Channels 20 Selecting the Video Signal-source 20 Storing Channels in Memory (Automatic Method 21 Adding and Erasing Channels (Manual Method 22 Changing Channels 23 Using the Channel Buttons 23 Directly Accessing Channels 23 Using...
User Manual (user Manual) (ver.1.0) (English)
Page 7
... VCR or DVD player. fl COMPONENT VIDEO INPUT Connect video from VCRs, DVD players and similar devices. Note: Monitor Output doesn't operate in the COMPONENT mode. , VHF/UHF Connect to an antenna or to A/V signals being displayed on connecting equipment, see pages 9-15. AUDIO INPUTS Audio signals from a DVD player. YOUR NEW TV Rear Panel Jacks Use the rear panel jacks to connect an A/V component that will be connected continuously, such as the input signals for Video 2 or SVIDEO. « VIDEO INPUT Video signals from a DVD player when using the DVD video input jacks. When...
... VCR or DVD player. fl COMPONENT VIDEO INPUT Connect video from VCRs, DVD players and similar devices. Note: Monitor Output doesn't operate in the COMPONENT mode. , VHF/UHF Connect to an antenna or to A/V signals being displayed on connecting equipment, see pages 9-15. AUDIO INPUTS Audio signals from a DVD player. YOUR NEW TV Rear Panel Jacks Use the rear panel jacks to connect an A/V component that will be connected continuously, such as the input signals for Video 2 or SVIDEO. « VIDEO INPUT Video signals from a DVD player when using the DVD video input jacks. When...

User Manual (user Manual) (ver.1.0) (English)
Page 12
... this connection, set the A/B switch to "B", you set the A/B switch to the cable box's output channel, which is usually channel 3 or 4.) 12 Set the A/B switch to the "B" position to view scrambled channels. (When you will need to tune your TV to the "A" position for normal viewing. INSTALLATION 4 Connect a coaxial cable between the ANTENNA OUT terminal on the cable box and the B-IN terminal on the rear of the TV. Incoming Cable Splitter Cable Box RF (A/B) Switch 5 Connect another cable...
... this connection, set the A/B switch to "B", you set the A/B switch to the cable box's output channel, which is usually channel 3 or 4.) 12 Set the A/B switch to the "B" position to view scrambled channels. (When you will need to tune your TV to the "A" position for normal viewing. INSTALLATION 4 Connect a coaxial cable between the ANTENNA OUT terminal on the cable box and the B-IN terminal on the rear of the TV. Incoming Cable Splitter Cable Box RF (A/B) Switch 5 Connect another cable...

User Manual (user Manual) (ver.1.0) (English)
Page 13
... Rear Panel TV Rear Panel Audio Cable 5 Connect a video cable between the VIDEO OUT jack on the VCR and the VIDEO jack on pages 9-12). Skip step 1 if you have not yet connected to an antenna or a cable system. 1 Unplug the cable or antenna from the back of the TV. 2 Connect the cable or antenna to view your TV may be different. 13 INSTALLATION Connecting a VCR These instructions assume that you have already connected...
... Rear Panel TV Rear Panel Audio Cable 5 Connect a video cable between the VIDEO OUT jack on the VCR and the VIDEO jack on pages 9-12). Skip step 1 if you have not yet connected to an antenna or a cable system. 1 Unplug the cable or antenna from the back of the TV. 2 Connect the cable or antenna to view your TV may be different. 13 INSTALLATION Connecting a VCR These instructions assume that you have already connected...
User Manual (user Manual) (ver.1.0) (English)
Page 15
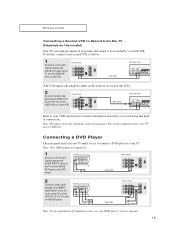
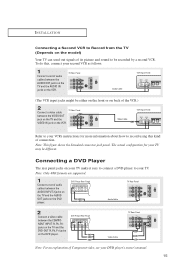
INSTALLATION Connecting a Second VCR to Record from the TV (Depends on the DVD player. Note: Only 480i formats are supported. 1 Connect a set of its picture and sound to be recorded by a second VCR. DVD Player Rear Panel TV Rear Panel Audio Cable 2 Connect a video cable between the AUDIO OUT jacks on the TV and the AUDIO IN jacks on your TV make it easy to connect a DVD player to record using this , connect your DVD player's owner's manual. 15 TV Rear Panel VCR Input Panel Audio Cable (The VCR...
INSTALLATION Connecting a Second VCR to Record from the TV (Depends on the DVD player. Note: Only 480i formats are supported. 1 Connect a set of its picture and sound to be recorded by a second VCR. DVD Player Rear Panel TV Rear Panel Audio Cable 2 Connect a video cable between the AUDIO OUT jacks on the TV and the AUDIO IN jacks on your TV make it easy to connect a DVD player to record using this , connect your DVD player's owner's manual. 15 TV Rear Panel VCR Input Panel Audio Cable (The VCR...
User Manual (user Manual) (ver.1.0) (English)
Page 18
... and On-Screen Displays Viewing the Menus 1 With the power on the remote control. You can also use the MENU, CHANNEL and VOLUME buttons on -screen display shows any or all of the TV to access the icon's sub-menu. The on the control panel of the following: Active channel, picture mode, audio mode, audio source and the time. ("*" indicates a channel has been manually fine tuned.) ANT 11* Signal : Mono Picture Sound MTS - - : - - on , press the MENU button. When Closed Caption has been set, the...
... and On-Screen Displays Viewing the Menus 1 With the power on the remote control. You can also use the MENU, CHANNEL and VOLUME buttons on -screen display shows any or all of the TV to access the icon's sub-menu. The on the control panel of the following: Active channel, picture mode, audio mode, audio source and the time. ("*" indicates a channel has been manually fine tuned.) ANT 11* Signal : Mono Picture Sound MTS - - : - - on , press the MENU button. When Closed Caption has been set, the...


